前言
最近flutter很火,作为android端还是有必要了解学习一下,多学总没啥坏处。
开发flutter可以使用studio开发工具或者vscode工具,电脑配置高推荐使用android studio,可能搞android的更钟情于studio吧。
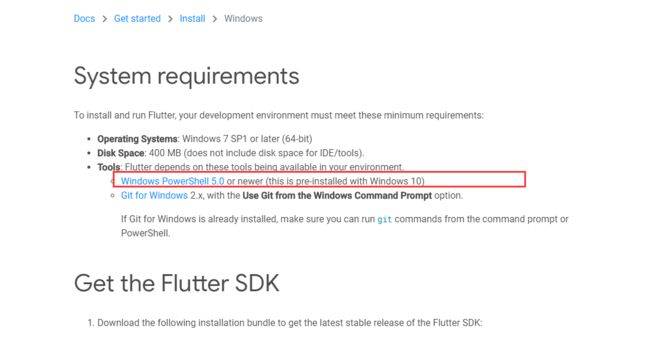
具体的环境配置参考官网,因为官网的文档写的很好。但是有个地方需要注意下:windows PowerShell需要升级到5.0,而win7系统默认是2.0(win10系统默认5.0),如果不升级,创建flutter项目成功后代码里面全是报错,也运行不起来。在flutter中文网上好像没有提到(可能我没注意到),但是flutter英文官网上是都写清楚了的。看图:
flutter项目目录结构介绍
flutter项目目录结构如下图:
flutter的目录中重要的文件夹有ios、android、lib、pubspec.yaml文件。
android和ios文件夹:
里面的东西一般都不需要修改,它只是相关配置文件
lib文件夹
这个文件夹很重要,好像不能修改,我修改之后widget_test.dart文件就会报路径错误,可能是姿势不对吧。项目的dart文件基本都放在lib文件夹下,lib下又有一个main.dart文件,main.dart文件中的main方法就是程序的入口了。
void main() => runApp(new MaterialApp(
  home: ProductList(
    products: List.generate(20, (i) => Product("测试数据$i", "详情数据$i")),
  ),
));
pubspec.yaml文件
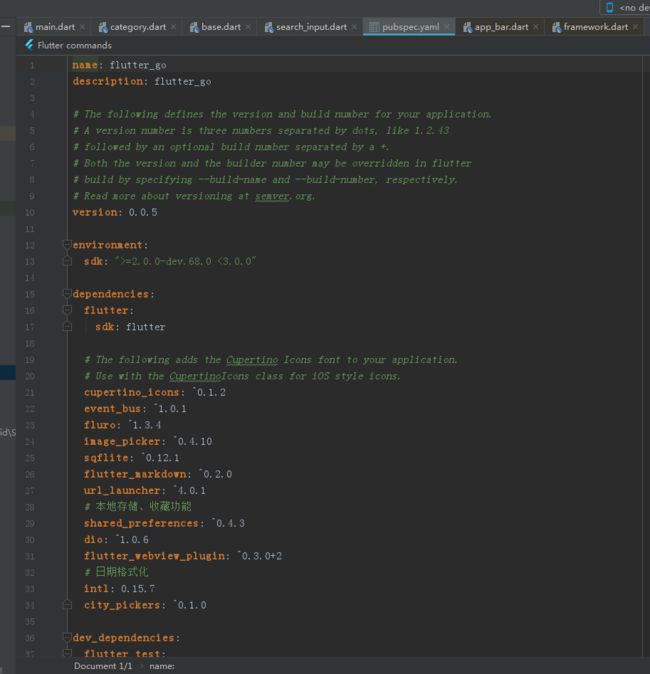
这个是flutter的配置文件,相关依赖都在此文件中,我们可以看下阿里官方开源的flutter-go项目的该配置文件,如图:
除了上面的几个文件之外,当然还可以创建其他的文件夹,如utils、image、tools等等
学习资源
我的学习资源参考的是技术胖的文章,各位可以百度搜索技术胖去他的官网查看相关文章,写的都还不错。
相关组件
接下来就是具体的组件介绍了
常用的外层组件有Center、Container、Row、Colum、ListView、Positioned、Stack等
常用的内层组件有Text、Image、RasinButton、Card等
下面都介绍一下,并给出了样板代码,复制出来直接可以运行。
center组件:
该组件内的所有内容都居中,没啥特殊的。
container组件:
这个控件相当于RelativeLayout,不指定width和height默认全屏或者撑满父布局。
属性有:
alignment:Alignment.topleft --内容的位置
color:Colors.lightGreen    --背景
decoration  -渐变色背景、边框、圆角、阴影等
普通使用方式:
  return new MaterialApp(
      title: "textWidget",
      home: Scaffold(
        body: new Center(
          child: new Container(
            child: new Text("哈哈吗,container不好用",
              textAlign: TextAlign.center,
              style: TextStyle(fontSize: 25.0,color: Color.fromARGB(200, 200, 234, 123)),
            ),
            alignment: Alignment.topLeft,
            width: 300.0,
            height: 300.0,
            color: Colors.lightGreen,
          ),
        ),
      ),
    );
decoration使用方式(使用该属性时需要隐藏color属性,否则会报错):
  return new MaterialApp(
    title: "测试",
    home: new Scaffold(
        backgroundColor: Colors.white,
        body: new Center(
          child: new Container(
            alignment: Alignment.center,
            child: new Text("测试"),
            // color: Colors.green,
            width: 400.0,
            height: 400.0,
            decoration: new BoxDecoration(
                gradient: new LinearGradient(colors: [
              Colors.green,
              Colors.greenAccent,
              Colors.blueAccent
            ]),
              border: new Border.all(width: 4,color: Colors.red),
              borderRadius: BorderRadius.all(Radius.circular(15)),
            ),
          ),
        )));
使用注意:如果不使用alignment属性,该布局就不会默认全屏
Text组件
展示文本的控件,使用方法:
 child: Text(
        "测试text测试text测试text测试text测试text测试text测试text测试text测试text测试text测试text测试text测试text测试text测试text测试text",
        textAlign: TextAlign.center,
        maxLines: 2,
        textDirection: TextDirection.rtl,
        style: TextStyle(
          fontSize: 15.0,
          color: Color.fromARGB(255, 255, 124, 124),
        //decoration: TextDecoration.underline,
           decorationStyle: TextDecorationStyle.solid,
         ),
       ),
属性有:
textAlign:内容对齐方式
textDirection:控件的位置,左或者右
maxLines:展示的最大行数
overflow:文本溢出时展示的方式,如:TextOverflow.ellipsis,把多出的文本用三个小点表示。
style:样式,TextStyle样式包含了 字体大小、颜色、下划线、粗体和常规体等一系列样式。
margin:相对于父布局偏移。padding:子布局偏移,他们的属性需要new EdgeInsets文件赋值,使用如下:
   margin: new EdgeInsets.only(
              left: 0,
              right: 0,
              top: 10,
              bottom: 10
            ),

   padding: new EdgeInsets.only(
              left: 0,
              right: 0,
              top: 10,
              bottom: 10
            ),
EdgeInsets有 only,all,fromLTRB ,fromWindowPadding,symmetric
only:使用上面有
all:表示上下左右四个方向都设置
fromLTRB:是only的简化方法,不需要left:10这样设置值,只需要这样使用:margin: new EdgeInsets.fromLTRB(10, 10, 10, 10),
symmetric:可以设置垂直方向和竖直方向的偏移量,如下:
      padding: new EdgeInsets.symmetric(
                  vertical: 10,
                  horizontal: 0
                ),
fromWindowPadding:这个东西不知道怎么用,暂时也没用到
使用注意事项:如果没有父布局,需要使用textDirection指定方向,如:
void main() => runApp(new Text("测试",textDirection: TextDirection.ltr,));

和

class TextCenter extends StatelessWidget{
    @override
  Widget build(BuildContext context) {
    // TODO: implement build
    return new Center(
      heightFactor: 100,
      widthFactor: 100,
      child: new Text("测试",textDirection: TextDirection.rtl,),
    );
  }
}
Image组件
和android中imageview控件一样,用于展示图片的控件,它的功能也类型,也可以展示本地、网络、assets、缓存的图片
使用方式:
  child: new Container(
    //alignment: Alignment.center,
      child: new Image.network(
          "https://p.ssl.qhimg.com/dmfd/400_300_/t01da5bd44928dcfc6c.jpg",
      fit: BoxFit.fill,
      ),
      width: 300,
      height: 300,
      color: Colors.red,
    ),
fit:BoxFit属性有cover、fill、fillwidth、fillheight、:
cover保持图片不变形,但可能会被裁剪
fill横向和纵向拉伸
fillwidth横向拉伸
fillheight纵向拉伸
scaledown保持图片不变,默认效果
图片显示色彩效果(混合模式):属性color和colorBlendMode配合使用,如下:
  child: new Image.network(
          "https://p.ssl.qhimg.com/dmfd/400_300_/t01da5bd44928dcfc6c.jpg",
      fit: BoxFit.scaleDown,
        color:Colors.blueAccent,
    // colorBlendMode: BlendMode.modulate,
        colorBlendMode: BlendMode.overlay,

      ),
图片重复显示属性repeat: ImageRepeat.repeatY,默认不重复,可以选中全部重复、x轴重复、y轴重复
注意:如果父布局使用alignment:Alignment.center 后再使用 fit:Boxfit.fill 等属性会无效
ListView组件
它是列表控件
简单使用方式:
class TestListView extends StatelessWidget {
  @override
  Widget build(BuildContext context) {
    // TODO: implement build
    return new MaterialApp(
      title: "测试listview",
      home: new Scaffold(
        appBar: new AppBar(
          title: new Text("listview测试"),
        ),
        body: new ListView(
          children: [
            new Image.network(
                "https://p.ssl.qhimg.com/dmfd/400_300_/t01da5bd44928dcfc6c.jpg"),
            new Image.network(
                "https://p.ssl.qhimg.com/dmfd/400_300_/t01da5bd44928dcfc6c.jpg"),
            new Image.network(
                "https://p.ssl.qhimg.com/dmfd/400_300_/t01da5bd44928dcfc6c.jpg"),
            new Image.network(
                "https://p.ssl.qhimg.com/dmfd/400_300_/t01da5bd44928dcfc6c.jpg"),
          ],
        ),
      ),
    );
  }
}
设置方向属性:scrollDirection,使用如下:
   return new ListView(
      scrollDirection: Axis.horizontal,
      children: [
        new Image.network(
            "https://p.ssl.qhimg.com/dmfd/400_300_/t01da5bd44928dcfc6c.jpg",width: 200,height: 200,),
        new Image.network(
            "https://p.ssl.qhimg.com/dmfd/400_300_/t01da5bd44928dcfc6c.jpg",width: 200,height: 200,),
        new Image.network(
            "https://p.ssl.qhimg.com/dmfd/400_300_/t01da5bd44928dcfc6c.jpg",width: 200,height: 200,),
        new Image.network(
            "https://p.ssl.qhimg.com/dmfd/400_300_/t01da5bd44928dcfc6c.jpg",width: 200,height: 200,),
      ],
);
listview展示list集合中的数据:
class SampApp extends StatelessWidget {
  @override
  Widget build(BuildContext context) {
    // TODO: implement build
    return new MaterialApp(
      title: "ceshi",
      theme: new ThemeData(
        primarySwatch: Colors.blue,
      ),
      home:  new Scaffold(
        appBar: new AppBar(
          title: new Text("sample App"),
        ),
        body: new ListView(
          children: _getListData(),
        ),
      )
    );
  }

  _getListData() {
    List listWidget = [];
    for (int i = 0; i < 100; i++) {
      listWidget.add(new Padding(
          padding: new EdgeInsets.all(10.0), child: new Text("数据 $i")));
    }
    return listWidget;
  }
}
点击事件,使用GestureDetector组件:
_getListData() {
List listWidget = [];
for (int i = 0; i < 100; i++) {
  listWidget.add(new GestureDetector(
      child: new Padding(
          padding: new EdgeInsets.all(10.0),
          child: new Text("数据11 $i")
      ),
    onTap: (){
        print("点击事件$i");
    },
  ));
}
GridView 控件
使用方式:
    class TestGridView extends StatelessWidget {
      @override
      Widget build(BuildContext context) {
        // TODO: implement build
        return new MaterialApp(
          home: Scaffold(
            appBar: new AppBar(
              title: new Text("测试gridview"),
            ),
            body: GridView(
              gridDelegate: SliverGridDelegateWithFixedCrossAxisCount(
                  crossAxisCount: 2,
                  mainAxisSpacing: 5.0,
                  crossAxisSpacing: 5.0,
                  childAspectRatio: 0.8),
              children: [
                new Image.network("http://img31.mtime.cn/mt/2014/03/07/123549.37376649_96X128.jpg",fit: BoxFit.cover,),
                new Image.network("http://img31.mtime.cn/mt/2014/01/06/105446.89493583_96X128.jpg",fit: BoxFit.cover,),
                new Image.network("http://img31.mtime.cn/mt/2014/06/17/145457.44209161_96X128.jpg",fit: BoxFit.cover,),
                new Image.network("http://img31.mtime.cn/mt/2013/11/29/102947.25583478_96X128.jpg",fit: BoxFit.cover,),
                new Image.network("http://img31.mtime.cn/mt/2013/12/23/133539.17727433_96X128.jpg",fit: BoxFit.cover,),
                new Image.network("http://img31.mtime.cn/mt/2016/07/28/145303.88789702_96X128.jpg",fit: BoxFit.cover,),
                new Image.network("http://img31.mtime.cn/mt/2013/11/20/172527.42989246_96X128.jpg",fit: BoxFit.cover,),
                new Image.network("http://img31.mtime.cn/mt/2014/09/12/102734.13658001_96X128.jpg",fit: BoxFit.cover,),
                new Image.network("http://img31.mtime.cn/mt/2014/03/12/145818.13256925_96X128.jpg",fit: BoxFit.cover,),
                new Image.network("http://img5.mtime.cn/mt/2019/03/27/095629.74997347_135X190X4.jpg",fit: BoxFit.cover,),
              ],
            ),
          ),
        );
      }
    }
crossAxisCount:展示的列数
mainAxisSpacing: 行间距
crossAxisSpacing: 列间距
childAspectRatio: 宽高比例
Row 控件
横向布局(主轴是横向)
    class TestRowView extends StatelessWidget {
      @override
      Widget build(BuildContext context) {
        // TODO: implement build
        return new MaterialApp(
          home: new Scaffold(
            appBar: new AppBar(
              title: new Text("行布局测试"),
            ),
            body: new Row(
              mainAxisAlignment: MainAxisAlignment.center,
              crossAxisAlignment: CrossAxisAlignment.end,
              children: [
                new Text("测试文本\n"),
                new Text("测试文本\n"),
                new Text("测试文本\n"),
    //            new Expanded(
    //                child: new RaisedButton(
    //              onPressed: () {},
    //              color: Colors.blue,
    //              child: new Text("blue button"),
    //            )),
    ////            new RaisedButton(
    ////              onPressed: () {},
    ////              color: Colors.greenAccent,
    ////              child: new Text("按钮"),
    ////            ),
    //            new Expanded(
    //                child: new RaisedButton(
    //                    onPressed: () {},
    //                    color: Colors.red,
    //                    child: new Text("red button"))),
    //            new Expanded(
    //                child: new RaisedButton(
    //                    onPressed: () {},
    //                    color: Colors.red,
    //                    child: new Text("red button"))),
              ],
            ),
          ),
        );
      }
    }
crossAxisAlignment:副轴的对齐方式,有start、center、end三种
mainAxisAlignment:主轴的对齐方式,有start、center、end三种
Expanded:灵活布局,使用该布局会撑满屏幕
RaisedButton:按钮,属于非灵活布局,不会撑满屏幕
Column 控件
纵向布局(主轴是纵向),
class TestColumnView extends StatelessWidget {
  @override
  Widget build(BuildContext context) {
    // TODO: implement build
    return new MaterialApp(
      home: new Scaffold(
        appBar: new AppBar(
          title: new Text("行布局测试"),
        ),
        body: new Column(
          crossAxisAlignment: CrossAxisAlignment.center,
          mainAxisAlignment: MainAxisAlignment.start,
          children: [
            new Text("测试文本测试文本"),
            new Text("测试文本"),
            new Text("测试文本文本文本文本文本文本"),
          ],
        ),
      ),
    );
  }
}
crossAxisAlignment:副轴的对齐方式,有start、center、end三种
mainAxisAlignment:主轴的对齐方式,有start、center、end三种
Stack遮盖布局
使用方式:
class TestStackView extends StatelessWidget {
  @override
  Widget build(BuildContext context) {
    var stack = new Stack(
        //对齐方式,FractionalOffset范围值为0~1  x轴0.5表示居中  y轴1表示在底部,
      alignment: FractionalOffset(0.5, 1),
      children: [
        //圆形控件
        new CircleAvatar(
          backgroundImage: new NetworkImage(
              "https://i.h2.pdim.gs/dmfd/200_200_100/d44dd385384a179528c5e327b996dcfc.jpeg"),
          radius: 100.0,
        ),
        //第二个布局遮盖第一个布局
        new Container(
          decoration: new BoxDecoration(
            color: Colors.lightBlue,
          ),
          padding: EdgeInsets.all(5.0),
          child: Text("测试遮盖布局"),
        )
      ],
    );

    return new MaterialApp(
      home: new Scaffold(
        appBar: new AppBar(title: new Text("测试stack遮盖布局"),),
        body: stack,
      ),
    );
  }
}
Positioned 定位布局
var stack = new Stack(
      alignment: FractionalOffset(0.5, 1),
      children: [
        new CircleAvatar(
          backgroundImage: new NetworkImage(
              "https://i.h2.pdim.gs/dmfd/200_200_100/d44dd385384a179528c5e327b996dcfc.jpeg"),
          radius: 100.0,
        ),
        //定位布局,上下左右随意设置double值,很灵活
        new Positioned(
          child: new Text("测试布局"),
          top: 10,
          left: 10,
        ),
        new Positioned(
          child: new Text("测试布局"),
          top: 10,
          right: 10,
        )
        /*   new Container(
          decoration: new BoxDecoration(
            color: Colors.lightBlue,
          ),
          padding: EdgeInsets.all(5.0),
          child: Text("测试遮盖布局"),
        )*/
      ],
    );
Card 卡片布局
   var cardView = new Card(
      child: Column(
        children: [
          new Text("测试1测试1测试1测试1测试1"),
          new Text("测试1测试1测试1测试1测试1"),
          new Text("测试1测试1测试1测试1测试1"),
          new Text("测试1测试1测试1测试1测试1"),
        ],
      ),
    );
Navigate导航使用
跳转错误:
Navigator operation requested with a context that does not include a Navigator.
解决办法:要使用Navigator,根元素不能是MaterialApp
跳转:
  Navigator.push(
          context,
          MaterialPageRoute(
              builder: (BuildContext context) => new SecondPage()));

SecondPage是自己的界面
返回上一个界面:
Navigator.pop(context);
回传值:
Navigator.pop(context, "返回上一个界面的数据2222");
回传值在上一个界面接受时需要使用:
//async异步
_navigateToNextPage(BuildContext context) async {
  //使用 await 方法 等待第二个界面回传值
  final result = await Navigator.push(
      context, MaterialPageRoute(builder: (context) => NextPage()));
  //android中的snackBar
  Scaffold.of(context).showSnackBar(SnackBar(content: Text("$result")));
}


