前言
Unity 工具更新了,新版本打包导出的工程不一样了。
最近集成新版本的 Unity 工程时,遇到好多坑。集成的过程不是很理想,总是出现这样那样的问题。自己不断尝试,无数次地打包、集成;网上查阅资料,摸索,请教各路大佬……良久,终于成功了!
今天把整个流程重新梳理一遍,希望大家在集成 unity 时能够少踩些坑。
工具
Unity 2018.2.17f1
Xcode 10
一、Unity 工程生成设置
1、在 Unity 工具中打开创建好的工程,然后点击上方的 File --> BuildSetting,在弹出的设置框中,选择 iOS 然后点击 Player Setting 进行设置。
2、设置如图(注意这里的 Bundle Identifier 与原生工程应该保持一致):
3、设置完毕之后,选择 Build 进行导出,导出名称和位置放在自己方便拷贝和运行的地方。
4、使用 Xcode 运行 Unity 工程,确保导出的工程没有问题。
二、原生工程集成 Unity
1、打开原生工程(即自己的 iOS 工程项目)。
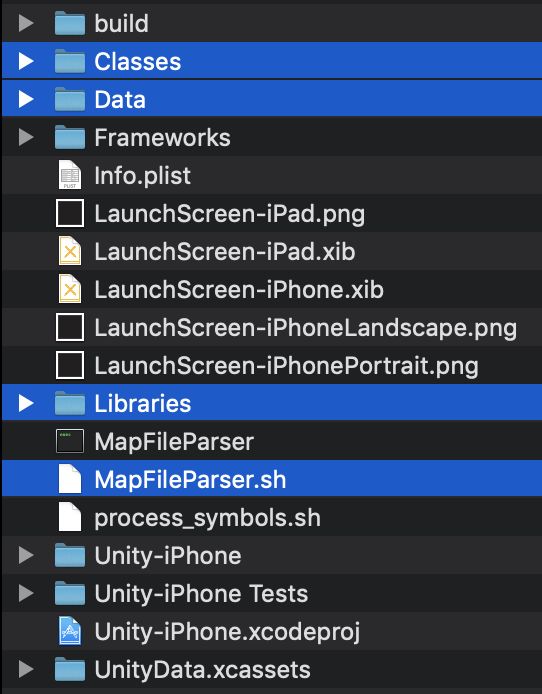
2、在 Unity 刚导出的工程中找到 Classes、Data、Libraries、和 MapFileParse.sh ,如图所示:
3、将它们拖进 iOS 项目工程。
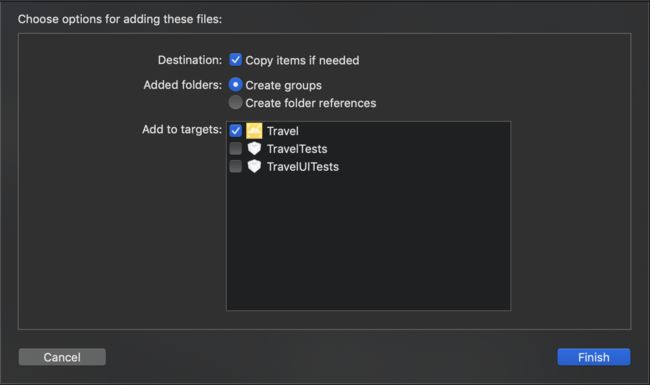
注意,添加 Classes、Libraries 和 MapFileParse.sh 方式如下:
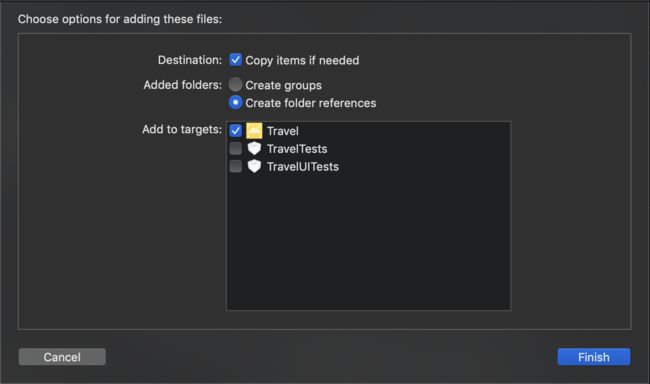
添加 Data 方式如下:
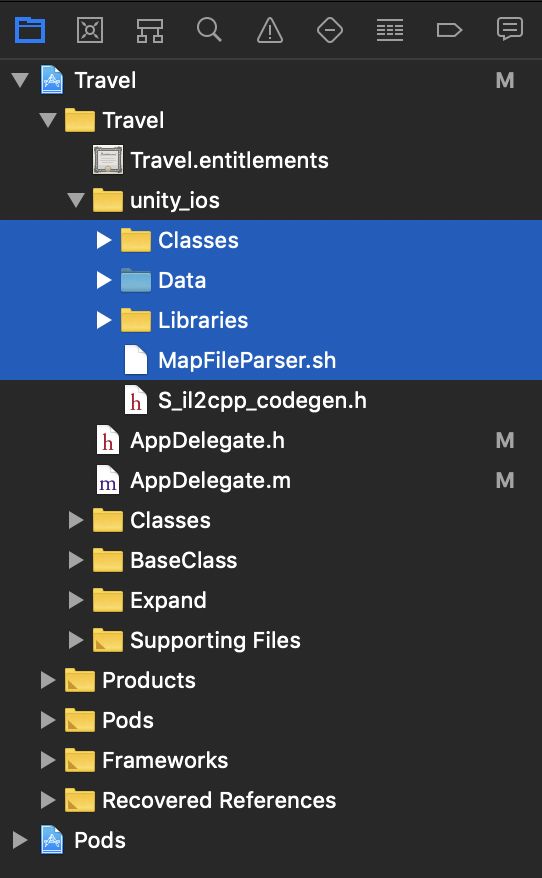
4、添加完成之后的原生项目结构,如图所示:
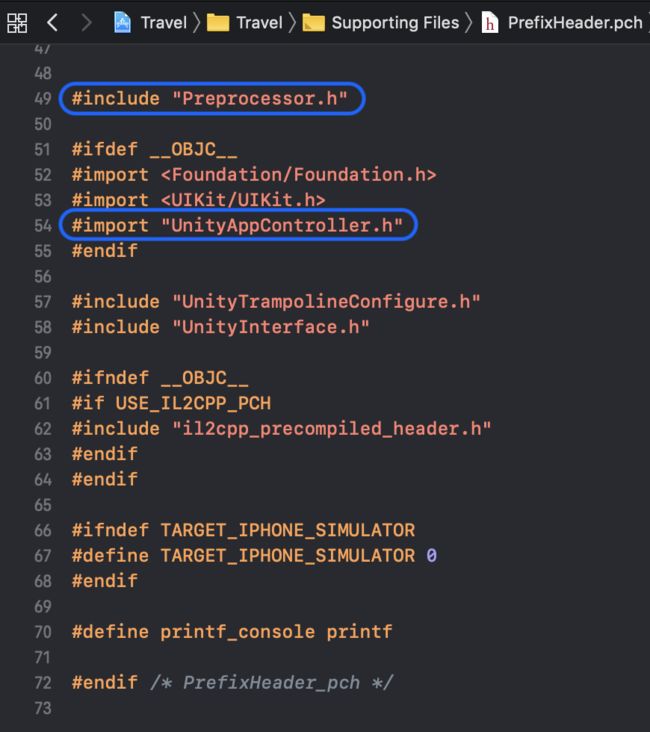
5、将 Classes 文件夹下 Prefix.pch 中的内容复制到原生工程(即自己的项目)的 PrefixHeader.pch 中,并且导入 UnityAppController.h 文件。然后删除 Classes 文件夹中的 Prefix.pch ,删除方式选择 Remove References。
注意:#include "Preprocessor.h" 必须放在其它头文件的前面(即 最前面),否则运行报错。
PS:如果原生工程没有 .pch 文件,可以直接在 Build Settings -> Precomplies Prxfix Header --> YES, 并且 Prefix Header 直接指向 Classes 的 Prefix.pch 文件;如果原来工程存在 .pch 文件,则做如上操作。
PrefixHeader.pch 内容如下图所示:
6、将 Classes 文件夹下 main.mm 中的内容复制到原生工程(即自己的项目)的 main.m 中,然后把原生工程(即自己项目)的 main.m 后缀改为 main.mm,删除 Classes 文件夹中的 main.mm ,删除方式选择 Remove References 。
7、添加 Unity 项目所依赖动态库(每个人的项目所依赖的库可能是不同的,具体请参照 Unity 导出的工程),并注意 Optional 选项。如下图所示:
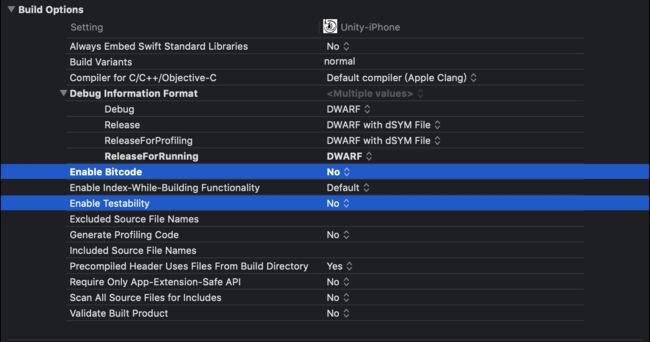
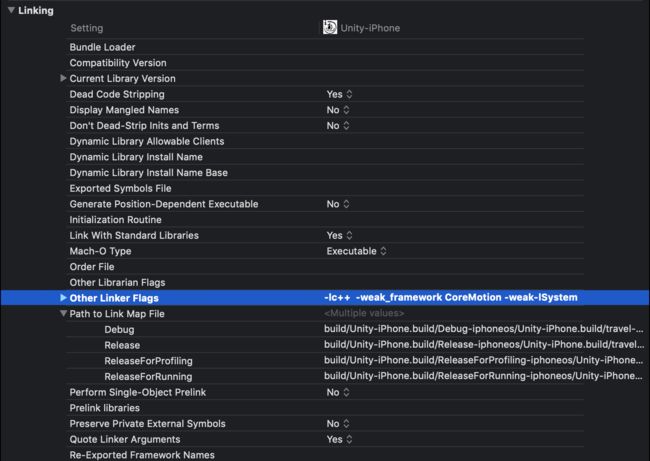
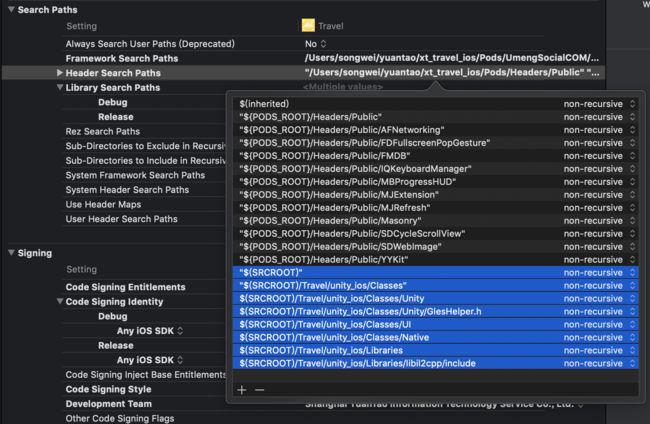
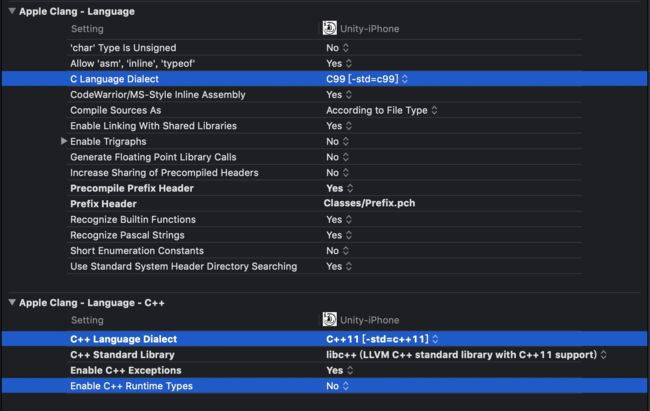
8、Build Setting 配置更改。此处重点需要注意以下几个位置,请对照 Unity 导出的项目一一进行设置。
相关设置如下:
Enable Bitcode --> NO,Enable Testability --> NO
Other Linker Flags 设置 4 个属性 $(inherited) -weak_framework CoreMotion -weak-ISystem
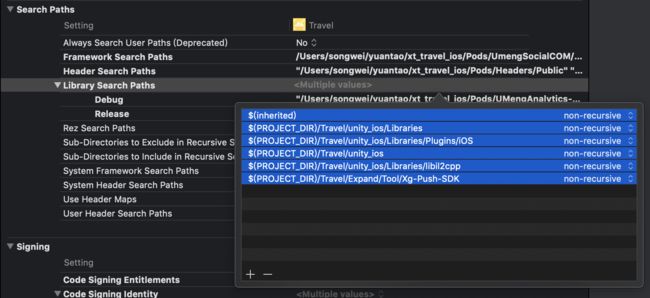
Header Search Paths 和 Library Search Paths (根据自己项目实际文件路径进行配置)
Other C Flags设置为:$(inherited) -DINIT_SCRIPTING_BACKEND=1 -fno-strict-overflow -DNET_4_0 -DRUNTIME_IL2CPP=1
C Language Dialect --> GNU99[-std=gnu99] (最新版本的才设置为这个值)
C++ Language Dialect --> C++11[-std=c++11]
Enable C++ Runtime Types --> NO
Overriding Deprecated Objective-C Methods --> YES
Unintentional Root Class --> YES
如下图所示:
9、添加 User-defined 设置,需要注意,版本设置需要用你导出 Unity 工程的版本,我的为 2018.2.17f1 版本:
具体配置如下:
GCC_THUMB_SUPPORT = NO
GCC_USE_INDIRECT_FUNCTION_CALLS = NO
UNITY_RUNTIME_VERSION = 2018.2.17f1 // 以自己 Unity 实际版本号为准
UNITY_SCRIPTING_BACKEND = il2cpp
此时,设置修改完毕,下面是代码修改!
三、代码修改
1、修改 AppDelegate.h 文件:
#import

@class MainTabbarController, UnityAppController;

@interface AppDelegate : UIResponder

/** AppDelegate 单例 */
@property (class, readonly, strong) AppDelegate *sharedAppDelegate;

@property (strong, nonatomic) UIWindow *window;

@property (strong, nonatomic) MainTabbarController *mainTabbarController;

@property (strong, nonatomic) UIWindow *unityWindow;
@property (strong, nonatomic) UnityAppController *unityController;
@property (strong, nonatomic) NSDictionary *dic;

- (void)showUnityWindow;
- (void)hideUnityWindow;
- (void)createAR;

@end
2、修改 AppDelegate.m 文件:
/**
 创建 unity 窗口
 @return unityWindow
 */

- (UIWindow*)unityWindow {
    if  (!_unityWindow) {
        return UnityGetMainWindow();
    }
    return _unityWindow;
}

/**
 展示unity窗口
 */
- (**void**)showUnityWindow {
    UnityPause(0);
    [self.unityWindow makeKeyAndVisible];
}

/**
 隐藏unity窗口
 */
- (void)hideUnityWindow {
    UnityPause(1);
    [**self**.window makeKeyAndVisible];
}

/**
 初始化 UnityAppController
 */
- (void)createAR {
    static dispatch_once_tonceToken;
    dispatch_once(&onceToken, ^{
        self.unityController = [[UnityAppController alloc] init];
        [self.unityController application:[UIApplication sharedApplication] didFinishLaunchingWithOptions:**self**.dic];
        [self.unityController applicationDidBecomeActive:[UIApplication sharedApplication]];
    });
    [self.window makeKeyAndVisible];
}

#pragma mark - UIApplicationDelegate

- (BOOL)application:(UIApplication*)application didFinishLaunchingWithOptions:(NSDictionary*)launchOptions {
    self.window = [[UIWindow alloc] initWithFrame:[[UIScreen mainScreen] bounds]];
    self.window.backgroundColor = [UIColor whiteColor];
    [CommonUtil createARresource];
    [CommonUtil startMonitoring];
    [self initRootViewController];
     self.dic = launchOptions;
    [self.window makeKeyAndVisible];

    return YES;
}

- (void)applicationWillResignActive:(UIApplication*)application {
    [self.unityController applicationWillResignActive:application];
}

- (void)applicationDidEnterBackground:(UIApplication*)application {
    [self.unityController applicationDidEnterBackground:application];
}

- (void)applicationWillEnterForeground:(UIApplication*)application {
    [self.unityController applicationWillEnterForeground:application];
}

- (void)applicationDidBecomeActive:(UIApplication*)application {
    [self.unityController applicationDidBecomeActive:application];
}

- (void)applicationWillTerminate:(UIApplication*)application {
    [self.unityController applicationWillTerminate:application];
}
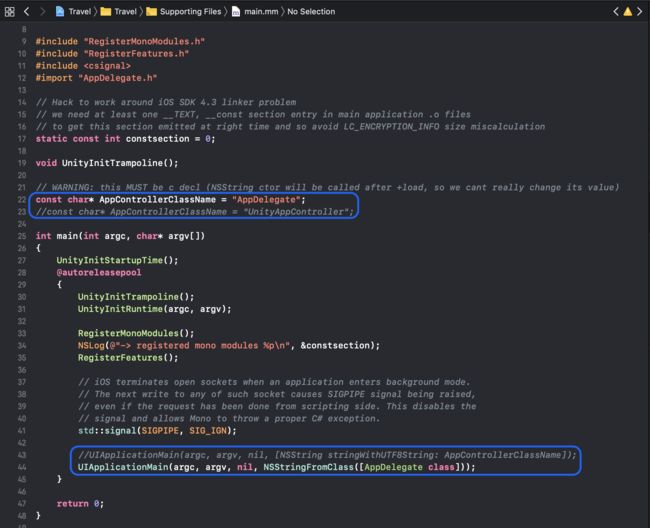
3、修改 main.mm 文件,如图所示:
代码如下:
#include "RegisterMonoModules.h"
#include "RegisterFeatures.h"
#include
#import "AppDelegate.h"

// Hack to work around iOS SDK 4.3 linker problem
// we need at least one __TEXT, __const section entry in main application .o files
// to get this section emitted at right time and so avoid LC_ENCRYPTION_INFO size miscalculation

static const int constsection = 0;

void UnityInitTrampoline();

// WARNING: this MUST be c decl (NSString ctor will be called after +load, so we cant really change its value)
const char* AppControllerClassName = "AppDelegate";
//const char* AppControllerClassName = "UnityAppController";

int main(int argc, char* argv[])
{
    UnityInitStartupTime();
    @autoreleasepool
    {
        UnityInitTrampoline();
        UnityInitRuntime(argc, argv);

        RegisterMonoModules();
        NSLog(@"-> registered mono modules %p\n", &constsection);
        RegisterFeatures();

        // iOS terminates open sockets when an application enters background mode.
        // The next write to any of such socket causes SIGPIPE signal being raised,
        // even if the request has been done from scripting side. This disables the
        // signal and allows Mono to throw a proper C# exception.
        std::signal(SIGPIPE, SIG_IGN);

        //UIApplicationMain(argc, argv, nil, [NSString stringWithUTF8String: AppControllerClassName]);
        UIApplicationMain(argc, argv, nil, NSStringFromClass([AppDelegate class]));
    }

    return 0;
}
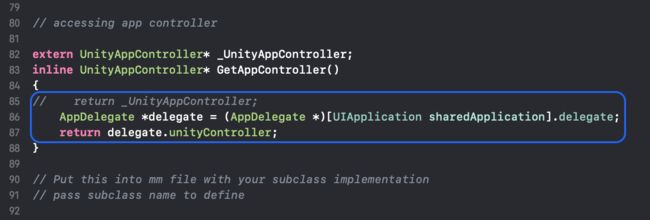
4、修改 UnityAppController.h 文件,如图所示:
代码如下:
extern UnityAppController* _UnityAppController;
inline UnityAppController* GetAppController()
{
//    return _UnityAppController;
    AppDelegate *delegate = (AppDelegate *)[UIApplication sharedApplication].delegate;
    return delegate.unityController;
}
5、修改 Preprocessor.h 文件(集成进来的 unity 的 Classes 文件夹中)
我们发现,在 Preprocessor.h 中,如图所示报错:
"Please include Preprocessor.h before other includes",提醒我们在 PrefixHeader.pch 中 #include "Preprocessor.h" 必须放在其它头文件的前面(即 最前面),否则运行报错。
解决方法:把这三行代码直接注释掉就行!如下所示:
7、修改 DeviceSettings.mm 文件 (集成进来的 Classes/Unity 文件夹中)
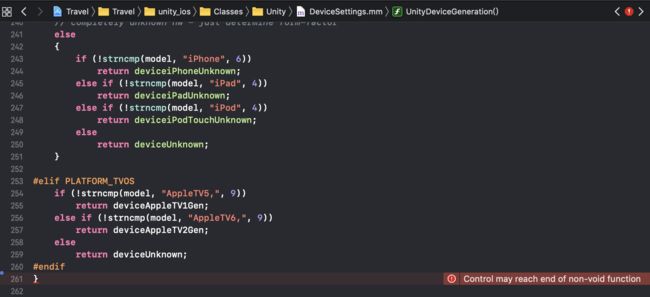
我们发现,在 DeviceSettings.mm 中,如图所示报错:
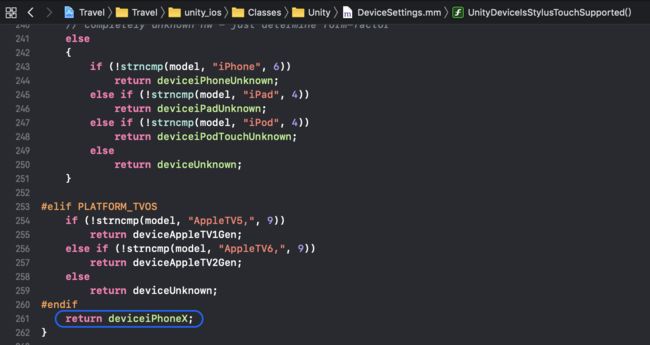
“Control may reach end of non-void function”,缺少默认 return 值
解决方法:添加默认 return 值。如图所示:
至此,修改完毕,下面开始运行调试!
四、Unity 启动与退出
1、启动 Unity
在需要 开启 Unity 的控制器中,调用初始化。我是在 HomeViewController 和 TRScenicDetailH5Controller 这两个控制器 中,调用开启。(PS:你们可以在 AppDelegate 中初始化好,即刚进入 App 时,初始化也行。)代码如下:
在 viewDidLoad 中,调用 初始化
- (void)viewDidLoad {
    [super viewDidLoad];

    // 调用 初始化,创建 AR
    [(AppDelegate *)[UIApplication sharedApplication].delegate createAR];
}
然后开启 Unity(AR)
/**
 传参数给 Unity,开启  Unity(AR)
*/
- (void)openAR {
    dispatch_async(dispatch_get_global_queue(0, 0), ^{
        UnitySendMessage("LoadScenes", "GetDate", [@"mp" UTF8String]);
        UnitySendMessage("LoadFile", "GetDate", [@"http://resourcesnode1.yuantaoit.com/mp/" UTF8String]);
        UnitySendMessage("LoadFile", "GetScenicId", [@"123" UTF8String]);
        dispatch_async(dispatch_get_main_queue(), ^{
            [(AppDelegate*)[UIApplication sharedApplication].delegate showUnityWindow];
        });
    });
}
2、退出 Unity (其实是暂停并隐藏)
单独创建一个控制器(iOS 与 Unity 交互的方法都可以写在这里),从 Unity 返回到 iOS,Unity 调用_PressButton() 方法,就可以回到 iOS 页面。
代码如下:
/**
 Unity 界面 返回 按钮的相响应方法
 调用 隐藏
 */
void _PressButton() {
    [(AppDelegate*)[UIApplication sharedApplication].delegate hideUnityWindow];
}
五、报错修改
APP 运行时可能会出现的报错及相应的解决方式:
1、il2cpp::vm::MetadataCache::Initialize(),如下所示:
·#0 il2cpp::vm::MetadataCache::Initialize()
·#1 il2cpp::vm::Runtime::Init(char const, char const)
·#2 ::InitializeIl2CppFromMain()
·#3 ::UnityInitApplicationNoGraphics()
·#4 ::-[UnityAppController application:didFinishLaunchingWithOptions:](UIApplication *, NSDictionary *)
·#5 _23-[AppDelegate createAR]_block_invoke·报:Thread 1: EXC_BAD_ACCESS(code=1,address=0x30)
国外论坛看了一下:
IL2CPP: Anyone else seeing MetadataCache::Initialize crashes sometimes when the game starts?
33 楼
I met the same problem, and I found that MetadataCache crashes because the MetadataCache::Register function (which is supposed to be called before MetadataCache is initalized), is actually never called.
This happens when you try to initialize the Unity runtime from outside the main binary: you can solve the problem by manually calling "s_Il2CppCodegenRegistration()" before "UnityInitApplicationNoGraphics(...)".
The problem is that, in my case, this only works if I try to init Unity from a static library: when I try from a dynamic one, I get a crash on "il2cpp::metadata::Il2CppGenericClassCompare".
翻译如下:
我遇到了同样的问题,我发现元数据缓存崩溃,因为实际上从未调用 MetadataCache::Register 函数(应该在初始化 MetadataCache 之前调用该函数)。
当您试图从主二进制文件外部初始化 Unity 运行时时会发生这种情况:您可以通过在“UnityInitApplicationNoGraphics(...)”之前手动调用“s_Il2CppCodegenRegistration()”来解决此问题。
问题是,在我的例子中,这只在我尝试从静态库初始化Unity时有效:当我从动态库尝试时,我在“il2cpp::metadata::Il2CppGenericClassCompare”上遇到崩溃。
我暂时采用 #33 楼的做法,后期再优化。若谁有更好的方法,欢迎指教。
什么?不会调用?
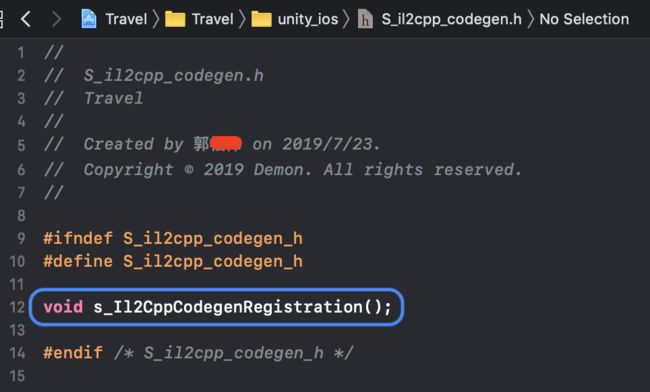
先创建一个头文件(Header File ),引入 s_Il2CppCodegenRegistration() 函数。 我这里是 S_il2cpp_codegen.h,如下图所示:
代码如下:
void s_Il2CppCodegenRegistration();
然后在 UnityAppController.mm 中引入头文件 #include "S_il2cpp_codegen.h" 。
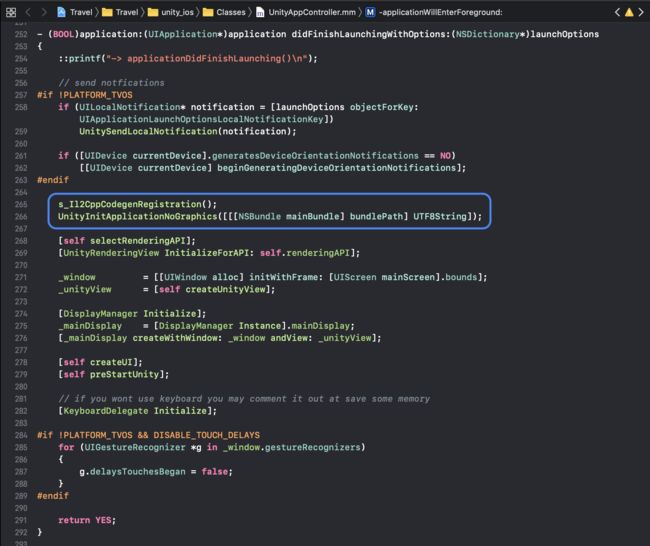
再找到 didFinishLaunchingWithOptions: 方法,在 UnityInitApplicationNoGraphics([[[NSBundle mainBundle] bundlePath] UTF8String]) 之前调用 s_Il2CppCodegenRegistration() 函数。如下图所示:
代码如下:
s_Il2CppCodegenRegistration();

UnityInitApplicationNoGraphics([[[NSBundle mainBundle] bundlePath] UTF8String]);
2、GetCloudProjectId[inlined],如下所示
·#0 _platform_strlen
·#1 strdup
·#2 GetCloudProjectId[inlined]
·#3 UnityInstallPostCrashCallback()
·#4 InitCrashReporter()
·#5 InitCrashHandling()·报:Thread 1: EXC_BAD_ACCESS(code=1,address=0x0)
Stack Overflow 上的回答
https://stackoverflow.com/questions/53580923/unity-crashes-on-iphone-at-getcloudprojectid
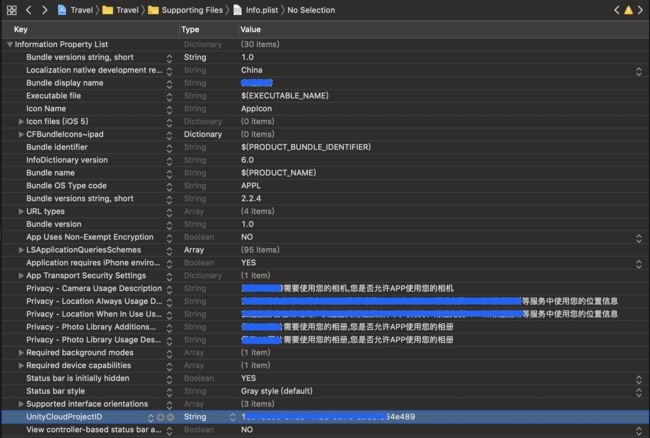
In the Info.plist, the UnityCloudProjectID was missing. I added it manually and this fixed it.
在原生项目工程的 Info.plist 里,添加 UnityCloudProjectID 键值对(参考 Unity 导出的工程)。
此时,运行成功!Unity 控制器已经打开,且可以返回。运行效果如下:
如果还有什么报错,请自己检查下 Build Setting 中是否还有什么需要修改的地方。以上是自己踩坑的心得体会,希望能对大家有所帮助。如有错误,欢迎批评指正!

