MyBatis 本是apache的一个开源项目iBatis, 2010年这个项目由apache software foundation 迁移到了google code,并且改名为MyBatis 。2013年11月迁移到Github。iBATIS一词来源于“internet”和“abatis”的组合,是一个基于Java的持久层框架。
MyBatis是支持普通SQL查询,存储过程和高级映射的优秀持久层框架。MyBatis消除了几乎所有的JDBC代码和参数的手工设置以及对结果集的检索封装。MyBatis可以使用简单的XML或注解用于配置和原始映射,将接口和Java的POJO(Plain Old Java Objects,普通的Java对象)映射成数据库中的记录。
1 第一个MyBatis程序
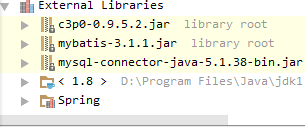
首先需要加入需要的jar包,构建Spring环境请参考:Spring学习之第一个hello world程序。这里我们需要加入mybatis包和MySQL驱动包,使用IDEA环境来开发程序,最后工程加入的包如下图所示:
然后需要在test数据库中新建测试表user,sql语句如下所示:
create table users (
    id int primary key auto_increment,
    name varchar(20),
    age int
);
insert into users (name, age) values('Tom', 12);
insert into users (name, age) values('Jack', 11);
1.1 定义表对应的实体类
public class User {

    private int id;
    private String name;
    private int age;

    public User() { }

    public User(int id, String name, int age) {
        this.id = id;
        this.name = name;
        this.age = age;
    }

    public int getId() {
        return id;
    }

    public void setId(int id) {
        this.id = id;
    }

    public String getName() {
        return name;
    }

    public void setName(String name) {
        this.name = name;
    }

    public int getAge() {
        return age;
    }

    public void setAge(int age) {
        this.age = age;
    }

    @Override
    public String toString() {
        return "User{" +
                "id=" + id +
                ", name='" + name + '\'' +
                ", age=" + age +
                '}';
    }
}
1.2 定义MyBatista的mybatisConfig.xml配置文件和user表的sql映射文件userMapper.xml
mybatisConfig.xml文件,该文件是在src目录下新建的。
xml version="1.0" encoding="UTF-8"?>
DOCTYPE configuration PUBLIC "-//mybatis.org//DTD Config 3.0//EN" "http://mybatis.org/dtd/mybatis-3-config.dtd">

<configuration>
<environments default="development">

    <environment id="development">
        <transactionManager type="JDBC" />

        <dataSource type="POOLED">
            <property name="driver" value="com.mysql.jdbc.Driver" />
            <property name="url" value="jdbc:mysql://192.168.1.150/test" />
            <property name="username" value="root" />
            <property name="password" value="123456" />
        dataSource>
    environment>
environments>


<mappers>
    <mapper resource="com/mybatis/userMapper.xml"/>
mappers>

configuration>
userMapper.xml文件,该配置文件在com.mybatis包下,user表对应的实体类User也在com.mybatis包下。
xml version="1.0" encoding="UTF-8" ?>
DOCTYPE mapper PUBLIC "-//mybatis.org//DTD Mapper 3.0//EN" "http://mybatis.org/dtd/mybatis-3-mapper.dtd">

<mapper namespace="com.mybatis.userMapper">

    <select id="getUser" parameterType="int" resultType="com.mybatis.User">
        select * from users where id=#{id}
    select>
    <select id="getUserAll" resultType="com.mybatis.User">
        select * from users
    select>


    <insert id="insertUser" parameterType="com.mybatis.User">
        insert into users (name, age) value(#{name}, #{age})
    insert>


    <delete id="deleteUser" parameterType="int">
        delete from users where id=#{id}
    delete>


    <update id="updateUser" parameterType="com.mybatis.User">
        update users set name=#{name}, age=#{age} where id=#{id}
    update>
mapper>
测试代码如下:
public class mybaitstest { SqlSessionFactory sessionFactory = null; SqlSession sqlSession = null; { String resource = "mybatisConfig.xml"; // 加载mybatis的配置文件(它也加载关联的映射文件) Reader reader = null; try { reader = Resources.getResourceAsReader(resource); } catch (IOException e) { e.printStackTrace(); } // 构建sqlSession的工厂 sessionFactory = new SqlSessionFactoryBuilder().build(reader); // 创建能执行映射文件中sql的sqlSession,默认是手动提交事务的,使用自动提交的话加上参数 true sqlSession = sessionFactory.openSession(true); } public void testSelectUser() { // 映射sql的标识字符串 String statement = "com.mybatis.userMapper" + ".getUser"; // 执行查询返回一个唯一user对象的sql User user = sqlSession.selectOne(statement, 1); System.out.println(user); } public void testSelectAll() { Listusers = sqlSession.selectList("com.mybatis.userMapper.getUserAll"); System.out.println(users); } public void testInsertUser(User user) { int insert = sqlSession.insert("com.mybatis.userMapper.insertUser", user); // 如果不是自动提交的话,需要使用 sqlSession。commit() System.out.println(insert); } public void testDeleteUser(int id) { int delete = sqlSession.delete("com.mybatis.userMapper.deleteUser", id); System.out.println(delete); } public void testUpdateUser(User user) { int update = sqlSession.update("com.mybatis.userMapper.updateUser", user); System.out.println(update); } public static void main(String[] args) throws IOException { new mybaitstest().testSelectUser(); } }
最后输出结果为:
2 基于注解的方式使用MyBatis
基于注解的方式使用MyBatis,首先定义对应表的sql映射接口。
public interface IUserMapper { @Insert("insert into users (name, age) value(#{name}, #{age})") public int add(User user); @Delete("delete from users where id=#{id}") public int deleteById(int id); @Update("update users set name=#{name}, age=#{age} where id=#{id}") public int update(User user); @Select("select * from users where id=#{id}") public User getById(int id); @Select("select * from users") public ListgetAll(); }
然后在mybatisConfig.xml配置文件中注册该接口:
class="com.mybatis.IUserMapper"/>
测试示例:
/**
 * 使用注解测试的方法
 */
public void test() {
    IUserMapper userMapper = sqlSession.getMapper(IUserMapper.class);

    User user = userMapper.getById(1);
    System.out.println(user);
}
3 如何简化配置操作
以上两个程序示例都是直接在配置文件中写连接数据库的信息,其实还可以专门把数据库连接信息写到一个db.proteries文件中,然后由配置文件来读取该db.properies文件信息。db.proteries文件内容如下:
user=root
password=123456
driverClass=com.mysql.jdbc.Driver
jdbcUrl=jdbc:mysql://192.168.1.150/test
然后在mybatisConfig.xml配置文件中将数据库环境信息更改为如下所示:
<properties resource="db.properties"/>

<environments default="development">

    <environment id="development">
        <transactionManager type="JDBC" />

        <dataSource type="POOLED">
            <property name="driver" value="${driverClass}" />
            <property name="url" value="${jdbcUrl}" />
            <property name="username" value="${user}" />
            <property name="password" value="${password}" />
        dataSource>
    environment>
environments>
配置表对应的sql映射文件时,可以使用别名来简化配置,在mybatisConfig.xml中添加如下配置,在userMapper中parameterType就可以配置为"_User"。
<typeAliases>
    <typeAlias type="com.mybatis.User" alias="_User"/>
typeAliases>
4 字段名与实体类属性名不匹配的冲突
新建表和数据,在test数据库中执行以下SQL语句:
create table orders (
    order_id int primary key auto_increment,
    order_no varchar(20),
    order_price float
);
insert into orders (order_no, order_price) values('aaa', 12);
insert into orders (order_no, order_price) values('bbb', 13);
insert into orders (order_no, order_price) values('ccc', 14);
创建对应表的类:
public class Order {

    private int i;
    private String no;
    private float price;

    public Order() { }

    public Order(int i, String no, float price) {
        this.i = i;
        this.no = no;
        this.price = price;
    }

    public int getI() {
        return i;
    }

    public void setI(int i) {
        this.i = i;
    }

    public String getNo() {
        return no;
    }

    public void setNo(String no) {
        this.no = no;
    }

    public float getPrice() {
        return price;
    }

    public void setPrice(float price) {
        this.price = price;
    }
}
mybaitsConfig.xml配置如下:
default="development">
接下来配置orderMapper.xml:
测试用例:
public class MyBaitsMain {
    SqlSessionFactory sessionFactory = null;
    SqlSession sqlSession = null;

    {
        String resource = "mybatisConfig.xml";
        // 加载mybatis的配置文件(它也加载关联的映射文件)
        Reader reader = null;
        try {
            reader = Resources.getResourceAsReader(resource);
        } catch (IOException e) {
            e.printStackTrace();
        }
        // 构建sqlSession的工厂
        sessionFactory = new SqlSessionFactoryBuilder().build(reader);
        // 创建能执行映射文件中sql的sqlSession,默认是手动提交事务的,使用自动提交的话加上参数 true
        sqlSession = sessionFactory.openSession(true);
    }

    public static void main(String[] args) {
        String statement = "com.mybatis.orderMapper.getOrder";
        String statement2 = "com.mybatis.orderMapper.getOrder2";

        Order order = new MyBaitsMain().sqlSession.selectOne(statement, 2);
        System.out.println(order);
        order = new MyBaitsMain().sqlSession.selectOne(statement2, 2);
        System.out.println(order);
    }
}
输出结果为:
5 实现关联表查询
5.1 一对一关联
这里实现班级id查询班级信息,班级信息中包括老师信息。首先创建表结构:
CREATE TABLE teacher(
    t_id INT PRIMARY KEY AUTO_INCREMENT,
    t_name VARCHAR(20)
);
CREATE TABLE class(
    c_id INT PRIMARY KEY AUTO_INCREMENT,
    c_name VARCHAR(20),
    teacher_id INT
);
ALTER TABLE class ADD CONSTRAINT fk_teacher_id FOREIGN KEY (teacher_id) REFERENCES teacher(t_id);

INSERT INTO teacher(t_name) VALUES('LS1');
INSERT INTO teacher(t_name) VALUES('LS2');

INSERT INTO class(c_name, teacher_id) VALUES('bj_a', 1);
INSERT INTO class(c_name, teacher_id) VALUES('bj_b', 2);
定义表对应的实体类:
public class Teacher {

    private int id;
    private String name;

    public Teacher() {
    }

    public Teacher(int id, String name) {
        this.id = id;
        this.name = name;
    }

    public int getId() {
        return id;
    }

    public void setId(int id) {
        this.id = id;
    }

    public String getName() {
        return name;
    }

    public void setName(String name) {
        this.name = name;
    }

    @Override
    public String toString() {
        return "Teacher{" +
                "id=" + id +
                ", name='" + name + '\'' +
                '}';
    }
}
public class Classes {

    private int id;
    private String name;
    private Teacher teacher;

    public Classes() {
    }

    public Classes(int id, String name, Teacher teacher) {
        this.id = id;
        this.name = name;
        this.teacher = teacher;
    }

    public int getId() {
        return id;
    }

    public void setId(int id) {
        this.id = id;
    }

    public Teacher getTeacher() {
        return teacher;
    }

    public void setTeacher(Teacher teacher) {
        this.teacher = teacher;
    }

    public String getName() {
        return name;
    }

    public void setName(String name) {
        this.name = name;
    }

    @Override
    public String toString() {
        return "Classes{" +
                "id=" + id +
                ", name='" + name + '\'' +
                ", teacher=" + teacher +
                '}';
    }
}
定义sql映射文件,需要在mybatisConfig.xml中注册该表映射文件。
测试类:
public class MyBaitsMain {
    SqlSessionFactory sessionFactory = null;
    SqlSession sqlSession = null;

    {
        String resource = "mybatisConfig.xml";
        // 加载mybatis的配置文件(它也加载关联的映射文件)
        Reader reader = null;
        try {
            reader = Resources.getResourceAsReader(resource);
        } catch (IOException e) {
            e.printStackTrace();
        }
        // 构建sqlSession的工厂
        sessionFactory = new SqlSessionFactoryBuilder().build(reader);
        // 创建能执行映射文件中sql的sqlSession,默认是手动提交事务的,使用自动提交的话加上参数 true
        sqlSession = sessionFactory.openSession(true);
    }

    public static void main(String[] args) {

        String statement = "com.mybatis.classesMapper.getClasses";
        String statement2 = "com.mybatis.classesMapper.getClasses2";

        Classes classes = new MyBaitsMain().sqlSession.selectOne(statement, 1);
        System.out.println(classes);
        classes = new MyBaitsMain().sqlSession.selectOne(statement2, 1);
        System.out.println(classes);
    }
}
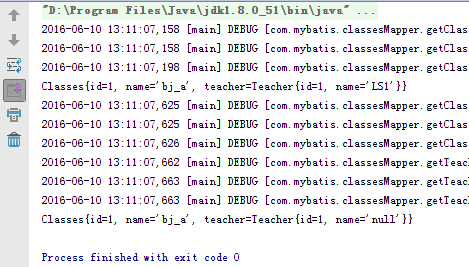
输出结果:
5.2 一对多关联
这里实现班级id查询班级信息,班级信息中包括老师信息和学生信息。首先创建表结构:
CREATE TABLE student(
    s_id INT PRIMARY KEY AUTO_INCREMENT,
    s_name VARCHAR(20),
    class_id INT
);
INSERT INTO student(s_name, class_id) VALUES('xs_A', 1);
INSERT INTO student(s_name, class_id) VALUES('xs_B', 1);
INSERT INTO student(s_name, class_id) VALUES('xs_C', 1);
INSERT INTO student(s_name, class_id) VALUES('xs_D', 2);
INSERT INTO student(s_name, class_id) VALUES('xs_E', 2);
INSERT INTO student(s_name, class_id) VALUES('xs_F', 2);
定义表对应的实体类:
public class Student {

    private int id;
    private String name;

    public Student(int id, String name) {
        this.id = id;
        this.name = name;
    }

    public Student() {
    }

    public int getId() {

        return id;
    }

    public void setId(int id) {
        this.id = id;
    }

    public String getName() {
        return name;
    }

    public void setName(String name) {
        this.name = name;
    }

    @Override
    public String toString() {
        return "Student{" +
                "id=" + id +
                ", name='" + name + '\'' +
                '}';
    }
}
定义sql映射文件,需要在mybatisConfig.xml中注册该表映射文件。
xml version="1.0" encoding="UTF-8" ?>
DOCTYPE mapper PUBLIC "-//mybatis.org//DTD Mapper 3.0//EN" "http://mybatis.org/dtd/mybatis-3-mapper.dtd">

<mapper namespace="com.mybatis.classesMapper2">

    <select id="getClasses" parameterType="int" resultMap="ClassesMap">
        SELECT * FROM class c, student s, teacher t WHERE c.c_id=s.class_id AND c.c_id=#{id}
    select>
    <resultMap id="ClassesMap" type="com.mybatis.Classes">
        <id property="id" column="c_id"/>
        <result property="name" column="c_name"/>
        <association property="teacher" javaType="com.mybatis.Teacher">
            <id property="id" column="t_id"/>
            <result property="name" column="t_name"/>
        association>

        <collection property="students" ofType="com.mybatis.Student">
            <id property="id" column="s_id"/>
            <result property="name" column="s_name"/>
        collection>
    resultMap>


    <select id="getClasses2" resultMap="ClassesMap2">
        SELECT * FROM class WHERE c_id=#{id}
    select>
    <select id="getTeacher" resultType="com.mybatis.Teacher">
        SELECT t_id id, t_name name FROM teacher WHERE  t_id=#{id}
    select>
    <select id="getStudent" resultType="com.mybatis.Student">
        SELECT s_id id, s_name name FROM student WHERE  class_id=#{id}
    select>
    <resultMap id="ClassesMap2" type="com.mybatis.Classes">
        <id property="id" column="c_id"/>
        <result property="name" column="c_name"/>
        <association property="teacher" column="teacher_id" select="getTeacher">
        association>
        <collection property="students" column="c_id" select="getStudent">
        collection>
    resultMap>

mapper>
测试类:
public class MyBaitsMain {
    SqlSessionFactory sessionFactory = null;
    SqlSession sqlSession = null;

    {
        String resource = "mybatisConfig.xml";
        // 加载mybatis的配置文件(它也加载关联的映射文件)
        Reader reader = null;
        try {
            reader = Resources.getResourceAsReader(resource);
        } catch (IOException e) {
            e.printStackTrace();
        }
        // 构建sqlSession的工厂
        sessionFactory = new SqlSessionFactoryBuilder().build(reader);
        // 创建能执行映射文件中sql的sqlSession,默认是手动提交事务的,使用自动提交的话加上参数 true
        sqlSession = sessionFactory.openSession(true);
    }

    public static void main(String[] args) {

        String statement = "com.mybatis.classesMapper2.getClasses";
        String statement2 = "com.mybatis.classesMapper2.getClasses2";

        Classes classes = new MyBaitsMain().sqlSession.selectOne(statement, 1);
        System.out.println(classes);
        classes = new MyBaitsMain().sqlSession.selectOne(statement2, 1);
        System.out.println(classes);
    }
}
输出结果:
6 MyBatis的缓存
正如大多数持久层框架一样,MyBatis 同样提供了一级缓存和二级缓存的支持
- 一级缓存: 基于PerpetualCache 的 HashMap本地缓存,其存储作用域为 Session,当 Session flush 或 close 之后,该Session中的所有 Cache 就将清空。
- 二级缓存与一级缓存其机制相同,默认也是采用 PerpetualCache,HashMap存储,不同在于其存储作用域为 Mapper(Namespace),并且可自定义存储源,如 Ehcache。
- 对于缓存数据更新机制,当某一个作用域(一级缓存Session/二级缓存Namespaces)的进行了 C/U/D 操作后,默认该作用域下所有 select 中的缓存将被clear。
7 Spring集成MyBatis
Spring集成MyBatis,开发环境为IDEA,打开IDEA,新建工程,工程名为spring-mybatis。注意,这里我选择的是带有Web功能的工程,其实在Spring集成MyBatis示例中并没有用到Web功能,这个可选可不选。
1、添加工程所需的jar包,比如MySQL驱动包、Spring包、commons-logging包等,最后添加的包结构图如下:
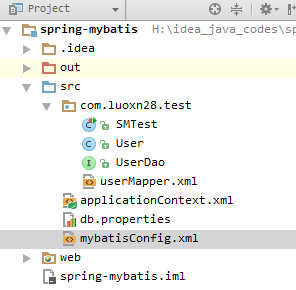
最后整个工程文件如下所示:
2、然后需要在test数据库中新建测试表user,sql语句如下所示:
create table users (
    id int primary key auto_increment,
    name varchar(20),
    age int
);
insert into users (name, age) values('Tom', 12);
insert into users (name, age) values('Jack', 11);
3、定义表对应的实体类和表操作接口。
package com.luoxn28.test;

public class User {

    private int id;
    private String name;
    private int age;

    public User() {
    }

    public User(int id, String name, int age) {
        this.id = id;
        this.name = name;
        this.age = age;
    }

    public User(String name, int age) {
        this.name = name;
        this.age = age;
    }

    public int getId() {
        return id;
    }

    public void setId(int id) {
        this.id = id;
    }

    public String getName() {
        return name;
    }

    public void setName(String name) {
        this.name = name;
    }

    public int getAge() {
        return age;
    }

    public void setAge(int age) {
        this.age = age;
    }

    @Override
    public String toString() {
        return "User{" +
                "id=" + id +
                ", name='" + name + '\'' +
                ", age=" + age +
                '}';
    }
}
package com.luoxn28.test; import java.util.List; public interface UserDao { public int insert(User user); public int update(User user); public int delete(int id); public User getById(int id); public ListgetAll(); }
4、定义表映射配置文件userDao.xml和MyBatis配置文件mybatisConfig.xml。
xml version="1.0" encoding="UTF-8" ?>
DOCTYPE mapper PUBLIC "-//mybatis.org//DTD Mapper 3.0//EN" "http://mybatis.org/dtd/mybatis-3-mapper.dtd">

<mapper namespace="com.luoxn28.test.UserDao">

    <insert id="insert" parameterType="com.luoxn28.test.User">
        INSERT users (name, age) VALUES (#{name}, #{age})
    insert>

    <update id="update" parameterType="com.luoxn28.test.User">
        UPDATE users set name=#{name}, age=#{age} where id=#{id}
    update>

    <delete id="delete" parameterType="int">
        DELETE FROM users where id=#{id}
    delete>

    <select id="getById" parameterType="int" resultType="com.luoxn28.test.User">
        SELECT * FROM users WHERE id=#{id}
    select>

    <select id="getAll" resultType="com.luoxn28.test.User">
        SELECT * FROM users
    select>

mapper>
xml version="1.0" encoding="UTF-8"?>
DOCTYPE configuration PUBLIC "-//mybatis.org//DTD Config 3.0//EN" "http://mybatis.org/dtd/mybatis-3-config.dtd">

<configuration>
    <mappers>
        <mapper resource="com/luoxn28/test/userMapper.xml"/>
    mappers>
configuration>
5、配置Spring的applicationContext.xml文件
xml version="1.0" encoding="UTF-8"?>
<beans xmlns="http://www.springframework.org/schema/beans"
       xmlns:xsi="http://www.w3.org/2001/XMLSchema-instance"
       xmlns:context="http://www.springframework.org/schema/context" xmlns:tx="http://www.springframework.org/schema/tx"
       xsi:schemaLocation="http://www.springframework.org/schema/beans http://www.springframework.org/schema/beans/spring-beans.xsd http://www.springframework.org/schema/context http://www.springframework.org/schema/context/spring-context.xsd http://www.springframework.org/schema/tx http://www.springframework.org/schema/tx/spring-tx.xsd">


    <context:property-placeholder location="classpath:db.properties"/>


    <bean id="dataSource" class="org.springframework.jdbc.datasource.DriverManagerDataSource">
        <property name="username" value="${user}"/>
        <property name="password" value="${password}"/>
        <property name="driverClassName" value="${driverClass}"/>
        <property name="url" value="${jdbcUrl}"/>
    bean>


    <bean id="sqlSessionFactory" class="org.mybatis.spring.SqlSessionFactoryBean">
        <property name="dataSource" ref="dataSource"/>
        <property name="typeAliasesPackage" value="com.luoxn28.test"/>
        <property name="configLocation" value="classpath:mybatisConfig.xml"/>
    bean>


    <bean id="userDao" class="org.mybatis.spring.mapper.MapperFactoryBean">
        <property name="mapperInterface" value="com.luoxn28.test.UserDao"/>
        <property name="sqlSessionFactory" ref="sqlSessionFactory"/>
    bean>

beans>
6、编写测试类SMTest
package com.luoxn28.test;

import org.springframework.context.ApplicationContext;
import org.springframework.context.support.ClassPathXmlApplicationContext;
import org.testng.annotations.BeforeTest;
import org.testng.annotations.Test;

public class SMTest {

    private ApplicationContext context = null;
    private UserDao userDao = null;

    @BeforeTest
    public void init() {
        context = new ClassPathXmlApplicationContext("applicationContext.xml");
        userDao = (UserDao) context.getBean("userDao");
    }

    @Test
    public void testInsert() {
        System.out.println(userDao.insert(new User("luoxn28", 23)));
    }

    @Test
    public void testUpdate() {
        System.out.println(userDao.update(new User(10, "luoxn28", 22)));
    }

    @Test
    public void testDelete() {
        System.out.println(userDao.delete(10));
    }

    @Test
    public void testGetById() {
        System.out.println(userDao.getById(10));
    }

    @Test
    public void getGetAll() {
        System.out.println(userDao.getAll());
    }
}
输出结果(这是测试的是getGetAll方法):
参考资料:
1、尚硅谷-MyBatis学习视频
2、Spring学习之AOP总结帖


