环境介绍
OS:CentOS7.4
RabbitMQ:3.7.7
依赖环境:erlang、socat
端口介绍:
4369 ##erlang发现口
5672 ##client端通信口
15672 ##管理界面ui端口
25672 ##server间内部通信
依赖环境安装
[root@localhost yum.repos.d]# cat a.repo
[bbitmq-erlang]
name=rabbitmq-erlang
baseurl=https://dl.bintray.com/rabbitmq/rpm/erlang/20/el/7
gpgcheck=1
gpgkey=https://dl.bintray.com/rabbitmq/Keys/rabbitmq-release-signing-key.asc
enabled=1
导入gpgcheck
[root@localhost yum.repos.d]# rpm --import https://packagecloud.io/rabbitmq/rabbitmq-server/gpgkey
安装socat
[root@localhost yum.repos.d]# yum -y install socat
下载RabbitMQ安装包
[root@localhost ~]# wget https://packagecloud.io/rabbitmq/rabbitmq-server/packages/el/7/rabbitmq-server-3.7.7-1.el7.noarch.rpm
[root@localhost ~]# yum -y localinstall rabbitmq-server-3.7.7-1.el7.noarch.rpm
启用RabbitMQ的web插件
[root@localhost ~]# rabbitmq-plugins enable rabbitmq_management
The following plugins have been configured:
  rabbitmq_management
  rabbitmq_management_agent
  rabbitmq_web_dispatch
Applying plugin configuration to rabbit@localhost...
The following plugins have been enabled:
  rabbitmq_management
  rabbitmq_management_agent
  rabbitmq_web_dispatch

started 3 plugins.
[root@localhost ~]# netstat -ntlp
Active Internet connections (only servers)
Proto Recv-Q Send-Q Local Address           Foreign Address         State       PID/Program name
tcp        0      0 0.0.0.0:111             0.0.0.0:*               LISTEN      1/systemd
tcp        0      0 0.0.0.0:4369            0.0.0.0:*               LISTEN      38383/epmd
tcp        0      0 192.168.122.1:53        0.0.0.0:*               LISTEN      1253/dnsmasq
tcp        0      0 0.0.0.0:22              0.0.0.0:*               LISTEN      1015/sshd
tcp        0      0 127.0.0.1:631           0.0.0.0:*               LISTEN      1012/cupsd
tcp        0      0 127.0.0.1:25            0.0.0.0:*               LISTEN      1182/master
tcp        0      0 0.0.0.0:25672           0.0.0.0:*               LISTEN      38454/beam.smp
tcp6       0      0 :::111                  :::*                    LISTEN      1/systemd
tcp6       0      0 :::4369                 :::*                    LISTEN      38383/epmd
tcp6       0      0 :::22                   :::*                    LISTEN      1015/sshd
tcp6       0      0 ::1:631                 :::*                    LISTEN      1012/cupsd
tcp6       0      0 ::1:25                  :::*                    LISTEN      1182/master
tcp6       0      0 :::5672                 :::*                    LISTEN      38454/beam.smp
开机启动rabbit
[root@localhost ~]# systemctl enable rabbitmq-server
启动rabbitmq
[root@localhost ~]# systemctl restart rabbitmq-server
Job for rabbitmq-server.service failed because the control process exited with error code. See "systemctl status rabbitmq-server.service" and "journalctl -xe" for details.
查看状态
[root@localhost ~]# systemctl status rabbitmq-server
● rabbitmq-server.service - RabbitMQ broker
   Loaded: loaded (/usr/lib/systemd/system/rabbitmq-server.service; enabled; vendor preset: disabled)
   Active: active (running) since Tue 2019-01-15 01:24:21 CST; 1min 19s ago
  Process: 41443 ExecStop=/usr/sbin/rabbitmqctl shutdown (code=exited, status=69)
 Main PID: 41607 (beam.smp)
   Status: "Initialized"
一般这个状态是因为文件".erlang.cookie"用户和用户组权限的问题
将该文件通过chown授权给rabbitmq
启动rabbitmq,查看端口
[root@localhost ~]# netstat -antlp | grep 5672
tcp        0      0 0.0.0.0:15672           0.0.0.0:*               LISTEN      3641/beam.smp
tcp        0      0 0.0.0.0:25672           0.0.0.0:*               LISTEN      3641/beam.smp
tcp        0      0 127.0.0.1:25672         127.0.0.1:56251         TIME_WAIT   -
tcp6       0      0 :::5672                 :::*                    LISTEN      3641/beam.smp
浏览器访问测试
用户名密码都是guest
rabbit搭建完成!
RabbitMQ使用方法
查看当前的连接
[root@localhost ~]# rabbitmqctl list__connectios
列出多有队列及队列的消息数
[root@localhost ~]# rabbitmqctl list__queues
查看当前队列消息
[root@localhost ~]# rabbitmqctl status
Status of node rabbit@localhost ...
[{pid,3641},
...
设置用户权限为超级管理员权限
[root@localhost ~]# rabbitmqctl set_user_tags root administartor
创建虚拟机管理消息队列
[root@localhost ~]# rabbitmqctl add_vhost read
Adding vhost "read" ...
删除虚拟机
[root@localhost ~]# rabbitmqctl delete_vhost read
查看当前虚拟机
[root@localhost ~]# rabbitmqctl list_vhosts
Listing vhosts ...
/  ##默认虚拟机
read
RabbitMQ用户管理、角色和权限管理
创建用户
[root@localhost ~]# rabbitmqctl add_user {user}root {password}123456
删除用户
[root@localhost ~]# rabbitmqctl add_user {username}
修改用户密码
[root@localhost ~]# rabbitmqctl change_password {username} {newpassword}
查看用户列表
[root@localhost ~]# rabbitmqctl list_users
角色权限分配
[root@localhost ~]# rabbitmqctl set_user_tags {username} {tag}
tag用户角色分类:none、management、policymaker、manitoring、administrator
tag常用角色:administrator、monitoring、management
权限描述
none:不能访问management plugin插件
administrator角色权限
拥有 policymaker和monitoring的所有权限,还拥有: 创建和删除 virtual hosts 查看、创建和删除users 查看创建和删除 permissions 关闭其他用户的 connection
monitoring角色权限:
拥有management 的所有权限,还拥有: 列出所有 virtual hosts,包括他们丌能登录的 virtual hosts 查看其他用户的 connections和channels 查看节点级别的数据如clustering和memory使用情冴 查看真正的关于所有 virtual hosts的全局的统计信息
management角色权限:
列出自己可以通过AMQP登入的virtual hosts
policymaker角色权限
拥有management的所有权限,同时拥有查看、创建、删除自己的vhosts所属的policies(策略)和parameters(参数)
-
查看自己的vhosts中的queues,exchange和bindings
查看和关闭自己的channels和connections
查看有关自己的vhosts的全局的统计信息,包含其他用户在这些vhosts中的活动
权限设置
[root@localhost ~]# rabbitmqctl set_permissions [-p vhostpath] {user} {conf} {write} {read}
[root@localhost ~]# rabbitmqctl set_permissions -p / root '.*' '.*' '.*' #设置用户对根目录有配置、读、写权限
conf:一个正则表达式match哪些配置资源能够被该用户访问
write:哪些资源能够被用户写
read:哪些资源能够被用户读
查看(指定vhosts)所有用户的权限信息
[root@localhost ~]# rabbitmqctl list_permissions -p /
Listing permissions for vhost "/" ...
rootguest
清除用户的权限信息
[root@localhost ~]# rabbitmqctl clear_permissions -p / root
Clearing permissions for user "root" in vhost "/" ...
使用python调用rabbitmq测试
安装py
[root@localhost ~]# yum -y install python-pip
安装epel扩展源
[root@localhost ~]# yum -y install epel-release
更新pip
[root@localhost ~]# pip install --upgrade pip
安装pika模块
[root@localhost ~]# pip install pika
创建生产者代码
[root@localhost ~]# cat send.py
#!/bin/env python
import pika
#指定连接的主机参数为localhost
connection=pika.BlockingConnection(pika.ConnectionParameters(host='localhost'))
#连接引导
channel=connection.channel()
#声明rabbitmq的队列BindingKey
channel.queue_declare(queue='hello')
#指定Exchange匹配模式,指定RoutingKey
channel.basic_publish(exchange='',
                      routing_key='hello',
                      body='Hello World!')
print("[x] Sent 'Hello World'")
#关闭连接
connection.close()
创建消费者代码
[root@localhost ~]# cat receive.py
#!/usr/bin/env python
import pika
#指定连接的主机参数为localhost
connection = pika.BlockingConnection(pika.ConnectionParameters(host='localhost'))
#连接引导
channel = connection.channel()
#声明rabbitmq的队列BindingKey
channel.queue_declare(queue='hello')
#指定调用的消息
def callback(ch, method, properties, body):
print(" [x] Received %r" % body)

channel.basic_consume(callback,
              queue='hello',
              no_ack=True)

print(' [*] Waiting for messages. To exit press CTRL+C')
channel.start_consuming()
测试脚本
[root@localhost ~]# python send.py
[x] Sent 'Hello World'
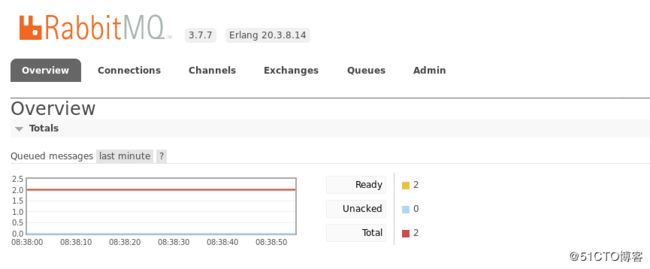
查看浏览器,消息队列产生了两个(脚本执行两次)且已处理完成


