WSL
以往我都是直接安装VirtualBox,然后再下载Linux系统的ISO镜像,装到VirtualBox里运行。
改用Win10系统后,了解到了WSL(Windows Subsystem for Linux),win10系统提供了直接安装Linux的便利,因此不用再通过虚拟机使用Linux系统。
- WSL作为Windows组件搭载在Windows10周年更新(1607)后的Windows系统中。
- WSL作为系统层的一部分,相较于应用层(虚拟机)会消耗更少的资源,并且与系统锲合度更高。
- WSL并不是Linux发行版。它基于Windows LxssManager服务运行,该服务支持本机运行ELF二进制文件。本质上是系统层面对Linux内核的支持,只需要打开一个类似
CMD的Bash命令行窗口,你的WSL就可以使用了(相当于建立了一个Session,因为WSL会一直伴随Win10的运行而运行)。 - WSL虽然不是完整的Linux系统,但你依然可以做到绝大多数在完整Linux系统能做的事(比如
vim,apt-get等)。
本文主要记录安装使用过程中的自己遇到的各种问题。
安装
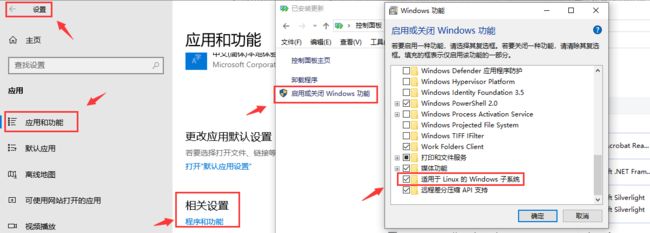
打开"开始"->"设置"->"应用和功能",在"相关设置"里点击"程序和功能",在弹出来的窗口中选择"启用或关闭Windows功能",勾上"适用于Linux的Windows子系统"。
或者以管理员身份打开PowerShell,执行以下命令:
Enable-WindowsOptionalFeature -Online -FeatureName Microsoft-Windows-Subsystem-Linux打开Windows Store,搜索"Linux"或者"Ubuntu",选择一个喜欢的系统下载,这里笔者下载的是Ubuntu。
- 如果安装不成功,可能是因为之前卸载后没有重启有遗留文件导致,重启电脑后再继续安装即可。
输入用户名和密码,完成初始化。
- 注意默认的用户并不是root,因此有些指令会提示"Permission denied."。如果要"run a command as administrator(user 'root')",也就是"以管理员身份运行",需要在你使用的命令前加sudo(super user do)。如直接执行"su"(switch user)的时候会提示"Authentication failure",而执行"sudo su"即可成功切换到root。
- 如果你不想一次次的在命令行前加"sudo",可以用"sudo su"指令来切换到root,输入密码后即可切换到root;如果想切换回普通用户,输入"su "则返回普通账户模式。
如果我们再懒一点不想每次都输入密码切换到root,可以设置默认账户为root。
- 找到"C:\Users\用户名\AppData\Local\Microsoft\WindowsApps\ubuntu.exe",在cmd下执行"ubuntu.exe config --default-user root",即可将默认登录用户切换成root。如果没起效,重启一下lxssmanager服务。
- 同理也可以用同样的方式切换成普通用户,将root改成你的用户名即可。
软件包管理
| Distribution 代表 | 软体管理机制 | 使用指令 | 线上升级机制(指令) |
|---|---|---|---|
| Red Hat/Fedora | RPM | rpm, rpmbuild | YUM (yum) |
| Debian/Ubuntu | DPKG | dpkg | APT (apt-get) |
与NuGet类似,Linux里也提供了各种包管理工具来安装和升级常用软件,Ubuntu里默认使用的是APT,当然你也可以通过使用"apt install yum"来安装yum指令支持,这里我们仅仅先使用dpkg和apt。
- dpkg:是"Debian Packager"的简写。用来安装.deb文件,但不会解决模块的依赖关系,且不会关心Ubuntu的软件仓库内的软件,可以用于安装本地的deb文件。
- apt:会解决和安装模块的依赖问题,并会咨询软件仓库,但不会安装本地的deb文件,apt是建立在dpkg之上的软件管理工具。
- 两者的区别是dpkg绕过apt包管理数据库对软件包进行操作,所以你用dpkg安装过的软件包用apt可以再安装一遍,但系统不知道之前安装过了,将会覆盖之前dpkg的安装。
aptitude与apt-get一样,是 Debian 及其衍生系统中功能极其强大的包管理工具。与 apt-get 不同的是,aptitude 在处理依赖问题上更佳一些。aptitude 在删除一个包时,会同时删除本身所依赖的包。这样,系统中不会残留无用的包,整个系统更为干净。
- 有的问题 apt-get 解决不了,必须使用 aptitude 解决,有的问题,用 aptitude 解决不了,必须使用apt-get.
- aptitude 解决得更好的地方:install, remove, reinstall(apt-get无此功能), show(apt-get无此功能), search(apt-get无此功能), hold(apt-get无此功能), unhold(apt-get无此功能)。
- apt-get 解决得更好的地方:source(aptitude无此功能), build-dep (低版本的aptitude没有build-dep功能)。
综上所述,我们优先使用aptitude|apt-get命令,其次使用apt,只安装.deb包时使用dpkg。
更新下载源
默认的包下载源是国外的网址,我们可以更换为国内的镜像来提高日常常用软件的下载速度。
/etc/apt/sources.list是包管理工具apt所用的记录软件包仓库位置的配置文件,同样的还有位于 /etc/apt/sources.list.d/*.list的各文件。
sources.list文件中的条目一般都有如下所示的形式:
deb http://site.example.com/debian distribution main restricted universe multiverse
deb-src http://site.example.com/debian distribution main restricted universe multiverse
第一部分标识了档案类型:
- deb:档案类型为二进制预编译软件包,一般我们所用的档案类型。
- deb-src:档案类型为用于编译二进制软件包的源代码。
第二部分则是软件包所在仓库网络地址。
- 常用镜像地址列表可以点此查看:Debian和Ubuntu。
跟在仓库地址后的其他部分是发行版(Distribution)。可以用命令lsb_release -sc来查看当前系统的代号。发行版有两种分类方法:
- 一类是发行版的具体代号,如
xenial,trusty,precise等。Ubuntu各个版本分别对应18.04为bionic,17.10为artful,16.04为xenial,14.04为trusty。 - 还有一类则是发行版的发行类型,如
oldstable,stable,testing和unstable。 - 另外,在发行版后还可能有进一步的指定,如
xenial-updates,trusty-security,stable-backports等。
最后部分则是main,restricted,universe和multiverse,这些文件夹里面包含了不同软件包索引。这几个文件夹内包的区别在于:
- main: 完全的自由软件。
- restricted: 不完全的自由软件。
- universe: Ubuntu官方不提供支持与补丁,全靠社区支持。
- multiverse:非自由软件,完全不提供支持和补丁。
下载源主要有教育网和非教育网的区别。教育网用户可以更换的下载源有清华大学镜像点,浙江大学镜像点,中国科学技术大学镜像点,北京理工大学镜像点等等;非教育网用户可以更换的下载源,主要是网易和阿里云,当然非教育网用户也可以设置成教育网的镜像点。
下面以Ubuntu16.04为例子,可以在百度上找到一堆镜像点,如下所示:
- 清华大学镜像点:
deb https://mirrors.tuna.tsinghua.edu.cn/ubuntu/ xenial main restricted universe multiverse
deb-src https://mirrors.tuna.tsinghua.edu.cn/ubuntu/ xenial main restricted universe multiverse
deb https://mirrors.tuna.tsinghua.edu.cn/ubuntu/ xenial-updates main restricted universe multiverse
deb-src https://mirrors.tuna.tsinghua.edu.cn/ubuntu/ xenial-updates main restricted universe multiverse
deb https://mirrors.tuna.tsinghua.edu.cn/ubuntu/ xenial-backports main restricted universe multiverse
deb-src https://mirrors.tuna.tsinghua.edu.cn/ubuntu/ xenial-backports main restricted universe multiverse
deb https://mirrors.tuna.tsinghua.edu.cn/ubuntu/ xenial-security main restricted universe multiverse
deb-src https://mirrors.tuna.tsinghua.edu.cn/ubuntu/ xenial-security main restricted universe multiverse
deb https://mirrors.tuna.tsinghua.edu.cn/ubuntu/ xenial-proposed main restricted universe multiverse
deb-src https://mirrors.tuna.tsinghua.edu.cn/ubuntu/ xenial-proposed main restricted universe multiverse- 网易163镜像点:
deb http://mirrors.163.com/ubuntu/ xenial main restricted universe multiverse
deb http://mirrors.163.com/ubuntu/ xenial-security main restricted universe multiverse
deb http://mirrors.163.com/ubuntu/ xenial-updates main restricted universe multiverse
deb http://mirrors.163.com/ubuntu/ xenial-proposed main restricted universe multiverse
deb http://mirrors.163.com/ubuntu/ xenial-backports main restricted universe multiverse
deb-src http://mirrors.163.com/ubuntu/ xenial main restricted universe multiverse
deb-src http://mirrors.163.com/ubuntu/ xenial-security main restricted universe multiverse
deb-src http://mirrors.163.com/ubuntu/ xenial-updates main restricted universe multiverse
deb-src http://mirrors.163.com/ubuntu/ xenial-proposed main restricted universe multiverse
deb-src http://mirrors.163.com/ubuntu/ xenial-backports main restricted universe multiverse- 阿里云镜像点:
deb http://mirrors.aliyun.com/ubuntu/ xenial main restricted universe multiverse
deb http://mirrors.aliyun.com/ubuntu/ xenial-security main restricted universe multiverse
deb http://mirrors.aliyun.com/ubuntu/ xenial-updates main restricted universe multiverse
deb http://mirrors.aliyun.com/ubuntu/ xenial-proposed main restricted universe multiverse
deb http://mirrors.aliyun.com/ubuntu/ xenial-backports main restricted universe multiverse
deb-src http://mirrors.aliyun.com/ubuntu/ xenial main restricted universe multiverse
deb-src http://mirrors.aliyun.com/ubuntu/ xenial-security main restricted universe multiverse
deb-src http://mirrors.aliyun.com/ubuntu/ xenial-updates main restricted universe multiverse
deb-src http://mirrors.aliyun.com/ubuntu/ xenial-proposed main restricted universe multiverse
deb-src http://mirrors.aliyun.com/ubuntu/ xenial-backports main restricted universe multiverse
执行"cat /etc/issue",获取我们安装的Ubuntu版本号:
root@[windows user name]:/etc/apt# cat /etc/issue
Ubuntu 18.04.2 LTS \n \l
可以看出笔者现在安装的Ubuntu已经是18.04版本了,百度一下Ubuntu18.04版本镜像源,譬如我们选择阿里云镜像:
deb http://mirrors.aliyun.com/ubuntu/ bionic main restricted universe multiverse
deb-src http://mirrors.aliyun.com/ubuntu/ bionic main restricted universe multiverse
deb http://mirrors.aliyun.com/ubuntu/ bionic-security main restricted universe multiverse
deb-src http://mirrors.aliyun.com/ubuntu/ bionic-security main restricted universe multiverse
deb http://mirrors.aliyun.com/ubuntu/ bionic-updates main restricted universe multiverse
deb-src http://mirrors.aliyun.com/ubuntu/ bionic-updates main restricted universe multiverse
deb http://mirrors.aliyun.com/ubuntu/ bionic-backports main restricted universe multiverse
deb-src http://mirrors.aliyun.com/ubuntu/ bionic-backports main restricted universe multiverse
deb http://mirrors.aliyun.com/ubuntu/ bionic-proposed main restricted universe multiverse
deb-src http://mirrors.aliyun.com/ubuntu/ bionic-proposed main restricted universe multiverse
先执行"cp sources.list sources.list.bak"备份一下源文件,然后输入"vim sources.list",在命令模式下输入"dG"可以删除文件里的所有内容,然后手动将上面的阿里云镜像源所有内容拷贝进命令窗口,在命令模式下输入":wq"即可保存sources.list退出了。之后可以再次通过vim命令或者cat命令查看sources.list文件内容是否更新成功。
我们测试一下软件更新,执行以下语句,看看是否可以顺利从aliyun上获取到资源:
sudo apt-get update  #从源地址上获取最新的软件列表
sudo apt-get upgrade  #比对本地已经安装的软件,如果有更新则更新软件
事实上Windows将Linux系统安装在如下的目录中,我们执行的各种命令行操作可以清晰的在这个目录中看到文件的变化:
C:\Users\[%UserName%]\AppData\Local\Packages\{Linux发行版包名}\LocalState\rootfs所以你也可以在"C:\Users[%UserName%]\AppData\Local\Packages\{Linux发行版包名}\LocalState\rootfs\etc\apt"里直接操作sources.list文件,就跟操作txt文档一样。注意在如果我们在windows直接操作的文件在bash里看的时候权限很可能会变成'----------',也就是任何用户都没有任何读写权限,需要通过"chmod 777 sources.list"之类的命令手动更改文件的访问权限,具体如何修改文件权限可以参照chmod --help命令的说明。
Linux子系统在"/mnt"目录下我们可以看到Windows下的所有目录和文件夹。
图像化界面
WSL的初衷是为了在Windows系统中运行Linux工具链,所以WSL没有“原生”搭载桌面环境,但这不影响我们自己安装一个Linux桌面环境。WSL想用GUI一般有两种方式,一种是用远程连接工具,一种是X server监听。
端口冲突
WSL和Win10共享同一套端口,如果出现两者监听同一个端口的情况,Windows主系统的程序拥有更高的优先级。也就是说,如果我们在WSL运行需要监听端口的程序,必须确认该端口没有被Windows主系统内的任何程序占用。如果出现冲突,请参阅软件相关文档修改默认配置。
例如,在WSL中安装SSH Server时,端口冲突将会导致WSL不能按照预期通过SSH连接登陆,但只需修改默认WSL的SSH监听端口,问题便迎刃而解。
众所周知,SSH的默认连接端口是
22,但是微软在Win10中内置了SSH Server For Windows并占用了默认的22端口,因此如果要在WSL中开启SSH Server,我们必须修改WSL中的默认SSH监听端口。
后台运行任务
参考资料
- 优雅使用WSL子系统
- 详解sources.list文件
