iOS 底层探索系列
一、动态方法解析流程分析
我们在上一章《消息查找》分析到了动态方法解析,为了更好的掌握具体的流程,我们接下来直接进行源码追踪。
我们先来到 _class_resolveMethod 方法,该方法源码如下:
void _class_resolveMethod(Class cls, SEL sel, id inst)
{
    if (! cls->isMetaClass()) {
        // try [cls resolveInstanceMethod:sel]

        _class_resolveInstanceMethod(cls, sel, inst);
    }
    else {
        // try [nonMetaClass resolveClassMethod:sel]
        // and [cls resolveInstanceMethod:sel]
        _class_resolveClassMethod(cls, sel, inst);
        if (!lookUpImpOrNil(cls, sel, inst,
                            NO/*initialize*/, YES/*cache*/, NO/*resolver*/))
        {
            _class_resolveInstanceMethod(cls, sel, inst);
        }
    }
}
大概的流程如下:
- 判断进行解析的是否是元类
- 如果不是元类,则调用
_class_resolveInstanceMethod进行对象方法动态解析 - 如果是元类,则调用
_class_resolveClassMethod进行类方法动态解析 - 完成类方法动态解析后,再次查询
cls中的imp,如果没有找到,则进行一次对象方法动态解析
1.1 对象方法动态解析
我们先分析对象方法的动态解析,我们直接来到 _class_resolveInstanceMethod 方法处:
static void _class_resolveInstanceMethod(Class cls, SEL sel, id inst)
{
    if (! lookUpImpOrNil(cls->ISA(), SEL_resolveInstanceMethod, cls,
                         NO/*initialize*/, YES/*cache*/, NO/*resolver*/))
    {
        // Resolver not implemented.
        return;
    }

    BOOL (*msg)(Class, SEL, SEL) = (typeof(msg))objc_msgSend;
    bool resolved = msg(cls, SEL_resolveInstanceMethod, sel);

    // Cache the result (good or bad) so the resolver doesn't fire next time.
    // +resolveInstanceMethod adds to self a.k.a. cls
    IMP imp = lookUpImpOrNil(cls, sel, inst,
                             NO/*initialize*/, YES/*cache*/, NO/*resolver*/);

    if (resolved  &&  PrintResolving) {
        if (imp) {
            _objc_inform("RESOLVE: method %c[%s %s] "
                         "dynamically resolved to %p",
                         cls->isMetaClass() ? '+' : '-',
                         cls->nameForLogging(), sel_getName(sel), imp);
        }
        else {
            // Method resolver didn't add anything?
            _objc_inform("RESOLVE: +[%s resolveInstanceMethod:%s] returned YES"
                         ", but no new implementation of %c[%s %s] was found",
                         cls->nameForLogging(), sel_getName(sel),
                         cls->isMetaClass() ? '+' : '-',
                         cls->nameForLogging(), sel_getName(sel));
        }
    }
}
大致的流程如下:
- 检查是否实现了
+(BOOL)resolveInstanceMethod:(SEL)sel类方法,如果没有实现则直接返回(通过cls->ISA()是拿到元类,因为类方法是存储在元类上的对象方法) - 如果当前实现了
+(BOOL)resolveInstanceMethod:(SEL)sel类方法,则通过objc_msgSend手动调用该类方法 - 完成调用后,再次查询
cls中的imp - 如果
imp找到了,则输出动态解析对象方法成功的日志 - 如果
imp没有找到,则输出虽然实现了+(BOOL)resolveInstanceMethod:(SEL)sel,并且返回了YES,但并没有查找到imp的日志
1.2 类方法动态解析
接着我们分析类方法动态解析,我们直接来到 _class_resolveClassMethod 方法处:
static void _class_resolveClassMethod(Class cls, SEL sel, id inst)
{
    assert(cls->isMetaClass());

    if (! lookUpImpOrNil(cls, SEL_resolveClassMethod, inst,
                         NO/*initialize*/, YES/*cache*/, NO/*resolver*/))
    {
        // Resolver not implemented.
        return;
    }

    BOOL (*msg)(Class, SEL, SEL) = (typeof(msg))objc_msgSend;
    bool resolved = msg(_class_getNonMetaClass(cls, inst),
                        SEL_resolveClassMethod, sel);

    // Cache the result (good or bad) so the resolver doesn't fire next time.
    // +resolveClassMethod adds to self->ISA() a.k.a. cls
    IMP imp = lookUpImpOrNil(cls, sel, inst,
                             NO/*initialize*/, YES/*cache*/, NO/*resolver*/);

    if (resolved  &&  PrintResolving) {
        if (imp) {
            _objc_inform("RESOLVE: method %c[%s %s] "
                         "dynamically resolved to %p",
                         cls->isMetaClass() ? '+' : '-',
                         cls->nameForLogging(), sel_getName(sel), imp);
        }
        else {
            // Method resolver didn't add anything?
            _objc_inform("RESOLVE: +[%s resolveClassMethod:%s] returned YES"
                         ", but no new implementation of %c[%s %s] was found",
                         cls->nameForLogging(), sel_getName(sel),
                         cls->isMetaClass() ? '+' : '-',
                         cls->nameForLogging(), sel_getName(sel));
        }
    }
}
大致的流程如下:
- 断言是否是元类,如果不是,直接退出
- 检查是否实现了
+(BOOL)resolveClassMethod:(SEL)sel类方法,如果没有实现则直接返回(通过cls-是因为当前cls就是元类,因为类方法是存储在元类上的对象方法) - 如果当前实现了
+(BOOL)resolveClassMethod:(SEL)sel类方法,则通过objc_msgSend手动调用该类方法,注意这里和动态解析对象方法不同,这里需要通过元类和对象来找到类,也就是_class_getNonMetaClass - 完成调用后,再次查询
cls中的imp - 如果
imp找到了,则输出动态解析对象方法成功的日志 - 如果
imp没有找到,则输出虽然实现了+(BOOL)resolveClassMethod:(SEL)sel,并且返回了YES,但并没有查找到imp的日志
这里有一个注意点,如果我们把上面例子中的objc_getMetaClass("LGPerson")换成self试试,会导致+(BOOL)resolveInstanceMethod:(SEL)sel方法被调用,其实问题是发生在class_getMethodImplementation方法处,其内部会调用到_class_resolveMethod方法,而我们的cls传的是self,所以又会走一次+(BOOL)resolveInstanceMethod:(SEL)sel

1.3 特殊的 NSObject 对象方法动态解析
我们再聚焦到 _class_resolveMethod 方法上,如果 cls 是元类,也就是说进行的是类方法动态解析的话,有以下源码:
_class_resolveClassMethod(cls, sel, inst); // 已经处理
        if (!lookUpImpOrNil(cls, sel, inst,
                            NO/*initialize*/, YES/*cache*/, NO/*resolver*/))
        {
            // 对象方法 决议
            _class_resolveInstanceMethod(cls, sel, inst);
        }
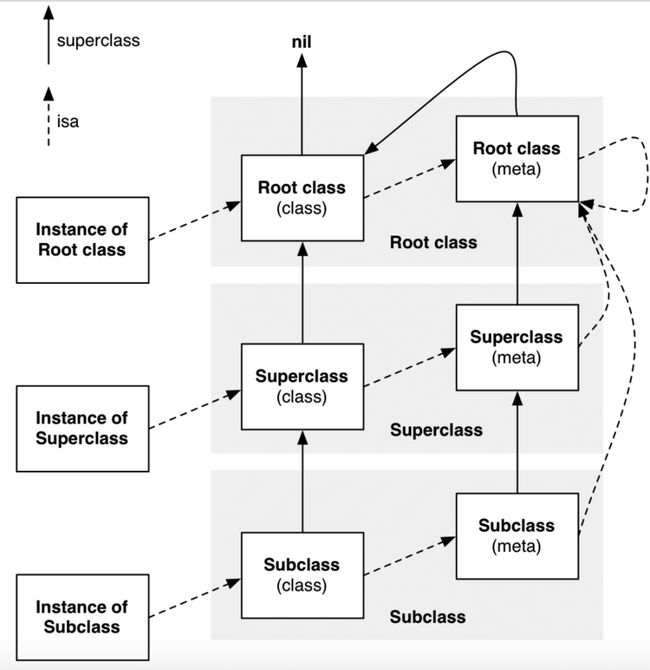
对于 _class_resolveClassMethod 的执行,肯定是没有问题的,只是为什么在判断如果动态解析失败之后,还要再进行一次对象方法解析呢,这个时候就需要上一张经典的 isa 走位图了:
由这个流程图我们可以知道,元类最终继承于根元类,而根元类又继承于 NSObject,那么也就是说在根元类中存储的类方法等价于在 NSObject 中存储的对象方法。而系统在执行 lookUpImpOrNil 时,会递归查找元类的父类的方法列表。但是由于元类和根元类都是系统自动生成的,我们是无法直接编写它们,而对于 NSObject,我们可以借助分类(Category)来实现统一的类方法动态解析,不过前提是类本身是没有实现 resolveClassMethod 方法:
这也就解释了为什么 _class_resolveClassMethod 为什么会多一步对象方法解析的流程了。
二、消息转发快速流程
如果我们没有进行动态方法解析,消息查找流程接下来会来到的是什么呢?
// No implementation found, and method resolver didn't help.
    // Use forwarding.

    imp = (IMP)_objc_msgForward_impcache;
    cache_fill(cls, sel, imp, inst);
根据 lookUpImpOrForward 源码我们可以看到当动态解析没有成功后,会直接返回一个 _objc_msgForward_impcache。我们尝试搜索一下它,定位到 objc-msg-arm64.s 汇编源码处:
STATIC_ENTRY __objc_msgForward_impcache

    // No stret specialization.
    b    __objc_msgForward

    END_ENTRY __objc_msgForward_impcache


    ENTRY __objc_msgForward

    adrp    x17, __objc_forward_handler@PAGE
    ldr    p17, [x17, __objc_forward_handler@PAGEOFF]
    TailCallFunctionPointer x17

    END_ENTRY __objc_msgForward
可以看到在 __objc_msgForward_impcache 内部会跳转到 __objc_msgForward,而 __objc_msgForward 内部我们并拿不到有用的信息。这个时候是不是线索就断了呢?我们会议一下前面的流程,如果找到了 imp,会进行缓存的填充以及日志的打印,我们不妨找到打印的日志文件看看里面会不会有我们需要的内容。
static void
log_and_fill_cache(Class cls, IMP imp, SEL sel, id receiver, Class implementer)
{
#if SUPPORT_MESSAGE_LOGGING
    if (objcMsgLogEnabled) {
        bool cacheIt = logMessageSend(implementer->isMetaClass(),
                                      cls->nameForLogging(),
                                      implementer->nameForLogging(),
                                      sel);
        if (!cacheIt) return;
    }
#endif
    cache_fill (cls, sel, imp, receiver);
}

bool logMessageSend(bool isClassMethod,
                    const char *objectsClass,
                    const char *implementingClass,
                    SEL selector)
{
    char    buf[ 1024 ];

    // Create/open the log file
    if (objcMsgLogFD == (-1))
    {
        snprintf (buf, sizeof(buf), "/tmp/msgSends-%d", (int) getpid ());
        objcMsgLogFD = secure_open (buf, O_WRONLY | O_CREAT, geteuid());
        if (objcMsgLogFD < 0) {
            // no log file - disable logging
            objcMsgLogEnabled = false;
            objcMsgLogFD = -1;
            return true;
        }
    }

    // Make the log entry
    snprintf(buf, sizeof(buf), "%c %s %s %s\n",
            isClassMethod ? '+' : '-',
            objectsClass,
            implementingClass,
            sel_getName(selector));

    objcMsgLogLock.lock();
    write (objcMsgLogFD, buf, strlen(buf));
    objcMsgLogLock.unlock();

    // Tell caller to not cache the method
    return false;
}
这里我们很清楚的能看到日志文件的存储位置已经命名方式:
![]()
这里还有一个注意点:
只有当 objcMsgLogEnabled 这个值为 true 的时候才会进行日志的输出,我们直接搜索这个值出现过的地方:
很明显,通过调用 instrumentObjcMessageSends 可以来实现打印的开与关。我们可以简单测试一下:
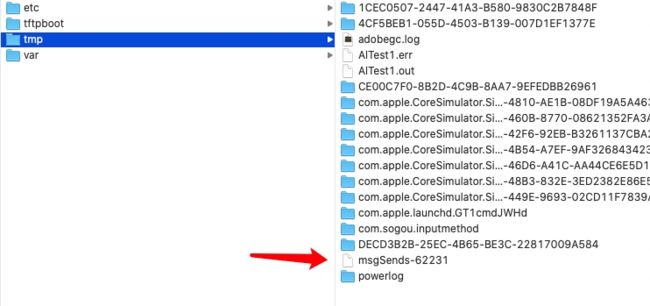
我们运行一下,然后来到 /private/tmp 目录下:
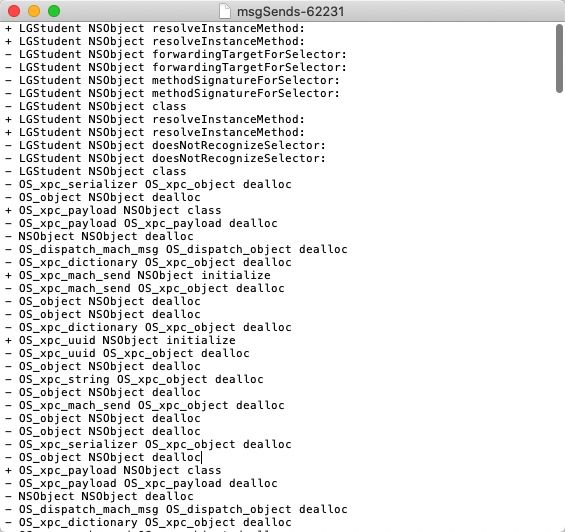
我们打开这个文件:
我们看到了熟悉的 resolveInstanceMethod,但是在这之后有 2 个之前我们没探索过的方法: forwardingTargetForSelector 和 methodSignatureForSelector。然后会有 doesNotRecognizeSelector 方法的打印,此时 Xcode 控制台打印如下:
我们可以看到 ___forwarding___ 发生在 CoreFoundation 框架里面。我们还是老规矩,以官方文档为准,查询一下 forwardingTargetForSelector 和 methodSignatureForSelector。
先是 forwardingTargetForSelector:
forwardingTargetForSelector 的官方定义是返回未找到 IMP 的消息首先定向到的对象,说人话就是在这个方法可以实现狸猫换太子,不是找不到 IMP 吗,我把这个消息交给其他的对象来处理不就完事了吗?我们直接用代码说话:
- (id)forwardingTargetForSelector:(SEL)aSelector{
    NSLog(@"%s -- %@",__func__,NSStringFromSelector(aSelector));
    if (aSelector == @selector(saySomething)) {
        return [LGTeacher alloc];
    }
    return [super forwardingTargetForSelector:aSelector];
}
这里我们直接返回 [LGTeacher alloc],我们运行试试看:
完美~,我们对 LGStudent 实例对象发送 saySomething 消息,结果最后是由 LGTeacher 响应了这个消息。关于 forwardingTargetForSelector ,苹果还给出了几点提示:
If an object implements (or inherits) this method, and returns a non-nil (and non-self) result, that returned object is used as the new receiver object and the message dispatch resumes to that new object. (Obviously if you return self from this method, the code would just fall into an infinite loop.)
译: 如果一个对象实现或继承了该方法,然后返回一个非空(非self)的结果,那么这个返回值会被当做新的消息接受者对象,消息会被转发到该对象身上。(如果你在这个方法里返回self,那么显然就会发生一个 死循环)。
If you implement this method in a non-root class, if your class has nothing to return for the given selector then you should return the result of invoking super’s implementation.
译: 如果你在一个非基类中实现了该方法,并且这个类没有任何可以返回的内容,那么你需要返回父类的实现。也就是return [super forwardingTargetForSelector:aSelector];。
This method gives an object a chance to redirect an unknown message sent to it before the much more expensive forwardInvocation: machinery takes over. This is useful when you simply want to redirect messages to another object and can be an order of magnitude faster than regular forwarding. It is not useful where the goal of the forwarding is to capture the NSInvocation, or manipulate the arguments or return value during the forwarding.
译: 这个方法使对象有机会在更昂贵的forwardInvocation:机械接管之前重定向发送给它的未知消息。当你只想将消息重定向到另一个对象,并且比常规转发快一个数量级时,这个方法就很有用。在转发的目标是捕获NSInvocation或在转发过程中操纵参数或返回值的情况下,此功能就无用了。
通过上面的官方文档定义,我们可以理清下思路:
-
forwardingTargetForSelector是一种快速的消息转发流程,它直接让其他对象来响应未知的消息。 -
forwardingTargetForSelector不能返回self,否则会陷入死循环,因为返回self又回去当前实例对象身上走一遍消息查找流程,显然又会来到forwardingTargetForSelector。 -
forwardingTargetForSelector适用于消息转发给其他能响应未知消息的对象,什么意思呢,就是最终返回的内容必须和要查找的消息的参数和返回值一致,如果想要不一致,就需要走其他的流程。
三、消息转发慢速流程
上面说到如果想要最终返回的内容必须和要查找的消息的参数和返回值不一致,需要走其他流程,那么到底是什么流程呢,我们接着看一下刚才另外一个方法 methodSignatureForSelector 的官方文档:
官方的定义是 methodSignatureForSelector 返回一个 NSMethodSignature 方法签名对象,这个该对象包含由给定选择器标识的方法的描述。
This method is used in the implementation of protocols. This method is also used in situations where an NSInvocation object must be created, such as during message forwarding. If your object maintains a delegate or is capable of handling messages that it does not directly implement, you should override this method to return an appropriate method signature.
译: 这个方法用于协议的实现。同时在消息转发的时候,在必须创建NSInvocation对象的情况下,也会用到这个方法。如果您的对象维护一个委托或能够处理它不直接实现的消息,则应重写此方法以返回适当的方法签名。
我们在文档的最后可以看到有一个叫 forwardInvocation: 的方法
我们来到该方法的文档处:
To respond to methods that your object does not itself recognize, you must override methodSignatureForSelector: in addition to forwardInvocation:. The mechanism for forwarding messages uses information obtained from methodSignatureForSelector: to create the NSInvocation object to be forwarded. Your overriding method must provide an appropriate method signature for the given selector, either by pre formulating one or by asking another object for one.
译:要响应对象本身无法识别的方法,除了forwardInvocation:外,还必须重写methodSignatureForSelector:。 转发消息的机制使用从methodSignatureForSelector:获得的信息来创建要转发的NSInvocation对象。 你的重写方法必须为给定的选择器提供适当的方法签名,方法是预先制定一个公式,也可以要求另一个对象提供一个方法签名。
显然,methodSignatureForSelector 和 forwardInvocation 不是孤立存在的,需要一起出现。我们直接上代码说话:
- (NSMethodSignature *)methodSignatureForSelector:(SEL)aSelector{
    NSLog(@"%s -- %@",__func__,NSStringFromSelector(aSelector));
    if (aSelector == @selector(saySomething)) { // v @ :
        return [NSMethodSignature signatureWithObjCTypes:"v@:"];
    }
    return [super methodSignatureForSelector:aSelector];
}


- (void)forwardInvocation:(NSInvocation *)anInvocation{
    NSLog(@"%s ",__func__);

   SEL aSelector = [anInvocation selector];

   if ([[LGTeacher alloc] respondsToSelector:aSelector])
       [anInvocation invokeWithTarget:[LGTeacher alloc]];
   else
       [super forwardInvocation:anInvocation];
}
然后查看打印结果:
可以看到,先是来到了 methodSignatureForSelector,然后来到了 forwardInvocation,最后 saySomething 消息被查找到了。
关于 forwardInvocation,还有几个注意点:
-
forwardInvocation方法有两个任务:- 查找可以响应
inInvocation中编码的消息的对象。对于所有消息,此对象不必相同。 - 使用
anInvocation将消息发送到该对象。anInvocation将保存结果,运行时系统将提取结果并将其传递给原始发送者。
- 查找可以响应
-
forwardInvocation方法的实现不仅仅可以转发消息。forwardInvocation还可以,例如,可以用于合并响应各种不同消息的代码,从而避免了必须为每个选择器编写单独方法的麻烦。forwardInvocation方法在对给定消息的响应中还可能涉及其他几个对象,而不是仅将其转发给一个对象。 -
NSObject的forwardInvocation实现:只会调用dosNotRecognizeSelector:方法,它不会转发任何消息。因此,如果选择不实现forwardInvocation`,将无法识别的消息发送给对象将引发异常。
至此,消息转发的慢速流程我们就探索完了。
四、消息转发流程图
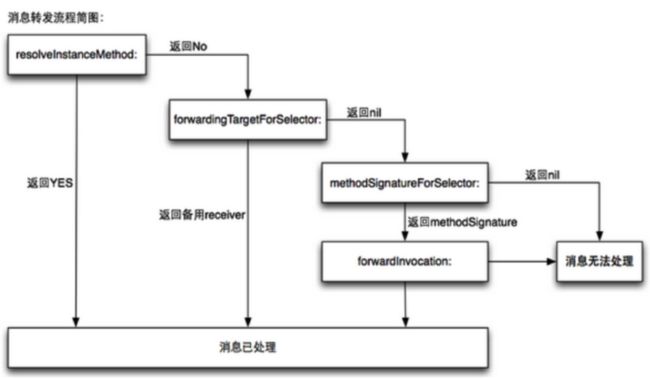
我们从动态消息解析到快速转发流程再到慢速转发流程可以总结出如下的流程图:
五、总结
我们从 objc_msgSend 开始,探索了消息发送之后是怎么样的一个流程,这对于我们理解 iOS 底层有很大的帮助。当然,限于笔者的水平,探索的过程可能会有一定的瑕疵。我们简单总结一下:
-
动态方法解析分为对象方法动态解析和类方法动态解析
- 对象方法动态解析需要消息发送者实现
+(BOOL)resolveInstanceMethod:(SEL)sel方法 - 类方法动态解析需要消息发送者实现
+(BOOL)resolveClassMethod:(SEL)sel方法
- 对象方法动态解析需要消息发送者实现
- 动态方法解析失败会进入消息转发流程
- 消息转发分为两个流程:快速转发和慢速转发
- 快速转发的实现是
forwardingTargetForSelector,让其他能响应要查找消息的对象来干活 - 慢速转发的实现是
methodSignatureForSelector和forwardInvocation的结合,提供了更细粒度的控制,先返回方法签名给Runtime,然后让anInvocation来把消息发送给提供的对象,最后由Runtime提取结果然后传递给原始的消息发送者。
iOS 底层探索已经来到了第七篇,我们接下来将会从 app 加载开始探索,探究 冷启动 和 热启动,以及 dyld 是如何工作的。


