
前言
在CTF比赛中, 有时我们需要对可执行文件进行patch,或者在植入后门时,patch也是常用的手段。不过手工patch比较麻烦,下面介绍几个工具。
博客地址:https://jinyu00.github.io/
ELF
Patchkit
地址:
https://github.com/lunixbochs/patchkit.git
1. 由于链接器的原因暂时还不能使用 libc 中的函数,所以所有要做的事情都需要我们自己实现。用 c 或者 asm
pt.patch(addr,jmp=jmp_addr) 用于修改程序流程。
pt.hook(addr, target) 用于劫持程序流程,进行参数过滤。
使用方式:./patch binary_file patch.py
过滤printf中 %n 的脚本。
def replace_free(pt):
printf_addr = 0x400548;// call printf 时的地址
new_printf = pt.inject(c=r'''
void fix_printf(char *fmt) {
for (int i = 0; fmt[i]; ++i)
{
if (fmt[i] == '%' && fmt[i+1] == 'n') {
//找到后,通过前移的方式删除字符,每次删掉一个。
int len=0;
int j;
while(fmt[len++]){
}
for(j=i;j
fmt[j] = fmt[j+1];
fmt[len-1] = '\x00';
len=0;
while(fmt[len++]){
}
for(j=i;j
fmt[j] = fmt[j+1];
fmt[len-1] = '\x00';
//i--;
}
}
}
''')
pt.hook(printf_addr, new_printf);
64位程序,修改 malloc函数的参数为 0x20
def replace(pt):
malloc_addr = 0x040057A; //call malloc的位置
new_malloc = pt.inject(asm=r'''
mov rdi,0x20
ret
''')
pt.hook(malloc_addr, new_malloc);
32位,由于与栈进行操作,要注意保存还原返回地址
def replace(pt):
malloc_addr = 0x08048454;
new_malloc = pt.inject(asm=r'''
pop eax
pop ebx
push 0x20
push eax
ret
''')
pt.hook(malloc_addr,new_malloc);
或者
def replace(pt):
malloc_addr = 0x08048454;
new_malloc = pt.inject(asm=r'''
mov eax,0x20
mov [esp+4], eax
ret
''')
pt.hook(malloc_addr,new_malloc);
LIEF
程序地址:https://github.com/lief-project/LIEF
使用这个工具可以很方便的 patch elf, pe,MachO 文件。本文以elf 为例。
通过交换导入导出符号
首先看第一个测试程序:
#include
#include
int main(int argc, char** argv) {
puts("/bin/sh");
return EXIT_SUCCESS;
}
我们的目标是让他调用 puts 变成调用 system
方案一
修改 libc 中的相关符号,然后使用 LD_LIBRARY_PATH 加载我们修改后的库。
import lief
hashme = lief.parse("hashme")
libc = lief.parse("/lib/x86_64-linux-gnu/libc-2.23.so")
# get puts, system symbol
puts_sym = filter(lambda e: e.name == "puts", libc.dynamic_symbols)[0]
system_sym = filter(lambda e: e.name == "system", libc.dynamic_symbols)[0]
# swap them
puts_sym.name = "system"
system_sym.name = "puts"
libc.write("libc.so.6")
print("done")
首先拿到 puts 和 system 符号对象,然后交换他们的名称。

成功
方案二
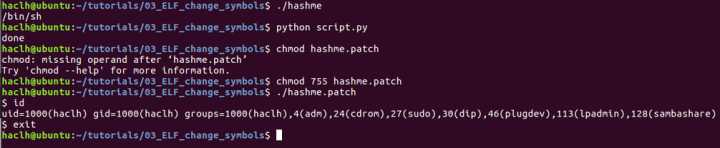
直接修改目标文件的导入符号,代码如下
import lief
hashme = lief.parse("hashme")
# get puts, system symbol
puts_sym = filter(lambda e: e.name == "puts", hashme.imported_symbols)[0]
# set puts to system
puts_sym.name = "system"
hashme.write("hashme.patch")
print("done")
直接增加代码进行patch
修改库函数
测试程序:
#include
#include
#include
int main(int argc, char **argv) {
if (argc != 2) {
printf("Usage: %s \n", argv[0]);
exit(-1);
}
int a = atoi(argv[1]);
printf("exp(%d) = %f\n", a, exp(a));
return 0;
}
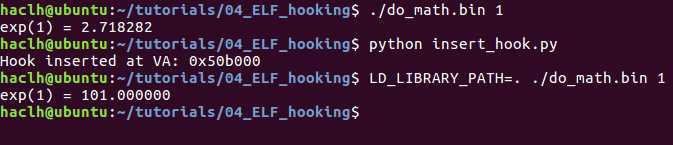
目标是hook exp 函数,直接增加一个 segments , 然后劫持函数指针到这里。首先编译一个 lib 用来提供用于 hook 的代码。
gcc -Os -nostdlib -nodefaultlibs -fPIC -Wl,-shared hook.c -o hook
hook.c 的内容:
double hook(double x) {
return x + 100;
}
然后看脚本内容,很清晰。
import lief
libm = lief.parse("/lib/x86_64-linux-gnu/libm-2.23.so")
hook = lief.parse("hook")
segment_added = libm.add(hook.segments[0])
print("Hook inserted at VA: 0x{:06x}".format(segment_added.virtual_address))
exp_symbol = libm.get_symbol("exp")
hook_symbol = hook.get_symbol("hook")
exp_symbol.value = segment_added.virtual_address + hook_symbol.value
libm.write("libm.so.6")
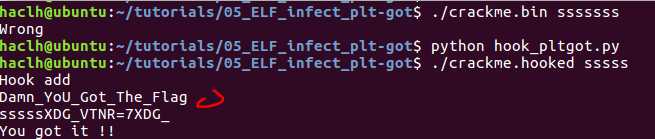
通过 got/plt 表 直接劫持程序
测试程序
#include
#include
#include
// Damn_YoU_Got_The_Flag
char password[] = "\x18\x3d\x31\x32\x03\x05\x33\x09\x03\x1b\x33\x28\x03\x08\x34\x39\x03\x1a\x30\x3d\x3b";
inline int check(char* input);
int check(char* input) {
for (int i = 0; i < sizeof(password) - 1; ++i) {
password[i] ^= 0x5c;
}
return memcmp(password, input, sizeof(password) - 1);
}
int main(int argc, char **argv) {
if (check(argv[1]) == 0) {
puts("You got it !!");
return EXIT_SUCCESS;
}
puts("Wrong");
return EXIT_FAILURE;
}
hook.c 内容,hook memcpy, 打印内容。
#include "arch/x86_64/syscall.c"
#define stdout 1
//gcc -nostdlib -nodefaultlibs -fPIC -Wl,-shared hook.c -o hook
int my_memcmp(const void* lhs, const void* rhs, int n) {
const char msg[] = "Hook add\n";
_write(stdout, msg, sizeof(msg));
_write(stdout, (const char*)lhs, n);
_write(stdout, "\n", 2);
_write(stdout, (const char*)rhs, n);
_write(stdout, "\n", 2);
return 0;
}
hook 脚本
import lief
crackme = lief.parse("crackme.bin")
hook = lief.parse("hook")
segment_added = crackme.add(hook.segments[0])
my_memcmp = hook.get_symbol("my_memcmp")
my_memcmp_addr = segment_added.virtual_address + my_memcmp.value
crackme.patch_pltgot('memcmp', my_memcmp_addr)
crackme.write("crackme.hooked")
参考:
https://lief.quarkslab.com/doc/tutorials/
https://github.com/lunixbochs/patchkit
本文由看雪论坛 暗香沉浮 原创 转载请注明来自看雪社区