目的
- 探索iOS Crash分类及捕获流程
- 了解Crash文件结构及段含义
- 了解Mach-o文件结构
- 分析Crash堆栈地址与符号表还原流程
Crash分类
Crash的主要原因是你的应用收到了未处理的信号。未处理信号可能来源于三个地方:kernel、其他进程、以及App本身。因此,crash异常也分为三种:
-
Mach异常:底层内核级异常。用户态的开发者可以直接通过Mach API设置thread,task,host的异常端口,来捕获Mach异常。 -
Unix信号:又称BSD信号。它是UNIX层的异常信号标准,通过方法threadsignal()将信号投递到出错线程。可以通过方法signal(x, SignalHandler)来捕获single。 -
NSException:应用级异常。它是未被捕获的Objective-C异常,导致程序向自身发送了SIGABRT信号而崩溃,对于未捕获的Objective-C异常,是可以通过try catch来捕获的,或者通过NSSetUncaughtExceptionHandler()机制来捕获。
三者关系
Mach异常、Unix信号、NSException异常是什么?它们之间有什么相互关系?
Darwin是Mac OS和iOS的操作系统,而XNU是Darwin操作系统的内核部分。XNU是混合内核,兼具宏内核和微内核的特性,而Mach即为其微内核。
Mac可执行下述命令查看
Darwin版本号。
~$ system_profiler SPSoftwareDataType
Software:

    System Software Overview:

      System Version: macOS 10.15 (19A583)
      Kernel Version: Darwin 19.0.0
      Boot Volume: Macintosh HD
      Boot Mode: Normal
      Computer Name: 58的MacBook Pro (2)
      User Name: lltree (lltree)
      Secure Virtual Memory: Enabled
      System Integrity Protection: Enabled
      Time since boot: 5 days 23:48
关系:
- 1 Mach异常是内核态的异常,属于底层异常。
- 2 转换Unix信号是为了兼容更为流行的POSIX标准(SUS规范),这样不必了解Mach内核也可以通过Unix信号的方式来兼容开发。
- 3 因为硬件产生的信号(通过CPU陷阱)被Mach层捕获,然后才转换为对应的Unix信号;苹果为了统一机制,于是操作系统和用户产生的信号(通过调用kill和pthread_kill)也首先沉下来被转换为Mach异常,再转换为Unix信号。
Carsh传递流程:
硬件产生信号或者kill或pthread_kill信号 --> Mach异常 --> Unix信号(SIGABRT)
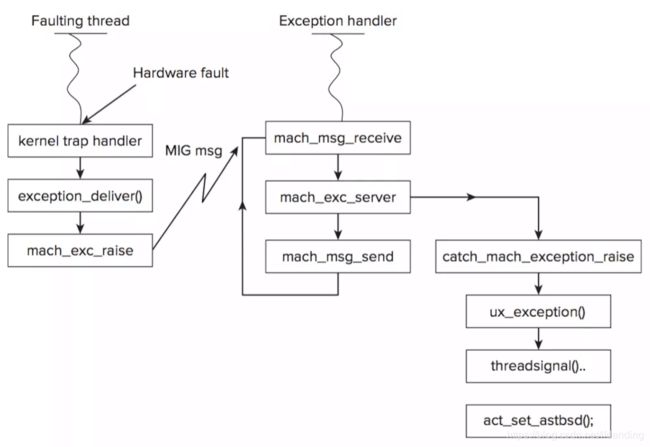
Mach异常捕获
- 1、硬件处理器陷阱产生的信号被
Mach层捕获 - 2、Mach异常处理程序
exception_triage()通过调用exception_deliver()首先尝试将异常抛给thread端口、然后尝试抛给task端口,最后再抛给host端口(默认端口),exception_deliver通过调用mach_exception_raise,触发异常; - 3、异常在内核中以消息机制进行处理,通过
task_set_exception_posrts()设置自定义的接收Mach异常消息的端口,相当于插入了一个exception处理程序。
实现:mach异常以消息机制处理而不是通过函数调用,exception messages可以被转发到先前注册的Mach exception处理程序。这意味着你可以插入一个exception处理程序,而不干扰现有的无论是调试器或Apple's crash reporter。
知道以上这些,那我们来尝试扑捉一下Mach异常。系统让用户很少关心底层实现细节,因此Mach提供少量API
// 内核中创建一个消息队列,获取对应的port
mach_port_allocate();
// 授予task对port的指定权限
mach_port_insert_right();
//将端口设置为接受异常的端口
task_set_exception_ports()
代码示例:异常捕获
static bool installExceptionHandler()
{
    KSLOG_DEBUG("Installing mach exception handler.");

    bool attributes_created = false;
    pthread_attr_t attr;

    kern_return_t kr;
    int error;

    //使用mach_task_self获取当前任务进程
    const task_t thisTask = mach_task_self();

    //Mach层异常类型
    exception_mask_t mask = EXC_MASK_BAD_ACCESS |
    EXC_MASK_BAD_INSTRUCTION |
    EXC_MASK_ARITHMETIC |
    EXC_MASK_SOFTWARE |
    EXC_MASK_BREAKPOINT;

    KSLOG_DEBUG("Backing up original exception ports.");
    //备份异常端口
    kr = task_get_exception_ports(thisTask,
                                  mask,
                                  g_previousExceptionPorts.masks,
                                  &g_previousExceptionPorts.count,
                                  g_previousExceptionPorts.ports,
                                  g_previousExceptionPorts.behaviors,
                                  g_previousExceptionPorts.flavors);
    if(kr != KERN_SUCCESS)
    {
        KSLOG_ERROR("task_get_exception_ports: %s", mach_error_string(kr));
        goto failed;
    }

    if(g_exceptionPort == MACH_PORT_NULL)
    {
        KSLOG_DEBUG("Allocating new port with receive rights.");
        /*
         创建一个具有接受权限的异常端口
         因为Mach异常其实是一个消息转发的异常,
         所以需要消息接收权限,在初始化异常端口的时候就赋予RECEIVE
         */
        kr = mach_port_allocate(thisTask,
                                MACH_PORT_RIGHT_RECEIVE,
                                &g_exceptionPort);
        if(kr != KERN_SUCCESS)
        {
            KSLOG_ERROR("mach_port_allocate: %s", mach_error_string(kr));
            goto failed;
        }

        KSLOG_DEBUG("Adding send rights to port.");
        //给端口添加发送权限
        kr = mach_port_insert_right(thisTask,
                                    g_exceptionPort,
                                    g_exceptionPort,
                                    MACH_MSG_TYPE_MAKE_SEND);
        if(kr != KERN_SUCCESS)
        {
            KSLOG_ERROR("mach_port_insert_right: %s", mach_error_string(kr));
            goto failed;
        }
    }

    KSLOG_DEBUG("Installing port as exception handler.");
    //将端口设置为接受异常的端口
    kr = task_set_exception_ports(thisTask,
                                  mask,
                                  g_exceptionPort,
                                  (int)(EXCEPTION_DEFAULT | MACH_EXCEPTION_CODES),
                                  THREAD_STATE_NONE);
    if(kr != KERN_SUCCESS)
    {
        KSLOG_ERROR("task_set_exception_ports: %s", mach_error_string(kr));
        goto failed;
    }


    pthread_attr_init(&attr);
    attributes_created = true;
    pthread_attr_setdetachstate(&attr, PTHREAD_CREATE_DETACHED);

    //创建辅助异常线程
    KSLOG_DEBUG("Creating secondary exception thread (suspended).");
    error = pthread_create(&g_secondaryPThread,
                           &attr,
                           &handleExceptions,
                           kThreadSecondary);
    if(error != 0)
    {
        KSLOG_ERROR("pthread_create_suspended_np: %s", strerror(error));
        goto failed;
    }
    g_secondaryMachThread = pthread_mach_thread_np(g_secondaryPThread);
    ksmc_addReservedThread(g_secondaryMachThread);

    //创建主要异常线程
    KSLOG_DEBUG("Creating primary exception thread.");
    error = pthread_create(&g_primaryPThread,
                           &attr,
                           &handleExceptions,
                           kThreadPrimary);
    if(error != 0)
    {
        KSLOG_ERROR("pthread_create: %s", strerror(error));
        goto failed;
    }
    pthread_attr_destroy(&attr);
    g_primaryMachThread = pthread_mach_thread_np(g_primaryPThread);
    ksmc_addReservedThread(g_primaryMachThread);

    KSLOG_DEBUG("Mach exception handler installed.");
    return true;


    //失败则退出
failed:
    KSLOG_DEBUG("Failed to install mach exception handler.");
    if(attributes_created)
    {
        pthread_attr_destroy(&attr);
    }
    uninstallExceptionHandler();
    return false;
}
代码示例:异常处理
static void* handleExceptions(void* const userData)
{
    MachExceptionMessage exceptionMessage = {{0}};
    MachReplyMessage replyMessage = {{0}};
    char* eventID = g_primaryEventID;

    const char* threadName = (const char*) userData;
    pthread_setname_np(threadName);
    if(threadName == kThreadSecondary)
    {
        KSLOG_DEBUG("This is the secondary thread. Suspending.");
        thread_suspend((thread_t)ksthread_self());
        eventID = g_secondaryEventID;
    }

    for(;;)
    {
        KSLOG_DEBUG("Waiting for mach exception");

        // Wait for a message.
         //等待mach exception,否则会阻塞
        kern_return_t kr = mach_msg(&exceptionMessage.header,
                                    MACH_RCV_MSG,
                                    0,
                                    sizeof(exceptionMessage),
                                    g_exceptionPort,
                                    MACH_MSG_TIMEOUT_NONE,
                                    MACH_PORT_NULL);

        //捕获到mach exception,跳出循环
        if(kr == KERN_SUCCESS)
        {
            break;
        }

        // Loop and try again on failure.
        KSLOG_ERROR("mach_msg: %s", mach_error_string(kr));
    }

    KSLOG_DEBUG("Trapped mach exception code 0x%llx, subcode 0x%llx",
                exceptionMessage.code[0], exceptionMessage.code[1]);
    if(g_isEnabled)
    {
        thread_act_array_t threads = NULL;
        mach_msg_type_number_t numThreads = 0;
        ksmc_suspendEnvironment(&threads, &numThreads);
        g_isHandlingCrash = true;
        kscm_notifyFatalExceptionCaptured(true);

        KSLOG_DEBUG("Exception handler is installed. Continuing exception handling.");


        // Switch to the secondary thread if necessary, or uninstall the handler
        // to avoid a death loop.
        if(ksthread_self() == g_primaryMachThread)
        {
            KSLOG_DEBUG("This is the primary exception thread. Activating secondary thread.");
// TODO: This was put here to avoid a freeze. Does secondary thread ever fire?
            restoreExceptionPorts();
            if(thread_resume(g_secondaryMachThread) != KERN_SUCCESS)
            {
                KSLOG_DEBUG("Could not activate secondary thread. Restoring original exception ports.");
            }
        }
        else
        {
            KSLOG_DEBUG("This is the secondary exception thread.");// Restoring original exception ports.");
//            restoreExceptionPorts();
        }

        // Fill out crash information
        KSLOG_DEBUG("Fetching machine state.");
        KSMC_NEW_CONTEXT(machineContext);
        KSCrash_MonitorContext* crashContext = &g_monitorContext;
        crashContext->offendingMachineContext = machineContext;
        kssc_initCursor(&g_stackCursor, NULL, NULL);
        if(ksmc_getContextForThread(exceptionMessage.thread.name, machineContext, true))
        {
            kssc_initWithMachineContext(&g_stackCursor, 100, machineContext);
            KSLOG_TRACE("Fault address %p, instruction address %p",
                        kscpu_faultAddress(machineContext), kscpu_instructionAddress(machineContext));
            if(exceptionMessage.exception == EXC_BAD_ACCESS)
            {
                crashContext->faultAddress = kscpu_faultAddress(machineContext);
            }
            else
            {
                crashContext->faultAddress = kscpu_instructionAddress(machineContext);
            }
        }

        KSLOG_DEBUG("Filling out context.");
        crashContext->crashType = KSCrashMonitorTypeMachException;
        crashContext->eventID = eventID;
        crashContext->registersAreValid = true;
        crashContext->mach.type = exceptionMessage.exception;
        crashContext->mach.code = exceptionMessage.code[0] & (int64_t)MACH_ERROR_CODE_MASK;
        crashContext->mach.subcode = exceptionMessage.code[1] & (int64_t)MACH_ERROR_CODE_MASK;
        if(crashContext->mach.code == KERN_PROTECTION_FAILURE && crashContext->isStackOverflow)
        {
            // A stack overflow should return KERN_INVALID_ADDRESS, but
            // when a stack blasts through the guard pages at the top of the stack,
            // it generates KERN_PROTECTION_FAILURE. Correct for this.
            crashContext->mach.code = KERN_INVALID_ADDRESS;
        }
        crashContext->signal.signum = signalForMachException(crashContext->mach.type, crashContext->mach.code);
        crashContext->stackCursor = &g_stackCursor;

        kscm_handleException(crashContext);

        KSLOG_DEBUG("Crash handling complete. Restoring original handlers.");
        g_isHandlingCrash = false;
        ksmc_resumeEnvironment(threads, numThreads);
    }

    KSLOG_DEBUG("Replying to mach exception message.");
    // Send a reply saying "I didn't handle this exception".
    replyMessage.header = exceptionMessage.header;
    replyMessage.NDR = exceptionMessage.NDR;
    replyMessage.returnCode = KERN_FAILURE;

    mach_msg(&replyMessage.header,
             MACH_SEND_MSG,
             sizeof(replyMessage),
             0,
             MACH_PORT_NULL,
             MACH_MSG_TIMEOUT_NONE,
             MACH_PORT_NULL);

    return NULL;
}
Signal异常捕获
Signal是Unix标准下的处理机制,让开发者不必关系底层内核相关。为了维护一个统一的机制,操作系统和用户尝试的信号首先被转换为Mach异常,然后再转换为信号(Signals)。
Mach 异常在Mach层被捕获并抛出后,会在BSD层被catch_mach_exception_raise处理,并通过ux_exception()将异常转换为对应的UNIX信号,并通过threadsignal()将信号投递到出错线程,iOS中的 POSIX API 就是通过 Mach 之上的 BSD 层实现的
代码示例:注册过程
void InstallSignalHandler(void){

    signal(SIGHUP, SignalExceptionHandler);
    signal(SIGINT, SignalExceptionHandler);
    signal(SIGQUIT, SignalExceptionHandler);
    signal(SIGABRT, SignalExceptionHandler);
    signal(SIGILL, SignalExceptionHandler);
    signal(SIGSEGV, SignalExceptionHandler);
    signal(SIGFPE, SignalExceptionHandler);
    signal(SIGBUS, SignalExceptionHandler);
    signal(SIGPIPE, SignalExceptionHandler);
}
代码示例:捕获处理
void SignalExceptionHandler(int signal){

    NSMutableString *mstr = [[NSMutableString alloc] init];
    [mstr appendString:@"Stack:\n"];
    void* callstack[128];
    int i, frames = backtrace(callstack, 128);
    char** strs = backtrace_symbols(callstack, frames);
    for (i = 0; i
NSException异常捕获
NSException异常属于OC层异常。该异常在OC层如果有对应的NSException(OC异常),就转换成OC异常,OC异常可以在OC层得到处理;如果OC异常一直得不到处理,程序会强行发送SIGABRT信号中断程序。在OC层如果没有对应的NSException,就只能让Unix标准的signal机制来处理了。
代码示例:注册过程
NSSetUncaughtExceptionHandler(&handleUncaughtException);
代码示例:捕获处理
void HandleException(NSException *exception){

    // 异常的堆栈信息
    NSArray *stackArray = [exception callStackSymbols];
    // 出现异常的原因
    NSString *reason = [exception reason];
    // 异常名称
    NSString *name = [exception name];
    NSString *exceptionInfo = [NSString stringWithFormat:@"Exception     reason:%@\nException name:%@\nException stack:%@",name, reason, stackArray];
    NSLog(@"%@", exceptionInfo);
    [UncaughtExceptionHandler saveCreash:exceptionInfo];
}
Crash崩溃堆栈符号化
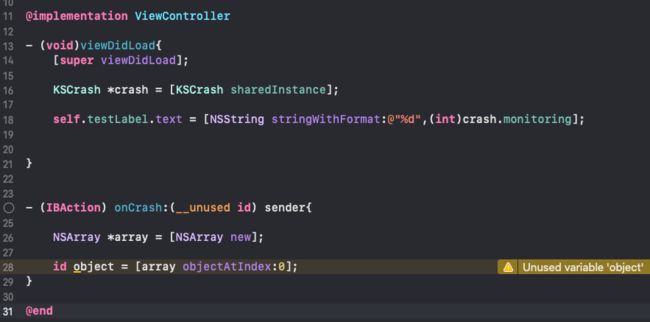
为探究崩溃堆栈符号化过程,我们提供一个简单的Demo,点击屏幕上按钮执行onCrash方法,主动触发崩溃。
而我们收集iOS的崩溃信息时,获取到的崩溃堆栈一般是如下的形式,全是十六进制的内存地址形式:
Last Exception Backtrace:
(0x1a8f9580c 0x1a8cbdfa4 0x1a8e9502c 0x102b298b4 0x1acfffab0
0x1aca378ac 0x1aca37c10 0x1aca36c2c 0x1ad039288 0x1ad03a5c8
0x1ad016b78 0x1ad08eef8 0x1ad091454 0x1ad08a2c8 0x1a8f137c4
0x1a8f1371c 0x1a8f12eb4 0x1a8f0e000 0x1a8f0d8a0 0x1b2e65328
0x1acffe740 0x102b2a3e4 0x1a8d98360)

Thread 0 name:  Dispatch queue: com.apple.main-thread
Thread 0 Crashed:
0   libsystem_kernel.dylib          0x00000001a8d8dec4 0x1a8d69000 + 151236
1   libsystem_pthread.dylib         0x00000001a8ca9774 0x1a8ca7000 + 10100
2   libsystem_c.dylib               0x00000001a8bfd844 0x1a8b8a000 + 473156
3   libc++abi.dylib                 0x00000001a8d567d4 0x1a8d55000 + 6100
4   libc++abi.dylib                 0x00000001a8d569c4 0x1a8d55000 + 6596
5   libobjc.A.dylib                 0x00000001a8cbe258 0x1a8cb8000 + 25176
6   Simple-Example                  0x0000000102b3e7cc 0x102b24000 + 108492
7   libc++abi.dylib                 0x00000001a8d63304 0x1a8d55000 + 58116
8   libc++abi.dylib                 0x00000001a8d62ed8 0x1a8d55000 + 57048
9   libobjc.A.dylib                 0x00000001a8cbe158 0x1a8cb8000 + 24920
10  CoreFoundation                  0x00000001a8f0d910 0x1a8e6a000 + 669968
11  GraphicsServices                0x00000001b2e65328 0x1b2e62000 + 13096
12  UIKitCore                       0x00000001acffe740 0x1ac5fd000 + 10491712
13  Simple-Example                  0x0000000102b2a3e4 0x102b24000 + 25572
14  libdyld.dylib                   0x00000001a8d98360 0x1a8d97000 + 4960
这样的格式我们很难看出实际含义,无法定位问题代码,只有将它们转化为可读的形式才有意义:
Bugly异常上报解析结果
Last Exception Backtrace:
0   CoreFoundation                  0x1a8f9580c __exceptionPreprocess + 220
1   libobjc.A.dylib                 0x1a8cbdfa4 objc_exception_throw + 55
2   CoreFoundation                  0x1a8e9502c -[__NSArray0 objectAtIndex:] + 107
3   Simple-Example                  0x102c318b4 -[ViewController onCrash:] + 22708 (ViewController.m:28)
4   UIKitCore                       0x1acfffab0 -[UIApplication sendAction:to:from:forEvent:] + 95
5   UIKitCore                       0x1aca378ac -[UIControl sendAction:to:forEvent:] + 239
6   UIKitCore                       0x1aca37c10 -[UIControl _sendActionsForEvents:withEvent:] + 407
7   UIKitCore                       0x1aca36c2c -[UIControl touchesEnded:withEvent:] + 519
8   UIKitCore                       0x1ad039288 -[UIWindow _sendTouchesForEvent:] + 2323
9   UIKitCore                       0x1ad03a5c8 -[UIWindow sendEvent:] + 3351
10  UIKitCore                       0x1ad016b78 -[UIApplication sendEvent:] + 335
11  UIKitCore                       0x1ad08eef8 __dispatchPreprocessedEventFromEventQueue + 5879
12  UIKitCore                       0x1ad091454 __handleEventQueueInternal + 4923
13  UIKitCore                       0x1ad08a2c8 __handleHIDEventFetcherDrain + 107
14  CoreFoundation                  0x1a8f137c4 __CFRUNLOOP_IS_CALLING_OUT_TO_A_SOURCE0_PERFORM_FUNCTION__ + 23
15  CoreFoundation                  0x1a8f1371c __CFRunLoopDoSource0 + 79
16  CoreFoundation                  0x1a8f12eb4 __CFRunLoopDoSources0 + 179
17  CoreFoundation                  0x1a8f0e000 __CFRunLoopRun + 1079
18  CoreFoundation                  0x1a8f0d8a0 CFRunLoopRunSpecific + 463
19  GraphicsServices                0x1b2e65328 GSEventRunModal + 103
20  UIKitCore                       0x1acffe740 UIApplicationMain + 1935
21  Simple-Example                  0x102c323e4 main + 25572 (main.m:16)
22  libdyld.dylib                   0x1a8d98360 start + 3
或者Xcode中的打印窗口输出结果
如上所示,我们一眼就能看明白,这次崩溃发生在
ViewController.m文件的
28行,对应的方法是
onCrash:,调用
[__NSArray0 objectAtIndex:]引起的崩溃。那么这样的符号化又是如何实现的呢?
认识符号表
符号表是内存地址与函数名、文件名、行号的映射表。符号表元素如下所示:
<起始地址> <结束地址> <函数> [<文件名>:<行号>],
有了符号表能快速并准确地定位用户APP发生Crash的代码位置,
我们可以使用符号表对APP发生Crash的程序堆栈进行解析和还原
什么是dSYM文件?
iOS平台中,dSYM文件是指具有调试信息的目标文件,文件名通常为: com.公司名.dSYM。如下图所示:
为直观呈现符号表,使用Bugly中的提取符号表命令从dSYM中提取符号表,类似如下结构:
5848    5880    -[ViewController onCrash:]  ViewController.m:24
5880    58a0    -[ViewController onCrash:]  ViewController.m:26
58a0    58a4    -[ViewController onCrash:]  ViewController.m:26
58a4    58a8    -[ViewController onCrash:]  ViewController.m:28
58a8    58b4    -[ViewController onCrash:]  ViewController.m:28
58b4    58c0    -[ViewController onCrash:]  ViewController.m:28
58c0    58f0    -[ViewController onCrash:]  ViewController.m:29
符号化的依据来自dSYM文件, dSYM文件也是Mach-o格式,我们按照Mach-o格式一步一步解析即可。
Mach-O文件类型分类:
- Executable:应用可执行的二进制文件,如.m/.h文件经过编译后会生成对应的Mach-O文件
- Dylib Library:动态链接库
- Static Library:静态链接库
- Bundle:不能被链接 Dylib,只能在运行使用dlopen()加载
- Relocatable Object File:可重定向文件类型
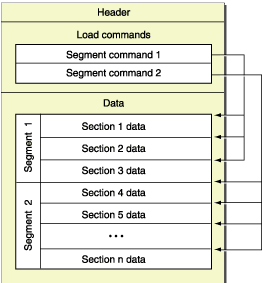
从图上我们可以大概的看出Mach-O可以分为3个部分
- Header
- Segment
- section
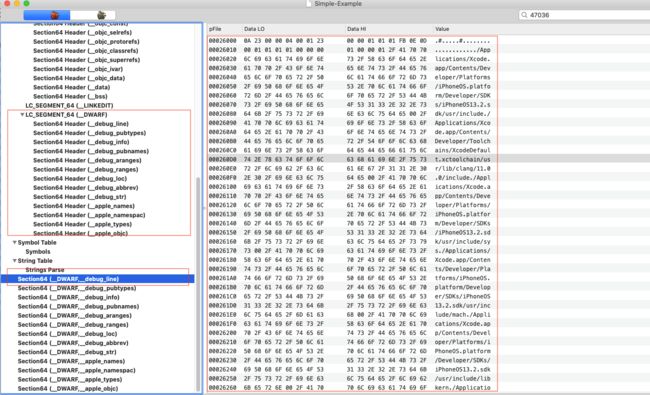
如图所示,header后面是segment,然后再跟着section,而一个segment是可以包含多个section的。为更加直观的呈现dSYM内容,我们把dSYM文件放入可视化工具:
其中的LC_SEGMENT_64(_DEARF)及Section64 Header(_debug_line)则是我们目标分析对象。
Crash日志格式:
iOS的crash报告日志可以分为:
- 头部(Header)
- 异常信息(Exception Information)
- 诊断信息(Additional Diagnostic Information)
- 线程堆栈(Backtraces)
- 线程状态(Thread State)
- 库信息(Binary Images)
这个六个部分。实例如下:
符号化解析流程
我们从刚才不管是上报到存储到手机端的Crash文件或者Xcode崩溃打印的信息中,在回溯堆栈中都离不开调用堆栈地址。如下所示:
Last Exception Backtrace:
(0x1a8f9580c 0x1a8cbdfa4 0x1a8e9502c 0x102b298b4 0x1acfffab0
0x1aca378ac 0x1aca37c10 0x1aca36c2c 0x1ad039288 0x1ad03a5c8
0x1ad016b78 0x1ad08eef8 0x1ad091454 0x1ad08a2c8 0x1a8f137c4
0x1a8f1371c 0x1a8f12eb4 0x1a8f0e000 0x1a8f0d8a0 0x1b2e65328
0x1acffe740 0x102b2a3e4 0x1a8d98360)
我们如何把实际运行中的调用堆栈地址通过dSYM文件关联起来,解析出来崩溃信息呢?例如
0x102b298b4
与解析完的
3 Simple-Example 0x102c318b4 -[ViewController onCrash:] + 22708 (ViewController.m:28)
如何形成对应关系?
苹果为了杜绝黑客攻击App,因此在App启动的时候,引入
ASLR地址空间布局随机化
ASLR:Address space layout randomization,将可执行程序随机装载到内存中,这里的随机只是偏移,而不是打乱,具体做法就是通过内核将 Mach-O的平移某个随机系数。slide 正是ASLR引入的偏移
每次使用随机偏移地址加载App程序,这样针对该行代码ViewController.m:28每次App运行的时候实际运行地址(例如:0x102b298b4)都是不一样的。
在Crash崩溃信息中,存在每个库信息,示例如下:
Binary Images:
0x102b24000 - 0x102baffff Simple-Example arm64  <86bf04850a8a344d8a426ed6859383e3> /var/containers/Bundle/Application/3D7D3552-E687-4007-B166-055B28C53F4C/Simple-Example.app/Simple-Example
0x102d14000 - 0x102d1ffff libobjc-trampolines.dylib arm64   /usr/lib/libobjc-trampolines.dylib
0x102dcc000 - 0x102e2ffff dyld arm64  <330227f4c8da3dcebfea057e7770ae9a> /usr/lib/dyld
库信息都存在,程序内存占用地址空间例如Simple-Example本次随机偏移后的地址为0x102b24000 - 0x102baffff。因此我们可以根据dSYM文件中程序加载地址计算出偏移slide。
偏移slide = 0x102b24000 - 0x100000000 = 0x2b24000
根据实际崩溃地址减去偏移slide则可计算除符号表中地址0x1000058b4
0x102c318b4 - 0x2b24000 = 0x1000058b4
可以通过以下命令查询崩溃信息
~ lltree$ dwarfdump --arch arm64 --lookup 0x1000058b4 Simple-Example.app.dSYM
查询结果如下
Simple-Example.app.dSYM/Contents/Resources/DWARF/Simple-Example:    file format Mach-O arm64
0x00046f0d: Compile Unit: length = 0x00000783 version = 0x0002 abbr_offset = 0x0000 addr_size = 0x08 (next unit at 0x00047694)

0x00046f18: DW_TAG_compile_unit
              DW_AT_producer    ("Apple clang version 11.0.0 (clang-1100.0.33.12)")
              DW_AT_language    (DW_LANG_ObjC)
              DW_AT_name    ("/Users/XXX/Desktop/iOS\346\272\220\344\273\243\347\240\201\347\240\224\347\251\266/KSCrash-master-2/iOS/Simple-Example/ViewController.m")
              DW_AT_stmt_list   (0x0000a5bc)
              DW_AT_comp_dir    ("/Users/XXX/Desktop/iOS\346\272\220\344\273\243\347\240\201\347\240\224\347\251\266/KSCrash-master-2/iOS")
              DW_AT_GNU_pubnames    (0x01)
              DW_AT_APPLE_major_runtime_vers    (0x02)
              DW_AT_low_pc  (0x0000000100005710)
              DW_AT_high_pc (0x00000001000059b0)

0x00047081:   DW_TAG_subprogram
                DW_AT_low_pc    (0x0000000100005848)
                DW_AT_high_pc   (0x00000001000058f0)
                DW_AT_frame_base    (DW_OP_reg29 W29)
                DW_AT_object_pointer    (0x000470a0)
                DW_AT_name  ("-[ViewController onCrash:]")
                DW_AT_decl_file ("/Users/XXX/Desktop/iOS XXX/iOS/Simple-Example/ViewController.m")
                DW_AT_decl_line (24)
                DW_AT_prototyped    (0x01)
Line info: file 'ViewController.m', line 28, column 8, start line 24
该信息如何在dSYM文件中体现呢?
DWARF 中的调试信息被放在一个叫作 .debug_info 的段中,该段与 DWARF 中其它的段类似,可以看成是一个表格状的结构,表中每一条记录叫作一个 DIE(debugging information entry), 一个 DIE 由一个 tag 及 很多 attribute 组成,其中 tag 用于表示当前的 DIE 的类型,类型指明当前 DIE 用于描述什么东西,如函数,变量,类型等,而 attribute 则是一对对的 key/value 用于描述其它一些信息,在 linux 下我们可以用如下命令来查看 ELF 中的调试信息:
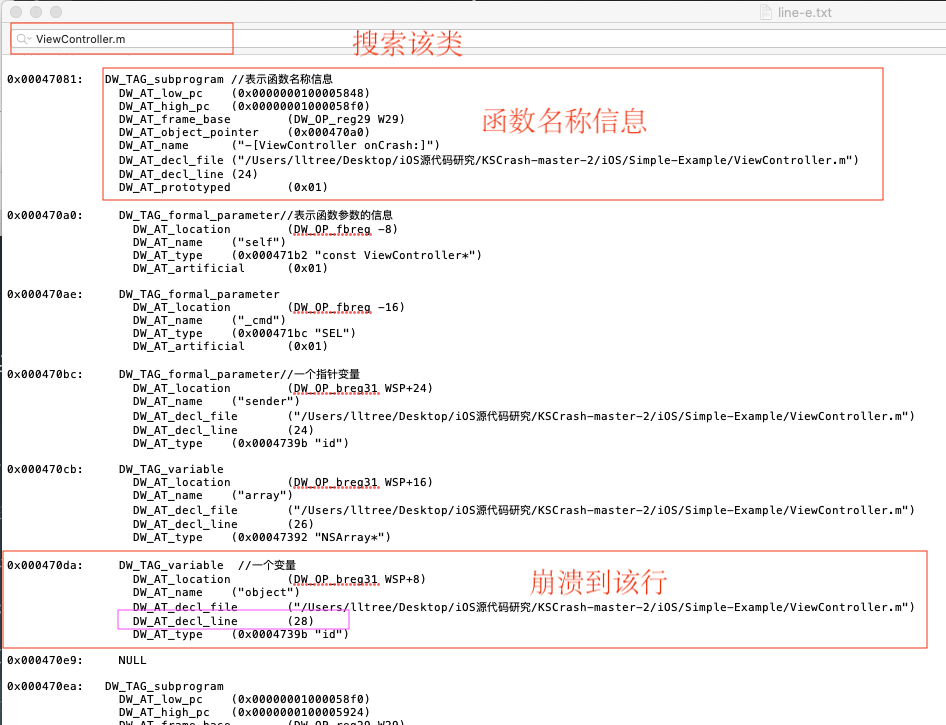
为此我们使用如下命令,提取出
dwarfdump -p -debug-info /Users/XXX/Desktop/crash分析/Simple-Example.app.dSYM/Contents/Resources/DWARF/Simple-Example >line-e.txt
line-e.txt结果如下:
该文件中,该DIE段信息中与共计7段信息,与从dSYM中使用Bugly提取符号表命令提取符号表段信息相符
5848    5880    -[ViewController onCrash:]  ViewController.m:24
5880    58a0    -[ViewController onCrash:]  ViewController.m:26
58a0    58a4    -[ViewController onCrash:]  ViewController.m:26
58a4    58a8    -[ViewController onCrash:]  ViewController.m:28
58a8    58b4    -[ViewController onCrash:]  ViewController.m:28
58b4    58c0    -[ViewController onCrash:]  ViewController.m:28
58c0    58f0    -[ViewController onCrash:]  ViewController.m:29
目前遗留问题:
每段信息58b4与虚拟内存起始地址0x0000000100005848之间关系,如何计算出来,暂时未知?
至此:结束


