1.这样写的初衷 参考easy-tree
这样写的是为了不重新引入一个css样式包看过treeview的包,而且还要去看文档,浪费了不少时间,于是就自己开始造轮子了
2.html 在敲得过程注意ul中li的嵌套关系,在li中使用伪类:before,:after线,要用相对定位。感觉表达不清,上图
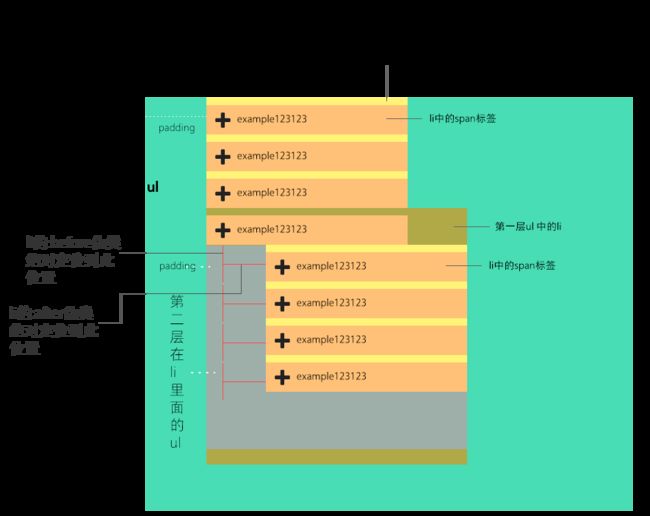
未去掉背景色
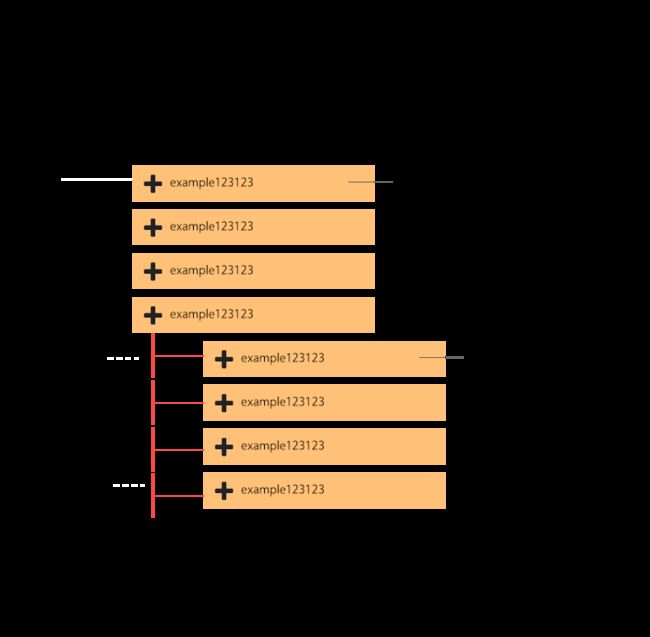
去掉背景色
2、css样式控制使用的编辑器less
        .nav-sidebar{
          &:first-child{
            padding-left:20px;
          }
          margin: 0;
          padding-left:45px;
          li{
            box-sizing:border-box;
            cursor: pointer;
            padding:10px 0 0 0;
            //margin-left:15px;
            position:relative;
            width: 100%;
            min-height:50px;
            line-height: 40px;
            .content-warp{
              box-sizing:border-box;
              display: inline-block;
              border-radius:5px;
              height: 40px;
              background-color: #ff7709;
              padding:0 10px;
            }
            &:before{
              position: absolute;
              content: '';
              left: -30px;
              top: 0;
              width: 1px;
              height:100%;
              border-left: 1px solid #999;
            }
            &:after {
              position: absolute;
              content: '';
              width:30px;
              height: 1px;
              left:-29px;
              top: 30px;
              border-top: 1px solid #999;
            }
            &:last-child{
              &:before{
                height: 31px;
              }
            }
          }
          .tree-parent{
            padding-left: 0;
            &:before{
              border: 0;
            }
            &:after{
              border:0;
            }
          }

        }
3、js只需要一行简单的代码就够了
      $('.content-warp').click(function (){
          $(this).siblings('ul.nav-sidebar').slideToggle(300)
      })
小结
代码没有做兼容性,代码少,基于jq 代码复杂过去就可以用,这也是当初自己写的原因,不想引入别人的包,还要去看半天的源码,虽然时间成本上是一样的,但还是喜欢自己写,喜欢的朋友可以尝试自己写一下
4.需求改了,然后就这样
我们与产品狗的斗争就是这样的,需求又改了 为了不然自己写的东西浪费掉,所以就照着继续写完。先上最总效果图
最终效果图
5. 还是基本的先上html
5. 然后css 变化不多,但是有变化
ps:后面的勾选状态是用图片模拟的,根本就没有input,老大说带有input更符合规范,你可以自己选择喜欢的图片
        .sidebar{
          padding:20px 0!important;
        }
        .close{
          display: none;
        }
        .nav-sidebar{
          &:first-child{
            padding-left:20px;
          }
          trasnsition:all ease 0.5s;
          margin: 0;
          padding-left:45px;
          li{
            box-sizing:border-box;
            padding:10px 20px 0 0;
            //margin-left:15px;
            position:relative;
            width: 100%;
            min-height:50px;
            line-height: 40px;
            label{
              cursor: pointer;
              float: right;
              padding: 0;
              margin: 0;
              display: inline-block;
              width:25px;
              height: 40px;
              text-align: center;
              background:url("/crawler/bootstrap/img/input_bg.png") 80px 60px;
              &.checked{
                background:url("/crawler/bootstrap/img/input_bg.png") 50px 90px;
              }
            }
            .content-warp{
              box-sizing:border-box;
              display: inline-block;
              border-radius:3px;
              height: 40px;
              width:90%;
              background-color:#9ee3e6;
              padding:0 10px;
              color: #3882b0;
              .icon{
                cursor: pointer;
                margin-right: 5px;
                line-height:40px;
                float: left;
              }
              .text{
                cursor: pointer;
                width:250px;
                display: inline-block;
              }

            }
            &:before{
              position: absolute;
              content: '';
              left: -30px;
              top: 0;
              width: 1px;
              height:100%;
              border-left: 1px solid #999;
            }
            &:after {
              position: absolute;
              content: '';
              width:30px;
              height: 1px;
              left:-29px;
              top: 30px;
              border-top: 1px solid #999;
            }
            &:last-child{
              &:before{
                height: 31px;
              }
            }
          }
          .tree-child1{
            padding-right: 0;
            .content-warp{
              background: rgba(0,0,0,0);
              color:#666;
              .icon{
                color:#ebd264;
              }
              .text{
                width:200px;
              }
            }
          }
          .tree-child2{
            padding-right: 0;
            .content-warp{
              background: rgba(0,0,0,0);
              color:#999;
              .icon{
                color:#fc6472;
              }
            }
          }
          .tree-parent{
            padding-left: 0;
            &:before{
              border: 0;
            }
            &:after{
              border:0;
            }
          }

        }
5. 再然后js
ps一点:想在后面写函数调用的直接写在点击事件的最后,这样他才能找到点击后的效果
        $('#sideContent').on('click','.text',function (){
                $(this).parents('.content-warp').siblings('ul.nav-sidebar').stop().slideToggle(150);
                if($(this).parents('.content-warp').find('i').hasClass('fa-plus')){
                    $(this).parents('.content-warp').find('i').removeClass('fa-plus').addClass('fa-minus')
                }else{
                    $(this).parents('.content-warp').find('i').removeClass('fa-minus').addClass('fa-plus')
                }
            })
                .on('click','label',function (){
                if($(this).hasClass('checked')){
                    $(this).removeClass('checked');
                    $(this).siblings('ul.nav-sidebar').find('label').removeClass('checked');
                    $(this).parents('ul.nav-sidebar').siblings('label').removeClass('checked');
                }else{
                    $(this).addClass('checked');
                    $(this).siblings('ul.nav-sidebar').find('label').addClass('checked');
                    var tempNumber = $(this).parents('li.tree-child2').siblings('li').length;
                    var curNumber = $(this).parents('li.tree-child2').siblings('li').children('label.checked').length;
                    if(curNumber == tempNumber&&tempNumber!=1){
                       $(this).parents('li.tree-child2').parent('ul.nav-sidebar').siblings('label').addClass('checked');
                        var tempNumber_1 =  $(this).parents('li.tree-child1').siblings('li').length;
                        var curNumber_1 = $(this).parents('li.tree-child1').siblings('li').children('label.checked').length;
                        if(curNumber_1 == tempNumber_1){
                            $(this).parents('li.tree-child1').parents('ul.nav-sidebar').siblings('label').addClass('checked');
                        }
                    }
                    var tempNumber_1 =  $(this).parents('li.tree-child1').siblings('li').length;
                    var curNumber_1 = $(this).parents('li.tree-child1').siblings('li').children('label.checked').length;
                    if(curNumber_1 == tempNumber_1){
                        $(this).parent('li.tree-child1').parents('ul.nav-sidebar').siblings('label').addClass('checked');
                    }
                }

            });
6. 没有做成插件的形式,是因为不会,也不想那样弄得太复杂,这算是结束了 treeview的写法