1、演示环境:
IP |
操作系统 |
部署程序 |
192.168.1.143 |
CentOS 7.5 |
Nginx |
192.168.1.144 |
CentOS 7.5 |
Tomcat |
192.168.1.145 |
CentOS 7.5 |
Tomcat |
2、配置192.168.1.144节点的主机名:
# vim /etc/hosts --> 192.168.1.144 TomcatA.qiuyue.com TomcatA
# vim /etc/hostname --> TomcatA
# hostnamectl set-hostname TomcatA
# hostname TomcatA
# logout
Ctrl + Shift + r
# hostname
3、配置192.168.1.145节点的主机名:
# vim /etc/hosts --> 192.168.1.145 TomcatB.qiuyue.com TomcatB
# vim /etc/hostname --> TomcatB
# hostnamectl set-hostname TomcatB
# hostname TomcatB
# logout
Ctrl + Shift + r
# hostname
4、192.168.1.144节点自定义Tomcat Host虚拟主机:
# cd /usr/local/tomcat/conf
# cp server.xml server.xml.bak
# vim server.xml,在和之间新增如下代码:
5、192.168.1.145节点自定义Tomcat Host虚拟主机:
# cd /usr/local/tomcat/conf
# cp server.xml server.xml.bak
# vim server.xml,在和之间新增如下代码:
6、192.168.1.144节点创建如下目录及测试页:
# mkdir -pv /data/{webapps,logs}
# mkdir -pv /data/webapps/ROOT
# vim /data/webapps/ROOT/index.jsp
<%@ page language="java" import="java.util.*" pageEncoding="UTF-8"%>
TomcatA.qiuyue.com
<% session.setAttribute("qiuyue.com","qiuyue.com"); %>
Session ID <%= session.getId() %>
Created ON <%= session.getCreationTime() %>
7、192.168.1.145节点创建如下目录及测试页:
# mkdir -pv /data/{webapps,logs}
# mkdir -pv /data/webapps/ROOT
# vim /data/webapps/ROOT/index.jsp
<%@ page language="java" import="java.util.*" pageEncoding="UTF-8"%>
TomcatB.qiuyue.com
<% session.setAttribute("qiuyue.com","qiuyue.com"); %>
Session ID <%= session.getId() %>
Created ON <%= session.getCreationTime() %>
8、分别启动192.168.1.144节点和192.168.1.145节点上的Tomcat:
# catalina.sh stop # catalina.sh configtest # catalina.sh start # ss -tunlp | grep -w :8080
9、配置192.168.1.143节点/etc/hosts文件:# vim /etc/hosts
192.168.1.144 TomcatA.qiuyue.com TomcatA
192.168.1.145 TomcatB.qiuyue.com TomcatB
10、在192.168.1.143节点中使用curl命令访问:
# curl http://TomcatA.qiuyue.com:8080 //能正常显示文本内容
# curl http://TomcatB.qiuyue.com:8080 //能正常显示文本内容
11、192.168.1.143节点实现反代、动静分离和负载均衡:
# yum -y install epel-release
# yum -y install nginx
# cd /etc/nginx
# cp nginx.conf nginx.conf.bak
# vim nginx.conf
(1)在http配置段中、server配置段外新增如下upstream:
upstream tcsrvs {
server TomcatA.qiuyue.com:8080;
server TomcatB.qiuyue.com:8080;
}
(2)在server配置段中新增如下location:
location ~* \.(jsp|do)$ {
proxy_pass http://tcsrvs;
}
备注:将.jsp和.do结尾的请求反向代理至http://tcsrvs
# nginx -t # systemctl start nginx.service # ss -tunlp | grep -w :80
12、本地浏览器访问测试:
192.168.1.143
192.168.1.143/index.jsp,访问的是默认虚拟主机
13、修改192.168.1.144节点Tomcat默认虚拟主机:
# catalina.sh stop
# vim server.xml
# catalina.sh configtest # catalina.sh start # ss -tunlp | grep -w :8080
14、修改192.168.1.145节点Tomcat默认虚拟主机:
# catalina.sh stop
# vim server.xml
# catalina.sh configtest # catalina.sh start # ss -tunlp | grep -w :8080
15、本地浏览器中重新访问192.168.1.143/index.jsp
轮询显示,Session ID一直在变:
16、实现session会话保持:# vim nginx.conf
方法一:根据客户端IP
upstream tcsrvs {
ip_hash;
server TomcatA.qiuyue.com:8080;
server TomcatB.qiuyue.com:8080;
}
# nginx -t # nginx -s reload # ss -tunlp | grep -w :80
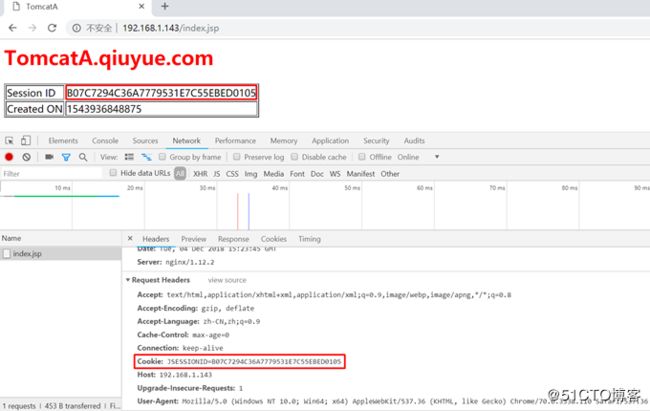
本地浏览器中访问192.168.1.143/index.jsp,无论如何刷新,页面都不会改变:
Google Chrome浏览器F12:
方法二:根据分发和识别cookie,使同一个客户端的请求始终落在同一台后端服务器上,默认标识名为route
工作流程:
1、客户端首次发起访问请求,Nginx接收
2、Nginx发现请求头没有cookie,以轮询方式将请求分发给后端服务器
3、后端服务器处理完请求,将响应数据返回给Nginx
4、Nginx生成带route的cookie,返回给客户端,route的值与后端服务器对应,每台后端真实服务器都会有一个唯一的route值,可能是明文,也可能是md5、sha1等hash值
5、客户端接收请求,并保存带有route的cookie
6、当客户端下一次发送请求时,会带上route,Nginx根据接收到的cookie中的route值,转发给对应的后端服务器
备注:当浏览器关闭,Nginx会给客户端重新分配一台后端服务器
CentOS 7.5中yum方式安装的Nginx版本为1.12.2,默认没有启用sticky功能
下载同版本的nginx-1.12.2.tar.gz进行编译安装,并新增sticky模块
# cp /usr/sbin/nginx /usr/sbin/nginx.20181203
# yum -y install gcc gcc-c++ openssl openssl-devel zlib zlib-devel pcre pcre-devel libxslt-devel libxml2-devel gd-devel perl-devel perl-ExtUtils-Embed GeoIP GeoIP-devel GeoIP-data wget
# tar -xf nginx-1.12.2.tar.gz -C /usr/src
# cd /usr/src/nginx-1.12.2
# ./configure --help | grep sticky //默认不支持sticky模块,是第三方模块
# wget https://bitbucket.org/nginx-goodies/nginx-sticky-module-ng/get/master.tar.gz
# tar -xf master.tar.gz
# mv nginx-goodies-nginx-sticky-module-ng-08a395c66e42 nginx-sticky-module
# nginx -V //复制yum方式安装时默认的编译选项
# ./configure --prefix=/usr/share/nginx --sbin-path=/usr/sbin/nginx --modules-path=/usr/lib64/nginx/modules --conf-path=/etc/nginx/nginx.conf --error-log-path=/var/log/nginx/error.log --http-log-path=/var/log/nginx/access.log --http-client-body-temp-path=/var/lib/nginx/tmp/client_body --http-proxy-temp-path=/var/lib/nginx/tmp/proxy --http-fastcgi-temp-path=/var/lib/nginx/tmp/fastcgi --http-uwsgi-temp-path=/var/lib/nginx/tmp/uwsgi --http-scgi-temp-path=/var/lib/nginx/tmp/scgi --pid-path=/run/nginx.pid --lock-path=/run/lock/subsys/nginx --user=nginx --group=nginx --with-file-aio --with-http_auth_request_module --with-http_ssl_module --with-http_v2_module --with-http_realip_module --with-http_addition_module --with-http_xslt_module=dynamic --with-http_image_filter_module=dynamic --with-http_geoip_module=dynamic --with-http_sub_module --with-http_dav_module --with-http_flv_module --with-http_mp4_module --with-http_gunzip_module --with-http_gzip_static_module --with-http_random_index_module --with-http_secure_link_module --with-http_degradation_module --with-http_slice_module --with-http_stub_status_module --with-http_perl_module=dynamic --with-mail=dynamic --with-mail_ssl_module --with-pcre --with-pcre-jit --with-stream=dynamic --with-stream_ssl_module --add-module=/usr/src/nginx-1.12.2/nginx-sticky-module
# make //不能执行make install
# /usr/src/nginx-1.12.2/objs/nginx -t
# /usr/src/nginx-1.12.2/objs/nginx -V
# cp -rf /usr/src/nginx-1.12.2/objs/nginx /usr/sbin/nginx
# nginx -s reload
# nginx -V
# ps -ef | grep nginx | grep -v grep
upstream tcsrvs {
# ip_hash;
sticky;
server TomcatA.qiuyue.com:8080;
server TomcatB.qiuyue.com:8080;
}
# nginx -t # nginx -s reload # ss -tunlp | grep -w :80
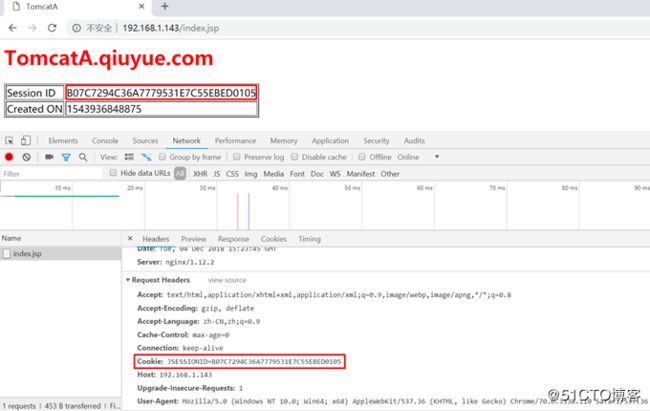
本地浏览器中访问192.168.1.143/index.jsp,无论如何刷新,页面都不会改变:
备注:cookie负载均衡相比ip hash一个明显的优点是对于内网nat用户的负载均衡,ip hash无法做到


