基于api28
源码解析
    @Deprecated
    protected boolean fitSystemWindows(Rect insets)
该方法在窗口的insets发生变化时,被调用。View调用该方法,以调整内容来适应窗口的变化。窗口的insets变化,包括status bar、软键盘、navigation bar等的显隐。
一般情况下我们不需要关心这个方法。但如果设置SYSTEM_UI_FLAG_LAYOUT_FULLSCREEN、SYSTEM_UI_FLAG_LAYOUT_HIDE_NAVIGATION等标识开启沉浸式,默认情况下,我们的内容区域就会被status bar、软键盘等遮挡。
该方法的默认实现会根据insets值来设置view的padding,并返回true,防止该事件继续传递(即只有一个view会真正fitSystemWindows)。要开启该方法,需要执行setFitsSystemWindows(true),或在XML中设置android:fitsSystemWindows="true"。
如果只需要为XML文件的根布局设置fitSystemWindows,该方法的默认实现就能满足。如果需要适配更加复杂的布局(比如有两个子View,一个在顶部,一个在底部,则顶部的需要根据insets设置paddingTop,底部的需要根据insets设置paddingBottom),你就需要重写该方法,自行处理insets。
需要说明的是,如果不做任何处理,所有view接收到的insets都是一样的(比如top是status bar的高度,bottom是软键盘的高度)。该方法的执行在layout之前。
api20新增
类
WindowInsets
该类封装了几种不同的insets。mSystemWindowInsets对应status bar、软键盘等引起的insets。可用方法如下:
获取四个边的inset
    public int getSystemWindowInsetLeft() {
        return mSystemWindowInsets.left;
    }

    public int getSystemWindowInsetTop() {
        return mSystemWindowInsets.top;
    }

    public int getSystemWindowInsetRight() {
        return mSystemWindowInsets.right;
    }

    public int getSystemWindowInsetBottom() {
        return mSystemWindowInsets.bottom;
    }
消费掉insets,使之不再传递
    //消费掉4个边的insets
    public WindowInsets consumeSystemWindowInsets() {
        final WindowInsets result = new WindowInsets(this);
        result.mSystemWindowInsets = EMPTY_RECT;
        result.mSystemWindowInsetsConsumed = true;
        return result;
    }

    //分别控制消费掉每个边的inset
    public WindowInsets consumeSystemWindowInsets(boolean left, boolean top,
            boolean right, boolean bottom) {
        if (left || top || right || bottom) {
            final WindowInsets result = new WindowInsets(this);
            result.mSystemWindowInsets = new Rect(
                    left ? 0 : mSystemWindowInsets.left,
                    top ? 0 : mSystemWindowInsets.top,
                    right ? 0 : mSystemWindowInsets.right,
                    bottom ? 0 : mSystemWindowInsets.bottom);
            return result;
        }
        return this;
    }
生成新的WindowInsets对象
    public WindowInsets replaceSystemWindowInsets(int left, int top,
            int right, int bottom) {
        final WindowInsets result = new WindowInsets(this);
        result.mSystemWindowInsets = new Rect(left, top, right, bottom);
        return result;
    }

    public WindowInsets replaceSystemWindowInsets(Rect systemWindowInsets) {
        final WindowInsets result = new WindowInsets(this);
        result.mSystemWindowInsets = new Rect(systemWindowInsets);
        return result;
    }
方法
1、dispatchApplyWindowInsets
    public WindowInsets dispatchApplyWindowInsets(WindowInsets insets) {
        try {
            mPrivateFlags3 |= PFLAG3_APPLYING_INSETS;
            if (mListenerInfo != null && mListenerInfo.mOnApplyWindowInsetsListener != null) {
                return mListenerInfo.mOnApplyWindowInsetsListener.onApplyWindowInsets(this, insets);
            } else {
                return onApplyWindowInsets(insets);
            }
        } finally {
            mPrivateFlags3 &= ~PFLAG3_APPLYING_INSETS;
        }
    }
该方法会被第一个调用,如果设置了listener,则执行自定义的listener,否则执行onApplyWindowInsets。
2、onApplyWindowInsets
    public WindowInsets onApplyWindowInsets(WindowInsets insets) {
        if ((mPrivateFlags3 & PFLAG3_FITTING_SYSTEM_WINDOWS) == 0) {
            // We weren't called from within a direct call to fitSystemWindows,
            // call into it as a fallback in case we're in a class that overrides it
            // and has logic to perform.
            if (fitSystemWindows(insets.getSystemWindowInsets())) {
                return insets.consumeSystemWindowInsets();
            }
        } else {
            // We were called from within a direct call to fitSystemWindows.
            if (fitSystemWindowsInt(insets.getSystemWindowInsets())) {
                return insets.consumeSystemWindowInsets();
            }
        }
        return insets;
    }
默认情况下该方法会执行第一个分支,即执行上面的fitSystemWindows。api20以上,android建议覆写该方法,而不是已废弃的fitSystemWindows。
3、setOnApplyWindowInsetsListener
监听fitSystemWindow事件。
listener类如下:
    public interface OnApplyWindowInsetsListener {
        public WindowInsets onApplyWindowInsets(View v, WindowInsets insets);
    }
fitSystemWindow事件的传递
ViewGroup:
    @Override
    public WindowInsets dispatchApplyWindowInsets(WindowInsets insets) {
        insets = super.dispatchApplyWindowInsets(insets);
        if (!insets.isConsumed()) {
            final int count = getChildCount();
            for (int i = 0; i < count; i++) {
                insets = getChildAt(i).dispatchApplyWindowInsets(insets);
                if (insets.isConsumed()) {
                    break;
                }
            }
        }
        return insets;
    }
可以看到,从根布局开始,先执行本身的super.dispatchApplyWindowInsets方法,然后遍历执行子View的dispatchApplyWindowInsets方法,如果被消费掉,则停止传递。
例子
布局如下:
设置沉浸式:
    public static void setStatusBarTransparent(Window window) {
        window.clearFlags(WindowManager.LayoutParams.FLAG_TRANSLUCENT_STATUS);
        window.getDecorView().setSystemUiVisibility(View.SYSTEM_UI_FLAG_LAYOUT_FULLSCREEN | View.SYSTEM_UI_FLAG_LAYOUT_STABLE);
        window.addFlags(WindowManager.LayoutParams.FLAG_DRAWS_SYSTEM_BAR_BACKGROUNDS);
        window.setStatusBarColor(Color.TRANSPARENT);
    }
设置软键盘适配方式:
- adjustResize
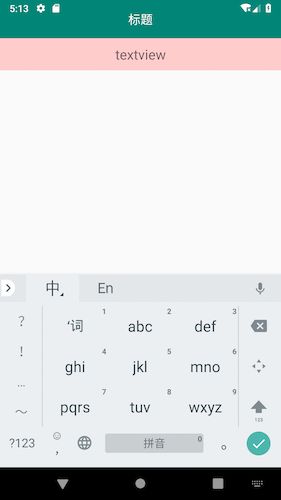
现在布局是这个样子的:
图1标题栏被状态栏遮挡,图2页面被软键盘遮挡。
再次强调一个概念,默认情况下,设置android:fitsSystemWindows="true"只有一个View会生效。
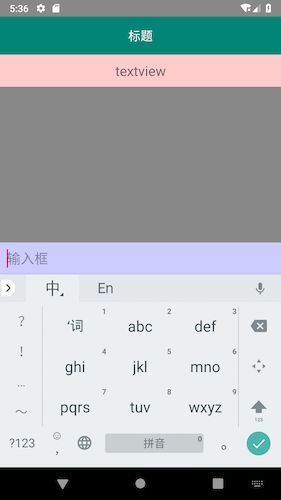
为根布局设置android:fitsSystemWindows="true",同时为了方便观察,给根布局设置一个灰色背景:
可以看到已经适配了软键盘,但顶部toolbar区域也显示了根布局的灰色背景,显然默认实现满足不了我们的需求。
解决方式有很多,这里介绍两种比较优雅的方式。
首先需要为Toolbar也设置android:fitsSystemWindows="true"
1、(api20可用)根布局设置OnApplyWindowInsetsListener
        findViewById(R.id.root).setOnApplyWindowInsetsListener(new View.OnApplyWindowInsetsListener() {
            @Override
            public WindowInsets onApplyWindowInsets(View v, WindowInsets insets) {
                //根布局应用底边inset
                WindowInsets newInsets = insets.replaceSystemWindowInsets(0, 0, 0, insets.getSystemWindowInsetBottom());
                v.onApplyWindowInsets(newInsets);

                //子布局(这里是toolbar)应用顶边inset
                return insets.replaceSystemWindowInsets(0, insets.getSystemWindowInsetTop(), 0, 0);
            }
        });
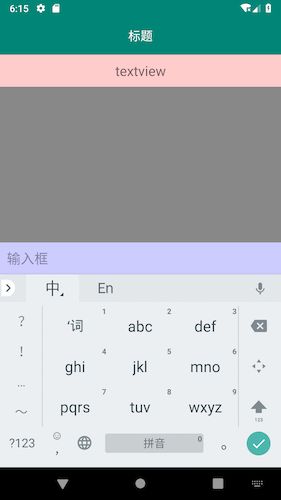
达到了预期效果。
2、自定义布局,重写fitSystemWindows方法
自定义根布局
    @Override
    protected boolean fitSystemWindows(Rect insets) {
        //根布局丢掉顶边inset
        insets.top = 0;
        super.fitSystemWindows(insets);
        //返回false,使事件继续传递
        return false;
    }
自定义toolbar
    @Override
    protected boolean fitSystemWindows(Rect insets) {
        //toolbar丢掉底边inset
        insets.bottom = 0;
        super.fitSystemWindows(insets);
        //返回true,使事件停止传递
        return true;
    }
两种方法实际上是等价,不过显然还是第一种方式更友好,只需要设置一个listener就能搞定,但因为api版本限制,所以很多情况下还是要使用第二种方式。
本例中有两点需要注意:
- 同时为根布局和toolbar设置
android:fitsSystemWindows="true"- toolbar中子View的高度需要是固定的,否则最终显示会有差异。
说明
如果覆写了fitSystemWindows(insets)或者onApplyWindowInsets(WindowInsets),覆写方法中不调用对应的super方法,则不需要设置setFitsSystemWindows(true)或者android:fitsSystemWindows="true"。
原因如下:
    @Deprecated
    protected boolean fitSystemWindows(Rect insets) {
        if ((mPrivateFlags3 & PFLAG3_APPLYING_INSETS) == 0) {
            if (insets == null) {
                return false;
            }
            try {
                mPrivateFlags3 |= PFLAG3_FITTING_SYSTEM_WINDOWS;
                return dispatchApplyWindowInsets(new WindowInsets(insets)).isConsumed();
            } finally {
                mPrivateFlags3 &= ~PFLAG3_FITTING_SYSTEM_WINDOWS;
            }
        } else {
            // 一般进入这个分支,执行如下函数
            return fitSystemWindowsInt(insets);
        }
    }

    private boolean fitSystemWindowsInt(Rect insets) {
        //setFitsSystemWindows(true)影响的就是这个标志位,如果覆写方法不执行super方法,
        //就不会执行到这里,不受标志位影响。
        if ((mViewFlags & FITS_SYSTEM_WINDOWS) == FITS_SYSTEM_WINDOWS) {
            mUserPaddingStart = UNDEFINED_PADDING;
            mUserPaddingEnd = UNDEFINED_PADDING;
            Rect localInsets = sThreadLocal.get();
            if (localInsets == null) {
                localInsets = new Rect();
                sThreadLocal.set(localInsets);
            }
            boolean res = computeFitSystemWindows(insets, localInsets);
            mUserPaddingLeftInitial = localInsets.left;
            mUserPaddingRightInitial = localInsets.right;
            //最终设置padding
            internalSetPadding(localInsets.left, localInsets.top,
                    localInsets.right, localInsets.bottom);
            return res;
        }
        return false;
    }


