效果演示
源代码已上传到github
由于ionic版本更新较快,有些写法可能改变来不及更新,请以github代码为准
ionic2.0插件的使用方式和ionic3.0已不一样
ionic2实战-添加拍照功能cordova-plugin-camera.gif
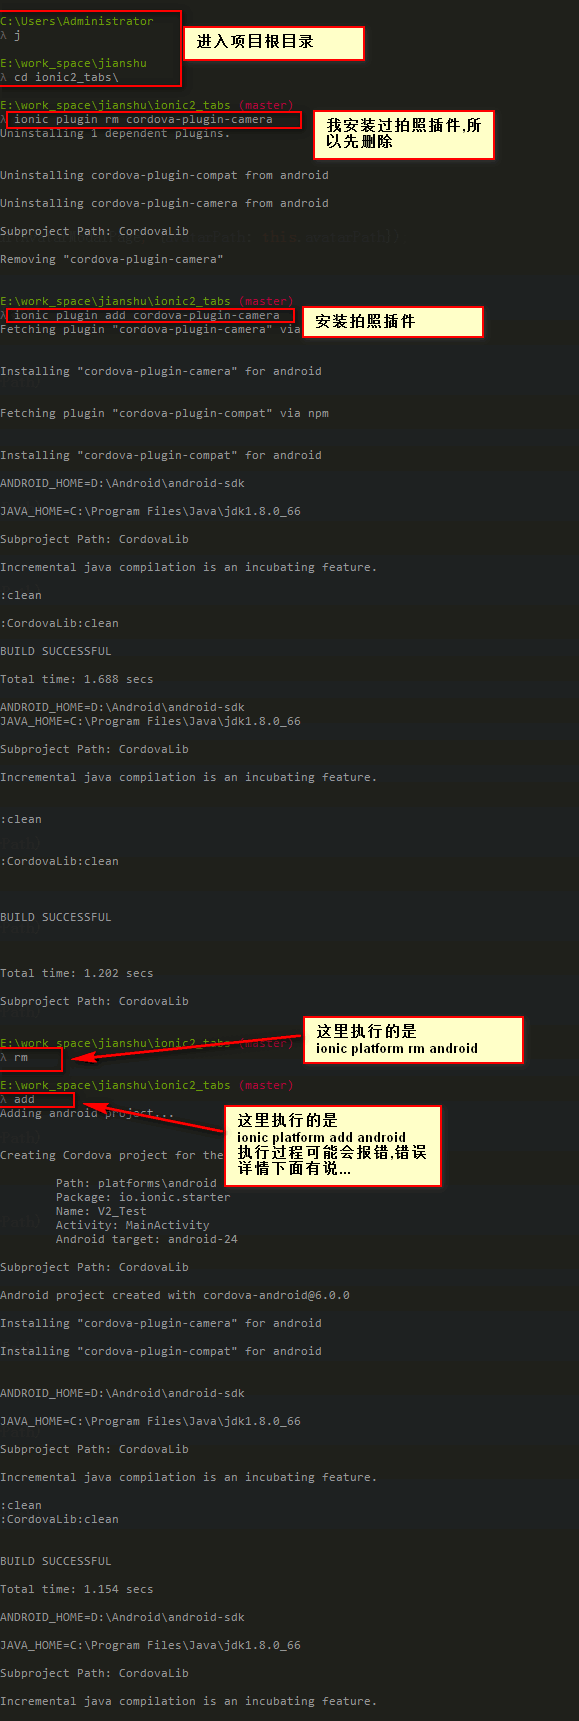
安装插件
- 安装cordova-plugin-camera插件,安装过程如下图
- 我在第一次执行
ionic platfrom add android时抛出了一个异常,解决了,异常详情看这里 - 当执行
ionic platfrom add android,没有问题时,说明我们的环境没有问题啦.然后在写代码.
 安装cordova-plugin-camera
封装拍照插件
- 第一步我在src根目录新建一个providers文件夹,在这个文件夹新建一个
NativeService.ts文件,叫NativeService是因为这个ts专门写app所有插件相关的代码,不止只有拍照插件 -
NativeService.ts完整代码如下
这里是ionic2.0插件的使用方式.ionic3.0使用方式看这里
    /**
     * Created by [email protected] on 01-03.
     */
    import {Injectable} from '@angular/core';
    import {ToastController, LoadingController} from 'ionic-angular';
    import {Camera} from 'ionic-native';

    @Injectable()
    export class NativeService {
      private toast;
      private loading;

      constructor(private toastCtrl: ToastController, private loadingCtrl: LoadingController) {
      }

      /**
       * 统一调用此方法显示提示信息
       * @param message 信息内容
       * @param duration 显示时长
       */
      showToast = (message: string = '操作完成', duration: number = 2500) => {
        this.toast = this.toastCtrl.create({
          message: message,
          duration: duration,
          position: 'top',
          showCloseButton: true,
          closeButtonText: '关闭'
        });
        this.toast.present();
      };

      /**
       * 关闭信息提示框
       */
      hideToast = () => {
        this.toast.dismissAll()
      };

      /**
       * 统一调用此方法显示loading
       * @param content 显示的内容
       */
      showLoading = (content: string = '') => {
        this.loading = this.loadingCtrl.create({
          content: content
        });
        this.loading.present();
        setTimeout(() => {//最长显示20秒
          this.loading.dismiss();
        }, 20000);
      };

      /**
       * 关闭loading
       */
      hideLoading = () => {
        this.loading.dismissAll()
      };

      /**
       * 使用cordova-plugin-camera获取照片的base64
       * @param options
       * @return {Promise}
       */
      getPicture = (options) => {
        return new Promise((resolve, reject) => {
          Camera.getPicture(Object.assign({
            sourceType: Camera.PictureSourceType.CAMERA,//图片来源,CAMERA:拍照,PHOTOLIBRARY:相册
            destinationType: Camera.DestinationType.DATA_URL,//返回值格式,DATA_URL:base64,FILE_URI:图片路径
            quality: 90,//保存的图像质量,范围为0 - 100
            allowEdit: true,//选择图片前是否允许编辑
            encodingType: Camera.EncodingType.JPEG,
            targetWidth: 800,//缩放图像的宽度(像素)
            targetHeight: 800,//缩放图像的高度(像素)
            saveToPhotoAlbum: false,//是否保存到相册
            correctOrientation: true//设置摄像机拍摄的图像是否为正确的方向
          }, options)).then((imageData) => {
            resolve(imageData);
          }, (err) => {
            console.log(err);
            err == 20 ? this.showToast('没有权限,请在设置中开启权限') : reject(err);
          });
        });
      };

      /**
       * 通过图库获取照片
       * @param options
       * @return {Promise}
       */
      getPictureByPhotoLibrary = (options = {}) => {
        return new Promise((resolve) => {
          this.getPicture(Object.assign({
            sourceType: Camera.PictureSourceType.PHOTOLIBRARY
          }, options)).then(imageBase64 => {
            resolve(imageBase64);
          }).catch(err => {
            String(err).indexOf('cancel') != -1 ? this.showToast('取消选择图片', 1500) : this.showToast('获取        照片失败');
          });
        });
      };

      /**
       * 通过拍照获取照片
       * @param options
       * @return {Promise}
       */
      getPictureByCamera = (options = {}) => {
        return new Promise((resolve) => {
          this.getPicture(Object.assign({
            sourceType: Camera.PictureSourceType.CAMERA
          }, options)).then(imageBase64 => {
            resolve(imageBase64);
          }).catch(err => {
            String(err).indexOf('cancel') != -1 ? this.showToast('取消拍照', 1500) : this.showToast('获取照片失败');
          });
        });
      };

    }
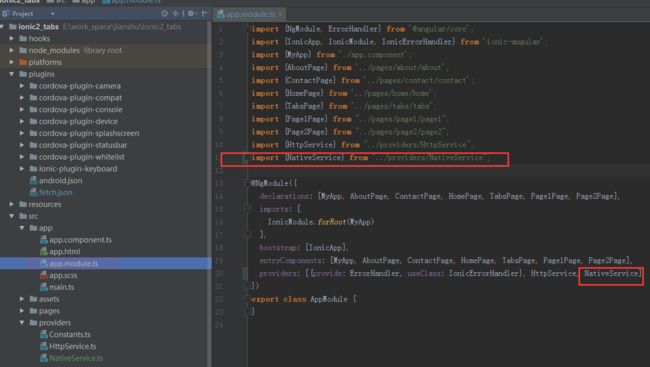
- 第二步,把
NativeService.ts加入到app.module.ts中,如下图
 Paste_Image.png
使用
我的html页面代码
设置个人头像
![]()
我的.ts文件代码
    import {Component} from '@angular/core';
    import {ViewController} from 'ionic-angular';
    import {NativeService} from "../../providers/NativeService";


    @Component({
      selector: 'page-page2',
      templateUrl: 'page2.html'
    })
    export class Page2Page {
      isChange: boolean = false;//头像是否改变标识
      avatarPath: string = './assets/img/qr_code.png';//用户默认头像
      imageBase64: string;//保存头像base64,用于上传

      constructor(private viewCtrl: ViewController,
                  private nativeService: NativeService) {
      }

      getPicture(type) {//1拍照,0从图库选择
        let options = {
          targetWidth: 400,
         targetHeight: 400
        };
        if (type == 1) {
          this.nativeService.getPictureByCamera(options).then(imageBase64 => {
            this.getPictureSuccess(imageBase64);
          });
       } else {
          this.nativeService.getPictureByPhotoLibrary(options).then(imageBase64 => {
            this.getPictureSuccess(imageBase64);
          });
        }
      }

      private getPictureSuccess(imageBase64) {
        this.isChange = true;
        this.imageBase64 = imageBase64;
        this.avatarPath = 'data:image/jpeg;base64,' + imageBase64;
      }

      saveAvatar() {
        if (this.isChange) {
          console.log(this.imageBase64);//这是头像数据.
          this.nativeService.showLoading('正在上传....');
          this.viewCtrl.dismiss({avatarPath: this.avatarPath});//这里可以把头像传出去.
        } else {
          this.dismiss();
        }
      }

      dismiss() {
        this.viewCtrl.dismiss();
      }
    }
最后
- 我选择获取图片base64字符串,主要是方便存储和上传.可以把字符串存在Storage中,可以同时上传多张.
- base64字符串大小和图片实际大小相差不大,所以不要误解上传base64字符串会比上传图片快
最后的最后
有人一直问拍照和从相册选择的照片如何上传,我上面已经说了,拍照和从相册选择照片返回的是base64字符串,上传字符串我们都会吧
还不会?this.http.post('后台接口地址', {'参数名':照片字符串}).map((res: Response) => res.json());如果你插件获取的图片的绝对路径.也可以通过以下代码转换为base64字符串.需要安装File插件
 /**
   * 根据图片绝对路径转化为base64字符串
   * @param url 绝对路径
   * @param callback 回调函数
   */
  convertImgToBase64(url, callback) {
    this.getFileContentAsBase64(url, function (base64Image) {
      callback.call(this, base64Image.substring(base64Image.indexOf(';base64,') + 8));
    })
  }

  private getFileContentAsBase64(path, callback) {
    function fail(err) {
      console.log('Cannot found requested file' + err);
    }

    function gotFile(fileEntry) {
      fileEntry.file(function (file) {
        let reader = new FileReader();
        reader.onloadend = function (e) {
          let content = this.result;
          callback(content);
        };
        reader.readAsDataURL(file);
      });
    }

    this.file.resolveLocalFilesystemUrl(path).then(fileEnter => gotFile(fileEnter)).catch(err => fail(err));
    // window['resolveLocalFileSystemURL'](path, gotFile, fail);
  }
- 上传到后台后需要把字符串转换成照片的,我这里贴出java代码
 /**
     * base64字节生成图片
     *
     * @param base64字符串
     * @param imgFilePath  生成的图片绝对路径+文件名
     * @return
     */
    public static boolean makePicture(String base64, String imgFilePath) {
        if (base64 == null) {
            return false;
        }
        BASE64Decoder decoder = new BASE64Decoder();
        try {
            // Base64解码
            byte[] bytes = decoder.decodeBuffer(base64);
            for (int i = 0; i < bytes.length; ++i) {
                if (bytes[i] < 0) {// 调整异常数据
                    bytes[i] += 256;
                }
            }
            // 生成jpeg图片
            OutputStream out = new FileOutputStream(imgFilePath);
            out.write(bytes);
            out.flush();
            out.close();
            return true;
        } catch (Exception e) {
            return false;
        }
    }