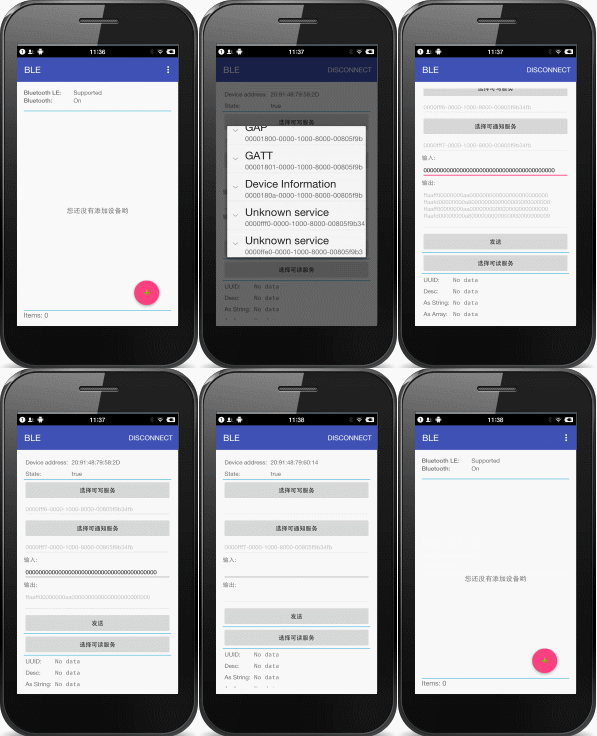
Android BLE基础操作框架,基于回调,操作简单。包含扫描、多连接、广播包解析、服务读写及通知等功能。
项目地址:https://github.com/xiaoyaoyou1212/BLE
项目依赖:
compile 'com.vise.xiaoyaoyou:baseble:2.0.0'
功能
支持多设备连接管理;
支持广播包解析;
支持自定义扫描过滤条件;
支持根据设备名称正则表达式过滤扫描设备;
支持根据设备信号最小值过滤扫描设备;
支持根据设备名称或 MAC 地址列表过滤扫描设备;
支持根据设备 UUID 过滤扫描设备;
支持根据指定设备名称或 MAC 地址搜索指定设备;
支持连接设备失败重试;
支持操作设备数据失败重试;
支持绑定数据收发通道,同一种能力可绑定多个通道;
支持注册和取消通知监听;
支持配置最大连接数,超过最大连接数时会依据 Lru 算法自动断开最近最久未使用设备;
支持配置扫描、连接和操作数据超时时间;
支持配置连接和操作数据重试次数以及重试间隔时间。
简介
打造该库的目的是为了简化蓝牙设备接入的流程。该库是 BLE 操作的基础框架,只处理 BLE 设备通信逻辑,不包含具体的数据处理,如数据的分包与组包等。该库提供了多设备连接管理,可配置最大连接数量,并在超过最大连接数时会依据 Lru 算法自动断开最近最久未使用设备。该库还定制了常用的扫描设备过滤规则,也支持自定义过滤规则。该库所有操作都采用回调机制告知上层调用的结果,操作简单,接入方便。
效果展示
使用介绍
权限配置
6.0 以下系统不需要配置权限,库中已经配置了如下权限:
而如果手机系统在 6.0 以上则需要配置如下权限:
因为蓝牙在 6.0 以上手机使用了模糊定位功能,所以需要添加模糊定位权限。
引入 SDK
在工程 module 的 build.gradle 文件中的 dependencies 中添加如下依赖:
compile 'com.vise.xiaoyaoyou:baseble:2.0.0'
构建完后就可以直接使用该库的功能了。
初始化
在使用该库前需要进行初始化,初始化代码如下所示:
//蓝牙相关配置修改
ViseBle.config()
        .setScanTimeout(-1)//扫描超时时间,这里设置为永久扫描
        .setConnectTimeout(10 * 1000)//连接超时时间
        .setOperateTimeout(5 * 1000)//设置数据操作超时时间
        .setConnectRetryCount(3)//设置连接失败重试次数
        .setConnectRetryInterval(1000)//设置连接失败重试间隔时间
        .setOperateRetryCount(3)//设置数据操作失败重试次数
        .setOperateRetryInterval(1000)//设置数据操作失败重试间隔时间
        .setMaxConnectCount(3);//设置最大连接设备数量
//蓝牙信息初始化,全局唯一,必须在应用初始化时调用
ViseBle.getInstance().init(this);
初始化可以是在 Application 中也可以是在 MainActivity 中,只需要是在使用蓝牙功能前就行。还有需要注意的是,蓝牙配置必须在蓝牙初始化前进行修改,如果默认配置满足要求也可以不修改配置。
设备扫描
库中针对设备扫描定义了几种常用过滤规则,如果不满足要求也可以自己定义过滤规则,下面针对库中提供的过滤规则使用方式一一介绍:
- 扫描所有设备
ViseBle.getInstance().startScan(new ScanCallback(new IScanCallback() {
    @Override
    public void onDeviceFound(BluetoothLeDeviceStore bluetoothLeDeviceStore) {

    }

    @Override
    public void onScanFinish(BluetoothLeDeviceStore bluetoothLeDeviceStore) {

    }

    @Override
    public void onScanTimeout() {

    }
}));
- 扫描指定设备 MAC 的设备
//该方式是扫到指定设备就停止扫描
ViseBle.getInstance().startScan(new SingleFilterScanCallback(new IScanCallback() {
    @Override
    public void onDeviceFound(BluetoothLeDeviceStore bluetoothLeDeviceStore) {

    }

    @Override
    public void onScanFinish(BluetoothLeDeviceStore bluetoothLeDeviceStore) {

    }

    @Override
    public void onScanTimeout() {

    }
}).setDeviceMac(deviceMac));
- 扫描指定设备名称的设备
//该方式是扫到指定设备就停止扫描
ViseBle.getInstance().startScan(new SingleFilterScanCallback(new IScanCallback() {
    @Override
    public void onDeviceFound(BluetoothLeDeviceStore bluetoothLeDeviceStore) {

    }

    @Override
    public void onScanFinish(BluetoothLeDeviceStore bluetoothLeDeviceStore) {

    }

    @Override
    public void onScanTimeout() {

    }
}).setDeviceName(deviceName));
- 扫描指定 UUID 的设备
ViseBle.getInstance().startScan(new UuidFilterScanCallback(new IScanCallback() {
    @Override
    public void onDeviceFound(BluetoothLeDeviceStore bluetoothLeDeviceStore) {

    }

    @Override
    public void onScanFinish(BluetoothLeDeviceStore bluetoothLeDeviceStore) {

    }

    @Override
    public void onScanTimeout() {

    }
}).setUuid(uuid));
- 扫描指定设备 MAC 或名称集合的设备
ViseBle.getInstance().startScan(new ListFilterScanCallback(new IScanCallback() {
    @Override
    public void onDeviceFound(BluetoothLeDeviceStore bluetoothLeDeviceStore) {

    }

    @Override
    public void onScanFinish(BluetoothLeDeviceStore bluetoothLeDeviceStore) {

    }

    @Override
    public void onScanTimeout() {

    }
}).setDeviceMacList(deviceMacList).setDeviceNameList(deviceNameList));
- 扫描指定信号范围或设备正则名称的设备
ViseBle.getInstance().startScan(new RegularFilterScanCallback(new IScanCallback() {
    @Override
    public void onDeviceFound(BluetoothLeDeviceStore bluetoothLeDeviceStore) {

    }

    @Override
    public void onScanFinish(BluetoothLeDeviceStore bluetoothLeDeviceStore) {

    }

    @Override
    public void onScanTimeout() {

    }
}).setDeviceRssi(rssi).setRegularDeviceName(regularDeviceName));
其中扫描到的设备列表由 BluetoothLeDeviceStore 管理,而单个设备信息都统一放到BluetoothLeDevice中,其中包含了设备的所有信息,如设备名称、设备地址、广播包解析信息等,设备的相关信息会在设备详情中进行介绍。
设备连接
设备连接有三种方式,一种是根据设备信息直接进行连接,另外两种是在没扫描的情况下直接通过设备名称或设备 MAC 进行扫描连接。三种连接方式使用如下:
- 根据设备信息连接设备
ViseBle.getInstance().connect(bluetoothLeDevice, new IConnectCallback() {
    @Override
    public void onConnectSuccess(DeviceMirror deviceMirror) {

    }

    @Override
    public void onConnectFailure(BleException exception) {

    }

    @Override
    public void onDisconnect(boolean isActive) {

    }
});
- 根据设备 MAC 直接扫描并连接
ViseBle.getInstance().connectByMac(deviceMac, new IConnectCallback() {
    @Override
    public void onConnectSuccess(DeviceMirror deviceMirror) {

    }

    @Override
    public void onConnectFailure(BleException exception) {

    }

    @Override
    public void onDisconnect(boolean isActive) {

    }
});
- 根据设备名称直接扫描并连接
ViseBle.getInstance().connectByName(deviceName, new IConnectCallback() {
    @Override
    public void onConnectSuccess(DeviceMirror deviceMirror) {

    }

    @Override
    public void onConnectFailure(BleException exception) {

    }

    @Override
    public void onDisconnect(boolean isActive) {

    }
});
设备详情
DEVICE INFO(设备信息)
- 获取设备名称(Device Name):
bluetoothLeDevice.getName(); - 获取设备地址(Device Address):
bluetoothLeDevice.getAddress(); - 获取设备类别(Device Class):
bluetoothLeDevice.getBluetoothDeviceClassName(); - 获取主要设备类别(Major Class):
bluetoothLeDevice.getBluetoothDeviceMajorClassName(); - 获取服务类别(Service Class):
bluetoothLeDevice.getBluetoothDeviceKnownSupportedServices(); - 获取配对状态(Bonding State):
bluetoothLeDevice.getBluetoothDeviceBondState();
RSSI INFO(信号信息)
- 获取第一次信号时间戳(First Timestamp):
bluetoothLeDevice.getFirstTimestamp(); - 获取第一次信号强度(First RSSI):
bluetoothLeDevice.getFirstRssi(); - 获取最后一次信号时间戳(Last Timestamp):
bluetoothLeDevice.getTimestamp(); - 获取最后一次信号强度(Last RSSI):
bluetoothLeDevice.getRssi(); - 获取平均信号强度(Running Average RSSI):
bluetoothLeDevice.getRunningAverageRssi();
SCAN RECORD INFO(广播信息)
根据扫描到的广播包AdRecordStore获取某个广播数据单元AdRecord的类型编号record.getType(),再根据编号获取广播数据单元的类型描述record.getHumanReadableType()以及该广播数据单元的长度及数据内容,最后通过AdRecordUtil.getRecordDataAsString(record)将数据内容转换成具体字符串。更多关于广播包解析可以参考Android BLE学习笔记中数据解析部分。
发送数据
在发送数据前需要先绑定写入数据通道,绑定通道的同时需要设置写入数据的回调监听,具体代码示例如下:
BluetoothGattChannel bluetoothGattChannel = new BluetoothGattChannel.Builder()
        .setBluetoothGatt(deviceMirror.getBluetoothGatt())
        .setPropertyType(PropertyType.PROPERTY_WRITE)
        .setServiceUUID(serviceUUID)
        .setCharacteristicUUID(characteristicUUID)
        .setDescriptorUUID(descriptorUUID)
        .builder();
deviceMirror.bindChannel(new IBleCallback() {
    @Override
    public void onSuccess(byte[] data, BluetoothGattChannel bluetoothGattChannel, BluetoothLeDevice bluetoothLeDevice) {

    }

    @Override
    public void onFailure(BleException exception) {

    }
}, bluetoothGattChannel);
deviceMirror.writeData(data);
这里的 deviceMirror 在设备连接成功后就可以获取到,需要注意的是,服务一样的情况下写入数据的通道只需要注册一次,如果写入数据的通道有多个则可以绑定多个。写入数据必须要在绑定写入数据通道后进行,可以在不同的地方多次写入。
接收数据
与发送数据一样,接收设备发送的数据也需要绑定接收数据通道,这里有两种方式,一种是可通知方式、一种是指示器方式,使用方式如下:
- 可通知方式
BluetoothGattChannel bluetoothGattChannel = new BluetoothGattChannel.Builder()
        .setBluetoothGatt(deviceMirror.getBluetoothGatt())
        .setPropertyType(PropertyType.PROPERTY_NOTIFY)
        .setServiceUUID(serviceUUID)
        .setCharacteristicUUID(characteristicUUID)
        .setDescriptorUUID(descriptorUUID)
        .builder();
deviceMirror.bindChannel(new IBleCallback() {
    @Override
    public void onSuccess(byte[] data, BluetoothGattChannel bluetoothGattChannel, BluetoothLeDevice bluetoothLeDevice) {

    }

    @Override
    public void onFailure(BleException exception) {

    }
}, bluetoothGattChannel);
deviceMirror.registerNotify(false);
- 指示器方式
BluetoothGattChannel bluetoothGattChannel = new BluetoothGattChannel.Builder()
        .setBluetoothGatt(deviceMirror.getBluetoothGatt())
        .setPropertyType(PropertyType.PROPERTY_INDICATE)
        .setServiceUUID(serviceUUID)
        .setCharacteristicUUID(characteristicUUID)
        .setDescriptorUUID(descriptorUUID)
        .builder();
deviceMirror.bindChannel(new IBleCallback() {
    @Override
    public void onSuccess(byte[] data, BluetoothGattChannel bluetoothGattChannel, BluetoothLeDevice bluetoothLeDevice) {

    }

    @Override
    public void onFailure(BleException exception) {

    }
}, bluetoothGattChannel);
deviceMirror.registerNotify(true);
在绑定通道后需要注册通知,并需要在收到注册成功的回调时调用如下代码设置监听:
deviceMirror.setNotifyListener(bluetoothGattInfo.getGattInfoKey(), new IBleCallback() {
    @Override
    public void onSuccess(byte[] data, BluetoothGattChannel bluetoothGattChannel, BluetoothLeDevice bluetoothLeDevice) {

    }

    @Override
    public void onFailure(BleException exception) {

    }
});
所有设备发送过来的数据都会通过上面的监听得到,如果不想监听也可以取消注册,使用方式如下:
deviceMirror.unregisterNotify(isIndicate);
isIndicate 表示是否是指示器方式。
读取数据
由于读取设备信息基本每次的通道都不一样,所以这里与上面收发数据有点不一样,每次读取数据都需要绑定一次通道,使用示例如下:
BluetoothGattChannel bluetoothGattChannel = new BluetoothGattChannel.Builder()
        .setBluetoothGatt(deviceMirror.getBluetoothGatt())
        .setPropertyType(PropertyType.PROPERTY_READ)
        .setServiceUUID(serviceUUID)
        .setCharacteristicUUID(characteristicUUID)
        .setDescriptorUUID(descriptorUUID)
        .builder();
deviceMirror.bindChannel(new IBleCallback() {
    @Override
    public void onSuccess(byte[] data, BluetoothGattChannel bluetoothGattChannel, BluetoothLeDevice bluetoothLeDevice) {

    }

    @Override
    public void onFailure(BleException exception) {

    }
}, bluetoothGattChannel);
deviceMirror.readData();
总结
从以上的描述中可以知道,设备相关的所有操作都统一交给 ViseBle 进行处理,并且该类是单例模式,全局只有一个,管理很方便。使用该库提供的功能前必须要调用 ViseBle.getInstance().init(context); 进行初始化。每连接成功一款设备都会在设备镜像池中添加一款设备镜像,该设备镜像是维护设备连接成功后所有操作的核心类,在断开连接时会将该设备镜像从镜像池中移除,如果连接设备数量超过配置的最大连接数,那么设备镜像池会依据 Lru 算法自动移除最近最久未使用设备并断开连接。ViseBle 中封装了几个常用的 API,如:开始扫描与停止扫描、连接与断开连接、清除资源等,该库提供的功能尽量简单易用,这也正是该项目的宗旨。
