温馨提示:阅读本文需要60-70分钟
微信公众号:顾林海
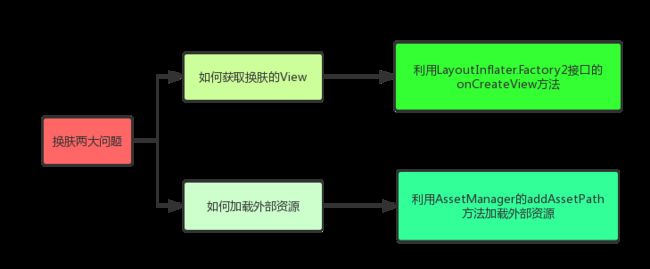
完成换肤需要解决两个问题:
如何获取换肤的View,利用LayoutInflater内部接口Factory2提供的onCreateView方法获取需要换肤的View,我们从setContentView方法的具体作用来了解LayoutInflater.Factory2接口的作用,以具体源码进行分析,MainActivity代码如下:
public class MainActivity extends AppCompatActivity {

    @Override
    protected void onCreate(@Nullable Bundle savedInstanceState) {
        super.onCreate(savedInstanceState);
        setContentView(R.layout.activity_main);
    }
}
MainActivity继承自AppCompatActivity,AppCompatActivity是Android Support Library包下的类,点击进入AppCompatActivity的setContentView方法:
    @Override
    public void setContentView(@LayoutRes int layoutResID) {
        getDelegate().setContentView(layoutResID);
    }
通过getDelegate()方法返回一个AppCompatDelegate对象,并调用AppCompatDelegate对象的setContentView方法。
    @NonNull
    public AppCompatDelegate getDelegate() {
        if (mDelegate == null) {
            mDelegate = AppCompatDelegate.create(this, this);
        }
        return mDelegate;
    }
通过AppCompatDelegate的create方法创建AppCompatDelegate对象:
    public static AppCompatDelegate create(Activity activity, AppCompatCallback callback) {
        return create(activity, activity.getWindow(), callback);
    }
通过create方法返回AppCompatDelegate对象:
    private static AppCompatDelegate create(Context context, Window window,
            AppCompatCallback callback) {
        if (Build.VERSION.SDK_INT >= 24) {
            return new AppCompatDelegateImplN(context, window, callback);
        } else if (Build.VERSION.SDK_INT >= 23) {
            return new AppCompatDelegateImplV23(context, window, callback);
        } else {
            return new AppCompatDelegateImplV14(context, window, callback);
        }
    }
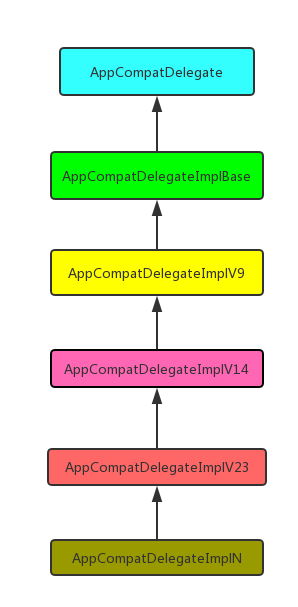
AppCompatDelegate对象的创建是根据SDK的不同版本而创建的,其中AppCompatDelegateImplN、AppCompatDelegateImplV23以及AppCompatDelegateImplV14的继承结构如下图所示:
AppCompatDelegate是一个抽象类,AppCompatDelegateImplBase也是抽象类,主要对AppCompatDelegate功能的扩展,具体的实现类是AppCompatDelegateImplV9,以上根据SDK版本创建的类都继承自AppCompatDelegateImplV9。
继续回到AppCompatActivity的setContentView方法:
    @Override
    public void setContentView(@LayoutRes int layoutResID) {
        getDelegate().setContentView(layoutResID);
    }
获取AppCompatDelegate对象后,通过该对象的setContentView方法设置ContentView,这个setContentView方法的具体调用是在AppCompatDelegateImplV9中,查看源码如下:
//android.support.v7.app.AppCompatDelegateImplV9

    @Override
    public void setContentView(int resId) {
        ensureSubDecor();
        ViewGroup contentParent = (ViewGroup) mSubDecor.findViewById(android.R.id.content);
        contentParent.removeAllViews();
        //注释1
        LayoutInflater.from(mContext).inflate(resId, contentParent);
        mOriginalWindowCallback.onContentChanged();
    }
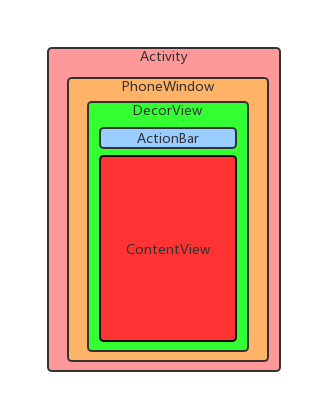
setContentView方法最核心的地方就是在注释1处,通过LayoutInflater加载layout.xml文件,contentParent是我们创建布局后所要添加进去的一个容器,在创建Activity时会创建顶层视图,也就是DecorView,DecorView其实是PhoneWindow中的一个内部类,它会加载相应的系统布局。如下图:
DecorView就是我们Activity显示的全部视图包括ActionBar,其中ContentView布局是由我们来创建的,并通过LayoutInflater添加到ContentView中。
进入LayoutInflater的inflate方法中。
    public View inflate(@LayoutRes int resource, @Nullable ViewGroup root) {
        return inflate(resource, root, root != null);
    }

    public View inflate(@LayoutRes int resource, @Nullable ViewGroup root, boolean attachToRoot) {
        final Resources res = getContext().getResources();
        if (DEBUG) {
            Log.d(TAG, "INFLATING from resource: \"" + res.getResourceName(resource) + "\" ("
                    + Integer.toHexString(resource) + ")");
        }

        final XmlResourceParser parser = res.getLayout(resource);
        try {
            return inflate(parser, root, attachToRoot);
        } finally {
            parser.close();
        }
    }
通过资源大管家,也就是Resources来加载layout文件,最后通过inflate方法的一步步调用,会走到createViewFromTag方法,该方法内部会对每个标签生成对应的View对象。
    View createViewFromTag(View parent, String name, Context context, AttributeSet attrs,
            boolean ignoreThemeAttr) {
        ...

        try {
            View view;
            if (mFactory2 != null) {
                //注释1
                view = mFactory2.onCreateView(parent, name, context, attrs);
            }
            ...
            if (view == null && mPrivateFactory != null) {
                view = mPrivateFactory.onCreateView(parent, name, context, attrs);
            }
            //注释2
            if (view == null) {
                final Object lastContext = mConstructorArgs[0];
                mConstructorArgs[0] = context;
                try {
                    if (-1 == name.indexOf('.')) {
                        view = onCreateView(parent, name, attrs);
                    } else {
                        view = createView(name, null, attrs);
                    }
                } finally {
                    mConstructorArgs[0] = lastContext;
                }
            }

            return view;
        } catch (InflateException e) {
            throw e;

        } catch (ClassNotFoundException e) {
            final InflateException ie = new InflateException(attrs.getPositionDescription()
                    + ": Error inflating class " + name, e);
            ie.setStackTrace(EMPTY_STACK_TRACE);
            throw ie;

        } catch (Exception e) {
            final InflateException ie = new InflateException(attrs.getPositionDescription()
                    + ": Error inflating class " + name, e);
            ie.setStackTrace(EMPTY_STACK_TRACE);
            throw ie;
        }
    }
经过一些列调用进入注释2处,通过mFactory2的onCreateView方法创建对应的View对象,mFactory2的赋值时机需要我们回到MainActivity代码中进行一步步查看:
public class MainActivity extends AppCompatActivity {

    @Override
    protected void onCreate(@Nullable Bundle savedInstanceState) {
        super.onCreate(savedInstanceState);
        setContentView(R.layout.activity_main);
    }
}
进入AppCompatActivity的onCreate方法中:
    protected void onCreate(@Nullable Bundle savedInstanceState) {
        final AppCompatDelegate delegate = getDelegate();
        //注释1
        delegate.installViewFactory();
        delegate.onCreate(savedInstanceState);
        ...
        super.onCreate(savedInstanceState);
    }
注释1处调用了delegate的installViewFactory方法,这个delegate对象是通过getDelegate()方法:
    @NonNull
    public AppCompatDelegate getDelegate() {
        if (mDelegate == null) {
            mDelegate = AppCompatDelegate.create(this, this);
        }
        return mDelegate;
    }
这段代码应该很熟悉了吧,也就是说最终调用AppCompatDelegateImplV9的installViewFactory方法,查看源码:
class AppCompatDelegateImplV9 extends AppCompatDelegateImplBase
        implements MenuBuilder.Callback, LayoutInflater.Factory2 {
    ...
    @Override
    public void installViewFactory() {
        LayoutInflater layoutInflater = LayoutInflater.from(mContext);
        if (layoutInflater.getFactory() == null) {
            //注释1
            LayoutInflaterCompat.setFactory2(layoutInflater, this);
        } else {
            if (!(layoutInflater.getFactory2() instanceof AppCompatDelegateImplV9)) {
                Log.i(TAG, "The Activity's LayoutInflater already has a Factory installed"
                        + " so we can not install AppCompat's");
            }
        }
    }
    ...
}
AppCompatDelegateImplV9本身也实现了LayoutInflater.Factory2接口,在注释1处调用LayoutInflaterCompat的setFactory2方法并传入layoutInflater实例以及自身AppCompatDelegateImplV9对象。
进入LayoutInflaterCompat的setFactory2方法:
public void setFactory2(LayoutInflater inflater, LayoutInflater.Factory2 factory) {
            //注释1
            inflater.setFactory2(factory);

            final LayoutInflater.Factory f = inflater.getFactory();
            if (f instanceof LayoutInflater.Factory2) {
                forceSetFactory2(inflater, (LayoutInflater.Factory2) f);
            } else {
                // Else, we will force set the original wrapped Factory2
                forceSetFactory2(inflater, factory);
            }
        }
注释1处将getDelegate()方法获取到的AppCompatDelegate对象(具体实现类是AppCompatDelegateImplV9)通过inflater的setFactory2传入进去。
进入LayoutInflater的setFactory2:
    public void setFactory2(Factory2 factory) {
        if (mFactorySet) {
            throw new IllegalStateException("A factory has already been set on this LayoutInflater");
        }
        if (factory == null) {
            throw new NullPointerException("Given factory can not be null");
        }
        mFactorySet = true;
        if (mFactory == null) {
            mFactory = mFactory2 = factory;
        } else {
            mFactory = mFactory2 = new FactoryMerger(factory, factory, mFactory, mFactory2);
        }
    }
到这里我们知道了LayoutInflater的成员变量mFactory2就是AppCompatDelegateImplV9对象(AppCompatDelegateImplV9实现LayoutInflater.Factory2接口)。
继续回到createViewFromTag方法中:
    View createViewFromTag(View parent, String name, Context context, AttributeSet attrs,
            boolean ignoreThemeAttr) {
        ...

        try {
            View view;
            if (mFactory2 != null) {
                //注释1
                view = mFactory2.onCreateView(parent, name, context, attrs);
            }
            ...
            if (view == null && mPrivateFactory != null) {
                view = mPrivateFactory.onCreateView(parent, name, context, attrs);
            }
            //注释2
            if (view == null) {
                final Object lastContext = mConstructorArgs[0];
                mConstructorArgs[0] = context;
                try {
                    if (-1 == name.indexOf('.')) {
                        view = onCreateView(parent, name, attrs);
                    } else {
                        view = createView(name, null, attrs);
                    }
                } finally {
                    mConstructorArgs[0] = lastContext;
                }
            }

            return view;
        } catch (InflateException e) {
            throw e;

        } catch (ClassNotFoundException e) {
            final InflateException ie = new InflateException(attrs.getPositionDescription()
                    + ": Error inflating class " + name, e);
            ie.setStackTrace(EMPTY_STACK_TRACE);
            throw ie;

        } catch (Exception e) {
            final InflateException ie = new InflateException(attrs.getPositionDescription()
                    + ": Error inflating class " + name, e);
            ie.setStackTrace(EMPTY_STACK_TRACE);
            throw ie;
        }
    }
注释1处调用mFactory2的onCreateView方法,也就是调用AppCompatDelegateImplV9的onCreateView方法。
进入AppCompatDelegateImplV9的onCreateView方法:
    @Override
    public final View onCreateView(View parent, String name, Context context, AttributeSet attrs) {
        ...
        return createView(parent, name, context, attrs);
    }
进入AppCompatDelegateImplV9的createView方法
    @Override
    public View createView(View parent, final String name, @NonNull Context context,
            @NonNull AttributeSet attrs) {
        ...

        return mAppCompatViewInflater.createView(parent, name, context, attrs, inheritContext,
                IS_PRE_LOLLIPOP, /* Only read android:theme pre-L (L+ handles this anyway) */
                true, /* Read read app:theme as a fallback at all times for legacy reasons */
                VectorEnabledTintResources.shouldBeUsed() /* Only tint wrap the context if enabled */
        );
    }
调用mAppCompatViewInflater的createView方法,继续进入:
    final View createView(View parent, final String name, @NonNull Context context,
            @NonNull AttributeSet attrs, boolean inheritContext,
            boolean readAndroidTheme, boolean readAppTheme, boolean wrapContext) {
        final Context originalContext = context;

        if (inheritContext && parent != null) {
            context = parent.getContext();
        }
        if (readAndroidTheme || readAppTheme) {
            // We then apply the theme on the context, if specified
            context = themifyContext(context, attrs, readAndroidTheme, readAppTheme);
        }
        if (wrapContext) {
            context = TintContextWrapper.wrap(context);
        }

        View view = null;

        // We need to 'inject' our tint aware Views in place of the standard framework versions
        switch (name) {
            case "TextView":
                view = createTextView(context, attrs);
                verifyNotNull(view, name);
                break;
            case "ImageView":
                view = createImageView(context, attrs);
                verifyNotNull(view, name);
                break;
            case "Button":
                view = createButton(context, attrs);
                verifyNotNull(view, name);
                break;
            case "EditText":
                view = createEditText(context, attrs);
                verifyNotNull(view, name);
                break;
            case "Spinner":
                view = createSpinner(context, attrs);
                verifyNotNull(view, name);
                break;
            case "ImageButton":
                view = createImageButton(context, attrs);
                verifyNotNull(view, name);
                break;
            case "CheckBox":
                view = createCheckBox(context, attrs);
                verifyNotNull(view, name);
                break;
            case "RadioButton":
                view = createRadioButton(context, attrs);
                verifyNotNull(view, name);
                break;
            case "CheckedTextView":
                view = createCheckedTextView(context, attrs);
                verifyNotNull(view, name);
                break;
            case "AutoCompleteTextView":
                view = createAutoCompleteTextView(context, attrs);
                verifyNotNull(view, name);
                break;
            case "MultiAutoCompleteTextView":
                view = createMultiAutoCompleteTextView(context, attrs);
                verifyNotNull(view, name);
                break;
            case "RatingBar":
                view = createRatingBar(context, attrs);
                verifyNotNull(view, name);
                break;
            case "SeekBar":
                view = createSeekBar(context, attrs);
                verifyNotNull(view, name);
                break;
            default:
                // The fallback that allows extending class to take over view inflation
                // for other tags. Note that we don't check that the result is not-null.
                // That allows the custom inflater path to fall back on the default one
                // later in this method.
                view = createView(context, name, attrs);
        }

        if (view == null && originalContext != context) {
            // If the original context does not equal our themed context, then we need to manually
            // inflate it using the name so that android:theme takes effect.
            view = createViewFromTag(context, name, attrs);
        }

        if (view != null) {
            // If we have created a view, check its android:onClick
            checkOnClickListener(view, attrs);
        }

        return view;
    }
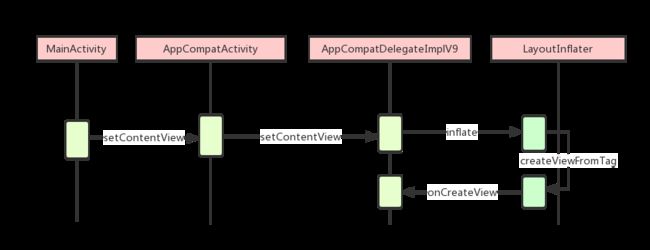
整个调用流程图如下:
mAppCompatViewInflater的createView方法主要通过switch/case形式对相应的标签名字创建对应的View对象,比如TextView调用createTextView方法创建TextView对象。这里有个问题,如果是自定义的View或是在这里并没有判断的View的话,View就为null。
继续回到createViewFromTag方法中:
    View createViewFromTag(View parent, String name, Context context, AttributeSet attrs,
            boolean ignoreThemeAttr) {
        ...

        try {
            View view;
            if (mFactory2 != null) {
                //注释1
                view = mFactory2.onCreateView(parent, name, context, attrs);
            }
            ...
            if (view == null && mPrivateFactory != null) {
                view = mPrivateFactory.onCreateView(parent, name, context, attrs);
            }
            //注释2
            if (view == null) {
                final Object lastContext = mConstructorArgs[0];
                mConstructorArgs[0] = context;
                try {
                    if (-1 == name.indexOf('.')) {
                        //注释3
                        view = onCreateView(parent, name, attrs);
                    } else {
                        //注释4
                        view = createView(name, null, attrs);
                    }
                } finally {
                    mConstructorArgs[0] = lastContext;
                }
            }

            return view;
        } catch (InflateException e) {
            throw e;

        } catch (ClassNotFoundException e) {
            final InflateException ie = new InflateException(attrs.getPositionDescription()
                    + ": Error inflating class " + name, e);
            ie.setStackTrace(EMPTY_STACK_TRACE);
            throw ie;

        } catch (Exception e) {
            final InflateException ie = new InflateException(attrs.getPositionDescription()
                    + ": Error inflating class " + name, e);
            ie.setStackTrace(EMPTY_STACK_TRACE);
            throw ie;
        }
    }
注释1处在上面已经解析过了就是对layout文件中的标签类型创建对应的View对象,如果是自定义的View或是layout文件中相应的View标签在这里并没有判断(毕竟系统不可能全部都判断到),这时View就为null。进入注释2处对View为null的情况进行处理。
注释3处如果不是全限定名的类名调用onCreateView方法:
    protected View onCreateView(View parent, String name, AttributeSet attrs)
            throws ClassNotFoundException {
        return onCreateView(name, attrs);
    }
    protected View onCreateView(String name, AttributeSet attrs)
            throws ClassNotFoundException {
        return createView(name, "android.view.", attrs);
    }
如果不是全限定的类名,默认加上“android.view.”。
继续往下追踪:
    public final View createView(String name, String prefix, AttributeSet attrs)
            throws ClassNotFoundException, InflateException {
        Constructor constructor = sConstructorMap.get(name);
        if (constructor != null && !verifyClassLoader(constructor)) {
            constructor = null;
            sConstructorMap.remove(name);
        }
        Class clazz = null;

        try {
            Trace.traceBegin(Trace.TRACE_TAG_VIEW, name);

            if (constructor == null) {
                // Class not found in the cache, see if it's real, and try to add it
                clazz = mContext.getClassLoader().loadClass(
                        prefix != null ? (prefix + name) : name).asSubclass(View.class);

                if (mFilter != null && clazz != null) {
                    boolean allowed = mFilter.onLoadClass(clazz);
                    if (!allowed) {
                        failNotAllowed(name, prefix, attrs);
                    }
                }
                constructor = clazz.getConstructor(mConstructorSignature);
                constructor.setAccessible(true);
                sConstructorMap.put(name, constructor);
            } else {
                // If we have a filter, apply it to cached constructor
                if (mFilter != null) {
                    // Have we seen this name before?
                    Boolean allowedState = mFilterMap.get(name);
                    if (allowedState == null) {
                        // New class -- remember whether it is allowed
                        clazz = mContext.getClassLoader().loadClass(
                                prefix != null ? (prefix + name) : name).asSubclass(View.class);

                        boolean allowed = clazz != null && mFilter.onLoadClass(clazz);
                        mFilterMap.put(name, allowed);
                        if (!allowed) {
                            failNotAllowed(name, prefix, attrs);
                        }
                    } else if (allowedState.equals(Boolean.FALSE)) {
                        failNotAllowed(name, prefix, attrs);
                    }
                }
            }

            Object lastContext = mConstructorArgs[0];
            if (mConstructorArgs[0] == null) {
                // Fill in the context if not already within inflation.
                mConstructorArgs[0] = mContext;
            }
            Object[] args = mConstructorArgs;
            args[1] = attrs;
            //注释1
            final View view = constructor.newInstance(args);
            if (view instanceof ViewStub) {
                // Use the same context when inflating ViewStub later.
                final ViewStub viewStub = (ViewStub) view;
                viewStub.setLayoutInflater(cloneInContext((Context) args[0]));
            }
            mConstructorArgs[0] = lastContext;
            return view;

        } catch (NoSuchMethodException e) {
            final InflateException ie = new InflateException(attrs.getPositionDescription()
                    + ": Error inflating class " + (prefix != null ? (prefix + name) : name), e);
            ie.setStackTrace(EMPTY_STACK_TRACE);
            throw ie;

        } catch (ClassCastException e) {
            // If loaded class is not a View subclass
            final InflateException ie = new InflateException(attrs.getPositionDescription()
                    + ": Class is not a View " + (prefix != null ? (prefix + name) : name), e);
            ie.setStackTrace(EMPTY_STACK_TRACE);
            throw ie;
        } catch (ClassNotFoundException e) {
            // If loadClass fails, we should propagate the exception.
            throw e;
        } catch (Exception e) {
            final InflateException ie = new InflateException(
                    attrs.getPositionDescription() + ": Error inflating class "
                            + (clazz == null ? "" : clazz.getName()), e);
            ie.setStackTrace(EMPTY_STACK_TRACE);
            throw ie;
        } finally {
            Trace.traceEnd(Trace.TRACE_TAG_VIEW);
        }
    }
上面代码比较多,总结就是在注释1处通过反射创建相应的View对象。
到这里我们知道了Layout资源文件的加载是通过LayoutInflater.Factory2的onCreateView方法实现的。也就是如果我们自己定义一个实现了LayoutInflater.Factory2接口的类并实现onCreateView方法,在该方法中保存需要换肤的View,最后给换肤的View设置插件中的资源。
加载外部资源可以通过反射创建AssetManager对象,反射调用AssetManager的addAssetPath方法加载外部资源,最后创建Resources对象并传入刚创建的AssetManager对象,通过刚创建的Resources对象获取相应的资源。
首先获取需要换肤的View,怎么知道哪些View需要换肤,可以通过自定义属性来判断,新建attr.xml:
skinChange用于判断View是否需要进行换肤。编写我们的布局文件:
新建SkinFactory类并实现自LayoutInflater.Factory2接口:
public class SkinFactory implements LayoutInflater.Factory2 {

  public class SkinFactory implements LayoutInflater.Factory2 {

    private AppCompatDelegate mDelegate;

    static final Class[] mConstructorSignature = new Class[]{Context.class, AttributeSet.class};//
    final Object[] mConstructorArgs = new Object[2];
    private static final HashMap> sConstructorMap = new HashMap>();
    static final String[] prefix = new String[]{
            "android.widget.",
            "android.view.",
            "android.webkit."
    };

    public void setDelegate(AppCompatDelegate delegate) {
        this.mDelegate = delegate;
    }

    @Override
    public View onCreateView(String name, Context context, AttributeSet attrs) {
        return null;
    }

    @Override
    public View onCreateView(View parent, String name, Context context, AttributeSet attrs) {

        View view = mDelegate.createView(parent, name, context, attrs);
        if (view == null) {
            mConstructorArgs[0] = context;
            try {
                if (-1 == name.indexOf('.')) {
                    view = createViewByPrefix(context, name, prefix, attrs);
                } else {
                    view = createViewByPrefix(context, name, null, attrs);
                }
            } catch (Exception e) {
                e.printStackTrace();
            }
        }

        //保存需要换肤的View
        SkinChange.getInstance().saveSkin(context, attrs, view);

        return view;
    }

    private  View createViewByPrefix(Context context, String name, String[] prefixs, AttributeSet attrs) {

        Constructor constructor = sConstructorMap.get(name);
        Class clazz = null;

        if (constructor == null) {
            try {
                if (prefixs != null && prefixs.length > 0) {
                    for (String prefix : prefixs) {
                        clazz = context.getClassLoader().loadClass(
                                prefix != null ? (prefix + name) : name).asSubclass(View.class);
                        if (clazz != null) break;
                    }
                } else {
                    clazz = context.getClassLoader().loadClass(name).asSubclass(View.class);
                }
                if (clazz == null) {
                    return null;
                }
                constructor = clazz.getConstructor(mConstructorSignature);
            } catch (Exception e) {
                e.printStackTrace();
                return null;
            }
            constructor.setAccessible(true);
            //缓存
            sConstructorMap.put(name, constructor);
        }
        Object[] args = mConstructorArgs;
        args[1] = attrs;
        try {
            //通过反射创建View对象
            return constructor.newInstance(args);
        } catch (Exception e) {
            e.printStackTrace();
        }
        return null;
    }
}
Factory2的onCreateView的实现的逻辑与源码差不多,通过系统的AppCompatDelegate的createView方法创建View,如果创建的View为空,通过反射创建View对象,最主要的一步是SkinChange.getInstance().saveSkin方法,用于保存换肤的View,具体代码如下,新建SkinChange类:
public class SkinChange {

    private SkinChange(){}

    public static SkinChange getInstance(){
        return Holder.SKIN_CHANGE;
    }

     private static class Holder{
         private static final SkinChange SKIN_CHANGE=new SkinChange();
    }

    private List mSkinListView = new ArrayList<>();

    public List getSkinViewList(){
        return mSkinListView;
    }

    public void saveSkin(Context context, AttributeSet attrs, View view) {
        TypedArray a = context.obtainStyledAttributes(attrs, R.styleable.Skin);
        boolean skin = a.getBoolean(R.styleable.Skin_skinChange, false);
        if (skin) {
            final int Len = attrs.getAttributeCount();
            HashMap attrMap = new HashMap<>();
            for (int i = 0; i < Len; i++) {
                String attrName = attrs.getAttributeName(i);
                String attrValue = attrs.getAttributeValue(i);
                attrMap.put(attrName, attrValue);
                Log.d("saveSkin","attrName="+attrName+"  attrValue="+attrValue);
            }

            SkinChange.Skin skinView = new SkinChange.Skin();
            skinView.view = view;
            skinView.attrsMap = attrMap;
            mSkinListView.add(skinView);
        }

    }

    public static class Skin{
        View view;
        HashMap attrsMap;
    }
}
将属性skinChange为true的View以及它的所有属性保存起来。
新建BaseActivity,实现onCreate方法,在setContentView方法之前替换LayoutInflater的成员变量mFactory2:
public abstract class BaseActivity extends AppCompatActivity {

    private SkinFactory mSkinFactory;

    @Override
    protected void onCreate(@Nullable Bundle savedInstanceState) {
        if(null == mSkinFactory){
            mSkinFactory=new SkinFactory();
        }
        mSkinFactory.setDelegate(getDelegate());
        LayoutInflater layoutInflater=LayoutInflater.from(this);
        layoutInflater.setFactory2(mSkinFactory);
        super.onCreate(savedInstanceState);
    }
}
运行效果如下:
从控制台打印的信息我们已经知道哪些View的属性需要进行换肤,剩下的就是加载外部apk中的资源,创建LoadResources类:
public class LoadResources {

    private Resources mSkinResources;
    private Context mContext;
    private String mOutPkgName;

    public static LoadResources getInstance() {
        return Holder.LOAD_RESOURCES;
    }

    private LoadResources() {
    }

    private static class Holder{
        private static final LoadResources LOAD_RESOURCES=new LoadResources();
    }
    public void init(Context context) {
        mContext = context.getApplicationContext();
    }

    public void load(final String path) {
        File file = new File(path);
        if (!file.exists()) {
            return;
        }
        PackageManager mPm = mContext.getPackageManager();
        PackageInfo mInfo = mPm.getPackageArchiveInfo(path, PackageManager.GET_ACTIVITIES);
        mOutPkgName = mInfo.packageName;
        AssetManager assetManager;
        try {
            assetManager = AssetManager.class.newInstance();
            Method addAssetPath = assetManager.getClass().getMethod("addAssetPath", String.class);
            addAssetPath.invoke(assetManager, path);
            mSkinResources = new Resources(assetManager,
                    mContext.getResources().getDisplayMetrics(),
                    mContext.getResources().getConfiguration());
        } catch (Exception e) {
            e.printStackTrace();
        }

    }

    public int getColor(int resId) {
        if (mSkinResources == null) {
            return resId;
        }
        String resName = mSkinResources.getResourceEntryName(resId);
        int outResId = mSkinResources.getIdentifier(resName, "color", mOutPkgName);
        if (outResId == 0) {
            return resId;
        }
        return mSkinResources.getColor(outResId);
    }

    public Drawable getDrawable(int resId) {
        if (mSkinResources == null) {
            return ContextCompat.getDrawable(mContext, resId);
        }
        String resName = mSkinResources.getResourceEntryName(resId);
        int outResId = mSkinResources.getIdentifier(resName, "drawable", mOutPkgName);
        if (outResId == 0) {
            return ContextCompat.getDrawable(mContext, resId);
        }
        return mSkinResources.getDrawable(outResId);
    }
}
LoadResources类非常简单,通过反射创建AssetManager,并执行addAssetPath来加载外部apk,最后创建一个外部资源的Resources。
新建接口ISkinView用于约定换肤方法:
public interface ISkinView {
    void change(String path);
}
创建SkinChangeBiz并实现ISkinView接口:
 public class SkinChangeBiz implements ISkinView {

    private static class Holder {
        private static final ISkinView SKIN_CHANGE_BIZ = new SkinChangeBiz();
    }

    public static ISkinView getInstance() {
        return Holder.SKIN_CHANGE_BIZ;
    }

    @Override
    public void change(String path) {
        File skinFile = new File(Environment.getExternalStorageDirectory(), path);
        LoadResources.getInstance().load(skinFile.getAbsolutePath());
        for (SkinChange.Skin skinView : SkinChange.getInstance().getSkinViewList()) {
            changeSkin(skinView);
        }
    }

    void changeSkin(SkinChange.Skin skinView) {
        if (!TextUtils.isEmpty(skinView.attrsMap.get("background"))) {
            int bgId = Integer.parseInt(skinView.attrsMap.get("background").substring(1));
            String attrType = skinView.view.getResources().getResourceTypeName(bgId);
            if (TextUtils.equals(attrType, "drawable")) {
                skinView.view.setBackgroundDrawable(LoadResources.getInstance().getDrawable(bgId));
            } else if (TextUtils.equals(attrType, "color")) {
                skinView.view.setBackgroundColor(LoadResources.getInstance().getColor(bgId));
            }
        }

        if (skinView.view instanceof TextView) {
            if (!TextUtils.isEmpty(skinView.attrsMap.get("textColor"))) {
                int textColorId = Integer.parseInt(skinView.attrsMap.get("textColor").substring(1));
                ((TextView) skinView.view).setTextColor(LoadResources.getInstance().getColor(textColorId));
            }
        }

    }

}
SkinChangeBiz的change方法中先加载外部资源,再遍历之前保存的换肤View,对相关属性进行设置。
前期工作已经准备好了,剩下的创建皮肤插件,新建工程,添加需要换肤的资源,注意资源名必须与宿主的资源名一样,皮肤插件的sdk版本也必须保持一致,皮肤插件工程就不贴出来了,比较简单。
        mBtnSkin.setOnClickListener(new View.OnClickListener() {
            @Override
            public void onClick(View v) {
                //进行换肤
                SkinChangeBiz.getInstance().change("skinPlugin.apk");
            }
        });
运行效果如下:
github地址请点击这里

