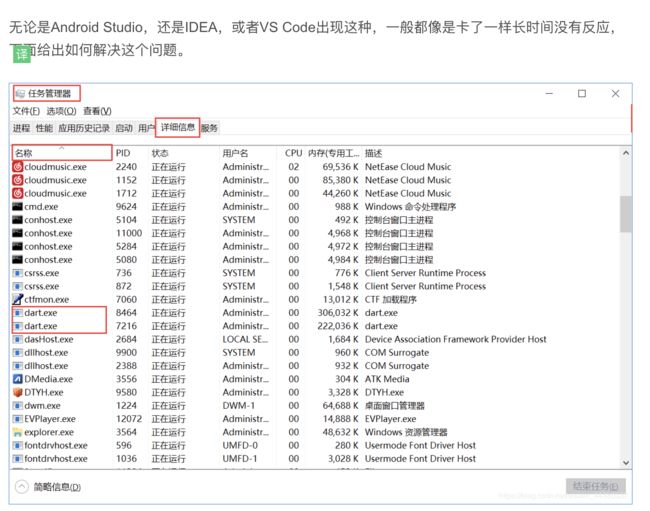
1、flutter命令
Waiting for another flutter command to release the startup lock…
2、androidstudio 创建卡死(使用命令创建)
flutter create -i objc -a java test1234
3、添加高斯模糊层
import 'dart:ui';

buildss(){
    return Stack(
      children: [
        Container(
          height: CommUtil.height(800),
          child: Image.network('图片的地址',fit: BoxFit.fitHeight,),
        ),
        Container(
          width: CommUtil.width(1080),
          height: CommUtil.height(800),
          child:  ClipRRect(
            child: BackdropFilter(
              filter: ImageFilter.blur(sigmaX: 10, sigmaY: 10),
              child: Container(
                color: Colors.white.withOpacity(0.2),
              ),
            ),
          ),
        ),
      ],
    );
  }
4、适用于Android和ios的base自适应顶部和底部状态的控件
import 'package:flutter/material.dart';
import 'package:flutter/services.dart';
import 'dart:math' as math;
import 'dart:io';
///base布局
class BaseLayout extends StatelessWidget {
  ///状态栏字体主题  FontStyle
  final FontStyle stateFontStyle;
  /// 是否显示状态栏
  final bool isStateBar;
  Color background;
  BoxDecoration topColor;
  Widget child;


  BaseLayout({@required this.stateFontStyle,@required this.isStateBar,@required this.child,this.background = Colors.white,this.topColor});


  @override
  Widget build(BuildContext context) {
    EdgeInsets padding = MediaQuery.of(context).padding;
    double top = math.max(padding.top , EdgeInsets.zero.top); //计算状态栏的高度
    double bottomPadding = MediaQuery.of(context).padding.bottom;
    if (!isStateBar){
      top = 0;
    }

    SystemUiOverlayStyle style = SystemUiOverlayStyle(
      systemNavigationBarColor: Colors.white,// 底部状态栏背景颜色
      systemNavigationBarDividerColor: null,
      systemNavigationBarIconBrightness: Brightness.light, //dart 灰色  light 白色
      statusBarColor: Colors.transparent, //状态栏背景
      statusBarIconBrightness: isLight(stateFontStyle),
      statusBarBrightness: isLight(stateFontStyle),
    );

    return Scaffold(
      backgroundColor: background,
      body: AnnotatedRegion(
        value: style,
        child: Flex(
          direction: Axis.vertical,
          children: [
            Container(
              width: double.infinity,
              height: top,
              decoration: topColor,
            ),
            Expanded(child: child),
            Container(
              width: double.infinity,
              color: Colors.white,
              height: bottomPadding,
            ),
          ],
        ),
      ),
    );
  }
  ///判断是否是白色字体
  Brightness isLight(FontStyle style){
    if (style == FontStyle.dark){
      return Platform.isIOS ? Brightness.dark : Brightness.light;
    }else{
      return Platform.isIOS ? Brightness.light: Brightness.dark;
    }
  }

}
/// 状态栏字体颜色
enum FontStyle{
    ///白色
   light,
    ///黑色
   dark,
}
5、shared_preferences 控件
导入包
shared_preferences: ^0.5.6
工具类
import 'package:shared_preferences/shared_preferences.dart';

class SpUtil {
  ///保存String类型的Key
  static Future putString(String key,String value) async{
    SharedPreferences preferences = await SharedPreferences.getInstance();
    preferences.setString(key, value);
  }
  ///获取String类型的Key
  static Future getString(String key) async{
    SharedPreferences preferences = await SharedPreferences.getInstance();
    return preferences.getString(key);
  }

  ///保存Bool类型的Key
  static Future putBoolean(String key,bool value) async{
    SharedPreferences preferences = await SharedPreferences.getInstance();
    preferences.setBool(key, value);
  }
  ///获取Bool类型的Key
  static Future getBoolean(String key) async{
    SharedPreferences preferences = await SharedPreferences.getInstance();
    return preferences.getBool(key);
  }


  ///保存int类型的Key
  static Future putInt(String key,int value) async{
    SharedPreferences preferences = await SharedPreferences.getInstance();
    preferences.setInt(key, value);
  }
  ///获取int类型的Key
  static Future getInt(String key) async{
    int vv = -1;
    try{
      SharedPreferences preferences = await SharedPreferences.getInstance();
      vv = preferences.getInt(key);
    }catch(e){
    }
    return vv;
  }
}
6、屏幕自适应的库
导入包
flutter_screenutil: ^0.7.0
使用
//初始化屏幕的尺寸,在第一个页面的build函数内使用
ScreenUtil.instance = ScreenUtil(width: 1080, height: 1920)
      ..init(context);
//用法,可以新建一个公共的工具类
//只使用width和fontSize方法就好,使用height的话,某些机型的宽高比更这个比例不一样,会有一点小差别,导致显示不全
 static double width(num num){
    return ScreenUtil.getInstance().setWidth(num);
  }

  static double height(num num){
    return ScreenUtil.getInstance().setHeight(num);
  }

  static double fontSize(num num){
    return ScreenUtil.getInstance().setSp(num);
  }
