Before start
1.You need to know how to simulate ASA with Qemu,if you don't,pls refer to RONSUN's article:
http://www.netemu.cn/bbs/thread-6898-1-1.html
2.You have the knowledge to simulate the Route & Switch
Requirement
1.Dynamips,Dynagen,Wincap,SecureCRT,Qemu etc.
2.IOS image for Dynamips:
(such as unzip-c3725-ix-mz.123-3c.bin, c3640-js-mz.124-10.bin)
3.BES (Option)
4.Mozilla Firefox (Option)
5.sslclient-win-1.1.3.173.pkg sslclient-win-1.1.3.173.rar (370.45 KB)
6.open***-2.1_rc7-install.exe for TAP interface open***-2.1_rc7-install.rar (1.28 MB)
用于创建TAP接口
7.TFTP software TFTP.rar (1.55 MB)
TFTF服务器端程序
8.WindowsXP professional system (IE6 or higher!!!)
Topology
1.3640 Switch is not shown in the topology
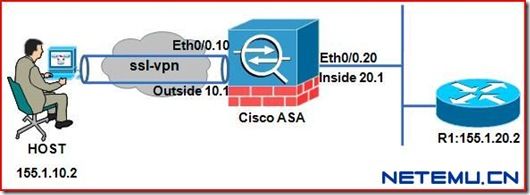
2.ASA’s eth0/0 is divided to 2 sub-interfaces,each belongs to one vlan
3.3640 switch connect to ASA use a trunk point
4.ASA’s eth0/0.10 belongs to VLAN10,eth0/0.20 belongs to VLAN20
5.HOST belongs to VLAN 10 outside, R1 belongs to VLAN20 inside
Object
Host can use SSL-××× connect to inside network,telnet the inside Route R1.
Configuration
Dynamips.net
`router SW1`
image = E:\Dynamips\Dynamips\images\unzip-c3640-js-mz.124-10.bin
model = 3640
console = 3015
ram = 256
confreg = 0x2142
idlepc =0x6041f880
exec_area = 64
mmap = false
slot0 = NM-16ESW
!----------------------------connect to Route R1-----------------------
f0/1 = R1 f0/0
!----------------------------connect to Dynamips SW1, use TAP 0,-----------------
f0/10 = NIO_gen_eth:\Device\NPF_{8009E20D-E44F-4120-A419-F66848D50F1D}
!----------------------------connect to HOST’s network-------------------------------
f0/15 = NIO_gen_eth:\Device\NPF_{DDF724B9-3D73-4020-BC7E-E8CE0FA8FFDF}
`router R1`
image = E:\Dynamips\Dynamips\images\unzip-c3725-ix-mz.123-3c.bin
model = 3725
console = 3011
ram = 64
confreg = 0x2142
ASA.bat
!-------------------------connect to TAP 0 ,bridge with SW1’s f0/10---------------------------
………….
set nic1=-net nic,vlan=0,model=i82557b,macaddr=00:aa:00:00:02:01 -net tap,vlan=0,ifname=tap0 (Only one line,can’t input ‘Enter’)
Basic network configuration
ASA
interface Ethernet0/0
no nameif
no security-level
no ip address
!
!----------------------------connect to SW1 f0/10,belongs to VLAN10------------------------
interface Ethernet0/0.10
vlan 10
nameif outside
security-level 0
ip address 155.1.10.1 255.255.255.0
!
!----------------------------connect to SW1 f0/10,belongs to VLAN20------------------
interface Ethernet0/0.20
vlan 20
nameif inside
security-level 100
ip address 155.1.20.1 255.255.255.0
!
SW1
!----------------------------------created 2 vlans-----------------------------------
SW1#vlan database
SW1(vlan)#vlan 10
SW1(vlan)#vlan 20
SW1(vlan)#exit
APPLY completed.
!----------------------------------connect with R1 f0/0-----------------------------
interface FastEthernet0/1
switchport access vlan 20
!
!----------------------------------connect with tap0---------------------------------
interface FastEthernet0/10
switchport mode trunk
switchport trunk encap dot1q
!----------------------------------connect with HOST’s local area network-----------
!
interface FastEthernet0/15
switchport access vlan 10
R1
!-----------------------------------connect with SW1 f0/1---------------------------
interface FastEthernet0/0
ip address 155.1.20.2 255.255.255.0
!-----------------------------------for Telnet-------------------------------------------
line vty 0 4
login
password cisco
Upload SSL-××× client software to FLASH
ASA# copy tftp flash
Address or name of remote host []? 155.1.10.2
Source filename []? sslclient-win-1.1.3.173.pkg
Destination filename [sslclient-win-1.1.3.173.pkg]?
Accessing tftp://155.1.10.2/sslclient-win-1.1.3.173.pkg...!!!!!!!!!!!!!!!!!!!!!!!!!!!!!!!!!!!!!!!!!!!!!!!!!!!!!!!!!!!!!!!!!!!!!!!!!!!!!!!!!!!!!!!!!!!!!!!!!!!!!!
Writing file disk0:/sslclient-win-1.1.3.173.pkg...
!!!!!!!!!!!!!!!!!!!!!!!!!!!!!!!!!!!!!!!!!!!!!!!!!!!!!!!!!!!!!!!!!!!!!!!!!!!!!!!!!!!!!!!!!!!!!!!!!!!!!!
416354 bytes copied in 8.700 secs (52044 bytes/sec)
ASA# dir flash:
Directory of disk0:/
---------------------------------------------------------------------------------------
56 -rwx 416354 05:22:39 Jul 09 2008 sslclient-win-1.1.3.173.pkg
---------------------------------------------------------------------------------------
15679488 bytes total (8200192 bytes free)
Delete some unused folders
ASA# del /recursive flash:/csco_config
Delete filename [csco_config]?
Examine files in directory disk0:/csco_config? [confirm]
………..
Enable web*** on outside,use port 444
ASA(config)# web***
!-----------------Don’t conflict with ASDM’s Manage port 443 ,IMPORTANT!!!--------------
ASA(config-web***)# port 444
ASA(config-web***)# enable outside
INFO: Web××× and DTLS are enabled on 'outside'.
Basic ASA SSL-××× configuration
!-------------------create a address pool for ssl-*** dialer user---------------------------
ip local pool SSL-POOL 10.10.10.1-10.10.10.100
no failover
!-------------------map ASDM image---------------------------------------------------
asdm image disk0:/asdm-602.bin
http server enable
!-------------------enable web*** use port 444------------------------------
web***
port 444
enable outside
!-------------------map ssl-client software -----------------------------------
svc image disk0:/sslclient-win-1.1.3.173.pkg 1
svc enable
tunnel-group-list enable
!-------------------create group-policy for login users-----------------------
group-policy myssl***-group-policy internal
group-policy myssl***-group-policy attributes
***-tunnel-protocol svc web***
web***
svc ask enable
!--------------------------create a user named cisco password cisco for login-------
username cisco password cisco
!--------------------------map a group policy to the user cisco------------------------
username cisco attributes
***-group-policy myssl***-group-policy
!--------------------------create a tunnel group-----------------------------------------
tunnel-group myssl***-group type remote-access
tunnel-group myssl***-group general-attributes
!---------------------------assign a address pool for the tunnel group-----------------
address-pool SSL-POOL
tunnel-group myssl***-group web***-attributes
group-alias group-cisco enable
Test
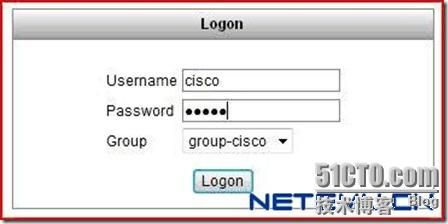
Open https://155.1.10.1:444 ,u can see the follow output:
Input username cisco password cisco, login!
What to next….
Next is all the Graphic User Interface , so ,I trust u can take it…..

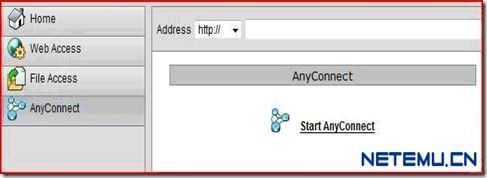
Click Start AnyConnect …..

