puppet是一种Linux、Unix、windows平台的集中配置管理系统,是目前运维主流的运维自动化工具,运维人员或者系统管理员可以通过使用 puppet 来处理所有的管理细节。
puppet使用自有的puppet描述语言(由于puppet是由ruby写的,因此如ruby语法非常相近),可管理file(文件),user(用户),group(组),package(软件包),mount(挂载),schedule和cron(计划任务),service(服务),tidy(清理),yumrepo(yum仓库),sshkey(ssh认证)等常用资源。puppet把这些系统实体称之为资源,puppet的设计目标是简化对这些资源的管理以及妥善处理资源间的依赖关系。
下面简单记录了关于puppet的安装和配置的实践过程,并进行了简单的测试。
环境说明:
rhel6.5 selinux and iptables disabled
| node | ip | remark |
| server1.example.com | 172.25.45.1 | puppet master |
| server2.example.com | 172.25.45.2 | puppet agent |
| server3.example.com | 172.25.45.3 | puppet agent |
注意:
1、主机名
Puppet 要求所有机器有完整的域名(FQDN),如果没有 DNS 服务器提供域名的话,可以在两台机器上设置主机名。注意要先设置主机名再安装 Puppet,因为 Puppet 是基于证书的,安装 Puppet 时会把主机名写入证书,客户端和服务端通信需要这个证书。
2、必须要有域名解析以及时间必须同步,不然会验证失败
软件包说明:
需要依次安装ruby、facter和puppet。(安装facter和puppet时,要使用ruby install.rb。)
Puppet 是用ruby语言写的,所以要安装ruby环境,服务器端与客户端都要安装。可以用yum直接安装,也可以精细化安装(需要4个包)。
安装puppet之前必须先安装facter。facter是一个系统盘点工具,收集主的一些资料,比如CPU,主机IP等,它收集到值发送给puppet服务器端,服务器端就可以根据不同的条件来对不同的节点机器生成不同的puppet配置文件。
软件包:
update/:
puppet-server-3.8.1-1.el6.noarch.rpm
puppet-3.8.1-1.el6.noarch.rpm
facter-2.4.4-1.el6.x86_64.rpm
hiera-1.3.4-1.el6.noarch.rpm
rubygem-json-1.5.5-3.el6.x86_64.rpm
ruby-shadow-2.2.0-2.el6.x86_64.rpm
ruby-augeas-0.4.1-3.el6.x86_64.rpm
rubygems-1.3.7-5.el6.noarch.rpm
这里都放在update/目录下
1.安装puppet
【server1】
cd update/
yum install -y puppet-server-3.8.1-1.el6.noarch.rpm puppet-3.8.1-1.el6.noarch.rpm facter-2.4.4-1.el6.x86_64.rpm hiera-1.3.4-1.el6.noarch.rpm rubygem-json-1.5.5-3.el6.x86_64.rpm ruby-shadow-2.2.0-2.el6.x86_64.rpm ruby-augeas-0.4.1-3.el6.x86_64.rpm rubygems-1.3.7-5.el6.noarch.rpm
touch /etc/puppet/manifest/site.pp    ##site.pp文件是puppet读取所有模块pp文件的开始,在3.0版本以前必须设置,否则服务无法启动。
/etc/init.d/puppetmaster start        ##启动服务,默认监听8140端口
ls /etc/puppet/ ##默认安装目录
【server2/server3】
cd update/
yum install -y puppet-3.8.1-1.el6.noarch.rpm facter-2.4.4-1.el6.x86_64.rpm hiera-1.3.4-1.el6.noarch.rpm rubygem-json-1.5.5-3.el6.x86_64.rpm ruby-shadow-2.2.0-2.el6.x86_64.rpm ruby-augeas-0.4.1-3.el6.x86_64.rpm rubygems-1.3.7-5.el6.noarch.rpm
ls /etc/puppet/
##默认安装目录详解##
/etc/puppet 配置目录:
组织结构如下:
|-- puppet.conf #主配置文件,详细内容可执行 puppet --genconfig
|-- fileserver.conf #文件服务器配置文件
|-- auth.conf #认证配置文件(ACL权限控制文件)
|-- autosign.conf #自动验证配置文件
|-- tagmail.conf #邮件配置文件(将错误信息发送)
|-- manifests #文件存储目录(puppet 会先读取该目录的.PP 文件
|--nodes
| puppetclient.pp
|-- site.pp #定义 puppet 相关的变量和默认配置。
|-- modules.pp #加载 class 类模块文件(include syslog)
|-- modules #定义模块
|-- syslog #以 syslog 为例
|-- file
|-- manifests
|-- init.pp #class 类配置
|-- templates #模块配置目录
2.证书
【server1】
puppet cert list    ##显示所有等待签名的证书。此时无。
puppet cert list --all    ##显示所有签名的证书。puppetmaster第一次启动会自动生成证书自动注册自己
【server2】
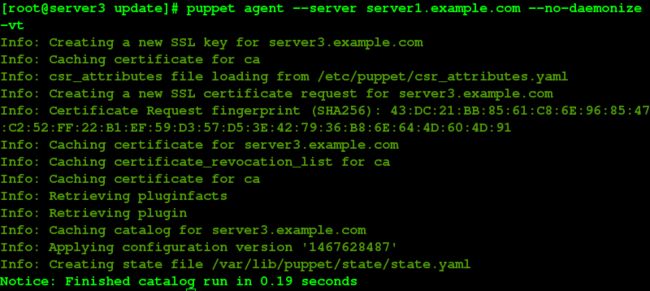
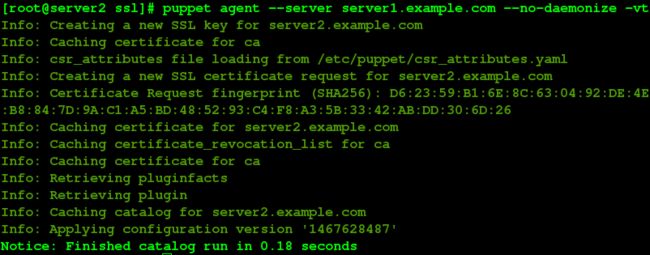
puppet agent --server server1.example.com --no-daemonize -vt ##客户端向服务器端申请证书
puppetd 从 server1.example.com 去读取puppet配置文件。第一次连接,双方会进行ssl证书的验证。由于是新的客户端,在服务器端那里还没有被认证,因此需要在服务器端进行证书认证。
参数--server 指定了需要连接的puppet master 的名字或是地址,默认连接名为“puppet”的主机。(如要修改默认连接主机可以修改/etc/sysconfig/puppet 文件中的PUPPET_SERVER=puppet 选项)
参数--no-daemonize 是 puppet客户端运行在前台
参数--verbose使客户端输出详细的日志
【server1】
puppet cert list ##查看证书申请列表
puppet cert sign server2.example.com    ##签名证书
#puppet cert sign --all    ##同时签名多份证书
puppet cert list --all
【server2】
puppet agent --server server1.example.com --no-daemonize -vt ##签名成功
##自动注册##
这种注册方式简单来讲是通过Puppetmaster端的ACL列表进行控制的,安全系统较低,也就是说符合预先定义的ACL列表中的所有节点请求不需要确认都会被自动注册上,也就是说你只需要知道ACL列表要求,其次能和PuppetMaster端通信便可轻易注册成功。当然,它的最大优点就是效率非常高。
vim /etc/puppet/puppet.conf
在[main]下面加上autosign = true ##允许所有客户端的认证
在/etc/puppet目录下创建一个autosign.conf文件,内容如下:
*.example.com ##允许所有example.com域的主机
/etc/init.d/puppetmaster reload ##重启服务
puppet agent --server server1.example.com --no-daemonize -vt ##在server3上
【server1】
puppet cert list --all
在实际中有时会修改client 端的主机名,这样就需要重新生成证书。可以在服务器端先删除原客户端主机名的签名证书,再在客户端删除/var/lib/puppet/ssl/目录下所有文件,重新对服务器进行证书申请。
具体操作如下:
【server1】
puppet cert clean server2.example.com ##删除签名证书
【server2】
cd /var/lib/puppet/ssl/
rm -rf *
puppet agent --server server1.example.com --no-daemonize -vt ##由于配置文件,自动签名证书
##预签名注册##
预签名注册是在agent端未提出申请的情况下,预先在puppetmaster端生成agent端的证书,然后复制到节点对应的目录下即可注册成功,这种方式安全系数最高,但是操作麻烦,需要提前预知所有节点服务器的certname名称,其次需要将生成的证书逐步copy到所有节点上去。不过,如果你的系统中安装了kickstart或者cobbler这样的自动化工具,倒是可以将证书部分转换成脚本集成到统一自动化部署中。(生产环境中更建议此方式)
3.puppet 资源定义
##创建文件##
方法一:
【server1】
vim /etc/puppet/manifest/site.pp ##在没有指定节点的情况下,对所有已经经过验证的 client 都生效。
file {
'/tmp/testfile':
content => 'www.westos.org',
mode => 600,
owner => puppet,
group => puppet
}
【server2】
puppet agent --server server1.example.com --no-daemonize -vt
ll /tmp/testfile
方法二:
【server1】
cd /etc/puppet/
mkdir files
cp /etc/passwd files/
vim fileserver.conf
在内容的最后加上以下内容:
[files]
path /etc/puppet/files
allow *.example.com
/etc/init.d/puppetmaster reload
vim /etc/puppet/manifest/site.pp
在之前内容的最后加上以下内容:
file {
'/tmp/passed':
source => 'puppet:///files/passwd' ##要求文件从puppetmaster端服务器下载
}
【server2】
puppet agent --server server1.example.com --no-daemonize -vt
ll /tmp/passed
##软件包与服务定义##
【server1】
vim /etc/puppet/manifests/site.pp
在之前内容的最后加上以下内容:
package {
'httpd':
ensure => present
}
service {
'httpd':
ensure => running,
require => Package['httpd']
}
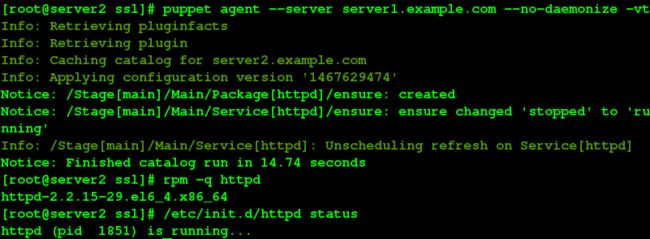
【server2】
rpm -q httpd
puppet agent --server server1.example.com --no-daemonize -vt
rpm -q httpd
/etc/init.d/httpd status
##用户定义##
【server1】
vim /etc/puppet/manifests/site.pp
在之前内容的最后加上以下内容:
user {
"test":
uid => 900,
home => "/home/test",
shell => "/bin/bash",
provider => useradd,
managehome => true,
ensure => present,
password => westos
}
【server2】
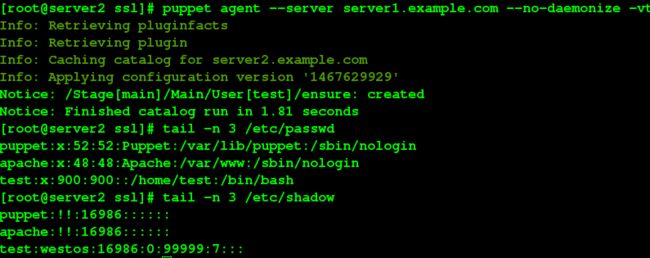
puppet agent --server server1.example.com --no-daemonize -vt
tail -n 3 /etc/passwd
tail -n 3 /etc/shadow    ##此时密码是明文
##将密码显示加密##
【server1】
vim /etc/puppet/manifests/site.pp
注释掉password => westos
在之前内容的最后加上以下内容:
exec {
'echo westos | passwd --stdin test':
path => "/usr/bin:/bin",
onlyif => 'id test'
}
【server2】
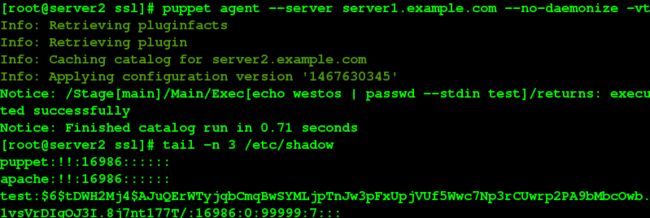
puppet agent --server server1.example.com --no-daemonize -vt
tail -n 3 /etc/shadow    ##此时密码是密文
##文件系统挂载##
【server1】
vim /etc/puppet/manifests/site.pp
将exec这一段内容都加上注释
将package的内容改为如下:
package {
['httpd','nfs-utils']:
ensure => present
}
并在之前内容的最后加上以下内容:
file { "/public":
ensure => directory
}
mount { "/public":
device => "172.25.45.250:/mnt",
fstype => "nfs",
options => "defaults",
ensure => mounted ##如果需要卸载,改为absent
}
【物理机】
systemctl status nfs
systemctl start nfs
【server2】
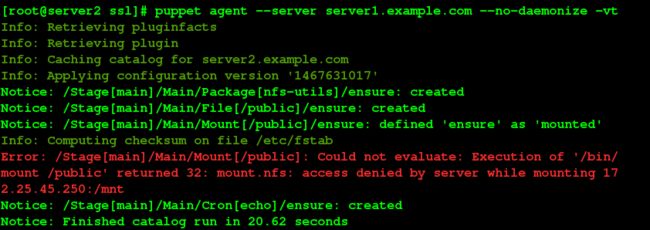
puppet agent --server server1.example.com --no-daemonize -vt
此时报错不是因为权限问题,修改之后依然报错,通过一些技术帖,发现是因为端口号的问题:
I googled and found that since the port is over 1024 I needed to add the "insecure" option to the relevant line in /etc/exports on the server. Once I did that (and ran exportfs -r), the mount -a on the client worked.
##如果端口号大于1024,则需要将 insecure 选项加入到配置文件(/etc/exports)相关选项中mount客户端才能正常工作。
查看exports手册中关于secure选项的说明
man exports
##secure 选项要求mount客户端请求源端口小于1024(然而在使用 NAT 网络地址转换时端口一般总是大于1024的),默认情况下是开启这个选项的,如果要禁止这个选项,则使用 insecure 标识
所以解决方法要修改配置文件/etc/exports,加入 insecure 选项。
【物理机】
vim /etc/exports
加入以下内容:
/mnt *(insecure,rw,async,no_root_squash)
systemctl restart nfs ##重启服务
【server2】
puppet agent --server server1.example.com --no-daemonize -vt
df
vim /etc/fstab
## crontab 任务##
【server1】
vim /etc/puppet/manifests/site.pp
在之前内容的最后加上以下内容:
cron { echo:
command => "/bin/echo `/bin/date` >> /tmp/echo",
user => root,
hour => ['2-4'],
minute => '*/10'
}
【server2】
puppet agent --server server1.example.com --no-daemonize -vt
/etc/init.d/crond status
cd /var/spool/cron/    ##任务会在该目录下生成
cat root     ##或crontab -l
##不同节点的定义##
mkdir nodes
cp site.pp nodes/server2.pp
cp site.pp nodes/server3.pp
vim site.pp
将内容注释掉,在最前面添上:import 'nodes/*.pp'
建立节点文件:
cd nodes/
vim server2.pp
将内容修改为如下:
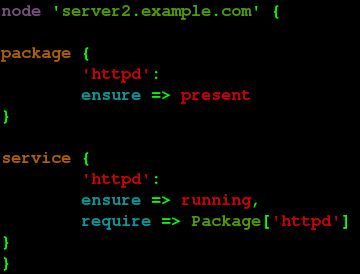
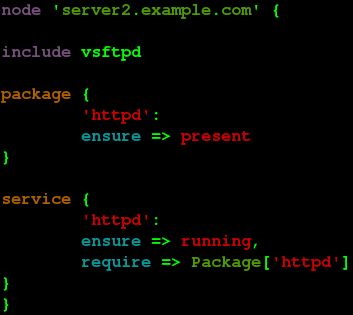
node 'server2.example.com' {
package {
'httpd':
ensure => present
}
service {
'httpd':
ensure => running,
require => Package['httpd']
}
}
vim server3.pp
将内容改为如下:
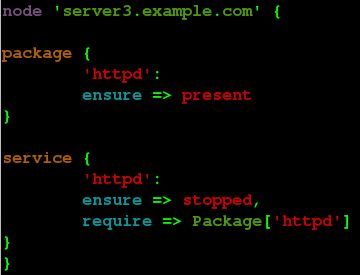
node 'server3.example.com' {
package {
'httpd':
ensure => present
}
service {
'httpd':
ensure => stopped,
require => Package['httpd']
}
}
【server2/server3】
puppet agent --server server1.example.com --no-daemonize -vt
/etc/init.d/httpd status
##模块编写##
【server1】
cd /etc/puppet/modules/
mkdir vsftpd
cd vsftpd
mkdir files
yum install -y vsftpd
cd files/
cp /etc/vsftpd/vsftpd.conf .
rpm -e vsftpd
ll vsftpd.conf    ##权限为600
chmod 644 vsftpd.conf
vim vsftpd.conf
将12行anonymous_enable的值改为NO
md5sum vsftpd.conf ##当anonymous_enable的值为YES时,值不同
cd ..
touch install.pp config.pp service.pp init.pp
vim install.pp
内容如下:
class vsftpd::install {
package {
'vsftpd':
ensure => present
}
}
vim config.pp
内容如下:
class vsftpd::config {
file {
'/etc/vsftpd/vsftpd.conf':
source => 'puppet:///modules/vsftpd/vsftpd.conf',
##实际路径为/etc/puppet/modules/vsftpd/files/vsftpd.conf
mode => 600,
require => Class['vsftpd::install'],
notify => Class['vsftpd::service']
}
}
vim service.pp
内容如下:
class vsftpd::service {
service {
'vsftpd':
ensure => running,
require => Class['vsftpd::install','vsftpd::config']
}
}
vim init.pp
内容如下:
class vsftpd {
include vsftpd::install,vsftpd::config,vsftpd::service
}
cd /etc/puppet/manifests/nodes
vim server2.pp
在node 'server2.example.com' 的下面添上一行:include vsftpd
【server2】
puppet agent --server server1.example.com --no-daemonize -vt
报错!
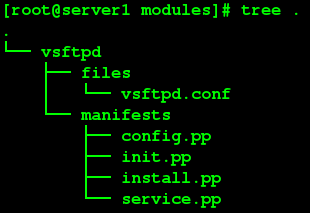
解决方法:在server1的/etc/puppet/modules/vsftpd下建立一个manifests目录,将*.pp文件移到该目录下。
【server1】
cd /etc/puppet/modules/vsftpd
mkdir manifests
mv *.pp manifests/
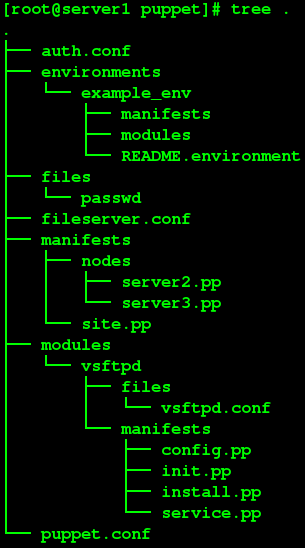
可以看到该结构:
puppet目录完整结构:
【server2】
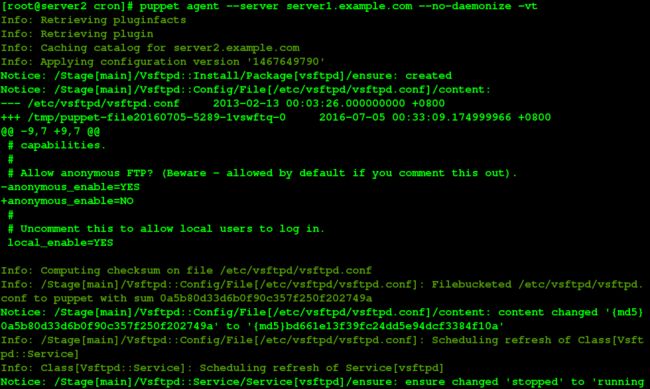
puppet agent --server server1.example.com --no-daemonize -vt
【server3】
time puppet agent --server server1.example.com --no-daemonize -vt
4.模板应用(添加虚拟主机配置)##
文件存放在templates 目录中,以*.erb 结尾。
【server1】
cd /etc/puppet/modules/vsftpd/
mkdir templates
cd ..
cp vsftpd/ httpd -r
cd httpd/files/
yum isntall -y httpd
cp /etc/httpd/conf/httpd.conf  .
rm -rf httpd.conf
cd ..
cd manifests/
将init.pp install.pp config.pp service.pp的vsftpd换成httpd
vim init.pp ; vim install.pp ; vim config.pp ; vim service.pp
:%s/vsftpd/httpd/g
cd /etc/puppet/manifests/nodes
vim server2.pp
修改内容如下:
node 'server2.example.com' {
include vsftpd,httpd
}
【server2】
puppet agent --server server1.example.com --no-daemonize -vt
【server1】
cd /etc/puppet/modules/httpd/templates
vim httpd_vhost.erb
内容如下:
ServerName <%= domainname %>
DocumentRoot /var/www/<%= domainname %>
ErrorLog logs/<%= domainname %>_error.log
CustomLog logs/<%= domainname %>_access.log common
cd /etc/puppet/modules/httpd/manifests
vim init.pp
修改内容如下:
class httpd {
include httpd::install,httpd::config,httpd::service
}
define httpd::vhost($domainname) {
file { "/etc/httpd/conf.d/${domainname}_vhost.conf":
content => template("httpd/httpd_vhost.erb"),
require => Class["httpd::install"],
notify => Class["httpd::service"]
}
file { "/var/www/$domainname":
ensure => directory
}
file { "/var/www/$domainname/index.html":
content => $domainname
}
}
vim config.pp
将'/etc/httpd/httpd.conf'改为/etc/httpd/conf/httpd.conf
cd /etc/puppet/manifests/nodes
vim server2.pp
修改内容如下:
node 'server2.example.com' {
include vsftpd,httpd
httpd::vhost { 'www.example.com':
domainname => "www.example.com",
}
httpd::vhost { 'www.linux.org':
domainname => "www.linux.org",
}
}
cd /etc/puppet/modules/httpd/files
vim httpd.conf
将990行 NameVirtualHost *:80 的注释去掉
在最后面添上以下内容:
DocumentRoot /var/www/html
ServerName server2.example.com
【server2】
cd /var/www/html
echo server2.example.com > index.html
puppet agent --server server1.example.com --no-daemonize -vt
cd /etc/httpd/conf.d/
ls
cat www.example.com_vhost.conf
cat www.linux.org_vhost.conf
【物理机】
vim /etc/hosts
在172.25.45.2的后面添上:www.example.com www.linux.org
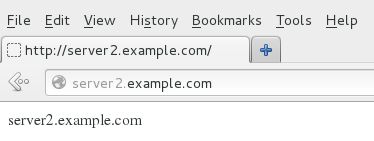
http://server2.example.com/
http://www.example.com/
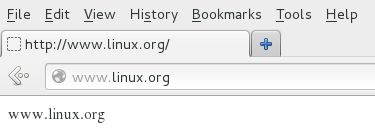
http://www.linux.org/
##错误总结##
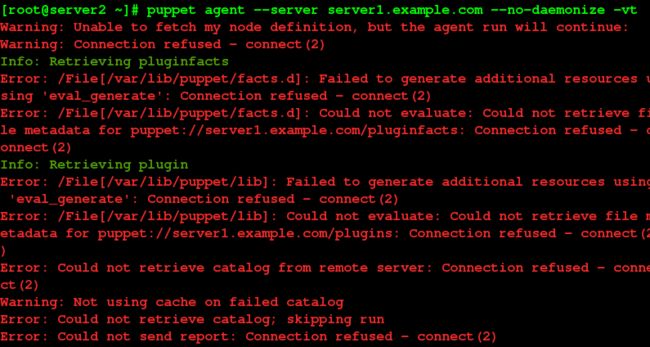
1.再次启动的时候报错,puppetmaster没有启动
出现以下报错:
出现此错误是因为主节点puppetmaster服务没有开
2.上面的挂载问题
可能是因为端口号默认设置的问题,如上面方式解决即可。
3.在客户端获得证书后同步失败
(1)时间同步问题 检查master和client之前时间是否不一样
(2)/etc/resolv.conf里面有search localdomain


