@(iOS 项目实战)[项目实战]
- 作者: Liwx
- 邮箱:[email protected]
目录
- 1.项目环境搭建
- 工程项目配置
- 2.项目框架
- 项目总体框架图,效果图
- 3.自定义TabBar
- 自定义TabBar的原因
- 自定义TabBar步骤
- 4.自定义TabBarController
- 设置UIWindow的根控制器
- 自定义TabBarController步骤
1.项目环境搭建
工程项目配置
-
工程项目环境配置
- 设置Boundle Identifier
- 配置部署环境,运行在ios7及以上版本
- 设置设备支持方向
- 启动桌面隐藏状态栏
- 设置桌面图标和启动图片
工程项目配置图
2.项目框架
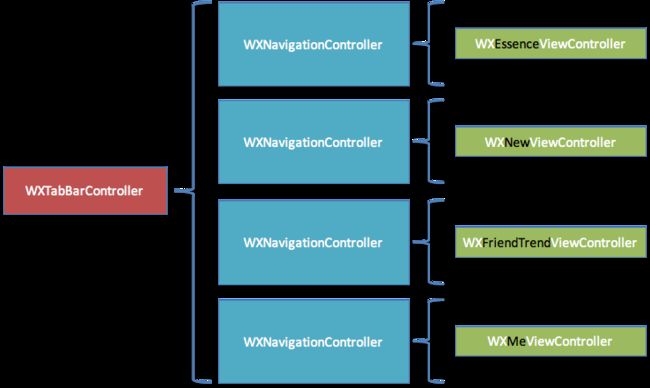
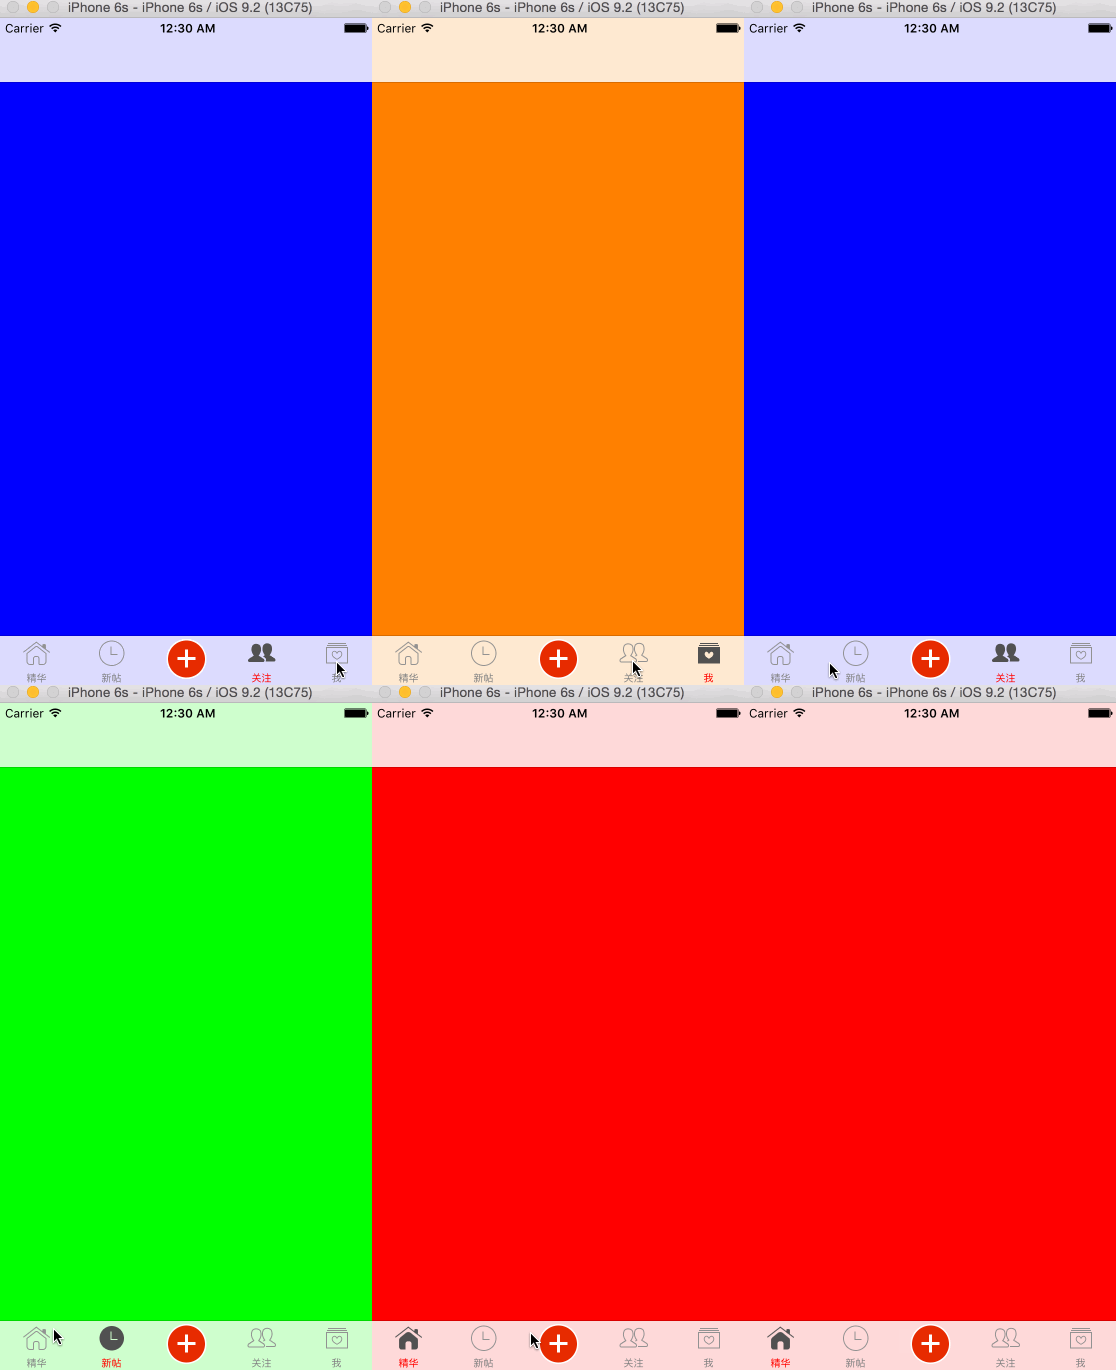
项目总体框架图,效果图
-
项目框架图
-
初步运行效果图
3.自定义TabBar
自定义TabBar的原因
需在TabBar中间添加按钮,系统的UITabBar不能满足需求.所以使用自定义TabBar
-
分析: 系统TabBar为什么显示不了加号按钮
- 判断下发布图片和其他图片区别(尺寸不一样)
- 发布图片太大,导致显示不出来
- 1.改图片尺寸不符合需求
- 系统的UITabBarButton不能满足需求
-
解决方案
- 1.直接往tabBar中间添加一个发布按钮(1.多了一个控制器不安全,有可能系统UITabBarButton把你的按钮覆盖)
- 2.自定义TabBar控件 (重写layoutSubviews,懒加载加号按钮,并在布局子控件的时候添加到自定义TabBar中间
注意: 系统是在viewWillAppear:方法中把所有的UITabBarButton添加到UITabBar中.
自定义TabBar步骤
- 1.懒加载加号按钮(加号按钮只需加载一次)
#pragma =======================================================================
#pragma mark - 懒加载
// ----------------------------------------------------------------------------
// 加号按钮
- (UIButton *)plusButton
{
    if (_plusButton == nil) {
        UIButton *plusButton = [[UIButton alloc] init];
        [plusButton setImage:[UIImage imageNamed:@"tabBar_publish_icon"] forState:UIControlStateNormal];
        [plusButton setImage:[UIImage imageNamed:@"tabBar_publish_click_icon"] forState:UIControlStateHighlighted];
        // 设置尺寸
        [plusButton sizeToFit];
        _plusButton = plusButton;

        [self addSubview:plusButton];
    }
    return _plusButton;
}
- 2.重新布局tabBar子控件
- tabBar的子控件不止只有UITabBarButton,所以需过滤UITabBarButton,可以使用以下两种方法过滤.
- 1.
[view isKindOfClass:NSClassFromString(@"UITabBarButton")] - 2.
[@"UITabBarButton" isEqualToString:NSStringFromClass([view class])]
#pragma =======================================================================
#pragma mark - 布局子控件
// ----------------------------------------------------------------------------
// 重新布局tabBar子控件
- (void)layoutSubviews
{
    [super layoutSubviews];

    // 1.定义frame属性
    NSInteger count = self.items.count;
    CGFloat itemX = 0;
    CGFloat itemY = 0;
    CGFloat itemW = self.wx_width / (count + 1);
    CGFloat itemH = self.wx_height;

    // 2.遍历子控件(过滤UITabBarButton), UITabBarButton是私有属性
    NSInteger index = 0;
    for (UIView *view in self.subviews) {
        // 2.1 过滤UITabBarButton
        // 可以用两张方式判断
        // 1.[view isKindOfClass:NSClassFromString(@"UITabBarButton")]
        // 2.[@"UITabBarButton" isEqualToString:NSStringFromClass([view class])]
        if ([view isKindOfClass:NSClassFromString(@"UITabBarButton")]) {

            // 2.2 计算x值,并设置frame
            itemX = index * itemW;
            view.frame = CGRectMake(itemX, itemY, itemW, itemH);

            index++;
            // 判断如果是是第二个batBarButton,空一格
            if (index == 2) {
                index++;
            }
        }
    }

    // 3.设置加号按钮
    self.plusButton.center = CGPointMake(self.wx_width * 0.5, self.wx_height * 0.5);
}
4.自定义TabBarController
设置UIWindow的根控制器
- 在AppDelegate.m中设置UIWindow的根控制器为自定义TabBarController
- (BOOL)application:(UIApplication *)application didFinishLaunchingWithOptions:(NSDictionary *)launchOptions {

    // 1.创建window
    self.window = [[UIWindow alloc] initWithFrame:[UIScreen mainScreen].bounds];

    // 2.设置window的根控制器
    self.window.rootViewController = [[WXTabBarController alloc] init];

    // 3.让window成为主窗口,并显示
    [self.window makeKeyAndVisible];

    return YES;
}
自定义TabBarController步骤
- 1.添加所有子控制器
// ----------------------------------------------------------------------------
// 添加所有子控制器
- (void)setupAllChildViewController
{
    // 精华
    [self setupOneChildViewController:[[WXEssenceViewController alloc] init]];

    // 新帖
    [self setupOneChildViewController:[[WXNewViewController alloc] init]];

    // 发布
//    [self setupOneChildViewController:[[WXPublishViewController alloc] init]];

    // 关注
    [self setupOneChildViewController:[[WXFriendTrendViewController alloc] init]];

    // 我
    [self setupOneChildViewController:[[WXMeViewController alloc] init]];
}

// ----------------------------------------------------------------------------
// 添加一个子控制器
- (void)setupOneChildViewController:(UIViewController *)viewController
{
    // 1.包装导航控制器
    UINavigationController *nav = [[UINavigationController alloc] initWithRootViewController:viewController];
    [self addChildViewController:nav];
}
- 2.设置所有tabBarButton
- 设置图片不被渲染两种方式
- 方法一: 在Assets.xcassets直接设置
图片Render As为Original Image,记得1x,2x,3x都要选中. - 方法二: 使用
imageWithRenderingMode:方法抽取生成不被渲染图片的分类.
// ----------------------------------------------------------------------------
// 设置所有tabBarButton
- (void)setupAllTabBarButton
{
    // 精华tabBarItem设置
    [self setupOneTabBarButtonVcIndex:0 titile:@"精华" imageName:@"tabBar_essence_icon" selectedImageName:@"tabBar_essence_click_icon"];

    // 新帖tabBarItem设置
    [self setupOneTabBarButtonVcIndex:1 titile:@"新帖" imageName:@"tabBar_new_icon" selectedImageName:@"tabBar_new_click_icon"];

    // 关注tabBarItem设置
    [self setupOneTabBarButtonVcIndex:2 titile:@"关注" imageName:@"tabBar_friendTrends_icon" selectedImageName:@"tabBar_friendTrends_click_icon"];

    // 我tabBarItem设置
    [self setupOneTabBarButtonVcIndex:3 titile:@"我" imageName:@"tabBar_me_icon" selectedImageName:@"tabBar_me_click_icon"];
}

// ----------------------------------------------------------------------------
// 设置一个tabBarButton信息
- (void)setupOneTabBarButtonVcIndex:(NSInteger)vcIndex titile:(NSString *)title imageName:(NSString *)imageName selectedImageName:(NSString *)selectedImageName
{
    // 1.获取子控制器(UINavigationController),并设置标题和图片
    WXNavigationController *nav = self.childViewControllers[vcIndex];

    nav.tabBarItem.title = title;
    nav.tabBarItem.image = [UIImage imageNamed:imageName];
    nav.tabBarItem.selectedImage = [UIImage imageWithOriginalRender:selectedImageName];
}
- 3.设置自定义tabBar
- 将系统的tabBar换成自定义tabBar,
系统的tabBar是readOnly,用KVC设置
- 将系统的tabBar换成自定义tabBar,
// ----------------------------------------------------------------------------
// 设置自定义tabBar
- (void)setupTabBar
{
    WXTabBar *tabBar = [[WXTabBar alloc] init];
    // 1.将系统的tabBar换成自定义tabBar,系统的tabBar是readOnly,用KVC设置
    [self setValue:tabBar forKey:@"tabBar"];
}
- 4.统一设置
TabBarItem的文字属性-
1.iOS7之前(在
UIStringDrawing.h中可以找到)- 比如UITextAttributeFont\UITextAttributeTextColor
- 规律:
UITextAttributeXXX
-
2.iOS7开始(在
NSAttributedString.h中可以找到)- 比如NSFontAttributeName\NSForegroundColorAttributeName
- 规律:
NSXXXAttributeName
-
-
initialize方法在第一次使用当前类或者它的子类的时候调用,在initialize方法统一设置必须判断是不是当前类,如果在initialize方法统一设置时,没判断是否是当前类,其子类的TabBarItem也会被统一设置.建议在load方法中统一设置,之后会对使用load方法设置进行解析.
-
-
// ----------------------------------------------------------------------------
// 第一次使用当前类或者它的子类的时候调用
+ (void)initialize
{
    // 一次性设置设置tabBarItem字体颜色
    // 1.判断是否是WXTabBarController
    if (self == [WXTabBarController class]) {
        // 1.1 获取item
        UITabBarItem *item = [UITabBarItem appearanceWhenContainedIn:self, nil];

        NSDictionary *attrNormal = @{NSForegroundColorAttributeName : [UIColor redColor]};
        [item setTitleTextAttributes:attrNormal forState:UIControlStateSelected];
        NSDictionary *attrHigh = @{NSForegroundColorAttributeName : [UIColor grayColor]};
        [item setTitleTextAttributes:attrHigh forState:UIControlStateNormal];
    }
}


