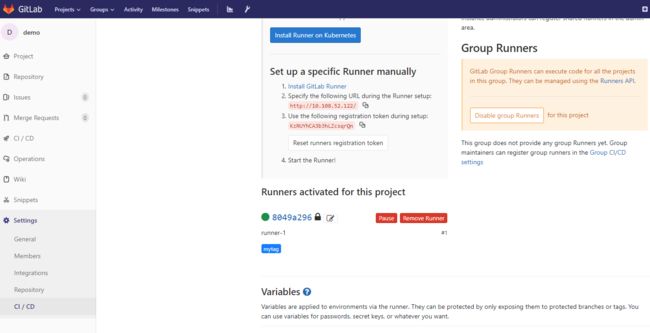
配置gitlab-runner
根据官方文档,runner分为三种:Shared, specific and group Runners, 具体可以参考https://docs.gitlab.com/ee/ci/runners/
Gitlab Runner安装方式有两种,一种是直接二进制文件安装,一种是基于docker镜像安装。
方式一:通过二进制文件安装
参考官方文档 https://docs.gitlab.com/runner/install/index.html
#下载二进制文件
bob@bob-k8s3:~$ sudo wget -O /usr/local/bin/gitlab-runner https://gitlab-runner-downloads.s3.amazonaws.com/latest/binaries/gitlab-runner-linux-amd64

#添加可执行权限
bob@bob-k8s3:~$ ls -l /usr/local/bin/gitlab-runner
-rw-r--r-- 1 root root 30379232 Dec  6 21:33 /usr/local/bin/gitlab-runner
bob@bob-k8s3:~$ sudo chmod +x /usr/local/bin/gitlab-runner
bob@bob-k8s3:~$ ls -l /usr/local/bin/gitlab-runner
-rwxr-xr-x 1 root root 30379232 Dec  6 21:33 /usr/local/bin/gitlab-runner

#查看是否安装了docker,没有安装的话安装docker
bob@bob-k8s3:~$ whereis docker
docker: /usr/bin/docker /etc/docker /usr/share/docker.io /usr/share/man/man1/docker.1.gz

#创建一个新用户gitlab-runner
bob@bob-k8s3:~$sudo useradd --comment 'GitLab Runner' --create-home gitlab-runner --shell /bin/bash

#给gitlab-runner用户设置密码(这一步可选)
bob@bob-k8s3:~$ sudo passwd gitlab-runner
Enter new UNIX password:
Retype new UNIX password:
passwd: password updated successfully

#把gitlab-runner用户加入DOCKER组,使得其不用sudo就可以执行docker命令
bob@bob-k8s3:~$sudo usermod -aG docker gitlab-runner

#安装并且启动服务
bob@bob-k8s3:~$ sudo gitlab-runner install --user=gitlab-runner --working-directory=/home/gitlab-runner
Runtime platform                                    arch=amd64 os=linux pid=96019 revision=7f00c780 version=11.5.1
bob@bob-k8s3:~$ sudo gitlab-runner start
Runtime platform                                    arch=amd64 os=linux pid=96246 revision=7f00c780 version=11.5.1

#按照提示一步一步注册runner
bob@bob-k8s3:~$ sudo gitlab-runner register
Runtime platform                                    arch=amd64 os=linux pid=96418 revision=7f00c780 version=11.5.1
Running in system-mode.

Please enter the gitlab-ci coordinator URL (e.g. https://gitlab.com/):
http://10.108.52.122
Please enter the gitlab-ci token for this runner:
KzRUYhCA3b3hLZcsqrQn
Please enter the gitlab-ci description for this runner:
[bob-k8s3]: runner-1
Please enter the gitlab-ci tags for this runner (comma separated):
mytag
Registering runner... succeeded                     runner=KzRUYhCA
Please enter the executor: virtualbox, docker+machine, docker, parallels, shell, ssh, docker-ssh, docker-ssh+machine, kubernetes:
shell
Runner registered successfully. Feel free to start it, but if it's running already the config should be automatically reloaded!
方式二:使用docker镜像安装
下载镜像
sudo docker pull gitlab/gitlab-runner
启动
sudo docker run -d --name gitlab-runner --restart always \
    -v /srv/gitlab-runner/config:/etc/gitlab-runner \
    -v /var/run/docker.sock:/var/run/docker.sock \
    gitlab/gitlab-runner:latest
将gitlab上的项目注册到gitlab-runner中,注册步骤参考方式一:
sudo docker exec -it gitlab-runner gitlab-ci-multi-runner register
配置 .gitlab-ci.yml
.gitlab-ci.yml的官方文档:Configuration of your jobs with .gitlab-ci.yml
配置好 Runner 之后,我们要做的事情就是在项目根目录中添加 .gitlab-ci.yml(文件名前面有一个点号) 文件了。当我们添加了 .gitlab-ci.yml 文件后,每次提交代码或者合并 Merge request都会自动运行构建任务了。
Pipeline 也是通过提交代码或者合并 MR 来触发的!文件 .gitlab-ci.yml 是用来定义 Pipeline 的!
注意:可以在gitlab项目->settings->CI / CD Settings->Variables里添加yml文件使用的环境变量。
.gitlab-ci.yml文件内容如下:
# 定义 stages
stages:
  - build
  - test

# 定义 job
job1:
  stage: test
  script:
    - echo "I am job1"
    - echo "I am in test stage"

# 定义 job
job2:
  stage: build
  script:
    - echo "I am job2"
    - echo "I am in build stage"
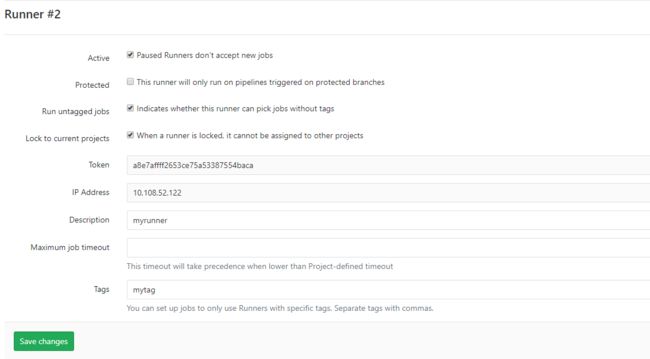
保存并提交会自动触发pipeline, 但却发现pipeline一直pending, 提示说job is stuck check runners,原因是没有勾选project->settings->CI / CD ->Settings->runners,点击对应的runner进行编辑,可以看到下面的界面,勾选其中的"Run untagged jobs"即可:
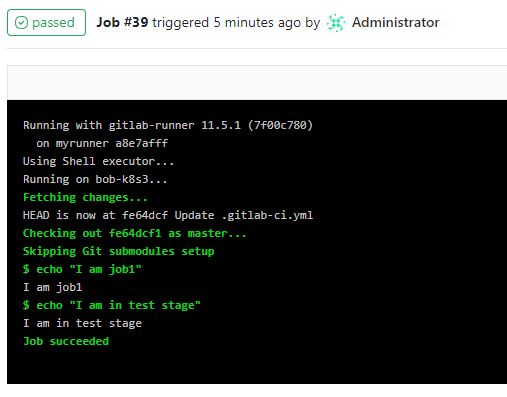
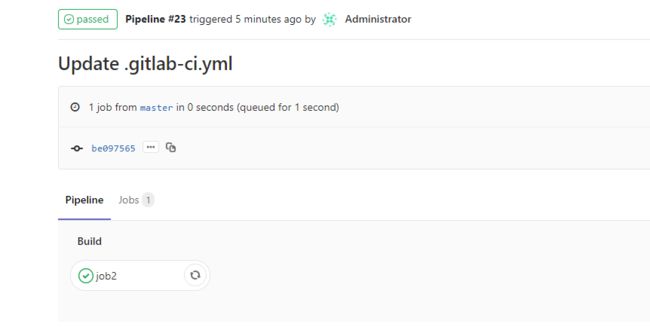
勾选之后,重新运行,可以看到运行结果为passed:
job tags
每个job可以指定一个或者多个tag,这些tag对应的是注册gitlab-runner时填写的tag名称,不是提交代码时给代码打的tag.
- 如果一个job指定了tag,则运行带有指定tag的那个runner
- 如果一个job没有指定标签,但runner勾选了"Run untagged jobs",则运行对应的runner
- 如果一个job没有指定标签,并且没有任何一个runner勾选了"Run untagged jobs",则这个pipeline会一直pending
不勾选"Run untagged jobs",给job添加tag成功运行pipeline的例子:
# 定义 stages
stages:
  - build
  - test

# 定义 job
job1:
  stage: test
  tags:
    - mytag
  script:
    - echo "I am job1"
    - echo "I am in test stage"

# 定义 job
job2:
  stage: build
  tags:
    - mytag
  script:
    - echo "I am job2"
    - echo "I am in build stage"
Skipping jobs
有三种方式:使用only关键词跳过特定job;使用except关键词跳过特定job;使用[ci skip] 跳过特定pipeline
1. 使用[ci skip] 或者 [skip ci]
如果提交的备注里包含了[ci skip] 或者 [skip ci](不管是出现在备注的最前面、中间、还是最后都行),代码进入代码库但不会触发pipeline(递增了pipeline id 但没有执行), 对应的pipeline会标记为skipped。
如下图中的#22号pipeline:2. 使用only关键词
提交代码的备注信息如果包含了"hello world"会执行job1, 如果不包含,则pipeline中不会显示也不会执行job1
# 定义 stages
stages:
  - build
  - test

# 定义 job
job1:
  stage: test
  tags:
    - mytag
  only:
    variables:
      - $CI_COMMIT_MESSAGE =~ /hello world/
  script:
    - echo $CI_COMMIT_MESSAGE
    - echo "I am in test stage13"

# 定义 job
job2:
  stage: build
  tags:
    - mytag
  script:
    - echo "I am job2"
    - echo "I am in build stage22"
如下图,"Jobs 1"意思是只运行了一个job(本来有2个)
3. 使用except关键词
except关键字和only正好相反。
下面的配置只要备注信息里包含"hello world"就不会执行job1, 不包含”hello world"就会正常执行job1
# 定义 stages
stages:
  - build
  - test

# 定义 job
job1:
  stage: test
  tags:
    - mytag
  except:
    variables:
      - $CI_COMMIT_MESSAGE =~ /hello world/
  script:
    - echo $CI_COMMIT_MESSAGE
    - echo "I am in test stage13"

# 定义 job
job2:
  stage: build
  tags:
    - mytag
  script:
    - echo "I am job2"
    - echo "I am in build stage22"
4 使用retry关键词
有时候会遇到因为网络问题JOB失败的场景,这时候重试就能避免失败,示例如下:
test:
  script: rspec
  retry:
    max: 2
    when:
      - runner_system_failure
      - stuck_or_timeout_failure
注意:
- 只有commits 或者merges到默认分支(默认是master)才能响应上述的trigger, 如果想修改默认分支,可以在gitlab里修改。所以就算你写了[ci skip],但你只是commit到了本地库,没有push到master,也不会触发skip的动作,必须是最新的那个commit离包含这些trigger才有效。
docker executor(普通模式)
如果在注册gitlab-runner的时候选择docker executor,使用方法如下
- 注册时选择docker executor并填写docker image的名字,这些信息会保存在/etc/gitlab-runner/config.toml。比如使用镜像docker-jiuxia.com/flutterimage:1.0(一般来说,这个镜像里包含了用户自定义的各种依赖和工具)
- 在pipeline的.gitlab-ci.yml对应的job段落里添加image:docker-jiuxia.com/flutterimage:1.0,pipeline运行的时候会下载对应的镜像开始编译
- 其他操作跟使用shell executor一致。但PIPELINE运行的时候是在DOCKER镜像里运行的, SHELL模式运行的时候是在注册runner的那台机器上)
例子:下面的dockerfile会创建一个编译flutter程序的镜像作为docker executor(使用二进制文件安装gitlab-runner, 注册的时候选择docker作为executor)
root@bob-k8s3:/home/bob/temp# cat Dockerfile
FROM ubuntu:18.04

ARG PUB_HOSTED_URL=https://pub.flutter-io.cn
ARG FLUTTER_STORAGE_BASE_URL=https://storage.flutter-io.cn

ENV ANDROID_HOME="/opt/android-sdk" \
PATH="/opt/android-sdk/tools/bin:/opt/flutter/bin:/opt/flutter/bin/cache/dart-sdk/bin:$PATH"

RUN apt-get update \
&& apt-get -y install --no-install-recommends curl git lib32stdc++6 openjdk-8-jdk-headless unzip \
&& apt-get -y install lcov \
&& apt-get --purge autoremove \
&& apt-get autoclean \
&& rm -rf /var/lib/apt/lists/*

RUN git clone -b master https://github.com/flutter/flutter.git /opt/flutter

RUN curl -O https://dl.google.com/android/repository/sdk-tools-linux-4333796.zip \
&& mkdir /opt/android-sdk \
&& unzip sdk-tools-linux-4333796.zip -d /opt/android-sdk \
&& rm sdk-tools-linux-4333796.zip

RUN echo "nameserver 192.168.0.22" > /etc/resolv.conf && \
    echo "search lalala.com" >> /etc/resolv.conf

RUN mkdir ~/.android \
&& echo 'count=0' > ~/.android/repositories.cfg \
&& yes | sdkmanager --licenses \
&& sdkmanager "tools" "build-tools;28.0.3" "platforms;android-28" "platform-tools" \
&& yes | sdkmanager --licenses \
&& flutter doctor -v

root@bob-k8s3:/home/bob/temp# docker build -t docker-jiuxia.com/flutterimage:1.0 .
root@bob-k8s3:/home/bob/temp# docker push docker-jiuxia.com/flutterimage:1.0
对应的.gitlab-ci.yml pipeline内容如下:
stages:
  - build

job1:
  stage: build
  image: docker-jiuxia.com/flutterimage:1.0
  script:
    - echo "I am job1"
    - export PUB_HOSTED_URL=https://pub.flutter-io.cn
    - export FLUTTER_STORAGE_BASE_URL=https://storage.flutter-io.cn
    - flutter packages get
    - flutter test --coverage
    - genhtml -o coverage coverage/lcov.info
    - flutter build apk
  only:
    refs:
      - master
运行pipeline的时候说找不到域名gitlab-jiuxia.com,看起来在docker-jiuxia.com/flutterimage:1.0添加dns的方式并没有起效,解决方法是修改/etc/gitlab-runner/config.toml添加dns = ["192.168.0.22"]
root@bob-k8s3:/home/bob/temp# ls /etc/gitlab-runner/config.toml
/etc/gitlab-runner/config.toml
root@bob-k8s3:/home/bob/temp# cat /etc/gitlab-runner/config.toml
concurrent = 1
check_interval = 0

[session_server]
  session_timeout = 1800

[[runners]]
  name = "k8sclient"
  url = "https://gitlab.jiuxia.com/"
  token = "72F9XTBZskNX_2ZCzb7X"
  executor = "docker"
  [runners.docker]
    tls_verify = false
    image = "docker-jiuxia.com/flutterimage:1.0"
    dns = ["192.168.0.22"]
    privileged = false
    disable_entrypoint_overwrite = false
    oom_kill_disable = false
    disable_cache = false
    volumes = ["/cache"]
    shm_size = 0
  [runners.cache]
    [runners.cache.s3]
    [runners.cache.gcs]
另外一种可行的方式:不制作镜像,直接引用别人的基础镜像,把安装依赖包的步骤放进before_script, 效果和上面先生成镜像的方式是一样的。示例如下:
# file: .gitlab-ci.yml**

image: ubuntu:18.04
before_script:
  - export ANDROID_HOME=/opt/android-sdk
  - export PATH=/opt/android-sdk/tools/bin:/opt/flutter/bin:/opt/flutter/bin/cache/dart-sdk/bin:$PATH
  - export PUB_HOSTED_URL=https://pub.flutter-io.cn
  - export FLUTTER_STORAGE_BASE_URL=https://storage.flutter-io.cn
  - apt-get -qq update --yes
  - apt-get -qq -y install --no-install-recommends curl git lib32stdc++6 openjdk-8-jdk-headless unzip > /dev/null
  - apt-get -qq -y install lcov > /dev/null
#   - apt-get --purge autoremove
#   - apt-get autoclean
  - curl -s -O https://dl.google.com/android/repository/sdk-tools-linux-4333796.zip > /dev/null
  - mkdir /opt/android-sdk
  - unzip  -qq sdk-tools-linux-4333796.zip -d /opt/android-sdk
  - rm sdk-tools-linux-4333796.zip
  - git clone -b master https://github.com/flutter/flutter.git /opt/flutter &> /dev/null
  - mkdir ~/.android
  - echo 'count=0' > ~/.android/repositories.cfg
    #使用set +o pipefail解决yes命令导致的pipeline失败,也即忽略pipeline错误
  - set +o pipefail
  - yes | sdkmanager --licenses > /dev/null
  - sdkmanager "tools" "build-tools;28.0.3" "platforms;android-28" "platform-tools" > /dev/null
  - yes | sdkmanager --licenses > /dev/null
  - which flutter
  - flutter doctor -v
  - set -o pipefail


stages:
  - build
  - test

# 定义 job
job1:
  stage: test
  script:
    - echo "I am job1"

    - flutter packages get
    - flutter test --coverage
    - genhtml -o coverage coverage/lcov.info
    - flutter build apk
  only:
    refs:
      - master
  cache:
    key: "$CI_COMMIT_REF_SLUG"
    paths:
      - /opt/android-sdk
      - /opt/flutter
      - /var/cache

# 定义 job
job2:
  stage: build
  before_script:
    - echo "echo something to skip the global before script, If you want to merge the content or inject global scripts, try using some of the Special YAML features."
  script:
    - echo "I am job233"
    - echo "I am in build stage"
docker executor(docker in docker模式)
docker executor普通模式可以满足大部分需求,但有时候使用这种模式的时候需要在引用的镜像里使用docker命令创建docker镜像,这时候就要修改配置。参考https://docs.gitlab.com/runner/executors/docker.html中的The privileged mode段落。
首先,修改config.toml支持privileged mode:
[[runners]]
  executor = "docker"
  [runners.docker]
    privileged = true
其次,修改.gitlab-ci.yml使用Docker-in-Docker container(image: docker:git是官方提供的docker in docker镜像)
image: docker:git
services:
- docker:dind

build:
  script:
  - docker build -t my-image .
  - docker push my-image
触发pipeline后就能看到 docker build能够正常执行,没有上述配置会提示Cannot connect to the Docker daemon at unix:///var/run/docker.sock. Is the docker daemon running?
完整YAML示例如下:
image: docker:git
services:
- docker:dind

before_script:
  - export PUB_HOSTED_URL=https://pub.flutter-io.cn
  - export FLUTTER_STORAGE_BASE_URL=https://storage.flutter-io.cn

stages:
  - buildflutter
  - builddocker

flutterjob:
  stage: buildflutter
  image: docker.jiuxia.com/myfultterimage:2.0
  script:
    - echo "I am buildflutter"
    - flutter packages get
    # - docker build -t my-image . >/dev/null #would be fail here, because it is in docker.jiuxia.com/myfultterimage:2.0

dockerjob:
  stage: builddocker
  script:
    - echo "I am builddocker"
    - cd dockerfile
    - docker build -t my-image . >/dev/null
    - ls -al

#flutterjob使用docker.jiuxia.com/myfultterimage:2.0编译FLUTTER程序,但是不能用docker build命令
#dockerjob里没有image字段,所以用的是image: docker:git, 可以使用docker build命令
从私有的docker registry下载镜像时会看到如下错误
Running with gitlab-runner 11.6.0 (f100a208)
  on gitlab-runner-docker-849cc95458-fjcs2 XUpVVv_w
Using Docker executor with image docker.jiuxia.com/flutter:1.0 ...
Starting service docker:dind ...
Pulling docker image docker:dind ...
Using docker image sha256:dfd9350d475b431e4b9b037fe31f4f0df70d597688776f3b13e273a8c2ecc680 for docker:dind ...
Waiting for services to be up and running...
Pulling docker image docker.jiuxia.com/flutter:1.0 ...
ERROR: Preparation failed: Error response from daemon: Get https://docker.jiuxia.com/v2/flutter/manifests/1.0: no basic auth credentials (executor_docker.go:168:0s)
Will be retried in 3s ...
解决办法有两种:
1, 在GITLAB页面每个项目的settings->CI->CI / CD Settings->Variables,添加变量DOCKER_AUTH_CONFIG, 值设置为如下内容:
{
     "auths": {
         "docker.jiuxia.com": {
             "auth": "YWRtaW46YWRtaW4xMjM="
         }
     }
 }
- 在runner的config.toml中对应的runner段落添加字段environment 字段并设置DOCKER_AUTH_CONFIG(注:这种方法按照官方文档的说法是可行的,但是实际上不能用)示例如下
[[runners]]
  executor = "docker"
  [runners.docker]
    privileged = true
    environment = ["DOCKER_AUTH_CONFIG={ \"auths\": { \"docker.jiuxia.com\": { \"auth\": \"YWRtaW46YWRtaW4xMjM=\" } } }"]
auth的值可以通过如下方式获取
root@bob-k8s3:~# echo -n 'admin:admin123' | base64
YWRtaW46YWRtaW4xMjM=

#或者
root@bob-k8s3:~# echo -n admin:admin123 | base64
YWRtaW46YWRtaW4xMjM=

#或者
root@bob-k8s3:~# cat ~/.docker/config.json
{
        "auths": {
                "docker.jiuxia.com": {
                        "auth": "YWRtaW46YWRtaW4xMjM="
                }
        }
}root@bob-k8s3:~#
参考
https://jpetazzo.github.io/2015/09/03/do-not-use-docker-in-docker-for-ci/
https://docs.gitlab.com/runner/register/
https://medium.com/@tonywooster/docker-in-docker-in-gitlab-runners-220caeb708ca
https://docs.gitlab.com/ee/ci/docker/using_docker_build.html


