1 概述
1.1 需求背景
图数据库 Nebula Graph 在生产环境中将拥有庞大的数据量和高频率的业务处理,在实际的运行中将不可避免的发生人为的、硬件或业务处理错误的问题,某些严重错误将导致集群无法正常运行或集群中的数据失效。当集群处于无法启动或数据失效的状态时,重新搭建集群并重新倒入数据都将是一个繁琐并耗时的工程。针对此问题,Nebula Graph 提供了集群 snapshot 的创建功能。
Snapshot 功能需要预先提供集群在某个时间点 snapshot 的创建功能,以备发生灾难性问题时用历史 snapshot 便捷地将集群恢复到一个可用状态。
1.2 术语
本文主要会用到以下术语:
- StorageEngine:Nebula Graph 的最小物理存储单元,目前支持 RocksDB 和 HBase,在本文中只针对 RocksDB。
- Partition:Nebula Graph 的最小逻辑存储单元,一个 StorageEngine 可包含多个 Partition。Partition 分为 leader 和 follower 的角色,Raftex 保证了 leader 和 follower 之间的数据一致性。
- GraphSpace:每个 GraphSpace 是一个独立的业务 Graph 单元,每个 GraphSpace 有其独立的 tag 和 edge 集合。一个 Nebula Graph 集群中可包含多个 GraphShpace。
- checkpoint:针对 StorageEngine 的一个时间点上的快照,checkpoint 可以作为全量备份的一个 backup 使用。checkpoint files是 sst files 的一个硬连接。
- snapshot:本文中的 snapshot 是指 Nebula Graph 集群的某个时间点的快照,即集群中所有 StorageEngine 的 checkpoint 的集合。通过 snapshot 可以将集群恢复到某个 snapshot 创建时的状态。
- wal:Write-Ahead Logging ,用 raftex 保证 leader 和 follower 的一致性。
2 系统构架
2.1 系统整体架构
2.2 存储系统结构关系
2.3 存储系统物理文件结构
[bright2star@hp-server storage]$ tree
.
└── nebula
    └── 1
        ├── checkpoints
        │   ├── SNAPSHOT_2019_12_04_10_54_42
        │   │   ├── data
        │   │   │   ├── 000006.sst
        │   │   │   ├── 000008.sst
        │   │   │   ├── CURRENT
        │   │   │   ├── MANIFEST-000007
        │   │   │   └── OPTIONS-000005
        │   │   └── wal
        │   │       ├── 1
        │   │       │   └── 0000000000000000233.wal
        │   │       ├── 2
        │   │       │   └── 0000000000000000233.wal
        │   │       ├── 3
        │   │       │   └── 0000000000000000233.wal
        │   │       ├── 4
        │   │       │   └── 0000000000000000233.wal
        │   │       ├── 5
        │   │       │   └── 0000000000000000233.wal
        │   │       ├── 6
        │   │       │   └── 0000000000000000233.wal
        │   │       ├── 7
        │   │       │   └── 0000000000000000233.wal
        │   │       ├── 8
        │   │       │   └── 0000000000000000233.wal
        │   │       └── 9
        │   │           └── 0000000000000000233.wal
        │   └── SNAPSHOT_2019_12_04_10_54_44
        │       ├── data
        │       │   ├── 000006.sst
        │       │   ├── 000008.sst
        │       │   ├── 000009.sst
        │       │   ├── CURRENT
        │       │   ├── MANIFEST-000007
        │       │   └── OPTIONS-000005
        │       └── wal
        │           ├── 1
        │           │   └── 0000000000000000236.wal
        │           ├── 2
        │           │   └── 0000000000000000236.wal
        │           ├── 3
        │           │   └── 0000000000000000236.wal
        │           ├── 4
        │           │   └── 0000000000000000236.wal
        │           ├── 5
        │           │   └── 0000000000000000236.wal
        │           ├── 6
        │           │   └── 0000000000000000236.wal
        │           ├── 7
        │           │   └── 0000000000000000236.wal
        │           ├── 8
        │           │   └── 0000000000000000236.wal
        │           └── 9
        │               └── 0000000000000000236.wal
        ├── data
3 处理逻辑分析
3.1 逻辑分析
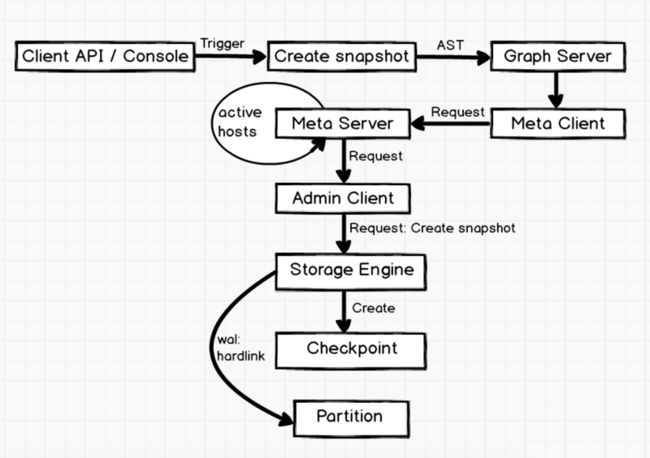
Create snapshot 由 client api 或 console 触发, graph server 对 create snapshot 的 AST 进行解析,然后通过 meta client 将创建请求发送到 meta server 。 meta server 接到请求后,首先会获取所有的 active host ,并创建 adminClient 所需的 request 。通过 adminClient 将创建请求发送到每个 StorageEngine ,StorageEngine 收到 create 请求后,会遍历指定 space 的全部 StorageEngine,并创建 checkpoint ,随后对 StorageEngine 中的全部 partition 的 wal 做 hardlink。在创建 checkpoint 和 wal hardlink 时,因为已经提前向所有 leader partition 发送了 write blocking 请求,所以此时数据库是只读状态的。
因为 snapshot 的名称是由系统的 timestamp 自动生成,所以不必担心 snapshot 的重名问题。如果创建了不必要的 snapshot,可以通过 drop snapshot 命令删除已创建的 snapshot。
3.2 Create Snapshot
3.3 Create Checkpoint
4 关键代码实现
4.1 Create Snapshot
folly::Future AdminClient::createSnapshot(GraphSpaceID spaceId, const std::string& name) {
    // 获取所有storage engine的host
    auto allHosts = ActiveHostsMan::getActiveHosts(kv_);
    storage::cpp2::CreateCPRequest req;

    // 指定spaceId,目前是对所有space做checkpoint,list spaces 工作已在调用函数中执行。
    req.set_space_id(spaceId);

    // 指定 snapshot name,已有meta server根据时间戳产生。
    // 例如:SNAPSHOT_2019_12_04_10_54_44
    req.set_name(name);
    folly::Promise pro;
    auto f = pro.getFuture();

    // 通过getResponse接口发送请求到所有的storage engine.
    getResponse(allHosts, 0, std::move(req), [] (auto client, auto request) {
        return client->future_createCheckpoint(request);
    }, 0, std::move(pro), 1 /*The snapshot operation only needs to be retried twice*/);
    return f;
}
4.2 Create Checkpoint
ResultCode NebulaStore::createCheckpoint(GraphSpaceID spaceId, const std::string& name) {
    auto spaceRet = space(spaceId);
    if (!ok(spaceRet)) {
        return error(spaceRet);
    }
    auto space = nebula::value(spaceRet);

    // 遍历属于本space中的所有StorageEngine
    for (auto& engine : space->engines_) {

        // 首先对StorageEngine做checkpoint
        auto code = engine->createCheckpoint(name);
        if (code != ResultCode::SUCCEEDED) {
            return code;
        }

        // 然后对本StorageEngine中的所有partition的last wal做hardlink
        auto parts = engine->allParts();
        for (auto& part : parts) {
            auto ret = this->part(spaceId, part);
            if (!ok(ret)) {
                LOG(ERROR) << "Part not found. space : " << spaceId << " Part : " << part;
                return error(ret);
            }
            auto walPath = folly::stringPrintf("%s/checkpoints/%s/wal/%d",
                                                      engine->getDataRoot(), name.c_str(), part);
            auto p = nebula::value(ret);
            if (!p->linkCurrentWAL(walPath.data())) {
                return ResultCode::ERR_CHECKPOINT_ERROR;
            }
        }
    }
    return ResultCode::SUCCEEDED;
}
5 用户使用帮助
5.1 CREATE SNAPSHOT
CREATE SNAPSHOT 即对整个集群创建当前时间点的快照,snapshot 名称由 meta server 的 timestamp 组成。
在创建过程中可能会创建失败,当前版本不支持创建失败的垃圾回收的自动功能,后续将计划在 metaServer 中开发 cluster checker 的功能,将通过异步线程检查集群状态,并自动回收 snapshot 创建失败的垃圾文件。
当前版本如果 snapshot 创建失败,必须通过 DROP SNAPSHOT 命令清除无效的 snapshot。
当前版本不支持对指定的 space 做 snapshot,当执行 CREATE SNAPSHOT 后,将对集群中的所有 space 创建快照。
CREATE SNAPSHOT 语法:
CREATE SNAPSHOT以下为笔者创建 3 个 snapshot 的例子:
([email protected]) [default_space]> create snapshot;
Execution succeeded (Time spent: 28211/28838 us)

([email protected]) [default_space]> create snapshot;
Execution succeeded (Time spent: 22892/23923 us)

([email protected]) [default_space]> create snapshot;
Execution succeeded (Time spent: 18575/19168 us)
我们用 5.3 提及的 SHOW SNAPSHOTS 命令看下现在有的快照
([email protected]) [default_space]> show snapshots;
===========================================================
| Name                         | Status | Hosts           |
===========================================================
| SNAPSHOT_2019_12_04_10_54_36 | VALID  | 127.0.0.1:77833 |
-----------------------------------------------------------
| SNAPSHOT_2019_12_04_10_54_42 | VALID  | 127.0.0.1:77833 |
-----------------------------------------------------------
| SNAPSHOT_2019_12_04_10_54_44 | VALID  | 127.0.0.1:77833 |
-----------------------------------------------------------
Got 3 rows (Time spent: 907/1495 us)
从上 SNAPSHOT_2019_12_04_10_54_36 可见 snapshot 名同 timestamp 有关。
5.2 DROP SNAPSHOT
DROP SNAPSHOT 即删除指定名称的 snapshot,可以通过 SHOW SNAPSHOTS 命令获取 snapshot 的名称,DROP SNAPSHOT 既可以删除有效的 snapshot,也可以删除创建失败的 snapshot。
语法:
DROP SNAPSHOT name笔者删除了 5.1 成功创建的 snapshot SNAPSHOT_2019_12_04_10_54_36 ,并用SHOW SNAPSHOTS 命令查看现有的 snapshot。
([email protected]) [default_space]> drop snapshot SNAPSHOT_2019_12_04_10_54_36;
Execution succeeded (Time spent: 6188/7348 us)

([email protected]) [default_space]> show snapshots;
===========================================================
| Name                         | Status | Hosts           |
===========================================================
| SNAPSHOT_2019_12_04_10_54_42 | VALID  | 127.0.0.1:77833 |
-----------------------------------------------------------
| SNAPSHOT_2019_12_04_10_54_44 | VALID  | 127.0.0.1:77833 |
-----------------------------------------------------------
Got 2 rows (Time spent: 1097/1721 us)
5.3 SHOW SNAPSHOTS
SHOW SNAPSHOTS 可查看集群中所有的 snapshot,可以通过 SHOW SNAPSHOTS 命令查看其状态(VALID 或 INVALID)、名称、和创建 snapshot 时所有 storage Server 的 ip 地址。
语法:
SHOW SNAPSHOTS以下为一个小示例:
([email protected]) [default_space]> show snapshots;
===========================================================
| Name                         | Status | Hosts           |
===========================================================
| SNAPSHOT_2019_12_04_10_54_36 | VALID  | 127.0.0.1:77833 |
-----------------------------------------------------------
| SNAPSHOT_2019_12_04_10_54_42 | VALID  | 127.0.0.1:77833 |
-----------------------------------------------------------
| SNAPSHOT_2019_12_04_10_54_44 | VALID  | 127.0.0.1:77833 |
-----------------------------------------------------------
Got 3 rows (Time spent: 907/1495 us)
6 注意事项
- 当系统结构发生变化后,最好立刻 create snapshot,例如 add host、drop host、create space、drop space、balance 等。
- 当前版本暂未提供用户指定 snapshot 路径的功能,snapshot 将默认创建在 data_path/nebula 目录下。
- 当前版本暂未提供 snapshot 的恢复功能,需要用户根据实际的生产环境编写 shell 脚本实现。实现逻辑也比较简单,拷贝各 engineServer 的 snapshot 到指定的文件夹下,并将此文件夹设置为 data_path,启动集群即可。
7 附录
最后,附上 Nebula Graph GitHub 地址:https://github.com/vesoft-inc/nebula 如果你在使用 Nebula Graph 过程中遇到任何问题,欢迎 GitHub 联系我们或者加入微信交流群,请联系微信号:NebulaGraphbot


