一、Sign In With Apple 简介
苹果官方是这么介绍的Sign In With Apple:
The fast, easy way to sign in to apps and websites.
Sign In With Apple 是一种在app 和网站上快速、容易登录的方式。
Sign In with Apple makes it easy for users to sign in to yourapps and websitesusing their Apple ID. Instead of filling out forms, verifying email addresses, and choosing new passwords, they can use Sign In with Apple to set up an account and start using your app right away. All accounts are protected withtwo-factor authenticationfor superior security, and Apple will not track users’ activity in your app or website.
对于用户来说,Sign In With Apple 使他们可以使用Apple ID容易地登录apps和网站。而不需要填写表单,验证邮件,选择新密码。用户可以使用Sign In With Apple 创建新用户并立即可以开始使用你的app。为了提高安全性,双重因子验证保护了帐号的安全性。而且Apple 不会跟踪用户在app 和网站的行为信息。
简单的说,Sign In With Apple 是一种类似于微信登录、微博登录的第三方登录方式,只不过其具有一些特殊的特性而已。下面优先介绍一下该项技术的特性和注意事项:
1. Sign In With Apple的特别之处:
安全性的保证,用户可以开启双重因子验证从而使自己的账号在其他设备登录时得到通知,更好的保护账号安全;此外用户在使用Sign In With Apple 时可以选择隐藏自己的私人信息,例如邮箱和电话等可以选择禁止第三方获取这些信息。
想详细了解双重因子验证可以查看:Two-factor authentication for Apple ID
Sign In With Apple 的另一个特点是对于APP应用的发展理念的引导,目前苹果官方的思想是能够使用户更便捷的访问一款应用,而不是受限于各种访问权限。用户可以把更多的时间投入到访问应用内容上面,而不是浪费在其他信息的填写上。
2. 开发Sign In With Apple的注意事项:
Sign In With Apple 是iOS13 新增的功能,需要使用: MacOS 10.14.4或更高版本的Mac上的Xcode 11开发。
Sign In With Apple 是跨平台的,可以支持iOS、macOS、watchOS、tvOS、JS。
Xcode 11 includes SDKs for iOS 13, macOS Catalina 10.15, watchOS 6, and tvOS 13. Xcode 11 supports on-device debugging for iOS 8 and later, tvOS 9 and later, and watchOS 2 and later. Xcode 11 requires a Mac running macOS Mojave 10.14.4 or later.
Xcode 11 包含支持iOS13、macOS Catalina 10.15, watchOS 6, and tvOS 13的SDK,Xcode11 支持iOS8、tvOS2 或之后的设备,Xcode11 需要运行在MacOS 10.14.4或更高系统版本的Mac上。
二、Sign In With Apple 开发流程
使用Sign In With Apple 的开发流程主要分为以下4步:
1.设置ASAuthorizationAppleIDButton相关布局,添加相应地授权处理;
2.获取授权码;
3.验证;
4.处理Sign In With Apple授权状态变化;
下面展开描述下iOS 使用Sign In With Apple的准备工作、可能遇到的问题及流程:
1. iOS 使用Sign In With Apple的准备工作:
1.1在Xcode11 Signing & capabilities 中添加 Sign In With Apple
2. iOS 使用Sign In With Apple可能遇到的问题:
2.1 开启双重因子验证的方式:
双重因子验证的开启:设置 -> 密码与安全性 -> 双重因子验证;
如果不开启双重因子验证,那么当我们在调用苹果官方授权接口的时候,系统也会提示我们需要去打开双重因子验证。
2.2 停止App 使用Sign In With Apple 的方式:
停止App 使用Sign In With Apple:设置 -> 密码与安全性 -> 使用您AppleID的App -> 找到对应的App - > “停止以Apple ID使用 Bundle ID...”;
3. iOS使用Sign In With Apple 的开发流程****:
3.1设置ASAuthorizationAppleIDButton相关布局,添加相应的授权处理,ASAuthorizationAppleIDButton是iOS 13.0中系统提供的Sign In With Apple的入口Button,此处使用自定义Button也是可以的,只是需要注意UI的设计规范;
- (void)configUI{

    if (@available(iOS 13.0, *)) {
        // Sign In With Apple Button
        ASAuthorizationAppleIDButton *appleIDBtn = [ASAuthorizationAppleIDButton buttonWithType:ASAuthorizationAppleIDButtonTypeDefault style:ASAuthorizationAppleIDButtonStyleWhite];
        appleIDBtn.frame = CGRectMake(50, self.view.bounds.size.height - 200, self.view.bounds.size.width - 100, 80);
        [appleIDBtn addTarget:self action:@selector(handleAuthorizationAppleIDButtonPress) forControlEvents:UIControlEventTouchUpInside];
        [self.view addSubview:appleIDBtn];
    }
}
关于ASAuthorizationAppleIDButton的设计规范,可以查看:Human Interface Guidelines 之 Sign In with Apple
3.2 获取授权码
获取授权码这部分主要看授权请求和2个代理ASAuthorizationControllerDelegate, ASAuthorizationControllerPresentationContextProviding,及相应的代理方法中的实现。
ASAuthorizationControllerDelegate
An interface for providing information about the outcome of an authorization request.
提供关于授权请求结果信息的接口
ASAuthorizationControllerPresentationContextProviding:
An interface the controller uses to ask a delegate for a presentation context.
控制器的代理使用一个展示授权控制器的上下文的接口
下面为获取授权请求方法:
// 获取授权
- (void)handleAuthorizationAppleIDButtonPress{

    if (@available(iOS 13.0, *)) {
        // 基于用户的Apple ID授权用户,生成用户授权请求的一种机制
        ASAuthorizationAppleIDProvider *appleIDProvider = [[ASAuthorizationAppleIDProvider alloc] init];
        // 创建新的AppleID 授权请求
        ASAuthorizationAppleIDRequest *appleIDRequest = [appleIDProvider createRequest];
        // 在用户授权期间请求的联系信息
        appleIDRequest.requestedScopes = @[ASAuthorizationScopeFullName,ASAuthorizationScopeEmail];
        // 由ASAuthorizationAppleIDProvider创建的授权请求 管理授权请求的控制器
        ASAuthorizationController *authorizationController = [[ASAuthorizationController alloc] initWithAuthorizationRequests:@[appleIDRequest]];
        // 设置授权控制器通知授权请求的成功与失败的代理
        authorizationController.delegate = self;
        // 设置提供展示上下文的代理,在这个上下文中 系统可以展示授权界面给用户
        authorizationController.presentationContextProvider = self;
        // 在控制器初始化期间启动授权流
        [authorizationController performRequests];
    } else {
        // 处理不支持系统版本
        NSLog(@"该系统版本不可用Apple登录");
    }
}
下边为实现代理方法的代码:
#pragma mark - delegate
//@optional 授权成功的回调
- (void)authorizationController:(ASAuthorizationController *)controller didCompleteWithAuthorization:(ASAuthorization *)authorization API_AVAILABLE(ios(13.0)){
    NSLog(@"授权完成:::%@", authorization.credential);

    if (@available(iOS 13.0, *)) {
        if ([authorization.credential isKindOfClass:[ASAuthorizationAppleIDCredential class]]) {

            // 用户登录使用ASAuthorizationAppleIDCredential
            ASAuthorizationAppleIDCredential *appleIDCredential = authorization.credential;
            NSString *user = appleIDCredential.user;
            // 用户的唯一标识,需要使用钥匙串的方式保存
            [keychain save:KEYCHAIN_IDENTIFIER(@"userIdentifier") data:user];
            // 获取用户相关信息

            // 暂未使用
            // NSString *state = appleIDCredential.state;

            // 暂未使用
            // NSArray *authorizedScopes = appleIDCredential.authorizedScopes;

            // 用于判断当前登录的苹果账号是否是一个真实用户,ASUserDetectionStatusLikelyReal时可用
            // ASUserDetectionStatus realUserStatus = appleIDCredential.realUserStatus;

            // 用户信息
            /*
            NSString *familyName = appleIDCredential.fullName.familyName;
            NSString *givenName = appleIDCredential.fullName.givenName;
            NSString *email = appleIDCredential.email;*/

            // 请求服务器验证时需要使用的参数
            NSData *identityToken = appleIDCredential.identityToken;
            NSData *authorizationCode = appleIDCredential.authorizationCode;

            NSString *identityTokenStr = [[NSString alloc] initWithData:identityToken encoding:NSUTF8StringEncoding];
            NSString *authorizationCodeStr = [[NSString alloc] initWithData:authorizationCode encoding:NSUTF8StringEncoding];
            NSLog(@"%@\n\n%@", identityTokenStr, authorizationCodeStr);

        }else if ([authorization.credential isKindOfClass:[ASPasswordCredential class]]){
            // 这个获取的是iCloud记录的账号密码,需要配置支持iOS 12 记录账号密码的新特性,如果不支持,此处不执行
            // 用户登录使用现有的密码凭证
            ASPasswordCredential *passwordCredential = authorization.credential;
            // 密码凭证对象的用户标识 用户的唯一标识
            NSString *user = passwordCredential.user;
            // 密码凭证对象的密码
            NSString *password = passwordCredential.password;
            NSLog(@"******************************* %@:%@", user,password);

        }else{
            NSLog(@"************************************ 授权信息均不符");
        }
    } else {
        // Fallback on earlier versions
    }
}
// 授权失败的回调
- (void)authorizationController:(ASAuthorizationController *)controller didCompleteWithError:(NSError *)error API_AVAILABLE(ios(13.0)){
    // Handle error.
    NSLog(@"Handle error:%@", error);
    NSString *errorMsg = nil;
    switch (error.code) {
        case ASAuthorizationErrorCanceled:
            errorMsg = @"用户取消了授权请求";
            break;
        case ASAuthorizationErrorFailed:
            errorMsg = @"授权请求失败";
            break;
        case ASAuthorizationErrorInvalidResponse:
            errorMsg = @"授权请求响应无效";
            break;
        case ASAuthorizationErrorNotHandled:
            errorMsg = @"未能处理授权请求";
            break;
        case ASAuthorizationErrorUnknown:
            errorMsg = @"授权请求失败未知原因";
            break;

        default:
            break;
    }
    NSLog(@"****************************** %@",errorMsg);
}
已经使用Sign In With Apple登录过app的用户
执行已经登录过的场景。如果设备中存在iCloud Keychain 凭证或者AppleID 凭证提示用户直接使用TouchID或FaceID登录即可,下面方法可以放在viewDidAppear中执行。
// 如果存在iCloud Keychain 凭证或者AppleID 凭证提示用户,如果不存在会走失败的回调
- (void)perfomExistingAccountSetupFlows{

    if (@available(iOS 13.0, *)) {
        // 基于用户的Apple ID授权用户,生成用户授权请求的一种机制
        ASAuthorizationAppleIDProvider *appleIDProvider = [[ASAuthorizationAppleIDProvider alloc] init];
        // 授权请求AppleID
        ASAuthorizationAppleIDRequest *appleIDRequest = [appleIDProvider createRequest];
        // 为了执行钥匙串凭证分享生成请求的一种机制
        ASAuthorizationPasswordProvider *passwordProvider = [[ASAuthorizationPasswordProvider alloc] init];
        ASAuthorizationPasswordRequest *passwordRequest = [passwordProvider createRequest];
        // 由ASAuthorizationAppleIDProvider创建的授权请求 管理授权请求的控制器
        ASAuthorizationController *authorizationController = [[ASAuthorizationController alloc] initWithAuthorizationRequests:@[appleIDRequest, passwordRequest]];
        // 设置授权控制器通知授权请求的成功与失败的代理
        authorizationController.delegate = self;
        // 设置提供 展示上下文的代理,在这个上下文中 系统可以展示授权界面给用户
        authorizationController.presentationContextProvider = self;
        // 在控制器初始化期间启动授权流
        [authorizationController performRequests];
    } else {
        // 处理不支持系统版本
        NSLog(@"该系统版本不支持Apple登录");
    }
}
3.3 Verification
关于验证的这一步,需要传递授权码给自己的服务端,自己的服务端调用苹果API Generate and validate tokens去校验授权码。
3.4监听授权状态变化
监听授权状态改变,并且做出相应处理。授权状态有:
ASAuthorizationAppleIDProviderCredentialRevoked:授权状态失效(用户停止使用AppID 登录App)、
ASAuthorizationAppleIDProviderCredentialAuthorized:已授权(已使用AppleID 登录过App)、
ASAuthorizationAppleIDProviderCredentialNotFound:授权凭证缺失(可能是使用AppleID 登录过App)
处理改变有2种处理方式,一种是通过通知的方式,另一种是监听当前的appleIDCredential.user的授权状态。
3.4.1 监听appleIDCredential.user的授权状态,这部分代码可以放到AppDelegate的
- (BOOL)application:(UIApplication *)application didFinishLaunchingWithOptions:(NSDictionary *)launchOptions中,在应用启动时检查授权状态是否改变,判断是否需要进行相关操作。
#pragma mark - Private functions
//! 观察授权状态
- (void)observeAuthticationState {

    if (@available(iOS 13.0, *)) {
        // A mechanism for generating requests to authenticate users based on their Apple ID.
        // 基于用户的Apple ID 生成授权用户请求的机制
        ASAuthorizationAppleIDProvider *appleIDProvider = [ASAuthorizationAppleIDProvider new];
        // 需要使用钥匙串的方式获取已经存在的用户唯一标识
        NSString *userIdentifier = [keychain load:KEYCHAIN_IDENTIFIER(@"userIdentifier")];

        if (userIdentifier) {
            NSString* __block errorMsg = nil;
            //Returns the credential state for the given user in a completion handler.
            // 在回调中返回用户的授权状态
            [appleIDProvider getCredentialStateForUserID:userIdentifier completion:^(ASAuthorizationAppleIDProviderCredentialState credentialState, NSError * _Nullable error) {
                switch (credentialState) {
                        // 苹果证书的授权状态
                    case ASAuthorizationAppleIDProviderCredentialRevoked:
                        // 苹果授权凭证失效
                        errorMsg = @"苹果授权凭证失效";
                        break;
                    case ASAuthorizationAppleIDProviderCredentialAuthorized:
                        // 苹果授权凭证状态良好
                        errorMsg = @"苹果授权凭证状态良好";
                        break;
                    case ASAuthorizationAppleIDProviderCredentialNotFound:
                        // 未发现苹果授权凭证
                        errorMsg = @"未发现苹果授权凭证";
                        // 可以引导用户重新登录
                        break;
                    case ASAuthorizationAppleIDProviderCredentialTransferred:
                        errorMsg = @"苹果授权信息变动";
                        break;
                }
                dispatch_async(dispatch_get_main_queue(), ^{
                    NSLog(@"SignInWithApple授权状态变化情况");
                    NSLog(@"%@", errorMsg);
                });
            }];

        }
    }
}
3.4.2使用通知的方式检测是否授权应用支持Sign In With Apple变化情况。在使用应用过程中检查授权状态变化,如下的代码可以根据自己的业务场景去考虑放置的位置。
// 添加苹果登录的状态通知,可根据具体需要选择放置位置
- (void)observeAppleSignInState {
    if (@available(iOS 13.0, *)) {
        NSNotificationCenter *center = [NSNotificationCenter defaultCenter];
        [center addObserver:self selector:@selector(handleSignInWithAppleStateChanged:) name:ASAuthorizationAppleIDProviderCredentialRevokedNotification object:nil];
    }
}

// 观察SignInWithApple状态改变
- (void)handleSignInWithAppleStateChanged:(id)noti {

    NSLog(@"%s", __FUNCTION__);
    NSLog(@"%@", noti);
}

- (void)dealloc {
    if (@available(iOS 13.0, *)) {
        [[NSNotificationCenter defaultCenter] removeObserver:self name:ASAuthorizationAppleIDProviderCredentialRevokedNotification object:nil];
    }
}
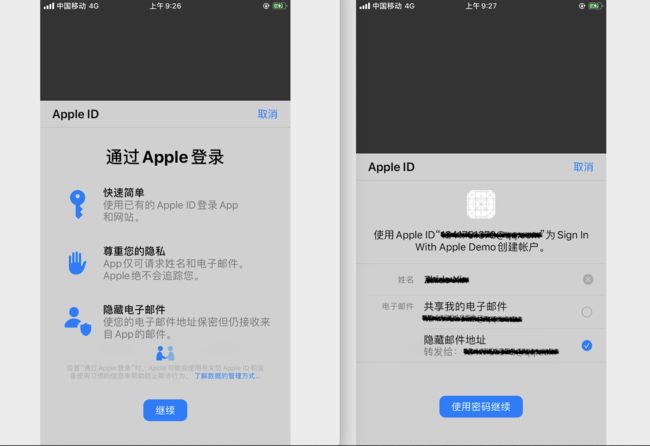
界面展示
Demo
OC版Sign In With Apple
Swift版官方Sign In With Apple
参考学习网址
Sign In with Apple - 使用苹果账号登录你的应用
What the Heck is Sign In with Apple?
Adding the Sign In with Apple Flow to Your App
Generate and validate tokens
以上属于笔者参考苹果文档总结的,若有雷同纯属巧合;如有错误,请多多指正,转载请标明来源和作者。