一 本地推送
使用 UIApplication 注册一个通知
//快捷回复
UIMutableUserNotificationCategory *category = [[UIMutableUserNotificationCategory alloc]init];
//唯一标示
category.identifier = @"hello";
/*
// timer-based scheduling定制
NSDate *fireDate; 触发时间
NSTimeZone *timeZone; 时区
NSString *alertBody; @"11111"
NSString *alertAction; 滑动解锁的按钮的文字
NSString *alertLaunchImage; 启动图片
NSString *alertTitle NS_AVAILABLE_IOS(8_2); 提醒标题
@property(nullable, nonatomic,copy) NSString *soundName; UILocalNotificationDefaultSoundName // sound
NSInteger applicationIconBadgeNumber; 图标文字
NSDictionary *userInfo; 用户信息
// category identifer of the local notification, as set on a UIUserNotificationCategory and passed to +[UIUserNotificationSettings settingsForTypes:categories:]
NSString *category;
注册通知类型
UIUserNotificationTypeNone
UIUserNotificationTypeBadge = 1 << 0, 图标文字
UIUserNotificationTypeSound = 1 << 1, 声音
UIUserNotificationTypeAlert = 1 << 2, 提示文字
*/
//这里是创建好的两个动作
/**
NSString *identifier;
NSString *title; 标题
NSDictionary *parameters NS_AVAILABLE_IOS(9_0);//枚举
UIUserNotificationActivationMode activationMode;//按钮响应事件 的处理 是否需要打开APP
UIUserNotificationActivationModeForeground, //程序前台 打开APP
UIUserNotificationActivationModeBackground //后台 陌陌的处理
BOOL authenticationRequired; 是否解锁屏幕的BOOl
BOOL destructive;//是否显示 红色字体
*/
UIMutableUserNotificationAction *action1 = [[UIMutableUserNotificationAction alloc]init];
action1.identifier = @"nihao111";
action1.title = @"好的000";
action1.activationMode = UIUserNotificationActivationModeBackground;
action1.authenticationRequired = NO;
action1.destructive = YES;
UIMutableUserNotificationAction *action2 = [[UIMutableUserNotificationAction alloc]init];
action2.identifier = @"nihao222";
action2.title = @"不好000";
action2.activationMode = UIUserNotificationActivationModeBackground;
action2.authenticationRequired = NO;
action2.destructive = NO;
//这里添加动作参数UIMutableUserNotificationAction, UIUserNotificationActionContextDefault 默认可以添加四个动作
[category setActions:@[action1,action2] forContext:UIUserNotificationActionContextDefault];
NSSet *set = [NSSet setWithObjects:category, nil];
//在这里创建一个UIUserNotificationSettings
UIUserNotificationSettings *setting = [UIUserNotificationSettings settingsForTypes:UIUserNotificationTypeBadge |UIUserNotificationTypeSound |UIUserNotificationTypeAlert categories:set];
//1 , 需要传入参数UIUserNotificationSettings
[[UIApplication sharedApplication]registerUserNotificationSettings:setting];
在方法里面定制一个通知 当点击屏幕的时候发送通知
- (void)touchesBegan:(NSSet*)touches withEvent:(UIEvent *)event
{
//1.创建本地通知 特定的时间显示出来 (定制)
UILocalNotification *local = [[UILocalNotification alloc]init];
//2.初始化 属性
local.alertBody = @"女神: 202";
local.alertAction = @"聊天";
local.fireDate = [NSDate dateWithTimeIntervalSinceNow:5];
local.applicationIconBadgeNumber = 10;
local.category = @"hello";
local.userInfo = @{@"name" : @"萌妹子" , @"age" : @17 ,@"QQ" : @"137"};
//3.定制 使用
[[UIApplication sharedApplication]scheduleLocalNotification:local];
//4.知道啥时候接收了通知
//代理
}
//跳转到聊天界面
//程序死了: 接收通知 -> didFinishLaunchingWithOptions (跳转界面的处理)
//程序活着: 接收通知 -> didReceiveLocalNotification (跳转界面的处理)
//接收到本地通知之后就会调用
//程序活着: 1.前台 2.后台
- (void)application:(UIApplication *)application didReceiveLocalNotification:(UILocalNotification *)notification
{
NSLog(@"%@",notification.userInfo);
//跳转界面 (QQ 跳转到聊天界面)
//怎么验证是否来了?
//调试
UILabel *label = [[UILabel alloc]initWithFrame:CGRectMake(0, 100, 100, 50)];
label.numberOfLines= 0;
label.backgroundColor = [UIColor redColor];
label.text = [NSString stringWithFormat:@"%@",notification.userInfo];
[self.window.rootViewController.view addSubview:label];
//跳转界面(聊天界面)
//冲突
//避免冲突 : 1.沟通 修改公共文件时告诉别人 2.分模块 //3.纯代码(可以,自动布局比较痛苦)
UIStoryboard *story = [UIStoryboard storyboardWithName:@"chat" bundle:nil];
CZChatViewController *chat = story.instantiateInitialViewController;
self.window.rootViewController = chat;
}
//从死到生 会来到didFinishLaunchingWithOptions
//1.点击图标(启动)
//2.接收通知(程序死了) : launchOptions[UIApplicationLaunchOptionsLocalNotificationKey] 有值
- (BOOL)application:(UIApplication *)application didFinishLaunchingWithOptions:(NSDictionary *)launchOptions {
if (launchOptions[UIApplicationLaunchOptionsLocalNotificationKey]) { //接收通知进来
//跳转界面 (QQ 跳转到聊天界面)
//怎么验证是否来了?
//调试方式 添加控件
UILabel *label = [[UILabel alloc]initWithFrame:CGRectMake(0, 100, 300, 350)];
label.numberOfLines= 0;
label.backgroundColor = [UIColor purpleColor];
label.text = [NSString stringWithFormat:@"%@",launchOptions];
[self.window.rootViewController.view addSubview:label];
//跳转界面(聊天界面)
UIStoryboard *story = [UIStoryboard storyboardWithName:@"chat" bundle:nil];
CZChatViewController *chat = story.instantiateInitialViewController;
self.window.rootViewController = chat;
}
return YES;
}
//本地通知的 快捷回复的处理响应
- (void)application:(UIApplication *)application handleActionWithIdentifier:(NSString *)identifier forLocalNotification:(UILocalNotification *)notification completionHandler:(void (^)())completionHandler
{
if ([identifier isEqualToString:@"nihao111"]) {
NSLog(@"接收信息!");
}else if ([identifier isEqualToString:@"nihao222"]) {
NSLog(@"拒绝!!");
}
//系统的回调
completionHandler();
}
二 远程推送
和本地推送一样要先注册通知 要在
- (BOOL)application:(UIApplication *)application didFinishLaunchingWithOptions:(NSDictionary *)launchOptions ;
方法中注册远程通知主要是苹果公司的APNS IOS中其实始终有一个长链接,那就是系统本身,这个长链接始终与APNS服务器相连,然后统一管理所有应用程序的推送
1、创建推送证书
(1)请求CSR文件
在MAC应用程序中找到钥匙串访问,打开它。
点击选项栏中的钥匙串访问中的证书助理:
选择从证书颁发机构申请证书:
填写电子邮件和名称,选择储存到磁盘,然后继续。
这时,我们存储的地方有了这样一个文件:CertificateSigningRequest.certSigningRequest。
(2)导出密钥文件
打开钥匙串,会发现多了一对密钥,名字就是上面你填写的常用名称。
我们选择专用密钥进行导出,然后设置一个我们自己的密码:
这时候我们又有了一个后缀名为.p12的文件。
(3)创建AppId
到https://developer.apple.com的member Center:
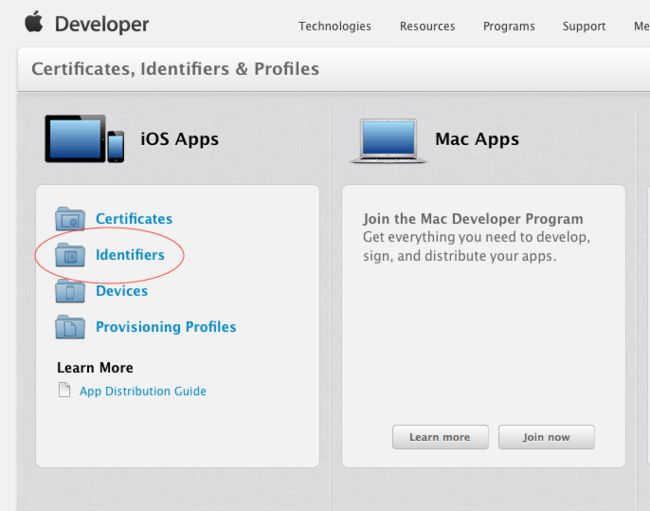
用你付过费的开发者appleID登陆后,选择Certificates:
如果你的项目已经创建了APP id,则可以不用重新创建,但是你创建的APP id必须要支持远程推送。如果还没有创建,点击加号,创建一个:
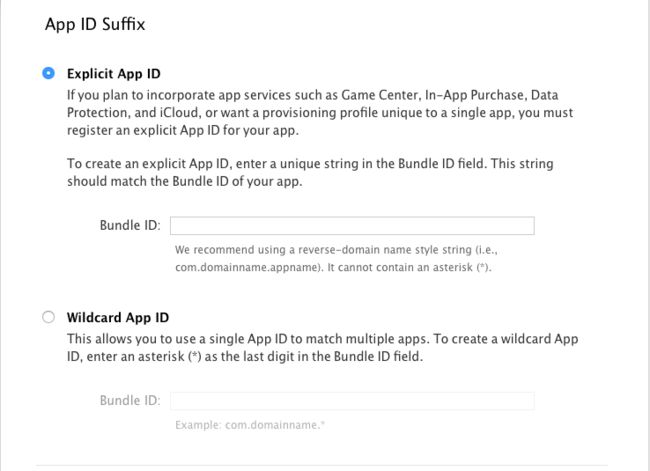
之后的界面中APP ID有两种类型:Explicit和Wildcard,分别是特殊的和通配的,我们需要推送功能,这个ID不能是通配的,所以我们选择第一个。
这里需要填的的Bundle ID必须和我们App中的一致.
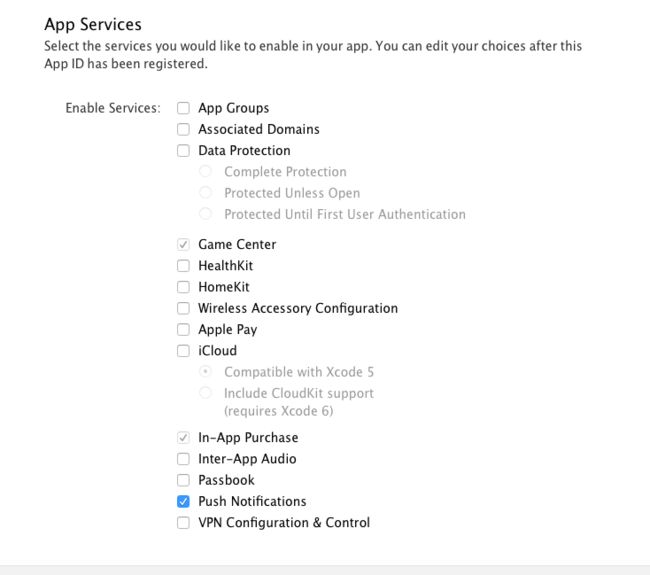
在APP ID的服务设置中,将Push Notification勾选上,点击continue。
之后点击submit,最后点击Done。这时我们的APP IDs列表中会出现我们刚才创建的APP ID。
(4)创建证书
点击我们刚才创建的APP ID,你会看到Push Notification一行为未设定的。我们点击Edit。
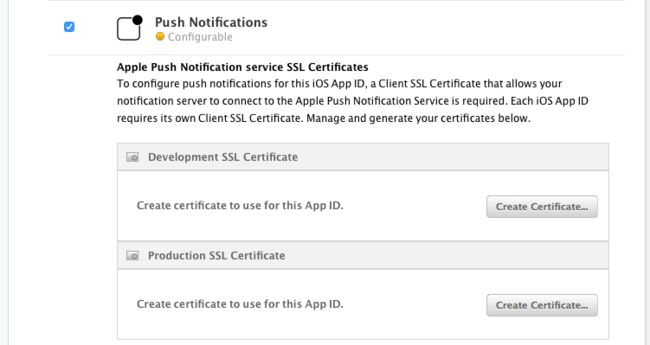
在Push Notifications设置里是如下界面,development是开发证书,Production是产品证书,我们现在需要测试,所以用Development证书,上线时要使用Production证书。点击Create Certificate。
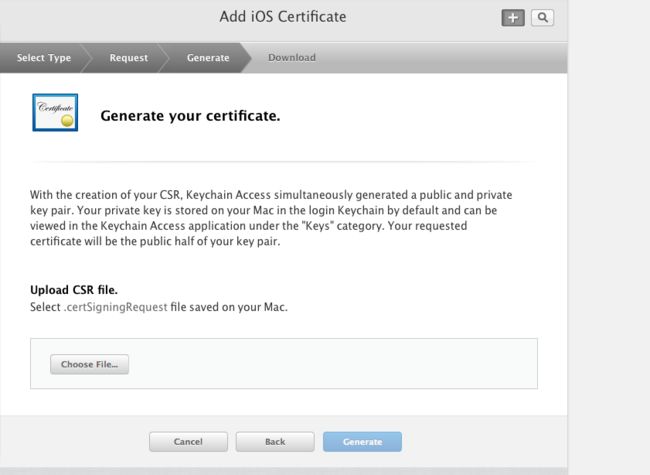
接着点击continue,如下界面会让我们选择一个CSR文件,我们第一步创建的文件在这里派上用场了,选择那个文件,点击Generate。
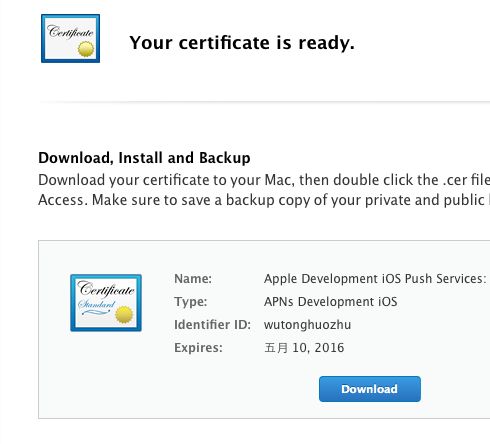
将创建好的证书下载到电脑中:
至此,我们已经有了三个文件了,分别是CSR文件,.p12文件,.cer文件。要将这三个文件放在同一个目录下。.cer文件分为测试和产品两个,需要哪个自行选择。
2、——服务端进行信息推送的设置
(1)处理证书
打开终端cd到我们上面得到的三个文件所在的目录。
在终端执行如下命令:
$ openssl x509 -in aps_development.cer -inform der -out PushCert.pem
aps_development.cer是刚才生成的.cer文件的文件名。会在当前文件夹中生成一个pem文件,这是我们服务端对应的证书。
再执行如下命令:
$ openssl pkcs12 -nocerts -out PushKey.pem -in key.p12
key.p12是上面生成的.p12文件的文件名。这时终端会让输入密码,这里的密码就是上面我们设置的密钥的密码。输入密码后回车,如果密码正确,会让我们输入新密码(一定切记),输入两次后,终端会提示成功创建PushKey.pem文件。
最后一步,将我们生成的两个pem文件和成为一个:
$ cat PushCert.pem PushKey.pem > ck.pem
(2)测试证书是否可用
在终端执行下面的命令:
$ telnet gateway.sandbox.push.apple.com 2195
等一小会,如果终端显示下面的情形,则证书正常。
然后执行如下命令:
openssl s_client -connect gateway.sandbox.push.apple.com:2195 -cert PushChatCert.pem -key PushKey.pem
输入密码后回车显示如下的结果则连接成功:
在 Appdelegate 中实现如下代码
//程序启动 程序接收远程通知 程序死了
- (BOOL)application:(UIApplication *)application didFinishLaunchingWithOptions:(NSDictionary *)launchOptions {
UIMutableUserNotificationAction *jieshou = [[UIMutableUserNotificationAction alloc]init];
jieshou.identifier = @"jieshou111";
jieshou.title = @"接受";
jieshou.activationMode = UIUserNotificationActivationModeBackground;
jieshou.destructive = NO;
UIMutableUserNotificationAction *reject = [[UIMutableUserNotificationAction alloc]init];
reject.identifier = @"jujue111";
reject.title = @"拒绝";
reject.activationMode = UIUserNotificationActivationModeBackground;
reject.destructive = YES;
UIMutableUserNotificationCategory *category = [[UIMutableUserNotificationCategory alloc]init];
category.identifier = @"xiaozhang";
[category setActions:@[jieshou,reject] forContext:UIUserNotificationActionContextDefault];
//0.注册通知类型
UIUserNotificationSettings *setting = [UIUserNotificationSettings settingsForTypes:UIUserNotificationTypeBadge | UIUserNotificationTypeAlert | UIUserNotificationTypeSound categories:[NSSet setWithObjects:category, nil]];
[[UIApplication sharedApplication]registerUserNotificationSettings:setting];
//1.定制远程通知
// 1.1 上传UDID+ bundleID = deviceToken
[[UIApplication sharedApplication]registerForRemoteNotifications];
//代理 block 返回值 地址的参数
if (launchOptions[UIApplicationLaunchOptionsRemoteNotificationKey]) {
NSLog(@"跳转界面!!!");
}
return YES;
}
//注册完毕远程通知之后就会调用 返回deviceToken
- (void)application:(UIApplication *)application didRegisterForRemoteNotificationsWithDeviceToken:(NSData *)deviceToken
{
//在这里需要拿到deviceToken保存服务器 (调用接口) APNS 才能成功推送消息;
//ffd3f110 cf934e57 dac35e18 73a9fd0f 1fda18d3 e7f96881 1275e541 e5e5d3ef
}
//接受到远程通知之后就会调用
//活着的情况下: 前台 和 后台
- (void)application:(UIApplication *)application didReceiveRemoteNotification:(NSDictionary *)userInfo
{
NSLog(@"%@",userInfo);
//跳转界面
}
- (void)application:(UIApplication *)application handleActionWithIdentifier:(NSString *)identifier forRemoteNotification:(NSDictionary *)userInfo completionHandler:(void (^)())completionHandler
{
if ([identifier isEqualToString:@"jieshou111"]) {
NSLog(@"接收!!!!");
}else if ([identifier isEqualToString:@"jujue111"]) {
NSLog(@"拒绝!!!");
}
completionHandler();
}

