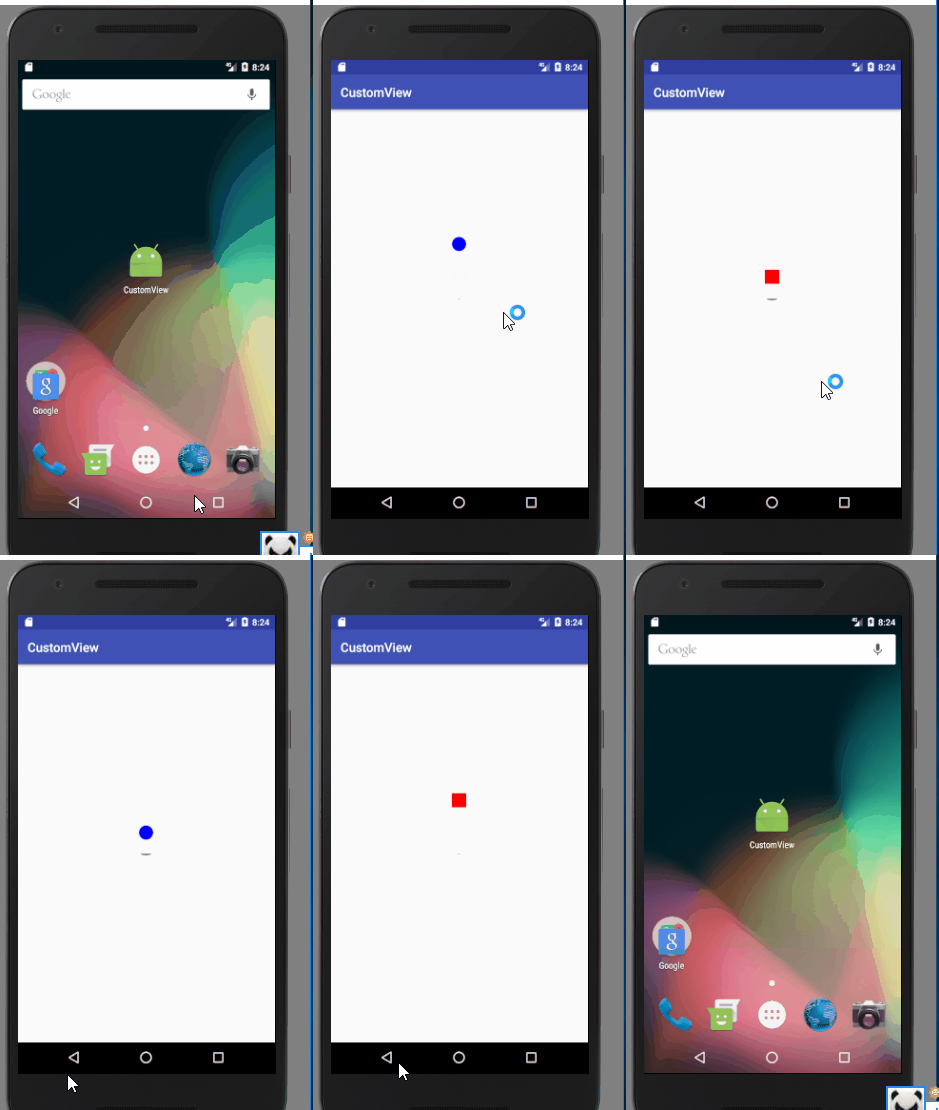
先上图
思考步骤还是和上一篇讲的一样,相同的套路:
自定义View(1)--QQ运动计步器
构造器不说了,正常情况一般三个都会写,这篇我没从attr里面写东西,所以这一步跳过了,我们直接来要真正思考的地方:首先我们这里实现的话有很多种方式,可以用图片,可以自己绘制,这里我们选择自己绘制,但是绘制的话,我们又要考虑这个动画是需要我们自己算坐标然后重绘?还是写成单独的一个view然后通过动画实现,这里我选择了后者,原因有三个:第一个是如果在 view内部写相关的移动旋转逻辑的话,计算量不用说增加了,这个是很费时间的,而且很容易出错;第二个是因为你不停的调用invalidate,看了源码的都知道,调用这个函数的会做很多工作,造成不必要的gpu耗费,这样不好;第三个是实用性,如果以后我们需要这样一个图像,我们可以直接把这个形状的view复制过去就可以使用,所以我们理清思路。
首先,上面跳动的view作为一个单独的view,下面的弧形阴影也做为一个单独的view,然后在外层通过一个viewGroup把他们组装起来并且控制相关的代码和其性能的优化。
我们先绘制图形的 view,也就是上下跳动的哪个view。我们 需要组装,所以我们肯定要重写onMeasure设置其宽高,这里我打算指定他的高度和宽度为圆的半径的两倍:
 @Override
    protected void onMeasure(int widthMeasureSpec, int heightMeasureSpec) {
        super.onMeasure(widthMeasureSpec, heightMeasureSpec);
        setMeasuredDimension(measureWidth(widthMeasureSpec),
                measureHeight(heightMeasureSpec));
    }

    /**
     * Determines the width of this view
     *
     * @param measureSpec A measureSpec packed into an int
     * @return The width of the view, honoring constraints from measureSpec
     */
    private int measureWidth(int measureSpec) {
        int result = 0;
        int specMode = MeasureSpec.getMode(measureSpec);
        int specSize = MeasureSpec.getSize(measureSpec);

        if (specMode == MeasureSpec.EXACTLY) {
            result = specSize;
        } else {
            result = mRadio * 2;
        }

        return result;
    }

    /**
     * Determines the height of this view
     *
     * @param measureSpec A measureSpec packed into an int
     * @return The height of the view, honoring constraints from measureSpec
     */
    private int measureHeight(int measureSpec) {
        int result = 0;
        int specMode = MeasureSpec.getMode(measureSpec);
        int specSize = MeasureSpec.getSize(measureSpec);
        if (specMode == MeasureSpec.EXACTLY) {
            result = specSize;
        } else {
            result = 2 * mRadio;
        }
        return result;
    }
接下来我们绘制图形,考略到我们需要变换不同形状的view,所以我写的时候分别写了三个绘制不同图案的函数,然后添加一个flag判断绘谁即可
@Override
    protected void onDraw(Canvas canvas) {
        super.onDraw(canvas);
        initCenterPoint();

        if (mFlog == 0)
            drawCircle(canvas);
        else if (mFlog == 1)
            drawRect(canvas);
        else
            drawTriangle(canvas);
    }

    private void initCenterPoint() {
        if (mCenterX == -1 || mCenterY == -1) {
            mCenterX = getMeasuredWidth() / 2;
            mCenterY = getMeasuredHeight() / 2;
         //   setPivotX(mCenterX);
         //  setPivotY(mCenterY);
        }
    }

    /**
     * 画圆
     *
     * @param canvas
     */
    private void drawCircle(Canvas canvas) {
        canvas.drawCircle(mCenterX, mCenterY, mRadio, mCirclePaint);
    }


    /**
     * 画正方形
     *
     * @param canvas
     */
    private void drawRect(Canvas canvas) {
        Rect rect = new Rect(mCenterX - mRadio,
                mCenterY - mRadio,
                mCenterX + mRadio,
                mCenterY + mRadio);
        canvas.drawRect(rect, mRectPaint);
    }


    public void setFlog(int mFlog) {
        this.mFlog = mFlog;
        invalidate();
    }

    /**
     * 绘制三角形
     *
     * @param canvas
     */
    private void drawTriangle(Canvas canvas) {
        Path path = new Path();
        path.moveTo(mCenterX, mCenterY - mRadio);
        path.lineTo(mCenterX - mRadio, mCenterY + mRadio);
        path.lineTo(mCenterX + mRadio, mCenterY + mRadio);
        canvas.drawPath(path, mTrianglePaint);
    }
测试一下这个图案已经绘制完成了,接下来我们绘制下面的阴影,同样的我们需要先测量,我这里设置宽高为半径值的2/3,宽为两倍的半径:
 @Override
    protected void onMeasure(int widthMeasureSpec, int heightMeasureSpec) {
        super.onMeasure(widthMeasureSpec, heightMeasureSpec);
        setMeasuredDimension(measureWidth(widthMeasureSpec),
                measureHeight(heightMeasureSpec));
    }

    /**
     * Determines the width of this view
     *
     * @param measureSpec A measureSpec packed into an int
     * @return The width of the view, honoring constraints from measureSpec
     */
    private int measureWidth(int measureSpec) {
        int result = 0;
        int specMode = MeasureSpec.getMode(measureSpec);
        int specSize = MeasureSpec.getSize(measureSpec);

        if (specMode == MeasureSpec.EXACTLY) {
            result = specSize;
        } else {
            result = mRadio * 2;
        }

        return result;
    }

    /**
     * Determines the height of this view
     *
     * @param measureSpec A measureSpec packed into an int
     * @return The height of the view, honoring constraints from measureSpec
     */
    private int measureHeight(int measureSpec) {
        int result = 0;
        int specMode = MeasureSpec.getMode(measureSpec);
        int specSize = MeasureSpec.getSize(measureSpec);
        if (specMode == MeasureSpec.EXACTLY) {
            result = specSize;
        } else {
            result = 2 * mRadio / 3;
        }
        return result;
    }
接下来我们绘制图案,我在绘制这个图案的时候是采用drawArc的方式,所以我们需要计算一下它的范围,我这采用的方案如下:
因为我们要上面的那块横线挨着物块view掉下的位置,所以rect的中心点就是这个,然后计算如下:
           int left = getWidth() / 2 - mRadio;
            int top = -getHeight() / 2;
            int right = getWidth() / 2 + mRadio;
            int bottom = getHeight() / 2;
            mRectF = new RectF(left, top, right, bottom);
其实getHeight就是2/3的半径
我们绘制的时候,绘制180°即可,:
   @Override
    protected void onDraw(Canvas canvas) {
        if (mRectF == null) {
            int left = getWidth() / 2 - mRadio;
            int top = -getHeight() / 2;
            int right = getWidth() / 2 + mRadio;
            int bottom = getHeight() / 2;
            mRectF = new RectF(left, top, right, bottom);
        }
        canvas.drawArc(mRectF, 0, 180, false, mArcPaint);
    }
最后我们将这两个图案组装起来,加上动画即可:
     public void startAnim() {
        if (mAnimatorSet == null) {
            mAnimatorSet = new AnimatorSet();
            //up
            ObjectAnimator rotationAnim = ObjectAnimator.ofFloat(mShapeView, "rotation", 0.0f, 360.0f);
            rotationAnim.setDuration(JUMP_UP_TIME);
            rotationAnim.setInterpolator(new AccelerateDecelerateInterpolator());//先快后慢

            ObjectAnimator translationAnimUp = ObjectAnimator.ofFloat(mShapeView, "translationY", 0, -JUMP_MAX_HEIGHT);
            translationAnimUp.setDuration(JUMP_UP_TIME);
            translationAnimUp.setInterpolator(new AccelerateDecelerateInterpolator());//先快后慢

            ObjectAnimator scaleXAnimUp = ObjectAnimator.ofFloat(mArcView, "scaleX", 1.0f, 0.2f);
            scaleXAnimUp.setDuration(JUMP_UP_TIME);
            scaleXAnimUp.setInterpolator(new AccelerateDecelerateInterpolator());//先快后慢

            ObjectAnimator scaleYAnimUp = ObjectAnimator.ofFloat(mArcView, "scaleY", 1.0f, 0.2f);
            scaleYAnimUp.setDuration(JUMP_UP_TIME);
            scaleYAnimUp.setInterpolator(new AccelerateDecelerateInterpolator());//先快后慢

            //down
            ObjectAnimator translationAnimDown = ObjectAnimator.ofFloat(mShapeView, "translationY", -JUMP_MAX_HEIGHT, 0);
            translationAnimDown.setDuration(JUMP_UP_TIME);
            translationAnimDown.setInterpolator(new AccelerateInterpolator());//先慢后快

            ObjectAnimator scaleXAnimXDown = ObjectAnimator.ofFloat(mArcView, "scaleX", 0.2f, 1.0f);
            scaleXAnimXDown.setDuration(JUMP_UP_TIME);
            scaleXAnimXDown.setInterpolator(new AccelerateInterpolator());//先慢后快

            ObjectAnimator scaleYAnimDown = ObjectAnimator.ofFloat(mArcView, "scaleY", 0.2f, 1.0f);
            scaleYAnimDown.setDuration(JUMP_UP_TIME);
            scaleYAnimDown.setInterpolator(new AccelerateInterpolator());//先慢后快

            mAnimatorSet.play(translationAnimUp)
                    .with(rotationAnim)
                    .with(scaleXAnimUp)
                    .with(scaleYAnimUp)
                    .before(translationAnimDown)
                    .before(scaleXAnimXDown)
                    .before(scaleYAnimDown);
            mAnimatorSet.addListener(new AnimatorListenerAdapter() {
                @Override
                public void onAnimationEnd(Animator animation) {
                    super.onAnimationEnd(animation);
                    mFlog++;//圆形 0-->1方形 -->2 三角形 -->3->0---->
                    if (mFlog > 2) {
                        mFlog = 0;
                    }
                    mShapeView.setFlog(mFlog);
                    startAnim();
                }
            });
        }
        mAnimatorSet.start();
    }
这样的话效果实现了,感觉没什么问题了。但是不要忘记了优化
优化
在这里我们主要优化这个动画对应Activity的生命周期 ,让其可见的时候加载动画,不可见的时候停止动画。主要使用Application.ActivityLifecycleCallbacks这个接口实现,具体实现的代码如下:
 @Override
    protected void onAttachedToWindow() {
        mActivity.getApplication().registerActivityLifecycleCallbacks(animLifecyleCallback);
        super.onAttachedToWindow();
    }

    @Override
    protected void onDetachedFromWindow() {
        mActivity.getApplication().unregisterActivityLifecycleCallbacks(animLifecyleCallback);
        super.onDetachedFromWindow();
    }

    private SimpleActivityLifecycleCallbacks animLifecyleCallback = new SimpleActivityLifecycleCallbacks() {
        @Override
        public void onActivityResumed(Activity activity) { // 页面第一次启动的时候不会执行
            if (activity == mActivity)
                startAnim();
            super.onActivityResumed(activity);
        }

        @Override
        public void onActivityPaused(Activity activity) {
            if (activity == mActivity)
                stopAnim();
            super.onActivityPaused(activity);
        }
    };
这样就更加优雅了。
源码github下载地址:
https://github.com/ChinaZeng/CustomView
