在Android3.0的时候,谷歌提供的Property Animation这个概念,与之前的tween动画相比,还是有明显的区别。举个最简单的例子,我们在一个imageview上面增加一个onclick事件,随后我们来一个位移动画,这时候我们再点击这个imageview,就会发现点击事件没了,然后我们又会很离奇的发现在一开始加载Imageview的那个地方,却可以响应这个点击事件,这不是很操蛋吗。。。从原理上来说,tween动画,仅仅是改变了view的绘图位置以及相关属性,没有牵扯到view本身这个对象的操作,所以才会带来如此大的麻烦。基于这一点,属性动画这个概念就很有必要去掌握。
我不打算深入的介绍属性动画如何使用,大家如有需求可以自行参考其他文章,我仅提供一个实际使用场景,供大家温故而知新
本篇博文在Github可以下载到,欢迎大家star、follow
先来看看本篇文章最终效果
其实很简单,就是一些爱心图通过贝塞尔曲线绘制出的路径移动到上方最后消失。具体差分一下,本篇文章涉及如下几个知识点:
- 属性动画的使用
- 贝塞尔曲线的相关知识
- PorterDuff的相关知识
基本分析完了,我们一个个的来攻破吧
自定义ImageView
我们在效果图上看到的爱心,其实并不是特地准备了这么多种不同的图片,而是由一张图片附着上不同的颜色最终形成不同颜色的爱心。
这个就需要我们自己通过canvas去绘制一个Bitmap出来,并且需要进行图形混合,才能将这个红色爱心变成其他五颜六色的爱心。图形混合需要使用到PorterDuff.Mode,一共有16种不同的Porter-Duff规则
这里我们需要颜色跟图片的交集:保留背景爱心的轮廓,但是颜色用新绘制上的色彩,看看这里面,明显SrcATop完全符合我们的要求
public class HeartImageView extends ImageView {
    Bitmap bitmap_heart;
    public HeartImageView(Context context) {
        this(context, null);
    }
    public HeartImageView(Context context, AttributeSet attrs) {
        this(context, attrs, 0);
    }
    public HeartImageView(Context context, AttributeSet attrs, int defStyleAttr) {
        super(context, attrs, defStyleAttr);
        bitmap_heart= BitmapFactory.decodeResource(getResources(), R.mipmap.heart);
    }
    @Override
    protected void onMeasure(int widthMeasureSpec, int heightMeasureSpec) {
        super.onMeasure(widthMeasureSpec, heightMeasureSpec);
        setMeasuredDimension(bitmap_heart.getWidth(), bitmap_heart.getHeight());
    }
    public void setColor(int color) {
        setImageBitmap(createColor(color));
    }
    private Bitmap createColor(int color) {
        int heartWidth=bitmap_heart.getWidth();
        int heartHeight=bitmap_heart.getHeight();
        Bitmap newBitmap=Bitmap.createBitmap(heartWidth, heartHeight, Bitmap.Config.ARGB_8888);
        Canvas canvas=new Canvas(newBitmap);
        Paint paint=new Paint();
        paint.setAntiAlias(true);
        canvas.drawBitmap(bitmap_heart, 0, 0, paint);
        canvas.drawColor(color, PorterDuff.Mode.SRC_ATOP);
        canvas.setBitmap(null);
        return newBitmap;
    }
}
代码没什么难度,一颗七彩爱心就绘制出来了
贝塞尔曲线路径
贝塞尔曲线(The Bézier Curves),是一种在计算机图形学中相当重要的参数曲线(2D,3D的称为曲面)
简单的介绍线性曲线、二次曲线、三次曲线贝塞尔曲线
- 线性曲线
给定点P0、P1,线性贝塞尔曲线只是一条两点之间的直线。这条线由下式给出:
当参数t变化时,其过程如下:
- 二次曲线
二次方贝塞尔曲线的路径由给定点P0、P1、P2的函数B(t)给出:
当参数t变化时,其过程如下:
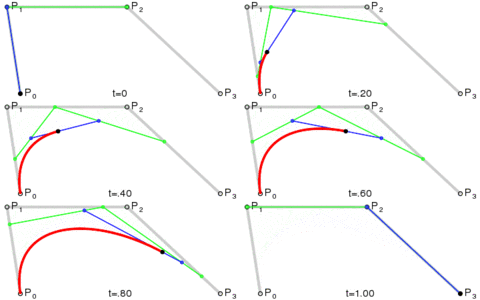
- 三次曲线
为建构高阶曲线,便需要相应更多的中介点。曲线的参数形式为:
当参数t变化时,其过程如下:
- 高阶曲线
到这里,公式也有了,效果你也可以看到了,你可以把爱心想象成在路径上面移动即可。有了公式我们怎么用呢?我们知道,在使用ValueAnimator的时候,我们会在onAnimationUpdate方法中,获取到当前动画的value值
animation.getAnimatedValue()
这个值是通过属性的开始、结束值与TimeInterpolation计算出的因子,经过一系列计算从而得到当前时间的属性值。 这个值你可以通过估值器TypeEvaluator去自定义返回,这里我们定义一个
private class HeartEvaluator implements TypeEvaluator {
    //贝塞尔曲线参考点1
    PointF f1;
    //贝塞尔曲线参考点2
    PointF f2;
    public HeartEvaluator(PointF f1, PointF f2) {
        this.f1=f1;
        this.f2=f2;
    }
    @Override
    public PointF evaluate(float fraction, PointF startValue, PointF endValue) {
        float leftTime=1f-fraction;
        PointF newPointF=new PointF();
        newPointF.x=startValue.x*leftTime*leftTime*leftTime
                +f1.x*3*leftTime*leftTime*fraction
                +f2.x*3*leftTime*fraction*fraction
                +endValue.x*fraction*fraction*fraction;
        newPointF.y=startValue.y*leftTime*leftTime*leftTime
                +f1.y*3*leftTime*leftTime*fraction
                +f2.y*3*leftTime*fraction*fraction
                +endValue.y*fraction*fraction*fraction;
        return newPointF;
    }
}
这里的newPointF就是我们要返回的值,这个值就是通过公式计算得到的。
路径也有了,下面就是最后的动画执行了
动画效果
这个动画的过程我是这样的,首先由小变大并且同时渐变,然后开始移动,在移动的同时发生渐变,最终消失
多个动画执行我们需要用到AnimatorSet,选择合适的方法playSequentially还是playTogether
首先把ImageView加到相对布局的最底下中间位置
RelativeLayout.LayoutParams params=new RelativeLayout.LayoutParams(LayoutParams.WRAP_CONTENT, LayoutParams.WRAP_CONTENT);
params.addRule(RelativeLayout.ALIGN_PARENT_BOTTOM);
params.addRule(RelativeLayout.CENTER_HORIZONTAL);
final HeartImageView imageView=new HeartImageView(context);
imageView.setColor(colors[new Random().nextInt(colors.length)]);
imageView.setVisibility(INVISIBLE);addView(imageView, params);
然后在ImageView加载完成之后,我们再开始执行动画,否则其宽高值我们获取不到
imageView.post(new Runnable() {
    @Override
    public void run() {
        //动画效果
    }
}
入场动画效果
ObjectAnimator scaleXAnimator=ObjectAnimator.ofFloat(imageView, View.SCALE_X, 0.5f, 1f);
ObjectAnimator scaleYAnimator=ObjectAnimator.ofFloat(imageView, View.SCALE_Y, 0.5f, 1f);
ObjectAnimator alphaAnimator=ObjectAnimator.ofFloat(imageView, View.ALPHA, 0.5f, 1f);
AnimatorSet enterAnimatorSet=new AnimatorSet();
enterAnimatorSet.playTogether(scaleXAnimator, scaleYAnimator, alphaAnimator);
enterAnimatorSet.setDuration(500);
enterAnimatorSet.addListener(new AnimatorListenerAdapter() {
    @Override
    public void onAnimationStart(Animator animation) {
        super.onAnimationStart(animation);
        imageView.setVisibility(VISIBLE);
    }
});
移动动画效果
int[] randomArray={0, 1};
int point1x=0;
int point1y=0;
int point2x=0;
int point2y=0;
if (randomArray[new Random().nextInt(2)]==0) {
    point1x=new Random().nextInt((width/2-dp2px(context, 50)));
} else {
    point1x=new Random().nextInt((width/2-dp2px(context, 50)))+(width/2+dp2px(context, 50));
}
if (randomArray[new Random().nextInt(2)]==0) {
    point2x=new Random().nextInt((width/2-dp2px(context, 50)));
} else {
    point2x=new Random().nextInt((width/2-dp2px(context, 50)))+(width/2+dp2px(context, 50));
}
point1y=new Random().nextInt(height/2-dp2px(context, 50))+(height/2+dp2px(context, 50));
point2y=-new Random().nextInt(point1y)+point1y;
int endX=new Random().nextInt(dp2px(context, 100))+(width/2-dp2px(context, 100));int endY=-new Random().nextInt(point2y)+point2y;
ValueAnimator translateAnimator=ValueAnimator.ofObject(new HeartEvaluator(new PointF(point1x, point1y), new PointF(point2x, point2y)), new PointF(width/2-imageView.getWidth()/2, height-imageView.getHeight()), new PointF(endX, endY));
translateAnimator.addUpdateListener(new ValueAnimator.AnimatorUpdateListener() {
    @Override
    public void onAnimationUpdate(ValueAnimator animation) {
        PointF pointF= (PointF) animation.getAnimatedValue();
        imageView.setX(pointF.x);
        imageView.setY(pointF.y);
    }
});
translateAnimator.addListener(new AnimatorListenerAdapter() {
    @Override
    public void onAnimationEnd(Animator animation) {
        super.onAnimationEnd(animation);
        removeView(imageView);
    }
});
TimeInterpolator[] timeInterpolator={new LinearInterpolator(), new AccelerateDecelerateInterpolator(), new DecelerateInterpolator(), new AccelerateInterpolator()};
translateAnimator.setInterpolator(timeInterpolator[new Random().nextInt(timeInterpolator.length)]);
ObjectAnimator translateAlphaAnimator=ObjectAnimator.ofFloat(imageView, View.ALPHA,  1f, 0f);
translateAlphaAnimator.setInterpolator(new DecelerateInterpolator());
AnimatorSet translateAnimatorSet=new AnimatorSet();
translateAnimatorSet.playTogether(translateAnimator, translateAlphaAnimator);
translateAnimatorSet.setDuration(1000);
这里看似代码很多,实际上重点在于随机了三阶贝塞尔曲线的4个点,并且随机了加速器。没难度
最后是总体动画调度
AnimatorSet allAnimator=new AnimatorSet();
allAnimator.playSequentially(enterAnimatorSet, translateAnimatorSet);
allAnimator.start();
OK,全文到此结束,一个简单的功能就实现了,同时涉及到的知识点我们也温故而知新了吧
参考文章
Android 颜色渲染(九) PorterDuff及Xfermode详解
贝塞尔曲线


