greenDAO 在之前就有耳闻,但是没空出时间去学习,今天突然看到了这个词,于是乎就决定搞定它,啃一下英文文档。那么故事就来了。
首先说说我所了解到的,为什么选用 greenDAO:
- greenDAO 可以将我们数据库的中数据转换为相应的对象,这样可以省去我们自己去转换对象的时间。
- 和同类型的库相比,性能是最好的。(官网如是说)主流同类型库的条形对比图如下图。
- greenDAO 也是当前 Android 开发中比较流行的库,当前的 github 星星数为 7278。
- 使用 SQL 语句进行查询容易出错,而且错误比较难以发现,使用 greenDAO 的话可以在编译阶段就发现错误。(官网说的)
- 还有就是代码比较简单明了,程序员都想用最少的代码,做最多的事,原谅我是个偷懒的程序猿。哈哈。
-
轻量级,整个库大小小于 150 k。
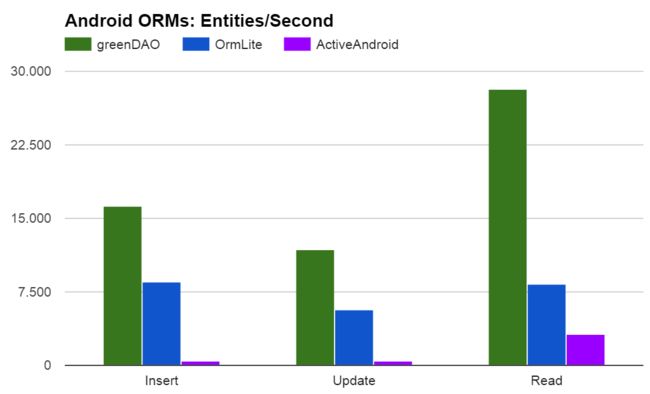 对比图
对比图
那么我们就开始学习吧。
引用 greenDAO
当前的 greenDAO 要求 gradle 的版本至少是 3.3 ,我升级 gradle 折腾了半个小时,升级 gradle 的 方法 和 gradle下载地址
// In your project level build.gradle file:
buildscript {
    repositories {
        jcenter()
        mavenCentral()
    }
    dependencies {
        classpath 'com.android.tools.build:gradle:2.3.0'
        classpath 'org.greenrobot:greendao-gradle-plugin:3.2.1'
    }
}

// In your app level build.gradle file:
apply plugin: 'com.android.application'
apply plugin: 'org.greenrobot.greendao'

dependencies {
    compile 'org.greenrobot:greendao:3.2.0'
}
实体类的生成
@Entity
public class StudentMsgBean {
    @Id
    private Long id;
    @Property(nameInDb = "STUDENTNUM")
    private String studentNum;
    @Property(nameInDb = "NAME")
    private String name;
    @Generated(hash = 381350025)
    public StudentMsgBean(Long id, String studentNum, String name) {
        this.id = id;
        this.studentNum = studentNum;
        this.name = name;
    }
    @Generated(hash = 160565988)
    public StudentMsgBean() {
    }
    public Long getId() {
        return this.id;
    }
    public void setId(Long id) {
        this.id = id;
    }
    public String getStudentNum() {
        return this.studentNum;
    }
    public void setStudentNum(String studentNum) {
        this.studentNum = studentNum;
    }
    public String getName() {
        return this.name;
    }
    public void setName(String name) {
        this.name = name;
    }
}
实体类中常用的注解:
@Entity 表明这个实体类会在数据库中生成一个与之相对应的表。
@Id 对应数据表中的 Id 字段,有了解数据库的话,是一条数据的唯一标识。
@Property(nameInDb = "STUDENTNUM") 表名这个属性对应数据表中的 STUDENTNUM 字段。
@Property 可以自定义字段名,注意外键不能使用该属性
@NotNull 该属性值不能为空
@Transient 该属性不会被存入数据库中
@Unique 表名该属性在数据库中只能有唯一值
当你写完实体类中的属性之后,点击编译,就会自动生成相应的 setter 和 getter 方法,至于那些 hash 值是自动赋值上去的。并且在该目录下生成 DaoMaster 和 DaoSession 这两个类用于初始化数据库。
增删改查
一般数据库的操作都离不开增删改查,那么我们就从这开始。
初始化
DaoMaster.DevOpenHelper devOpenHelper = new DaoMaster.DevOpenHelper(getApplicationContext(), "student.db", null);
DaoMaster daoMaster = new DaoMaster(devOpenHelper.getWritableDb());
DaoSession daoSession = daoMaster.newSession();
如果实体类有更新,那么要调用 daoSession.clear() 清除缓存,才能得到更新。
增
StudentMsgBeanDao msgBeanDao = daoSession.getStudentMsgBeanDao();
StudentMsgBean studentMsgBean = new StudentMsgBean();
studentMsgBean.setName("zone");
studentMsgBean.setStudentNum("123456");
msgBeanDao.insert(studentMsgBean);
删
                List list = msgBeanDao.queryBuilder()
                        .build().list();
                for (int i = 0; i < list.size(); i++) {
                    Log.d("zoneLog", "studentNumber: " + list.get(i).getStudentNum());
                    Log.d("zoneLog", "name: " + list.get(i).getName());
                    if (i == 0) {
                        msgBeanDao.deleteByKey(list.get(0).getId());//通过 Id 来删除数据
//                        msgBeanDao.delete(list.get(0));//通过传入实体类的实例来删除数据
                    }

                }
改
                List list = msgBeanDao.queryBuilder()
                        .build().list();
                for (int i = 0; i < list.size(); i++) {
                    Log.d("zoneLog", "studentNumber: " + list.get(i).getStudentNum());
                    Log.d("zoneLog", "name: " + list.get(i).getName());
                    if (i == 0) {
                        list.get(0).setName("zone==========>");
                        msgBeanDao.update(list.get(0));
                    }
                }
查
                List list = msgBeanDao.queryBuilder()
                        .offset(1)//偏移量,相当于 SQL 语句中的 skip
                        .limit(3)//只获取结果集的前 3 个数据
                        .orderAsc(StudentMsgBeanDao.Properties.StudentNum)//通过 StudentNum 这个属性进行正序排序
                        .where(StudentMsgBeanDao.Properties.Name.eq("zone"))//数据筛选,只获取 Name = "zone" 的数据。
                        .build()
                        .list();
需要注意的是 offset 是要和 limit 配合使用的。
- list() 所有实体会直接加载到内存中。
- listLazy() 当你需要使用时,才会加载,会自动缓存。使用完必须关闭。
- listLazyUncached() 如你所见,就是不会缓存的意思。使用完必须关闭。
- listIterator() 通过迭代器遍历结果集,不会缓存。使用完必须关闭。
- unique() 返回一个或者零个结果
- uniqueOrThrow() 返回非空的结果,否则抛出异常
listLazy(), listLazyUncached(), listIterator() 这三个方法都使用了 LazyList.class 这个类。它持有了数据库游标的引用,这就是为什么要关闭的原因。当然,当你遍历完所有的结果集,它是会自动关闭的。如果没有遍历完,就得手动关闭了。
当多次使用到查询的时候,更加高效的方法是新建一个 Query 对象。然后根据需要更改相应的查询参数。
Query query= msgBeanDao.queryBuilder().where(StudentMsgBeanDao.Properties.Name.eq("zone")).build();
List list1 = query.list();
query.setParameter(0, "zone123");
list1 = query.list();
query.setParameter(index, condition);
来说说这行代码的参数,首先 index 是从 0 开始算的,它是基于你所传的参数的顺序来定的。然后是 condition 这个就是你要修改的相应参数。这些算是基础操作了,那么下面我们来更深一步地学习。
1:1 查询
其实就是两张表联表查询。想象一下你高中的时候,每次到期末,学校都会发一张期末各科的成绩单给你,假定你只要学习英语和数学这两门学科,一个学生对应一张成绩单。那么下面的代码就是描述这种情况的。
学生实体类:
@Entity
public class StudentMsgBean {
    @Id
    private Long id;
    @Property(nameInDb = "STUDENT_NUM")
    private String studentNum;
    @Property(nameInDb = "NAME")
    private String name;
    @Property(nameInDb = "SCORE_ID")
    private Long scoreId;
    @ToOne(joinProperty = "scoreId")
    private ScoreBean mScoreBean;
    }
成绩实体类:
@Entity
public class ScoreBean {
    @Id
    private Long id;
    private String mathScore;
    private String englishScore;
    }
如上两段代码是两个实体类,为了方便查看,我进行了简化。通过让第一个实体类持有一个外键,这个外键是第二个实体类的 id 。让 greenDAO 能通过这个外键来查询到相应的数据。那么来看一下小 demo :
// 存入一个数据
StudentMsgBean studentMsgBean = new StudentMsgBean();
studentMsgBean.setName("zone");
studentMsgBean.setStudentNum("123456");
ScoreBean scoreBean = new ScoreBean();
scoreBean.setEnglishScore("120");
scoreBean.setMathScore("1000");
scoreBeanDao.insert(scoreBean);
ScoreBean scoreBean1 = scoreBeanDao.queryBuilder().unique();
if (scoreBean1 != null) {
studentMsgBean.setScoreId(scoreBean1.getId());
studentMsgBean.setMScoreBean(scoreBean);
msgBeanDao.insert(studentMsgBean);
}
// 查询数据
List list = msgBeanDao.queryBuilder().list();
for (int i = 0; i < list.size(); i++) {
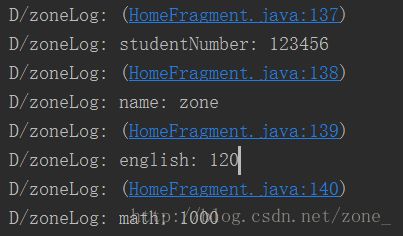
Log.d("zoneLog", "studentNumber: " + list.get(i).getStudentNum());
Log.d("zoneLog", "name: " + list.get(i).getName());
Log.d("zoneLog", "english: " + list.get(i).getMScoreBean().getEnglishScore());
Log.d("zoneLog", "math: " + list.get(i).getMScoreBean().getMathScore());
}
1:n
想象一下你写博客,你写了 n 篇博文,那么对于你来说,就是一对多的关系,那么接下来的 demo 就是关于这个的。实现一对多的方式有两种,先看看第一种
第一种:
作者实体类如下:(此处省略了 setter getter 等方法)
@Entity
public class Author {
    @Id
    private Long id;
    private String name;
    private String sex;
    @ToMany(referencedJoinProperty = "authorId")
    private List posts;
    }
博文实体类如下:(此处省略了 setter getter 等方法)
@Entity
public class Post {
    @Id
    private Long id;
    private String content;
    private Long authorId;
    }
AuthorDao authorDao=daoSession.getAuthorDao();
PostDao postDao = daoSession.getPostDao();
Author author = new Author();//存贮一个作者
author.setName("zone");
author.setSex("boy");
authorDao.insert(author);
Author authorByQuery = authorDao.queryBuilder().where(AuthorDao.Properties.Name.eq("zone"), AuthorDao.Properties.Sex.eq("boy")).unique();
Post firstPost = new Post();//写一篇文章
firstPost.setAuthorId(authorByQuery.getId());
firstPost.setContent("第一篇文章!");
Post secondPost = new Post();//写一篇文章
secondPost.setAuthorId(authorByQuery.getId());
secondPost.setContent("第二篇文章!");
postDao.insertInTx(firstPost,secondPost);//存储文章
Author authorResult = authorDao.queryBuilder().where(AuthorDao.Properties.Name.eq("zone"), AuthorDao.Properties.Sex.eq("boy")).unique();//查询存储的结果
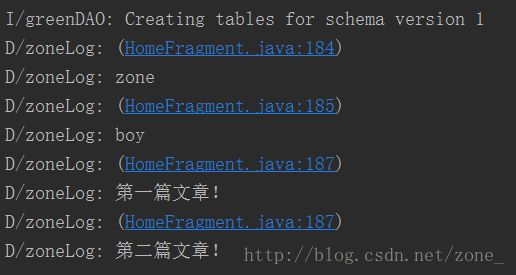
L.d(authorResult.getName());
L.d(authorResult.getSex());
for (int i = 0; i < authorResult.getPosts().size(); i++) {
L.d(authorResult.getPosts().get(i).getContent());
}
第二种方法:
referencedJoinProperty 是 @JoinProperty 的特例,这是一种自定义关联的方式。下面的代码中是通过 alias 和 authorAlias 进行关联。如果将 alias 改为 id ,将 authorAlias 改为 authorId ,那么第一种方法和第二种方法是等价的。
@Entity
public class Author {
    @Id
    private Long id;
    private String name;
    private String sex;
    private String alias;
    @ToMany(joinProperties = {
            @JoinProperty(name = "alias" ,referencedName = "authorAlias")
    })
    private List posts;
    }
@Entity
public class Post {
    @Id
    private Long id;
    private String content;
    private Long authorId;
    private String authorAlias;
    }
RxDao
最近响应式编程在 Android 这边也是火热朝天,那么我们也一起来探索一下 greenDAO 的 Rx 版。
初始化
DaoMaster.DevOpenHelper devOpenHelper = new DaoMaster.DevOpenHelper(getApplicationContext(), "student.db", null);
DaoMaster daoMaster = new DaoMaster(devOpenHelper.getWritableDb());
DaoSession daoSession = daoMaster.newSession();
RxDao authorLongRxDao = daoSession.getAuthorDao().rx();
增
  authorLongRxDao
        .insert(author)//保存单一实例
//      .insertInTx(author1,author2)//保存多个实例
        .subscribeOn(AndroidSchedulers.mainThread())
        .subscribe(new Action1() {
               @Override
               public void call(Author author) {
//              获取插入后的结果集
                }
         });
删
  authorLongRxDao
        .delete(author)//通过一个具体的实例来进行删除
//      .deleteByKey(key)//通过 id 来进行删除
//      .deleteAll()//删除所有
        .subscribeOn(AndroidSchedulers.mainThread())
        .subscribe(new Action1() {
            @Override
            public void call(Void aVoid) {

            }
         });
改
author.setName("asd");//这是一个查询到的实例 author
authorLongRxDao
        .update(author)//更新单个
//      .updateInTx(author1,author2)//更新多个
        .subscribeOn(AndroidSchedulers.mainThread())
        .subscribe(new Action1() {
            @Override
            public void call(Author author) {
//              获取更新后的结果集
            }
         });
查
RxQuery authorRxQuery = daoSession.getAuthorDao().queryBuilder().rx();
authorRxQuery
        .unique()//获取单一结果集
//      .list()//获取多个结果集
//      .oneByOne()//一次发射一个实例
        .subscribeOn(AndroidSchedulers.mainThread())
        .subscribe(new Action1() {
            @Override
            public void call(Author author) {

            }
        });
ok,学习到这里,初探也告一段落了,还有更加深入的用法就得靠大家来告诉我了,哈哈。