Zabbix是一个企业级的开源分布式监控解决方案,能监视各种网络参数,保证服务器系统的安全运营。但由于网上Zabbix的搭建教程多而杂,因此我整理了一篇详细搭建Zabbix的完整教程,适合新手入门学习Zabbix。
本实验软件版本:
- Cenos6.8,Nginx:1.9.15 , MySQL:5.5.49 , PHP:5.5.35,zabbix3.0.12
注意
- 搭建Zabbix前提需要有LAMP/LNMP环境,本文也将列出其详细安装步骤
- 开始搭建之前,将Nginx:1.9.15 , MySQL:5.5.49 , PHP:5.5.35,zabbix3.0.12几个软件包下载下来,并放到系统中
一.安装Nginx
1.1 安装依赖包
[root@haocheng ~]# yum -y install gcc gcc-c++ autoconf automake zlib zlib-devel openssl openssl-devel pcre* make gd-devel libjpeg-devel libpng-devel libxml2-devel bzip2-devel libcurl-devel
1.2 创建用户
[root@haocheng ~]# useradd nginx -s /sbin/nologin -M
1.3 将下载好的Nginx解压并进入到目录中
[root@haocheng ~]# tar xvf nginx-1.9.15.tar.gz && cd nginx-1.9.15
1.4 配置并进行编译
[root@haocheng nginx-1.9.15]# ./configure --prefix=/usr/local/product/nginx1.9.14 --user=www --group=www --with-http_ssl_module --with-http_v2_module --with-http_stub_status_module --with-pcre
[root@haocheng nginx-1.9.15]# make && make install
[root@haocheng nginx-1.9.15]# ln -s /usr/local/product/nginx1.9.14 /usr/local/nginx
1.5 部分参数解释:
--with-http_stub_status_module:支持nginx状态查询
--with-http_ssl_module:支持https
--with-http_spdy_module:支持google的spdy,这个必须ssl支持
--with-pcre:为了支持rewrite重写功能,必须制定pcre
二.安装PHP
2.1 解压并编译,配置
[root@haocheng ~]# tar xvf php-5.5.35.tar.gz && cd php-5.5.35
[root@haocheng php-5.5.35]# ./configure --prefix=/usr/local/product/php-5.5.35 --with-config-file-path=/usr/local/product/php-5.5.35/etc --with-bz2 --with-curl --enable-ftp --enable-sockets --disable-ipv6 --with-gd --with-jpeg-dir=/usr/local --with-png-dir=/usr/local --with-freetype-dir=/usr/local --enable-gd-native-ttf --with-iconv-dir=/usr/local --enable-mbstring --enable-calendar --with-gettext --with-libxml-dir=/usr/local --with-zlib --with-pdo-mysql=mysqlnd --with-mysqli=mysqlnd --with-mysql=mysqlnd --enable-dom --enable-xml --enable-fpm --with-libdir=lib64 --enable-bcmath
[root@haocheng php-5.5.35]# make && make install
[root@haocheng php-5.5.35]# ln -s /usr/local/product/php-5.5.35 /usr/local/php
[root@haocheng php-5.5.35]# cp php.ini-production /usr/local/php/etc/php.ini
[root@haocheng php-5.5.35]# cd /usr/local/php/etc/
[root@haocheng etc]# cp php-fpm.conf.default php-fpm.conf
2.2 修改php.ini参数(zabbix环境需要修改的参数)
max_execution_time = 300
memory_limit = 128M
post_max_size = 16M
upload_max_filesize = 2M
max_input_time = 300
date.timezone = PRC
三.安装MySQL
3.1 添加mysql用户,创建mysql的数据目录
[root@haocheng ~]# groupadd mysql
[root@haocheng ~]# mkdir -pv /data/mysql
[root@haocheng ~]# useradd -r -g mysql -d /data/mysql -s /sbin/nologin mysql
[root@haocheng ~]# chown -R mysql.mysql /data/mysql
3.2 安装cmake及依赖
[root@haocheng ~]# yum install cmake gcc* ncurses-devel -y
3.3 编译安装MySQL
[root@haocheng ~]# tar -xvf mysql-5.5.49.tar.gz && cd mysql-5.5.49
[root@haocheng mysql-5.5.49]# cmake -DCMAKE_INSTALL_PREFIX=/usr/local/product/mysql5.5.49 -DDEFAULT_CHARSET=utf8 -DENABLED_LOCAL_INFILE=1 -DMYSQL_DATADIR=/data/mysql -DWITH_EXTRA_CHARSETS=all -DWITH_READLINE=1 -DWITH_INNOBASE_STORAGE_ENGINE=1 -DMYSQL_TCP_PORT=3306 -DDEFAULT_COLLATION=utf8_general_ci
[root@haocheng mysql-5.5.49]# make && make install
[root@haocheng mysql-5.5.49]# ln -s /usr/local/product/mysql5.5.49 /usr/local/mysql
[root@haocheng mysql-5.5.49]# chown -R mysql.mysql /usr/local/mysql
3.4 拷贝mysql的配置文件
[root@haocheng mysql-5.5.49]# cd /usr/local/mysql/support-files/
[root@haocheng support-files]# cp my-medium.cnf /data/mysql/my.cnf
[root@haocheng support-files]# cp mysql.server /etc/init.d/mysqld
[root@haocheng support-files]# chmod +x /etc/init.d/mysqld
3.5 初始化MySQL
[root@haocheng support-files]# cd /usr/local/mysql/scripts
[root@haocheng scripts]# ./mysql_install_db --user=mysql --basedir=/usr/local/mysql/ --datadir=/data/mysql/
3.6 修改MySQL配置文件my.cnf中数据目录
datadir=/data/mysql/
3.7 启动MySQL
[root@haocheng ~]# /etc/init.d/mysqld start
Starting MySQL..                                           [  OK  ]
3.8 创建软链接
[root@haocheng ~]# ln -s /usr/local/mysql/bin/mysql /usr/bin
[root@haocheng ~]# ln -s /usr/local/mysql/bin/mysqladmin /usr/bin
3.9 登录数据库,创建zabbix数据库及用户名和密码
[root@haocheng ~]# mysql
mysql> create database zabbix default charset utf8;
Query OK, 1 row affected (0.00 sec)
mysql> grant all privileges on zabbix.* to zabbix@'localhost' identified by 'zabbix';
Query OK, 0 rows affected (0.00 sec)
mysql> flush privileges;
Query OK, 0 rows affected (0.00 sec)
3.10 为数据库的root创建密码
[root@haocheng ~]# mysqladmin -uroot password "zabbix"
四.安装zabbix server
4.1 安装依赖软件
[root@haocheng ~]# yum install mysql-devel net-snmp-devel -y
4.2 安装zabbix
[root@haocheng ~]# tar zxf zabbix-3.0.12.tar.gz && cd zabbix-3.0.12
4.3 编译zabbix
[root@haocheng zabbix-3.0.12]# ./configure --prefix=/usr/local/zabbix-3.0.12/ --enable-server --enable-agent --with-mysql --with-net-snmp --with-libcurl --with-libxml2
[root@haocheng zabbix-3.0.12]# make && make install
4.4 创建zabbix组,用户
[root@haocheng zabbix-3.0.12]# groupadd zabbix
[root@haocheng zabbix-3.0.12]# useradd zabbix -s /sbin/nologin -M -g zabbix
4.5 创建软链接
[root@haocheng zabbix-3.0.12]# mkdir /var/lib/mysql
[root@haocheng zabbix-3.0.12]# ln -s /tmp/mysql.sock /var/lib/mysql/
4.6 zabbix server需要导入3个sql文件
[root@haocheng zabbix-3.0.12]# mysql -uroot -pzabbix zabbix < database/mysql/schema.sql
[root@haocheng zabbix-3.0.12]# mysql -uroot -pzabbix zabbix < database/mysql/images.sql
[root@haocheng zabbix-3.0.12]# mysql -uroot -pzabbix zabbix < database/mysql/data.sql
五.zabbix管理网站配置(Nginx)
5.1 创建项目目录
[root@haocheng zabbix-3.0.12]# mkdir /data/web/zabbix.haocheng.com -p
[root@haocheng zabbix-3.0.12]# mkdir /data/logs/zabbix -p
5.2 将前端文件拷贝到项目目录下
[root@haocheng zabbix-3.0.12]# cp -rp frontends/php/* /data/web/zabbix.haocheng.com/
5.3 编辑nginx虚拟主机
[root@haocheng zabbix-3.0.12]# cd /usr/local/nginx/conf
[root@haocheng conf]# mkdir extra
[root@haocheng conf]# cd extra/
[root@haocheng extra]# vim zabbix.conf
server {
listen 8027;
server_name zabbix.haocheng.com;
access_log /data/logs/zabbix/zabbix.haocheng.com.access.log main;
index index.html index.php index.html;
root /data/web/zabbix.haocheng.com;

location /{
       try_files $uri $uri/ /index.php?$args;
}

location ~ ^(.+.php)(.*)$ {
       fastcgi_split_path_info ^(.+.php)(.*)$;
       include fastcgi.conf;
       fastcgi_pass 127.0.0.1:9000;
       fastcgi_index index.php;
       fastcgi_param PATH_INFO $fastcgi_path_info;
}

}
5.4 编辑nginx.conf配置文件
[root@haocheng conf]# vim nginx.conf
user  nginx;
worker_processes  1;

#error_log  logs/error.log warning;
#error_log  logs/error.log  notice;
#error_log  logs/error.log  info;

pid        logs/nginx.pid;

events {
    worker_connections  1024;
}


http {
    include       mime.types;
    default_type  application/octet-stream;

    log_format  main  '$remote_addr - $remote_user [$time_local] "$request" '
                      '$status $body_bytes_sent "$http_referer" '
                      '"$http_user_agent" "$http_x_forwarded_for"';

    access_log  logs/access.log  main;

    sendfile        on;
    #tcp_nopush     on;

    #keepalive_timeout  0;
    keepalive_timeout  65;

    #gzip  on;
    include extra/*.conf;

}
5.5 修改zabbix_server.conf文件
[root@haocheng conf]# cd /usr/local/zabbix-3.0.12/etc
[root@haocheng etc]# vim zabbix_server.conf
LogFile=/tmp/zabbix_server.log
PidFile=/tmp/zabbix_server.pid
DBHost=localhost
DBName=zabbix
DBUser=zabbix
DBPassword=zabbix
六.启动服务
6.1 启动nginx
[root@haocheng ~]# /usr/local/nginx/sbin/nginx
6.2 启动PHP
[root@haocheng ~]# /usr/local/php/sbin/php-fpm
6.3 启动zabbix server
[root@haocheng ~]# /usr/local/zabbix-3.0.12/sbin/zabbix_server
[root@haocheng ~]# ln -s /usr/local/mysql/lib/libmysqlclient.so.18 /usr/lib64/
6.4 添加/etc/hosts文件(对应自己机器IP)
10.0.2.15 zabbix.haocheng.com
6.5 查看服务端口
[root@haocheng ~]# netstat -lntup(查看是否有8027)

查看端口
6.6 将服务加入开机自启动
[root@haocheng ~]# echo "/usr/local/nginx/sbin/nginx" >>/etc/rc.local
[root@haocheng ~]# echo "/usr/local/php/sbin/php-fpm" >>/etc/rc.local
[root@haocheng ~]# echo "/etc/init.d/mysqld start" >>/etc/rc.local
[root@haocheng ~]# echo "/usr/local/zabbix-3.0.3/sbin/zabbix_server" >>/etc/rc.local
七. web端配置zabbix

按下一步进行配置
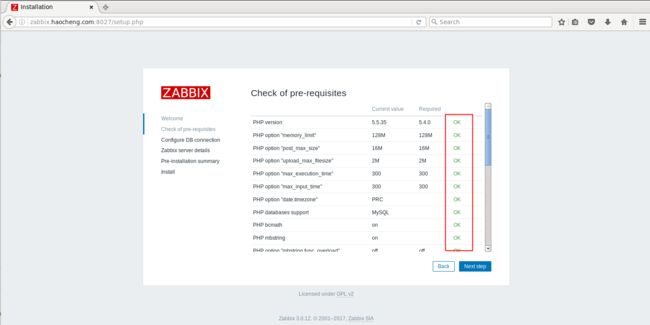
确保全部是OK再进行下一步
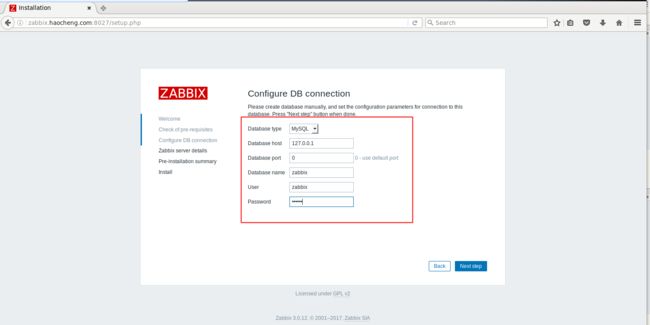
设置数据库
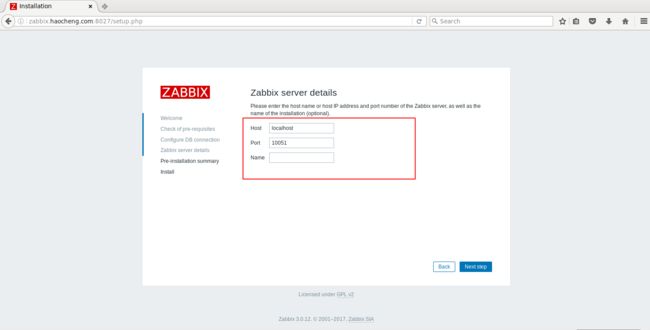
参数默认即可

检查配置信息

下载文件

修改文件属主权限
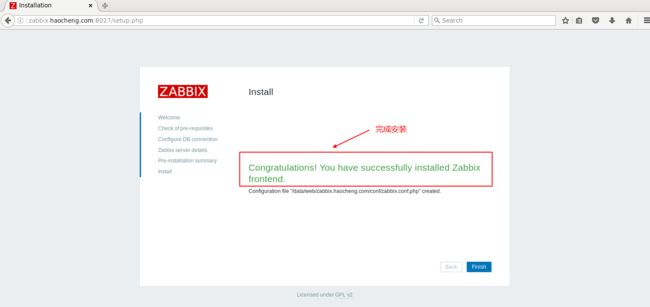
安装完成
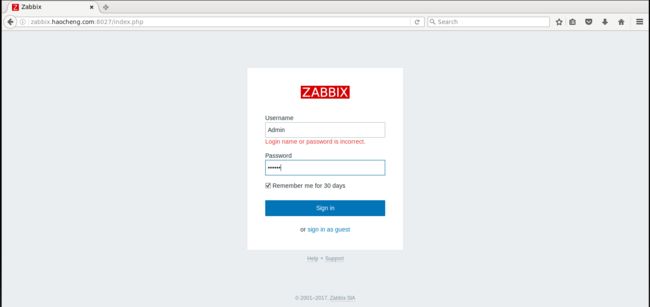
默认管理员账号为Admin,密码为zabbix

成功登入
- 如果想要将界面换成中文,则可以按以下步骤操作
[root@haocheng conf]# vim /data/web/zabbix.haocheng.com/include/locales.inc.php
找到zh_CN  将,flase改为true

点击红色方框

选择中文字体,确定

最终效果