1.学习目标
1.什么是Quartz2D
2.Quartz2D能做什么
3.图形上下文是什么
4.图形上下文的作用
5.绘图顺序
6.绘图步骤
7.基本图形绘制
8.上下文矩阵操作
9.上下文栈操作
10.Quartz2D坐标系与UIKit坐标系
11.Quartz2D的实际应用
2.基本介绍
2.1Quartz2D是什么
Quartz2D是苹果官方的二维绘图引擎。
它是跨平台,纯C语言。
同时支持iOS和Mac OS X系统。
Quartz2D的API来自于Core Graphics框架.
数据类型 和 函数 基本都以 CG 作为前缀.
注意:
Quartz2D 是苹果公司官方的二维绘图引擎,同时支持iOS和Mac OS X 系统。
Cocos2D(Cocos2D-x,Cocos2D-iPhone,Cocos2D-HTML5等):Cocos2D是一个第三方开源的2D游戏框架。
做游戏的还有Sprite Kit(苹果官方出的做iOS游戏的框架).
一般3D游戏用unity3D.
2.2Quartz2D能做什么
1.绘制图形:线条\三角形\矩形\圆\圆弧等。
2.绘制文字
3.绘制\生成图片(图像)
4.读取\生成PDF
5.截图\剪切图片
6.自定义UI控件
等等…
2.3图形上下文是什么
图形上下文连接图形绘制和输出目标的中间介质。
是 CGContextRef 类型
我们可以把它看做是画板或者草稿纸。
2.4图形上下文作用
图形上下文记录了路径信息,路径的状态,输出目标。
  路径信息:各种各样的图形
  绘图状态:颜色,线宽,样式,旋转,平移,图片裁剪区域等.
  输出目标:绘制到什么地方去?UIView,图片,pdf,打印机等
2.5绘图顺序
先绘制的图形在下面,后绘制的图形在上面
2.6基本图形绘制演练步骤
1.自定义UIView
2.实现drawRect方法
  2.1.获得图形上下文
  2.2.绘制路径,并且将路径添加到上下文中
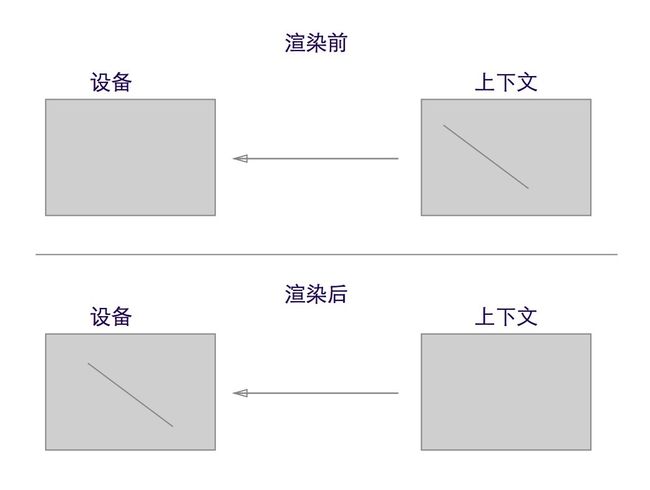
  2.3.渲染(将图形上下文中的路径绘制到对应的设备中)

解析:
1.获得图形上下文就是在准备一个草稿纸
2.绘制路径,并且将路径添加到上下文中 就是在草稿纸中绘制路径
3.渲染 就是 把草稿纸上的内容搬到输出目标上去,执行渲染后,上下文还在,但是上下文的路径就不在了。
2.7drawRect方法介绍
1.绘图代码为什么要写在 drawRect 方法中
  跟上下文相关,因为我们需要获得上下文,才能把图形绘制到界面上.
  在这个方法中才可以获得正确的上下文.

2.rect 参数的含义
  当前自定义View的bounds.

3.drawRect 什么时候调用
  是系统调用的.
  当View第一次显示的时候会调用
  当View重绘的时候会调用

4.如何重绘
  调用View对象的 setNeedsDisplay 方法 (全部刷新)
  调用View对象的 setNeedsDisplayInRect: 方法 ,参数表示需要重绘的区域  (部分刷新)

5.为什么不能手动调用 drawRect
  还是上下文的问题,手动调用的时候,可能拿不到上下文.
3.绘制基本图形--第一种方式 CGContext...
3.1绘制一条直线
- (void)drawRect:(CGRect)rect {
    //1.获得上下文
    CGContextRef ctx = UIGraphicsGetCurrentContext();
    //2.绘制路径,并将路径添加到上下文中.
    CGContextMoveToPoint(ctx, 100, 100); // 添加起点
    CGContextAddLineToPoint(ctx, 200, 200); // 添加终点
    //3.渲染
    CGContextStrokePath(ctx);
}

解析:
在生活中,我们在草稿纸中画画,第一需要草稿纸,第二需要笔,然后就是在哪里去画画。
CGContextMoveToPoint(ctx, 100, 100); 把笔移动到草稿纸的指定位置,注意:这个时候还没有开始绘制呢.
CGContextAddLineToPoint(ctx, 200, 200);意思是笔从(100,100)的位置绘制到(200,200)的位置.注意:笔并没有离开草稿纸.
CGContextStrokePath(ctx);注意:在执行渲染以后,上下文还在,但是上下文中的路径已经不在了.并且路径就绘制到Layer上去了。
3.2绘制两条未连接的线
- (void)drawRect:(CGRect)rect {
    //1.获得上下文
    CGContextRef ctx = UIGraphicsGetCurrentContext();
    //2.绘制路径,并将路径添加到上下文中.
    //2.1绘制第一条线
    CGContextMoveToPoint(ctx, 100, 100); // 添加起点
    CGContextAddLineToPoint(ctx, 200, 200); // 添加终点
    //2.2绘制第二条线
    CGContextMoveToPoint(ctx, 300, 200); // 添加起点
    CGContextAddLineToPoint(ctx, 100, 50); // 添加终点
    //3.渲染
    CGContextStrokePath(ctx);
}

解析:
CGContextMoveToPoint 方法 是把笔悬空草稿纸移动,移动过程中并不绘制路径.
注意:从相同点开始绘制,线肯定是可以连接起来的.
3.3绘制两条连接的线
- (void)drawRect:(CGRect)rect {
    //1.获得上下文
    CGContextRef ctx = UIGraphicsGetCurrentContext();
    //2.绘制路径,并将路径添加到上下文中.
    //2.1绘制第一条线
    CGContextMoveToPoint(ctx, 100, 100); // 添加起点
    CGContextAddLineToPoint(ctx, 200, 200); // 添加终点
    //2.2绘制第二条线
    CGContextAddLineToPoint(ctx, 300, 100); // 添加终点
    //3.渲染
    CGContextStrokePath(ctx);
}

解析: CGContextAddLineToPoint 会默认把上一条线的终点做为自己的起点.
3.4关闭路径
- (void)drawRect:(CGRect)rect {
    //1.获得上下文
    CGContextRef ctx = UIGraphicsGetCurrentContext();
    //2.绘制路径,并将路径添加到上下文中.
    //2.1绘制第一条线
    CGContextMoveToPoint(ctx, 100, 100); // 添加起点
    CGContextAddLineToPoint(ctx, 200, 200); // 添加终点
    //2.2绘制第二条线
    CGContextAddLineToPoint(ctx, 300, 100); // 添加终点
    //2.3关闭路径
    CGContextClosePath(ctx);
    //3.渲染
    CGContextStrokePath(ctx);
}

解析:
1.关闭路径是把最后一条线的终点和第一条线的起点连接起来
2.注意:第一条线是就近的CGContextMoveToPoint点
3.注意:如果CGContextMoveToPoint后面没有跟CGContextAddLineToPoint那么此点无效
3.5绘制矩形
- (void)drawRect:(CGRect)rect {
    //1.获得上下文
    CGContextRef ctx = UIGraphicsGetCurrentContext();
    //2.绘制路径,并将路径添加到上下文中.
    CGContextAddRect(ctx, CGRectMake(100, 100, 100, 100));
    //3.渲染
    CGContextStrokePath(ctx);
}
3.6绘制圆形\椭圆
- (void)drawRect:(CGRect)rect {
    //1.获得上下文
    CGContextRef ctx = UIGraphicsGetCurrentContext();
    //2.绘制路径,并将路径添加到上下文中.
    //注意:矩形为正方形呈现是图形就是圆,矩形为长方形呈现的图形就是椭圆
    CGContextAddEllipseInRect(ctx, CGRectMake(100, 100, 100, 100));
    //3.渲染
    CGContextStrokePath(ctx);
}
3.7绘制圆弧
- (void)drawRect:(CGRect)rect {
    //1.获得上下文
    CGContextRef ctx = UIGraphicsGetCurrentContext();
    //2.绘制路径,并将路径添加到上下文中.
    CGContextAddArc(ctx, rect.size.width*0.5, rect.size.height*0.5, 100, 0, M_PI_4, 0);
    //3.渲染
    CGContextStrokePath(ctx);
}
解析:
1. 0是顺时针,1是逆时针
3.8绘制扇形
- (void)drawRect:(CGRect)rect {
    //1.获得上下文
    CGContextRef ctx = UIGraphicsGetCurrentContext();
    //2.绘制路径,并将路径添加到上下文中.
    //2.1绘制圆弧
    CGContextAddArc(ctx, rect.size.width*0.5, rect.size.height*0.5, 100, 0, M_PI_4, 0);
    //2.2连接中心点
    CGContextAddLineToPoint(ctx,rect.size.width*0.5, rect.size.height*0.5);
    //2.3关闭路径
    CGContextClosePath(ctx);
    //3.渲染
    CGContextStrokePath(ctx);
}
4.绘制基本图形--第二种方式 CGMutablePathRef
4.1绘制一条直线
- (void)drawRect:(CGRect)rect {
    //1.获得上下文
    CGContextRef ctx = UIGraphicsGetCurrentContext();
    //2.绘制路径
    CGMutablePathRef path = CGPathCreateMutable();
    CGPathMoveToPoint(path, NULL, 100, 100);
    CGPathAddLineToPoint(path, NULL, 200, 200);
    //3将路径添加到上下文中
    CGContextAddPath(ctx, path);
    //4.渲染
    CGContextStrokePath(ctx);
}

解析:
CGPathMoveToPoint(path, NULL, 100, 100); 添加起点,注意:这个点并没有在草稿纸上
CGPathAddLineToPoint(path, NULL, 200, 200);添加终点,这样会绘制一条路径,但是这条路径并没有在草稿纸上.
CGContextAddPath(ctx, path); 会把这个路径拷贝一份放到草稿纸中.
4.2绘制两条未连接的线
- (void)drawRect:(CGRect)rect {
    //1.获得上下文
    CGContextRef ctx = UIGraphicsGetCurrentContext();
    //2.绘制路径
    CGMutablePathRef path = CGPathCreateMutable();

    //2.1添加第一条线
    CGPathMoveToPoint(path, NULL, 100, 100);
    CGPathAddLineToPoint(path, NULL, 200, 200);

    //2.2添加第二条线
    CGPathMoveToPoint(path, NULL, 300 , 300);
    CGPathAddLineToPoint(path, NULL, 300, 100);
    //3将路径添加到上下文中
    CGContextAddPath(ctx, path);
    //4.渲染
    CGContextStrokePath(ctx);
}
4.3绘制两条连接的线
- (void)drawRect:(CGRect)rect {
    //1.获得上下文
    CGContextRef ctx = UIGraphicsGetCurrentContext();
    //2.绘制路径
    CGMutablePathRef path = CGPathCreateMutable();

    //2.1添加第一条线
    CGPathMoveToPoint(path, NULL, 100, 100);
    CGPathAddLineToPoint(path, NULL, 200, 200);

    //2.2添加第二条线
    CGPathAddLineToPoint(path, NULL, 300, 100);
    //3将路径添加到上下文中
    CGContextAddPath(ctx, path);
    //4.渲染
    CGContextStrokePath(ctx);
}

解析:
CGPathAddLineToPoint 会默认把上一条线的终点做为自己的起点.
4.4关闭路径
- (void)drawRect:(CGRect)rect {
    //1.获得上下文
    CGContextRef ctx = UIGraphicsGetCurrentContext();
    //2.绘制路径
    CGMutablePathRef path = CGPathCreateMutable();
    CGPathMoveToPoint(path, NULL, 100, 100);
    CGPathAddLineToPoint(path, NULL, 200, 200);
    CGPathAddLineToPoint(path, NULL, 300, 100);
    //关闭路径
    CGPathCloseSubpath(path);
    //3将路径添加到上下文中
    CGContextAddPath(ctx, path);
    //4.渲染
    CGContextStrokePath(ctx);
}
解析:
1.关闭路径是把最后一条线的终点和第一条线的起点连接起来
2.注意:第一条线是就近的CGPathAddLineToPoint点
3.注意:如果 CGPathMoveToPoint 后面没有CGPathAddLineToPoint那么此点无效
4.5绘制矩形
- (void)drawRect:(CGRect)rect {
    //1.获得上下文
    CGContextRef ctx = UIGraphicsGetCurrentContext();
    //2.绘制路径
    CGMutablePathRef path = CGPathCreateMutable();
    CGPathAddRect(path, NULL, CGRectMake(100, 100, 100, 100));
    //3将路径添加到上下文中
    CGContextAddPath(ctx, path);
    //4.渲染
    CGContextStrokePath(ctx);
}
4.6绘制圆形\椭圆
- (void)drawRect:(CGRect)rect {
    //1.获得上下文
    CGContextRef ctx = UIGraphicsGetCurrentContext();
    //2.绘制路径
    CGMutablePathRef path = CGPathCreateMutable();
    //注意:矩形是正方形会绘制成圆,矩形是长方形会绘制成椭圆
    CGPathAddEllipseInRect(path, NULL, CGRectMake(100, 100, 100, 100));
    //3将路径添加到上下文中
    CGContextAddPath(ctx, path);
    //4.渲染
    CGContextStrokePath(ctx);
}
4.7绘制圆弧
- (void)drawRect:(CGRect)rect {
    //1.获得上下文
    CGContextRef ctx = UIGraphicsGetCurrentContext();
    //2.绘制路径
    CGMutablePathRef path = CGPathCreateMutable();
    CGPathAddArc(path, NULL, rect.size.width*0.5, rect.size.height*0.5, 100, 0, M_PI_4, 0);
    //3将路径添加到上下文中
    CGContextAddPath(ctx, path);
    //4.渲染
    CGContextStrokePath(ctx);
}
解析:
1. 0是顺时针,1是逆时针
4.8绘制扇形
- (void)drawRect:(CGRect)rect {
    //1.获得上下文
    CGContextRef ctx = UIGraphicsGetCurrentContext();
    //2.绘制路径
    CGMutablePathRef path = CGPathCreateMutable();
    //2.1绘制圆弧
    CGPathAddArc(path, NULL, rect.size.width*0.5, rect.size.height*0.5, 100, 0, M_PI_4, 0);
    //2.2连接中心点
    CGPathAddLineToPoint(path, NULL,rect.size.width*0.5, rect.size.height*0.5);
    //2.3关闭路径
    CGPathCloseSubpath(path);
    //3将路径添加到上下文中
    CGContextAddPath(ctx, path);
    //4.渲染
    CGContextStrokePath(ctx);
}
5.绘制基本图形--第三种方式 UIBezierPath
5.1绘制一条直线
- (void)drawRect:(CGRect)rect {
    //1.获得上下文
    CGContextRef ctx = UIGraphicsGetCurrentContext();
    //2.绘制路径
    UIBezierPath *path = [UIBezierPath bezierPath];
    [path moveToPoint:CGPointMake(100, 100)];
    [path addLineToPoint:CGPointMake(200, 200)];
    //3将路径添加到上下文中
    CGContextAddPath(ctx, path.CGPath);
    //4.渲染
    CGContextStrokePath(ctx);
}

解析:
moveToPoint 添加起点,注意:这个点并没有在草稿纸上
addLineToPoint添加终点,这样会绘制一条路径,但是这条路径并没有在草稿纸上.
CGContextAddPath 会把这个路径拷贝一份放到草稿纸中.
5.2绘制两条未连接的线
- (void)drawRect:(CGRect)rect {
    //1.获得上下文
    CGContextRef ctx = UIGraphicsGetCurrentContext();
    //2.绘制路径
    UIBezierPath *path = [UIBezierPath bezierPath];
    //2.1 添加第一条线
    [path moveToPoint:CGPointMake(100, 100)];
    [path addLineToPoint:CGPointMake(200, 200)];

    //2.1 添加第二条线
    [path moveToPoint:CGPointMake(300, 200)];
    [path addLineToPoint:CGPointMake(400, 100)];

    //3将路径添加到上下文中
    CGContextAddPath(ctx, path.CGPath);
    //4.渲染
    CGContextStrokePath(ctx);
}
5.3绘制两条连接的线
- (void)drawRect:(CGRect)rect {
    //1.获得上下文
    CGContextRef ctx = UIGraphicsGetCurrentContext();
    //2.绘制路径
    UIBezierPath *path = [UIBezierPath bezierPath];
    //2.1 添加第一条线
    [path moveToPoint:CGPointMake(100, 100)];
    [path addLineToPoint:CGPointMake(200, 200)];

    //2.1 添加第二条线
    [path addLineToPoint:CGPointMake(300, 100)];

    //3将路径添加到上下文中
    CGContextAddPath(ctx, path.CGPath);
    //4.渲染
    CGContextStrokePath(ctx);
}
5.4特有的绘制方式
- (void)drawRect:(CGRect)rect {
    //1.绘制路径
    UIBezierPath *path = [UIBezierPath bezierPath];
    //2.添加第一条线
    [path moveToPoint:CGPointMake(100, 100)];
    [path addLineToPoint:CGPointMake(200, 200)];
    //3.渲染
    [path stroke];
}

解析:
渲染方法会默认将路径添加到当前上下文.
5.5关闭路径
- (void)drawRect:(CGRect)rect {
    //1.获得上下文
    CGContextRef ctx = UIGraphicsGetCurrentContext();
    //2.绘制路径
    UIBezierPath *path = [UIBezierPath bezierPath];
    //2.1添加第一条线
    [path moveToPoint:CGPointMake(100, 100)];
    [path addLineToPoint:CGPointMake(200, 200)];
    //2.2添加第二条线
    [path addLineToPoint:CGPointMake(300, 100)];
    //2.3关闭路径
    [path closePath];
    //3将路径添加到上下文中
    CGContextAddPath(ctx, path.CGPath);
    //4.渲染
    CGContextStrokePath(ctx);
}
注意:
1. 关闭路径是把最后一条线的终点和第一条线的起点连接起来
2.注意:第一条线是就近的moveToPoint点
3.如果moveToPoint后没有响应的addLineToPoint方法,那么这个点无效
5.6绘制矩形
- (void)drawRect:(CGRect)rect {
    //1.获得上下文
    CGContextRef ctx = UIGraphicsGetCurrentContext();
    //2.绘制路径
    UIBezierPath *path = [UIBezierPath bezierPathWithRect:CGRectMake(100, 100, 100, 100)];
    //3将路径添加到上下文中
    CGContextAddPath(ctx, path.CGPath);
    //4.渲染
    CGContextStrokePath(ctx);
}
5.7绘制圆形\椭圆
- (void)drawRect:(CGRect)rect {
    //1.获得上下文
    CGContextRef ctx = UIGraphicsGetCurrentContext();
    //2.绘制路径
    //注意:矩形是正方形会绘制成圆,矩形是长方形会绘制成椭圆
    UIBezierPath *path = [UIBezierPath bezierPathWithOvalInRect:CGRectMake(100, 100, 100, 100)];
    //3将路径添加到上下文中
    CGContextAddPath(ctx, path.CGPath);
    //4.渲染
    CGContextStrokePath(ctx);
}
5.8绘制圆弧
- (void)drawRect:(CGRect)rect {
    //1.获得上下文
    CGContextRef ctx = UIGraphicsGetCurrentContext();
    //2.绘制路径
    UIBezierPath *path = [UIBezierPath bezierPathWithArcCenter:CGPointMake(rect.size.width*0.5, rect.size.height*0.5) radius:100 startAngle:0 endAngle:M_PI_4 clockwise:YES];
    //3将路径添加到上下文中
    CGContextAddPath(ctx, path.CGPath);
    //4.渲染
    CGContextStrokePath(ctx);
}
解析:
1. YES是顺时针,NO是逆时针
5.9绘制扇形
- (void)drawRect:(CGRect)rect {
    //1.获得上下文
    CGContextRef ctx = UIGraphicsGetCurrentContext();
    //2.绘制路径
    //2.1创建圆弧
    UIBezierPath *path = [UIBezierPath bezierPathWithArcCenter:CGPointMake(rect.size.width*0.5, rect.size.height*0.5) radius:100 startAngle:0 endAngle:M_PI_4 clockwise:YES];
    //2.2连接中心点
    [path addLineToPoint:CGPointMake(rect.size.width*0.5, rect.size.height*0.5)];
    //2.3关闭路径
    [path closePath];
    //3将路径添加到上下文中
    CGContextAddPath(ctx, path.CGPath);
    //4.渲染
    CGContextStrokePath(ctx);
}
6.绘图属性设置
6.1颜色设置
//第一种方式:OC设置方式
/*
 setStroke 描边颜色
 setFill 填充色
 set 既设置描边又设置填充色
 */
[[UIColor redColor] setFill];

//第二种方式:C设置方式
//2.1设置边框颜色
CGContextSetRGBStrokeColor(ctx, 100/255.0, 100/255.0, 100/255.0, 1.0);
//2.2设置填充色
CGContextSetRGBFillColor(ctx, 100/255.0, 100/255.0, 100/255.0, 1.0);

注意:
1.在同时设置了边框和填充色时,只有采用 既填充又边框 的渲染方式才能显示两种颜色
2.一定要在渲染之前设置
3.设置颜色就近原则,也就是在渲染之前多处设置颜色.
6.2线宽设置
CGContextSetLineWidth(ctx, 5);
6.3首尾样式
/*
 kCGLineCapButt 默认,直角
 kCGLineCapRound 圆角
 kCGLineCapSquare 方形,与第一个的区别就是长了一点(左右两边各加5的距离)
 */
CGContextSetLineCap(ctx, kCGLineCapRound);


//UIBezierPath 封装的首尾样式
[path setLineCapStyle:kCGLineCapRound];
6.4拼接样式
/*
 kCGLineJoinMiter 默认,直角
 kCGLineJoinRound 圆角
 kCGLineJoinBevel 切角
 */
CGContextSetLineJoin(ctx, kCGLineJoinRound);

//UIBezierPath 封装的拼接样式
[path setLineJoinStyle:kCGLineJoinRound];
7.渲染
7.1渲染方式
//填充式渲染
CGContextFillPath(ctx);
//边框式渲染
CGContextStrokePath(ctx);
/*
 kCGPathFill  填充式渲染
 kCGPathEOFill 奇偶填充渲染
 kCGPathStroke  描边式渲染
 kCGPathFillStroke  既填充又描边
 kCGPathEOFillStroke 奇偶填充描边渲染
 */
CGContextDrawPath(ctx, kCGPathFillStroke);
7.2奇偶填充规则
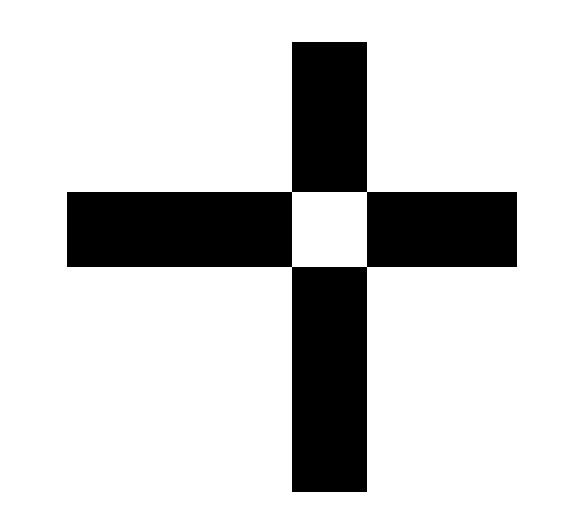
被覆盖过基数次的点填充,被覆盖过偶数次的点不填充
- (void)drawRect:(CGRect)rect {
    //1.获得上下文
    CGContextRef ctx = UIGraphicsGetCurrentContext();
    //2.绘制路径
    UIBezierPath *path = [UIBezierPath bezierPathWithRect:CGRectMake(50, 200, 300, 50)];
    CGContextAddPath(ctx, path.CGPath);

    UIBezierPath *path1 = [UIBezierPath bezierPathWithRect:CGRectMake(200, 100, 50, 300)];
    CGContextAddPath(ctx, path1.CGPath);
    //4.渲染
    CGContextDrawPath(ctx, kCGPathEOFill);
}
7.3非零环绕数规则 -- 了解,默认的填充规则
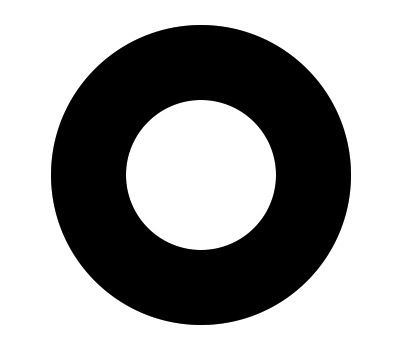
从左边跨过,+1.从右边跨过,-1.最后如果是0,那么不填充,否则填充。
- (void)drawRect:(CGRect)rect {
    //1.获得上下文
    CGContextRef ctx = UIGraphicsGetCurrentContext();
    //2.绘制路径
    //顺时针大圆
    UIBezierPath *path = [UIBezierPath bezierPathWithArcCenter:CGPointMake(150, 150) radius:100 startAngle:0 endAngle:M_PI*2 clockwise:1];
    CGContextAddPath(ctx, path.CGPath);
    //逆时针小圆
    UIBezierPath *path1 = [UIBezierPath bezierPathWithArcCenter:CGPointMake(150, 150) radius:50 startAngle:0 endAngle:M_PI*2 clockwise:0];
    CGContextAddPath(ctx, path1.CGPath);
    //4.渲染
    CGContextDrawPath(ctx, kCGPathFill);
}

解析:
1.错误的,但是容易理解
没有路径时,默认都是0,假设在大圆上随便取一个点,大圆顺时针绘制,从右往左跨过-1。
然后绘制小圆,小圆是逆时针绘制,小圆从左往右跨过那个点+1.
所以,如果选的点在大圆内,小圆外就是-1
选的点在大圆内,也在小圆内,那么这点被从左往右跨过,也被从右往左跨过,那么就是0,不绘制。

2.正确的,不容易理解
在大圆内随便取一个点,然后往任意方向来一条射线(切线不要考虑),这条射线和路径是有交点的,就是我们在画圆的时候,经过这条射线是从右往左,还是从左往右。
当这条线只经过了大圆与小圆没有交点,那么大圆顺时针绘制,从右往左跨过-1.
当这条线即经过大圆也经过小圆,那么大圆顺时针绘制,从右往左跨过-1,小圆逆时针绘制,从左往右跨过+1,这样就有了0.
7.4OC的非零环绕数规则
- (void)drawRect:(CGRect)rect {
    // 注意:只要小圆是逆时针绘制就可以。
    //顺时针大圆
    UIBezierPath *path = [UIBezierPath bezierPathWithArcCenter:CGPointMake(150, 150) radius:100 startAngle:0 endAngle:M_PI*2 clockwise:1];
    //逆时针小圆
    [path addArcWithCenter:CGPointMake(150, 150) radius:50 startAngle:0 endAngle:M_PI * 2 clockwise:1];
    //使用奇偶填充规则
    path.usesEvenOddFillRule = YES;
    //填充
    [path fill];
}
8.饼状图和柱状图
8.1饼状图
思路:
1.准备一个数据数组。相加可以是1,也可以是100.自己设计即可。我们假设是1
2.定义开始变量 和 结束变量都是0.
3.绘制扇形,下一个扇形的起始角度上之前所有扇形的角度总和。

- (void)drawRect:(CGRect)rect {
    //1.准备扇形块比例数组
    NSArray *array = @[@0.3,@0.1,@0.2,@0.4];
    //2.定义起始角度 和 结束角度
    CGFloat start = 0;
    CGFloat end = 0;
    for (int i = 0; i
8.2柱状图
思路:
1.准备数据数组
2.计算每个柱子的矩形位置--需要遍历数组
  宽度 = View的宽度 / (数组的长度 * 2 - 1);
  高度 = View的高度 * 当前柱子的比例
  X位置 = 宽度 * 当前柱子位置 * 2;
  Y位置 = View的高度 - 高度;
3.创建每个矩形并且填充.

- (void)drawRect:(CGRect)rect {
    //1.准备柱状图比例数组
    NSArray *array = @[@1,@0.5,@0.7,@0.3,@0.1,@0.6];
    //宽度 = 平均View的宽度
    CGFloat rectW = rect.size.width / (array.count*2-1);
    for (int i = 0; i < array.count; i++) {
        //高度 = View的高度的比例
        CGFloat rectH = rect.size.height * [array[i] floatValue];
        // X = 宽度 * 位置
        CGFloat rectX = rectW * i * 2;
        // Y = View的高度 - rect的高度
        CGFloat rectY = rect.size.height - rectH;
        //2.创建矩形
        UIBezierPath *path = [UIBezierPath bezierPathWithRect:CGRectMake(rectX, rectY, rectW, rectH)];
        //3.设置颜色
        [[self randomColor] set];
        //4.填充
        [path fill];
    }
}
8.3饼状图柱状图的封装
思路:
1.把数据的提供交给用户.
2.通过代理的方式来获得我们想要的数据.
9.进度条
思路:
1.自定义UIView
2.根据比例绘制圆弧
3.每当重新设置进度比例时,重绘界面
4.如果界面需要文字显示下载比例,就添加一个label.
- (void)drawRect:(CGRect)rect {
    //1.计算圆弧中心点
    CGPoint center = CGPointMake(rect.size.width * 0.5, rect.size.height * 0.5);
    //2.计算圆弧半径
    CGFloat radius = MIN(rect.size.width, rect.size.height);
    //3.计算结束角度
    CGFloat end = M_PI * 2 * self.progress;
    //4.绘制圆弧
    UIBezierPath *path = [UIBezierPath bezierPathWithArcCenter:center radius:radius*0.5 startAngle:0 endAngle:end clockwise:YES];
    //5.连接中心点
    [path addLineToPoint:CGPointMake(rect.size.width * 0.5, rect.size.height * 0.5)];
    //6.填充
    [path fill];

}

- (void)setProgress:(CGFloat)progress{
    _progress = progress;
    //重绘界面
    [self setNeedsDisplay];
}


