基本原理
通过手机的摄像头(Camera)进行视频采集,音频采集(AudioRecord)后通过x264进行视频编码,faac进行音频编码,然后通过 RTMPDump 实现打包推流。
视频格式简析
android 摄像头采集的数据格式为 nv21,而我们看到的视频的编码前的格式为 i420 ,所以要进行转换,这两种格式都属于 yuv420,只是存储方式上的差异。
以 4*4 的图片为例看一下 i420、yv12、nv21、nv12 存储格式的区别:
| i420 | |||
|---|---|---|---|
| y1 | y2 | y3 | y4 |
| y5 | y6 | y7 | y8 |
| y9 | y10 | y11 | y12 |
| y13 | y14 | y15 | y16 |
| u1 | u2 | u3 | u4 |
| v1 | v2 | v3 | v4 |
| yv12 | |||
|---|---|---|---|
| y1 | y2 | y3 | y4 |
| y5 | y6 | y7 | y8 |
| y9 | y10 | y11 | y12 |
| y13 | y14 | y15 | y16 |
| v1 | v2 | v3 | v4 |
| u1 | u2 | u3 | u4 |
| nv21 | |||
|---|---|---|---|
| y1 | y2 | y3 | y4 |
| y5 | y6 | y7 | y8 |
| y9 | y10 | y11 | y12 |
| y13 | y14 | y15 | y16 |
| v1 | u1 | v2 | u2 |
| v3 | u3 | v4 | u4 |
| nv12 | |||
|---|---|---|---|
| y1 | y2 | y3 | y4 |
| y5 | y6 | y7 | y8 |
| y9 | y10 | y11 | y12 |
| y13 | y14 | y15 | y16 |
| u1 | v1 | u2 | v2 |
| u3 | v3 | u4 | v4 |
四种在 y 部分完全一样,i420 和 yv12 的 u 和 v 分量是单独储存的,而 nv21 和
nv12 的 v 和 u 是交替存储的。
i420 、yv12 和 nv21 、nv12 一样,都是 v 和 u 分量的位置是颠倒的。
摄像头采集数据的坑
做过摄像头的开发的都知道,android 摄像头拍出来的视频是横向的,需要设置摄像头的显示方向来将摄像头setDisplayOrientation(90)给“掰过来”。
引用 Camera 类给出的示例代码:
android.hardware.Camera.CameraInfo info =
                new android.hardware.Camera.CameraInfo();
Camera.getCameraInfo(videoParam.getCameraId(), info);
int rotation = activity.getWindowManager().getDefaultDisplay().getRotation();
int degrees = 0;
switch (rotation) {
    case Surface.ROTATION_0:
        degrees = 0;
        pusherNative.setVideoOptions(videoParam.getHeight(), videoParam.getWidth(), videoParam.getBitrate(), videoParam.getFps());
        break;
     case Surface.ROTATION_90:
        degrees = 90;
        pusherNative.setVideoOptions(videoParam.getWidth(), videoParam.getHeight(), videoParam.getBitrate(), videoParam.getFps());
        break;
     case Surface.ROTATION_180:
        degrees = 180;
        break;
     case Surface.ROTATION_270:
         degrees = 270;
         break;
}

int result;
if (info.facing == Camera.CameraInfo.CAMERA_FACING_FRONT) {
    result = (info.orientation + degrees) % 360;
    result = (360 - result) % 360;  // compensate the mirror
} else {  // back-facing
     result = (info.orientation - degrees + 360) % 360;
}
camera.setDisplayOrientation(result);
关于 setDisplayOrientation 的介绍:
This does not affect the order of byte array passed in [onPreviewFrame(byte[], Camera)](https://developer.android.com/reference/android/hardware/Camera.PreviewCallback.html#onPreviewFrame(byte[], android.hardware.Camera))
, JPEG pictures, or recorded video
“矫正”过的摄像头虽然画面能正常显示了,但是我们通过camera.setPreviewCallbackWithBuffer(this)监听摄像头在预览过程中的回调数据发现方向仍然是横着的,所以我们需要在回调里对数据再做一次矫正工作。
关于cameraInfo.orientation 的介绍:
The orientation of the camera image. The value is the angle that the camera image needs to be rotated clockwise so it shows correctly on the display in its natural orientation. It should be 0, 90, 180, or 270.
For example, suppose a device has a naturally tall screen. The back-facing camera sensor is mounted in landscape. You are looking at the screen. If the top side of the camera sensor is aligned with the right edge of the screen in natural orientation, the value should be 90. If the top side of a front-facing camera sensor is aligned with the right of the screen, the value should be 270.
大概的意思是:在竖屏状态下,后置相机拍的照片需要顺时针旋转90度,前置相机拍的照片需要顺时针旋转270度看起来才正常。
也就是说,当手机方向为 Surface.ROTATION_0 (竖屏) 时,如果是前置相机,需要将 nv21 数据旋转 270 度(逆时针 90 度),如果是后置相机,则需要将 nv21 数据旋转 90 度(顺时针 90 度),当手机方向为 Surface.ROTATION_90 时,数据不需要处理,当手机方向为 Surface.ROTATION_270 时,数据需要旋转 180 度。
以上面的 4*4 图片为例, nv21 数据顺时针旋转 90度的格式前后对比:
| 前 | |||
|---|---|---|---|
| y1 | y2 | y3 | y4 |
| y5 | y6 | y7 | y8 |
| y9 | y10 | y11 | y12 |
| y13 | y14 | y15 | y16 |
| v1 | u1 | v2 | u2 |
| v3 | u3 | v4 | u4 |
| 后 | |||
|---|---|---|---|
| y13 | y9 | y5 | y1 |
| y14 | y10 | y6 | y2 |
| y15 | y11 | y7 | y3 |
| y16 | y12 | y8 | y4 |
| v3 | u3 | v1 | u1 |
| v4 | u4 | v2 | u2 |
nv21 中每个像素占用12位,一张图片所占的内存为 w * h * 1.5:
// 开始预览
private void startPreview() {
    try {
        camera = Camera.open(videoParam.getCameraId());
        Camera.Parameters parameter = camera.getParameters();
        parameter.setPreviewFormat(ImageFormat.NV21);
        setPreviewSize(parameter);
        camera.setParameters(parameter);
        setDisplayOrientation();
        int bitsPerPixel = ImageFormat.getBitsPerPixel(ImageFormat.NV21);
        int bufferSize = videoParam.getWidth() * videoParam.getHeight() * bitsPerPixel / 8;
        // 预览缓冲区
        buffer = new byte[bufferSize];
        // 转换方向后的缓冲区
        rawBuffer = new byte[bufferSize];
        camera.addCallbackBuffer(buffer);
        camera.setPreviewCallbackWithBuffer(this);
        camera.setPreviewDisplay(holder);
        camera.startPreview();
    } catch (Exception e) {
        e.printStackTrace();
    }
}
预览数据,调用推送视频的方法:
@Override
public void onPreviewFrame(byte[] bytes, Camera camera) {
    if (isPushing) {
        rotateNV21Data2Raw();
        pusherNative.pushVideo(rawBuffer);
    }
    camera.addCallbackBuffer(bytes);
}
做视频方向的矫正,使客户端接受到正常的画面,视频旋转时,将 u/v 信息看成一个整体进行处理。
private void rotateNV21Data2Raw() {
    int w = videoParam.getWidth(), h = videoParam.getHeight(), y_size = w * h, k = 0;
    // orientation = getWindowManager().getDefaultDisplay().getRotation ()
    switch (orientation) {
        case 0: {
            if (videoParam.getCameraId() == Camera.CameraInfo.CAMERA_FACING_BACK) {
                // 数据顺时针旋转90度
                // y
                for (int i = 0; i < w; i++) {
                    for (int j = h - 1; j >= 0; j--) {
                        rawBuffer[k++] = buffer[j * w + i];
                    }
                }
                // u/v
                for (int i = 0; i < w; i += 2) {
                    for (int j = h / 2 - 1; j >= 0; j--) {
                        // v
                        rawBuffer[k++] = buffer[y_size + w * j + i];
                        // u
                        rawBuffer[k++] = buffer[y_size + w * j + i + 1];
                   }
                }
            } else {
                // 数据逆时针旋转90度
                // y
                for (int i = w - 1; i >= 0; i--) {
                    for (int j = 0; j < h; j++) {
                        rawBuffer[k++] = buffer[j * w + i];
                    }
                }
                // u/v
                for (int i = w - 2; i >= 0; i -= 2) {
                    for (int j = 0; j < h / 2; j++) {
                        // v
                        rawBuffer[k++] = buffer[y_size + w * j + i];
                        // u
                        rawBuffer[k++] = buffer[y_size + w * j + i + 1];
                    }
                 }
            }
        }
        break;
        case 90: {
            // 手机逆时针旋转90度,数据不动
            rawBuffer = buffer;
        }
        break;
        case 270: {
            // 手机顺时针旋转90度,数据顺时针旋转180度
            // y
            for (int i = y_size - 1; i >= 0; i--) {
                rawBuffer[k++] = buffer[i];
            }
            // u/v
            for (int i = y_size * 3 / 2 - 2; i >= y_size; i -= 2) {
                // v
                rawBuffer[k++] = buffer[i];
                // u
                rawBuffer[k++] = buffer[i + 1];
            }
        }
        break;
    }
}
“矫正”后的数据终于可以使用了吗,no,no,no,我们还要将其转换为 i420 格式供 x264 压缩,这块的代码交给 c++ 层处理吧。
// yuv data
x264_picture_t *x264_pic_in;
// y length = w * h
int y_len;
// u/v length = y_len / 2
int u_v_len;

// 传入 java 层的 rawBuffer数据
jbyte *data = env->GetByteArrayElements(array, NULL);
memcpy(x264_pic_in->img.plane[0], data, y_len);
jbyte *u = (jbyte *) x264_pic_in->img.plane[1];
jbyte *v = (jbyte *) x264_pic_in->img.plane[2];
for (int i = 0; i < u_v_len; i++) {
    *(u + i) = *(data + y_len + i * 2 + 1);
    *(v + i) = *(data + y_len + i * 2);
}
H264结构中,一个视频图像编码后的数据叫做一帧,一帧由一个片或多个片组成,一个片由一个或多个宏块组成,一个宏块由16x16的yuv数据组成。宏块作为H264编码的基本单位。
参考:
H264 在网络传输的是 NALU,一帧图片分成若干个 nal,将一个或多个 nal 打包成 RTMPPacket 压到推送队列,通过轮询推送队列的包, rtmp将其放到上传队列推送到服务器端。
发送的包主要分为两种:sps + pps 头信息 和 帧数据

视频包的格式:

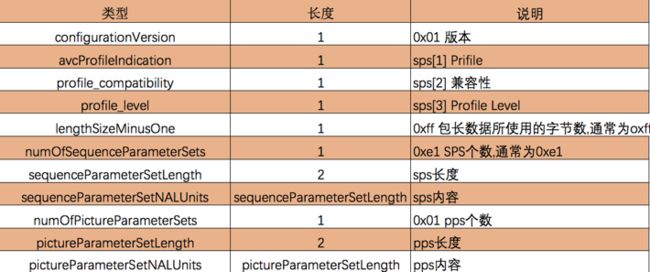
pps 和 sps 的数据包格式:
示例代码:
x264_nal_t *nal = NULL;
int n_nal = -1;
x264_picture_init(x264_pic_out);
if (x264_encoder_encode(x264, &nal, &n_nal, x264_pic_in, x264_pic_out) < 0) {
    LOG_E("编码失败");
    return;
}
x264_pic_in->i_pts++;

// x264 中 1f 固定值
uint8_t sps[100];
memset(sps, 0, 100);
int sps_len;
uint8_t pps[100];
memset(pps, 0, 100);
int pps_len;
for (int i = 0; i < n_nal; i++) {
    if (nal[i].i_type == NAL_SPS) {
        // 67 & 1f = NAL_SPS
        // 前面4个字节是分隔符 0000 0001
        sps_len = nal[i].i_payload - 4;
        memcpy(sps, nal[i].p_payload + 4, sps_len);
    } else if (nal[i].i_type == NAL_PPS) {
        // 68 & 1f = NAL_PPS
        pps_len = nal[i].i_payload - 4;
        memcpy(pps, nal[i].p_payload + 4, pps_len);
        // 发送 sps + pps 头信息
        add_264_sequence_header(pps, sps, pps_len, sps_len);
    } else {
        // 普通帧数据
        add_264_body(nal[i].p_payload, nal[i].i_payload);
    }
}

void add_264_sequence_header(uint8_t *pps, uint8_t *sps, int pps_len, int sps_len) {
    int body_size = pps_len + sps_len + 16;
    RTMPPacket *packet = (RTMPPacket *) malloc(sizeof(RTMPPacket));
    RTMPPacket_Alloc(packet, body_size);
    int i = 0;
    unsigned char *body = (unsigned char *) packet->m_body;
    body[i++] = 0x17;
    body[i++] = 0x00;
    body[i++] = 0x00;
    body[i++] = 0x00;
    body[i++] = 0x00;
    // 版本号
    body[i++] = 0x01;
    // profile
    body[i++] = sps[1];
    // 兼容性
    body[i++] = sps[2];
    // 设置 profile level "baseline"
    body[i++] = sps[3];
    // 0xff 包长数据所使用的字节数
    body[i++] = 0xff;
    // sps 个数
    body[i++] = 0xe1;
    // sps 长度
    body[i++] = (sps_len >> 8) & 0xff;
    body[i++] = sps_len & 0xff;
    // sps 内容
    memcpy(&body[i], sps, sps_len);
    i += sps_len;
    body[i++] = 0x01;
    // pps 长度
    body[i++] = (pps_len >> 8) & 0xff;
    body[i++] = pps_len & 0xff;
    // pps 内容
    memcpy(&body[i], pps, pps_len);
    packet->m_packetType = RTMP_PACKET_TYPE_VIDEO;
    packet->m_nBodySize = body_size;
    packet->m_nTimeStamp = 0;
    packet->m_hasAbsTimestamp = 0;
    packet->m_nChannel = 0x04;
    packet->m_headerType = RTMP_PACKET_SIZE_MEDIUM;

    // 将 RTMP 包放入推送队列
    put(packet);
}

// 分隔符有两种 00 00 00 01 和 00 00 01
void add_264_body(uint8_t *buf, int buf_len) {
    // 去除分隔符,首地址偏移
    if (buf[2] == 0x00) {
        buf += 4;
        buf_len -= 4;
    } else if (buf[2] == 0x01) {
        buf += 3;
        buf_len -= 3;
    }
    int body_size = buf_len + 9;
    RTMPPacket *packet = (RTMPPacket *) malloc(sizeof(RTMPPacket));
    RTMPPacket_Alloc(packet, body_size);
    char *body = packet->m_body;
    // 判断是否关键帧单元 buf[0] == 65
    int type = buf[0] & 0x1f;
    body[0] = 0x27;
    if (type == NAL_SLICE_IDR) {
        body[0] = 0x17;
    }
    int i = 1;
    body[i++] = 0x01;
    body[i++] = 0x00;
    body[i++] = 0x00;
    body[i++] = 0x00;
    // 写入 body 的长度
    body[i++] = (buf_len >> 24) & 0xff;
    body[i++] = (buf_len >> 16) & 0xff;
    body[i++] = (buf_len >> 8) & 0xff;
    body[i++] = buf_len & 0xff;
    // 写入 body 的内容
    memcpy(&body[i], buf, buf_len);
    packet->m_packetType = RTMP_PACKET_TYPE_VIDEO;
    packet->m_nBodySize = body_size;
    packet->m_nTimeStamp = RTMP_GetTime() - start_time;
    packet->m_hasAbsTimestamp = 0;
    packet->m_nChannel = 0x04;
    packet->m_headerType = RTMP_PACKET_SIZE_LARGE;
    // 放到推流队列
    put(packet);
}

void put(RTMPPacket *packet) {
    pthread_mutex_lock(&p_mutex);
    if (publishing) {
        queue.push(packet);
    }
    pthread_cond_signal(&p_cond);
    pthread_mutex_unlock(&p_mutex);
}

RTMPPacket *get() {
    pthread_mutex_lock(&p_mutex);
    if (queue.empty()) {
        pthread_cond_wait(&p_cond, &p_mutex);
    }
    RTMPPacket *packet = queue.front();
    queue.pop();
    pthread_mutex_unlock(&p_mutex);
    return packet;
}
设置音频选项
uint channels = _channels;
u_long sampleRate = _sampleRate;
audioHandle = faacEncOpen(sampleRate, channels, &input_samples, &max_output_bytes);
if (!audioHandle) {
      // 失败
      LOG_I("打开音频编码器失败")
 }
faacEncConfigurationPtr configurationPtr = faacEncGetCurrentConfiguration(audioHandle);
configurationPtr->mpegVersion = MPEG4;
configurationPtr->allowMidside = 1;
configurationPtr->aacObjectType = LOW;
// 是否包含 ADTS 头
configurationPtr->outputFormat = 0;
// 消除爆破声,短暂的噪声
configurationPtr->useTns = 1;
configurationPtr->useLfe = 0;
configurationPtr->shortctl = SHORTCTL_NORMAL;
configurationPtr->inputFormat = FAAC_INPUT_16BIT;
configurationPtr->quantqual = 100;
configurationPtr->bandWidth = 0; // 频宽

// 使上面的配置生效
if (!faacEncSetConfiguration(audioHandle, configurationPtr)) {
    LOG_E("失败");
}
LOG_I("声音设置成功");
ADTS 为7个字节大小,包含音频的声道数,采样率,帧大小等信息,对于 RTMP 服务器则不需要这些信息,所以封装时不再需要。
音频的录制和推送:
// java 端 使用 audiorecord 录制音频
class AudioRecordRunnable implements Runnable {

    @Override
    public void run() {
        audioRecord.startRecording();
        while (isPushing) {
            byte[] buffer = new byte[inputSamples * 2];
            int read = audioRecord.read(buffer, 0, buffer.length);
            if (read > 0) {
                pusherNative.pushAudio(buffer, read);
            }
        }
        audioRecord.stop();
    }
}
// pushNative
jbyte *buf = env->GetByteArrayElements(buf_, NULL);
uint8_t *out_buf = (uint8_t *) malloc(sizeof(max_output_bytes));
// buf_size 为录制的音频字节数,音频采样数 = buf_size / 2,每个采样为 16 位,占用2个字节
int out_buf_size = faacEncEncode(audioHandle, (int32_t *) buf, buf_size / 2, out_buf,
                                     max_output_bytes);
if (out_buf_size > 0) {
    add_aac_body(out_buf, out_buf_size);
}
env->ReleaseByteArrayElements(buf_, buf, 0);
free(out_buf);
在连接到RTMP服务器后,需要先发送音频的采样率信息头:
void add_aac_sequence_header() {
    if (!audioHandle) {
        return;
    }
    unsigned char *buf;
    u_long len; /* buf长度,一般是 2 */
    faacEncGetDecoderSpecificInfo(audioHandle, &buf, &len);
    RTMPPacket *packet = (RTMPPacket *) malloc(sizeof(RTMPPacket));
    RTMPPacket_Alloc(packet, len + 2);
    RTMPPacket_Reset(packet);
    unsigned char *body = (unsigned char *) packet->m_body;
    /*AF 00 + AAC RAW data*/
    body[0] = 0xaf;
    body[1] = 0x00;
    memcpy(&body[2], buf, len); /*spec_buf 是 AAC sequence header 数据*/
    packet->m_packetType = RTMP_PACKET_TYPE_AUDIO;
    packet->m_nBodySize = len + 2;
    packet->m_nChannel = 0x04;
    packet->m_hasAbsTimestamp = 0;
    packet->m_nTimeStamp = 0;
    packet->m_hasAbsTimestamp = 0;
    packet->m_headerType = RTMP_PACKET_SIZE_MEDIUM;
    put(packet);
    free(buf);
    LOG_I("放入音频编码信息")
}
轮询推送队列,发送 RTMPPacket 信息:
RTMP *rtmp = RTMP_Alloc();
RTMP_Init(rtmp);
rtmp->Link.timeout = 5;
RTMP_SetupURL(rtmp, path);
RTMP_EnableWrite(rtmp);
if (!RTMP_Connect(rtmp, NULL)) {
    LOG_E("连接失败");
    goto end;
}
// 连接流
RTMP_ConnectStream(rtmp, 0);
// 发送音频采样率的信息头
add_aac_sequence_header();
while (publishing) {
    RTMPPacket *packet = get();
    // 推流
    packet->m_nInfoField2 = rtmp->m_stream_id;
    // 1 代表使用上传队列
    bool rs = RTMP_SendPacket(rtmp, packet, 1);
    LOG_I("推送 packet->%d", rs);
    RTMPPacket_Free(packet);
    free(packet);
}
end:
    publishing = 0;
    free(path);
    RTMP_Close(rtmp);
    RTMP_Free(rtmp);
    pthread_exit(NULL);
发现有的手机会出现崩溃现象,请关闭硬件加速后试试。
推流 demo:https://gitee.com/chuanzhi/H264Pusher.git