1:实现原理
ASI基于CFNetwork框架开发,而AFN基于NSURL.
ASI更加的底层,请求使用创建objcCFHTTPMessageRef进行,使用objcNSOperationQueue进行管理,objcASIHTTPRequest就是objcNSOpration的子类,并实现了NSCopy协议。使用objcstatic NSOperationQueue *sharedQueue, 在objcASIHTTPRequest执行网络请求时把自己加进去objcqueue。
AFN基于NSURL,请求使用objcNSURLRequest作为参数传入objcNSURlconnection进行。使用objcNSOperationQueue进行管理,通过初始化objcAFHTTPRquestOperationManager进行多线程管理。
2:优缺点对比
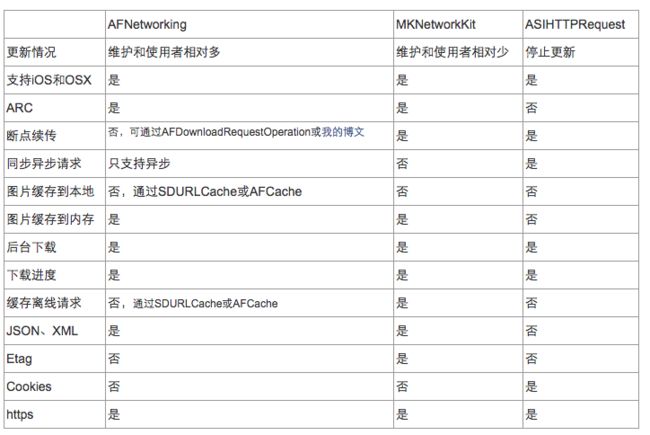
ASI开发者已于2012年10月宣布暂停该开源库的更新.AFN的活跃维护者比较多。
2:ASI的大概实现
ASIHTTPRequest是NSOperation的子类。 在ASIHTTPRequest有个初始方法:
- (id)initWithURL:(NSURL *)newURL

{

 self = [self init];

 [self setRequestMethod:@"GET"];

 [self setRunLoopMode:NSDefaultRunLoopMode];

 [self setShouldAttemptPersistentConnection:YES];

 [self setPersistentConnectionTimeoutSeconds:60.0];

 [self setShouldPresentCredentialsBeforeChallenge:YES];

 [self setShouldRedirect:YES];

 [self setShowAccurateProgress:YES];

 [self setShouldResetDownloadProgress:YES];

 [self setShouldResetUploadProgress:YES];

 [self setAllowCompressedResponse:YES];

 [self setShouldWaitToInflateCompressedResponses:YES];

 [self setDefaultResponseEncoding:NSISOLatin1StringEncoding];

 [self setShouldPresentProxyAuthenticationDialog:YES];

 [self setTimeOutSeconds:[ASIHTTPRequest defaultTimeOutSeconds]];

 [self setUseSessionPersistence:YES];

 [self setUseCookiePersistence:YES];

 [self setValidatesSecureCertificate:YES];

 [self setRequestCookies:[[[NSMutableArray alloc] init] autorelease]];

 [self setDidStartSelector:@selector(requestStarted:)];

 [self setDidReceiveResponseHeadersSelector:@selector(request:didReceiveResponseHeaders:)];

 [self setWillRedirectSelector:@selector(request:willRedirectToURL:)];

 [self setDidFinishSelector:@selector(requestFinished:)];

 [self setDidFailSelector:@selector(requestFailed:)];

 [self setDidReceiveDataSelector:@selector(request:didReceiveData:)];

 [self setURL:newURL];

 [self setCancelledLock:[[[NSRecursiveLock alloc] init] autorelease]];

 [self setDownloadCache:[[self class] defaultCache]];

 return self;

}
然后在执行异步网络访问时,把自己扔进shareQueue进行管理。
- (void)startAsynchronous

{

#if DEBUG_REQUEST_STATUS || DEBUG_THROTTLING

 ASI_DEBUG_LOG(@"[STATUS] Starting asynchronous request %@",self);

#endif

 [sharedQueue addOperation:self];

}

执行同步访问时更直接。注意[self main]. main方法里面执行了CFNetwork的操作。
- (void)startSynchronous

{

#if DEBUG_REQUEST_STATUS || DEBUG_THROTTLING

 ASI_DEBUG_LOG(@"[STATUS] Starting synchronous request %@",self);

#endif

 [self setSynchronous:YES];

 [self setRunLoopMode:ASIHTTPRequestRunLoopMode];

 [self setInProgress:YES];

 if (![self isCancelled] && ![self complete]) {

 [self main];

 while (!complete) {

 [[NSRunLoop currentRunLoop] runMode:[self runLoopMode] beforeDate:[NSDate distantFuture]];

 }

 }

 [self setInProgress:NO];

}

[](http://mozhenhau.com/2015/08/12/IOS%E7%BD%91%E7%BB%9C%E8%AF%B7%E6%B1%82%E6%A1%86%E6%9E%B6AFNetworking%E5%92%8CASIHttpRequest%E5%AF%B9%E6%AF%94/#2-ASI_u57FA_u672C_u4F7F_u7528)2.ASI基本使用
ASIHTTPRequest *request = [ASIHTTPRequest requestWithURL:[NSURL URLWithString:@"XXXXX"]];

[request setDelegate:self]; //ASIHTTPRequestDelegate

[request startAsynchronous];

不用进行很多配置,是因为ASIHTTPRequest的requestWithURL方法有默认配置,可以在实例化后自己再修改。如下(还有更多的自己阅读源码):
[self setRequestMethod:@"GET"]; //访问方法

[self setRunLoopMode:NSDefaultRunLoopMode]; //默认runloop

[self setShouldAttemptPersistentConnection:YES]; //设置持久连接,重用request时用节约

[self setPersistentConnectionTimeoutSeconds:60.0];

[self setShouldPresentCredentialsBeforeChallenge:YES]; //是否要证书验证

[self setShouldRedirect:YES];

[self setShowAccurateProgress:YES]; //进度

[self setShouldResetDownloadProgress:YES];

[self setShouldResetUploadProgress:YES];

[self setAllowCompressedResponse:YES];

[self setShouldWaitToInflateCompressedResponses:YES];

[self setDefaultResponseEncoding:NSISOLatin1StringEncoding];

[self setShouldPresentProxyAuthenticationDialog:YES];

[self setTimeOutSeconds:[ASIHTTPRequest defaultTimeOutSeconds]]; //请求的网络等待时长

[self setUseSessionPersistence:YES]; //保持session

[self setUseCookiePersistence:YES]; //保持cookie

[self setValidatesSecureCertificate:YES];

[self setRequestCookies:[[[NSMutableArray alloc] init] autorelease]];

[self setDidStartSelector:@selector(requestStarted:)]; //请求开始

[self setDidReceiveResponseHeadersSelector:@selector(request:didReceiveResponseHeaders:)]; //获取到ResponseHeader

[self setWillRedirectSelector:@selector(request:willRedirectToURL:)];

[self setDidFinishSelector:@selector(requestFinished:)]; //请求完成

[self setDidFailSelector:@selector(requestFailed:)]; //请求失败

[self setDidReceiveDataSelector:@selector(request:didReceiveData:)]; //获取到data,多次

[self setURL:newURL]; //设置URL

[self setCancelledLock:[[[NSRecursiveLock alloc] init] autorelease]];

[self setDownloadCache:[[self class] defaultCache]];
ASIHTTPRequestDelegate的代理:
- (void)requestStarted:(ASIHTTPRequest *)request;

- (void)request:(ASIHTTPRequest *)request didReceiveResponseHeaders:(NSDictionary *)responseHeaders;

- (void)request:(ASIHTTPRequest *)request willRedirectToURL:(NSURL *)newURL;

- (void)requestFinished:(ASIHTTPRequest *)request;

- (void)requestFailed:(ASIHTTPRequest *)request;

- (void)requestRedirected:(ASIHTTPRequest *)request;

- (void)request:(ASIHTTPRequest *)request didReceiveData:(NSData *)data;

- (void)authenticationNeededForRequest:(ASIHTTPRequest *)request;

- (void)proxyAuthenticationNeededForRequest:(ASIHTTPRequest *)request;
2.AFN基本使用
1.实现基本原理:
先看看AFHTTPRquestOperationManager的默认初始化方法:
可以看出默认的request为二进制,reponse为json解析。可以根据业务进行修改。
- (instancetype)initWithBaseURL:(NSURL *)url {

 self = [super init];

 if (!self) {

 return nil;

 }

 // Ensure terminal slash for baseURL path, so that NSURL +URLWithString:relativeToURL: works as expected

 if ([[url path] length] > 0 && ![[url absoluteString] hasSuffix:@"/"]) {

 url = [url URLByAppendingPathComponent:@""];

 }

 self.baseURL = url; //初始化了baseurl,比如你的访问地址是http://192.168.0.100/login.action . 初始化baseUrl为http://192.168.0.100/ , 以后manager GET:@"login.action"即可。

 self.requestSerializer = [AFHTTPRequestSerializer serializer];

 self.responseSerializer = [AFJSONResponseSerializer serializer];

 self.securityPolicy = [AFSecurityPolicy defaultPolicy]; //AFSSLPinningModeNone无隐私要求

 self.reachabilityManager = [AFNetworkReachabilityManager sharedManager];

 self.operationQueue = [[NSOperationQueue alloc] init];

 self.shouldUseCredentialStorage = YES;

 return self;

}
再看看其中一个方法GET方法。
AFHTTPRequestOperation 是 AFURLConnectionOperation的子类,AFURLConnectionOperation的子类是NSOperation的子类,并实现了NSURLConnectionDelegate等网络协议。
objc@interface AFURLConnectionOperation : NSOperation
是使用刚才manager初始化生成的operationQueue进行多线程管理,所以一个项目有一个manager然后用来管理网络请求就行了。多线程已经由AFN内部处理了。
- (AFHTTPRequestOperation *)GET:(NSString *)URLString

 parameters:(id)parameters

 success:(void (^)(AFHTTPRequestOperation *operation, id responseObject))success

 failure:(void (^)(AFHTTPRequestOperation *operation, NSError *error))failure

{

 AFHTTPRequestOperation *operation = [self HTTPRequestOperationWithHTTPMethod:@"GET" URLString:URLString parameters:parameters success:success failure:failure];

 [self.operationQueue addOperation:operation];

 return operation;

}
AFHTTPRequestOperation的生成,复用了很多manager的属性:
- (AFHTTPRequestOperation *)HTTPRequestOperationWithRequest:(NSURLRequest *)request

 success:(void (^)(AFHTTPRequestOperation *operation, id responseObject))success

 failure:(void (^)(AFHTTPRequestOperation *operation, NSError *error))failure

{

 AFHTTPRequestOperation *operation = [[AFHTTPRequestOperation alloc] initWithRequest:request];

 operation.responseSerializer = self.responseSerializer;

 operation.shouldUseCredentialStorage = self.shouldUseCredentialStorage;

 operation.credential = self.credential;

 operation.securityPolicy = self.securityPolicy;

 [operation setCompletionBlockWithSuccess:success failure:failure]; //注意这个地方

 operation.completionQueue = self.completionQueue;

 operation.completionGroup = self.completionGroup;

 return operation;

}
最后的回调,AFN是使用了NSOperation自己的block,难怪在协议找了好久没找到
- (void)setCompletionBlock:(void (^)(void))block {

 [self.lock lock];

 if (!block) {

 [super setCompletionBlock:nil];

 } else {

 __weak __typeof(self)weakSelf = self;

 [super setCompletionBlock:^ {

 __strong __typeof(weakSelf)strongSelf = weakSelf;

#pragma clang diagnostic push

#pragma clang diagnostic ignored "-Wgnu"

 dispatch_group_t group = strongSelf.completionGroup ?: url_request_operation_completion_group();

 dispatch_queue_t queue = strongSelf.completionQueue ?: dispatch_get_main_queue();

#pragma clang diagnostic pop

 dispatch_group_async(group, queue, ^{

 block();

 });

 dispatch_group_notify(group, url_request_operation_completion_queue(), ^{

 [strongSelf setCompletionBlock:nil];

 });

 }];

 }

 [self.lock unlock];

}
2.基本GET
AFHTTPRequestOperationManager *manager = [AFHTTPRequestOperationManager manager];

 [manager GET:@"http://example.com/resources.json" parameters:nil success:^(AFHTTPRequestOperation *operation, id responseObject) {

 NSLog(@"JSON: %@", responseObject);

 } failure:^(AFHTTPRequestOperation *operation, NSError *error) {

 NSLog(@"Error: %@", error);

 }];
3.下载一个文件
NSURLSessionConfiguration *configuration = [NSURLSessionConfiguration defaultSessionConfiguration];

AFURLSessionManager *manager = [[AFURLSessionManager alloc] initWithSessionConfiguration:configuration];

NSURL *URL = [NSURL URLWithString:@"http://example.com/download.zip"];

NSURLRequest *request = [NSURLRequest requestWithURL:URL];

NSURLSessionDownloadTask *downloadTask = [manager downloadTaskWithRequest:request progress:nil destination:^NSURL *(NSURL *targetPath, NSURLResponse *response) {

 NSURL *documentsDirectoryURL = [[NSFileManager defaultManager] URLForDirectory:NSDocumentDirectory inDomain:NSUserDomainMask appropriateForURL:nil create:NO error:nil];

 return [documentsDirectoryURL URLByAppendingPathComponent:[response suggestedFilename]];

} completionHandler:^(NSURLResponse *response, NSURL *filePath, NSError *error) {

 NSLog(@"File downloaded to: %@", filePath);

}];

[downloadTask resume];