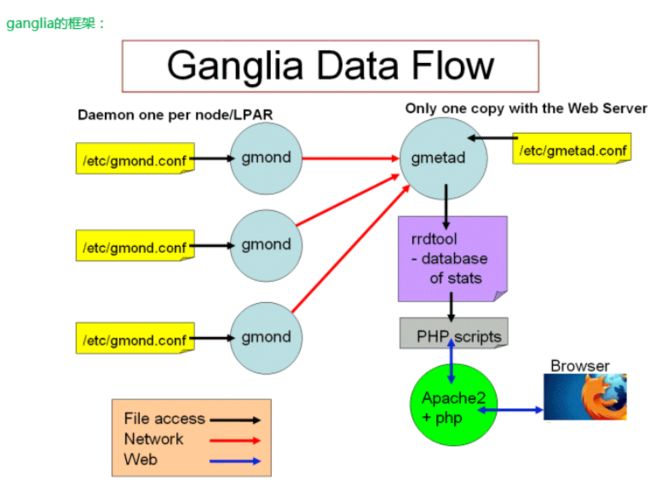
好记性不如烂笔头,一开始方法没对配置文件搞了很久,有必要记录下。
--------发现真好用特别是粘贴图片很方便!
Ganlia 简介
��Ganglia是一个监控服务器、集群的开源软件,能够用曲线图表现最近一个小时,最近一天,最近一周,最近一月,最近一年的服务器或者集群的cpu负载,内存,网络,硬盘等指标。Ganglia的强大在于:ganglia服务端能够通过一台客户端收集到同一个网段的所有客户端的数据,ganglia集群服务端能够通过一台服务端收集到它下属的所有客户端数据。
软件安装
服务端安装:
安装gmetad # yuminstall -y ganglia-gmetad ganglia-devel
安装依赖图形软件rrdtool # yum install -y rrdtool(先确认已卸载旧版本# yum erase rrdtool -y)
安装httpd服务器 # yum install -y httpd
安装ganglia-web及php #yum install -yganglia-web php
客户端安装:
安装gmond #yum install -y ganglia-gmond
软件安装目录说明
ganglia配置文件目录:/etc/ganglia
rrd数据库存放目录:/var/lib/ganglia/rrds
httpd主站点目录:/var/www/html
ganglia-web安装目录:/usr/share/ganglia
ganglia-web配置目录:/etc/httpd/conf.d/ganglia.conf
配置服务端(gmetad)
1.将ganglia-web的站点目录连接到httpd主站点目录# ln -s/usr/share/ganglia/ /var/www/html/
2.修改httpd主站点目录下ganglia站点目录的访问权限,将ganglia站点目录访问权限改为ganglia:ganglia # chown -R apache:apache/var/www/html/ganglia/# chmod -R 755 /var/www/html/ganglia/
3.修改rrd数据库存放目录访问权限 将rrd数据库存放目录访问权限改为ganglia:ganglia,这个是默认权限,也可以在gmetad中修改为root或nobody,这边做相应修改 # chown -R ganglia:ganglia/var/lib/ganglia/rrds/
4.修改ganglia-web的访问权限:# vi/etc/httpd/conf.d/ganglia.conf
Order deny,allow
#Deny from all
#Allow from 127.0.0.1
#Allow from ::1
Allow from all
# Allow from .example.com
将ganglia-web的站点目录连接到httpd主站点目录# ln -s/usr/share/ganglia/ /var/www/html/
修改httpd主站点目录下ganglia站点目录的访问权限,将ganglia站点目录访问权限改为ganglia:ganglia
# chown -R apache:apache/var/www/html/ganglia/
# chmod -R 755 /var/www/html/ganglia/
修改rrd数据库存放目录访问权限
将rrd数据库存放目录访问权限改为ganglia:ganglia,这个是默认权限,也可以在gmetad中修改为root或nobody,这边做相应修改
# chown -R ganglia:ganglia/var/lib/ganglia/rrds/
修改ganglia-web的访问权限:# vi/etc/httpd/conf.d/ganglia.conf
5.配置服务端 gmetad.conf
#vi /etc/ganglia/gmetad.conf  监听端口号(默认是8649)。
data_source "host118" 192.xxx.xxx.118:8649
rrd_rootdir "/var/lib/ganglia/rrds"
6.配置客户端 gmond.conf
# vi /etc/ganglia/gmond.conf globals内容可不做修改,
user = ganglia可以自行设置。
globals {
daemonize = yes
setuid = yes
user = ganglia
debug_level = 0
max_udp_msg_len = 1472
mute = no
deaf = no
allow_extra_data = yes
host_dmax = 86400 /*secs. Expires (removes from web interface) hosts in 1 day */
host_tmax = 20 /*secs */
cleanup_threshold = 300 /*secs */
gexec = no
send_metadata_interval = 0 /*secs */
}
cluster {
name = "host118"
owner = "unspecified"
latlong = "unspecified"
url = "unspecified"
}
udp_send_channel {
mcast_join = 239.2.11.71
port = 8649
ttl = 1
}
udp_recv_channel {
mcast_join = 239.2.11.71
port = 8649
bind = 239.2.11.71
retry_bind = true
# Size of the UDP buffer. If you are handling lots of metrics you really
# should bump it up to e.g. 10MB or even higher.
# buffer = 10485760
}
tcp_accept_channel {
port = 8649
# If you want to gzip XML output
gzip_output = no
}
异常情况:
查看错误日志
tail -f /var/log/httpd/error_log
异常1:
Errors were detected in your configuration.
DWOO compiled templates directory '/var/lib/ganglia/dwoo/compiled' is not writeable.
Please adjust $conf['dwoo_compiled_dir'].
DWOO cache directory '/var/lib/ganglia/dwoo/cache' is not writeable.
Please adjust $conf['dwoo_cache_dir'].
in /usr/share/ganglia/eval_conf.php on line 126
解决方法:
mkdir -p /var/lib/ganglia/dwoo/compiled
mkdir -p /var/lib/ganglia/dwoo/cache
chmod 777 /var/lib/ganglia/dwoo/compiled
chmod 777 /var/lib/ganglia/dwoo/cache
异常2:
Starting httpd: httpd: apr_sockaddr_info_get() failed for localhost2
httpd: Could not reliably determine the server's fully qualified domain name, using 127.0.0.1 for ServerName
vi /etc/httpd/conf/httpd.conf
ServerName = localhost:80
There was an error collecting ganglia data (127.0.0.1:8652): fsockopen error: Permission denied
There was an error collecting ganglia data (127.0.0.1:8652): fsockopen error: Permission denied
解决方法一:
关闭selinux:把SELINUX=enforcing改成SELINUX=disable;需要重启机器。
vi /etc/selinux/config
SELINUX=disable
解决方法二:
使用命令setenforce 0来关闭selinux而不需要重启,刷新页面,即可访问!但此方法只是权宜之计。想永久修改selinux设置,还是要使用方法一。
异常3:
虚拟机时间不同步可能会导致数据无法同步,解决方法:
rdate -s time-b.nist.gov && hwclock -w (永久性)
异常4:
centOS 6.5防火墙未关闭,导致windows无法访问web,解决方法:
关闭命令: service iptables stop
永久关闭防火墙:chkconfig iptables off
两个命令同时运行,运行完成后查看防火墙关闭状态
service iptables statu
访问连接:服务端IP/ganglia
自定义扩展:
利用 modpython.so 可执行python脚本扩展,安装方法
yum install -y ganglia-gmond-python.x86_64
vi /etc/ganglia/gmond.conf
include ("/etc/ganglia/conf.d/*.pyconf") 指定执行conf.d下面的所有python脚本。
进入/etc/ganglia/conf.d 添加insight.conf文件:
modules {
  module {
    name = "insight"  #与脚本名称相同
    language = "python" #执行脚本语言
  }
}

 collection_group {
  collect_every = 2
  time_threshold = 90

  metric {
    #这里的name值要与insight.py中的d1里的name保持一致
    name = "get_server_status"  #与脚本相应的名称相同
    title = "--server_status--."  #页面显示title
    value_threshold = 0
  }
}
进入/usr/lib64/ganglia/python_modules,添加insight.py脚本文件(metric_init,metric_cleanup):
import subprocess  #导入使用python包
descriptors = list()
def get_insight_status(name):
    cmd = 'ps -ef|grep insight-server'   #定义命令
    result = subprocess.Popen(cmd, shell=True, stdout=subprocess.PIPE)
    out, err = result.communicate()  #读取结果
    if out.__contains__('/insight-server'):
        return 1
    return 0

def metric_init(params):
    global descriptors
    d1 = {
        'name': 'get_insight_status',   #业务名称
        'call_back': get_insight_status,    #调用函数名称
        'time_max': 90,     # 最大调度间隔时间
        'value_type': 'uint',
        'units': 'C',
        'slope': 'both',
        'format': '%u',
        'description': 'service status',   #描述信息
        'groups': 'insight'     #所属模块
    }
    descriptors = [d1]
    return descriptors   #返回信息

def metric_cleanup():
    pass

    ```


