前言
因为公司项目需要,通过Unity做一个AR项目,并且整合到现有项目中,其中遇到了一些坑,也被很多人帮助过,特来记录一下,希望大家能少走一些弯路。
其中涉及到的开发工具及相关语言有
- Unity 5.6.1
- xcode 8.3.3
- Swift 3.1
- AR引擎 EasyAR 2.0
- cocoapods
参考案例
- 老外原版思路 How to use Unity 3D within an iOS app
- unity 整合到原生iOS项目(swift 2.3)
- 给我很大帮助的AmazingW大神,大部分核心东西都是从他那获取的
准备工作
因为项目中使用到了EasyAR的AR SDK,但并不是每个人都需要,所以有需要的请自行到EasyAR官网下载并注册成为开发者,目前最新版本为2.0(官方分为Basic和Pro两个版本),本项目使用的是Pro(包括以前的1.3.1版本其实都是类似的)。
开始
一. Unity导出iOS工程
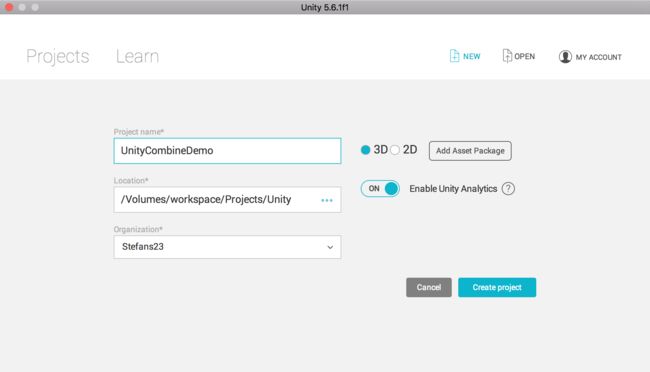
新建一个新的Unity工程
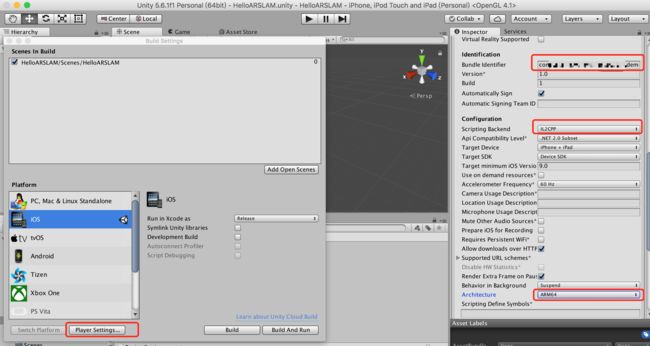
把从EasyAR官网下载的unitypackage包导入到项目中,由于EasyAR不是这里的重点,所以相关设置等请自行官网解决。设置完成后导出iOS工程
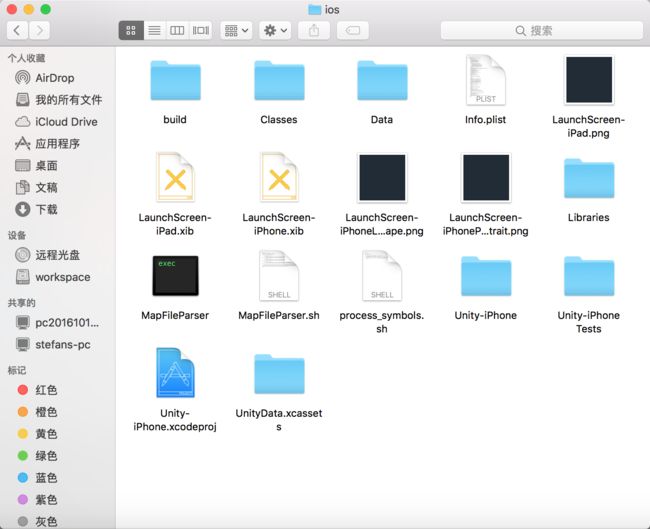
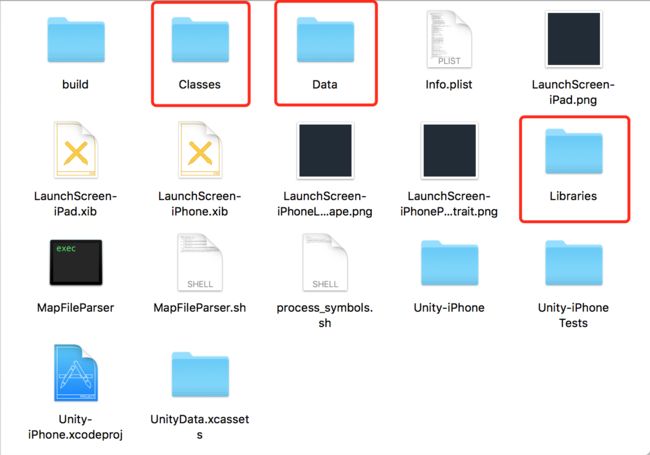
以下是导出成功的iOS工程(oc版本)
到这里Unity的工作就结束了,建议大家先运行导出的iOS工程看手机上是否正常。
二. 新建iOS工程(Swift3)
1. 添加Unity.xcconfig文件到项目
相关文件地址
//
//  Unity.xcconfig
//
//
//  Created by Stefans on 2017/6/14.
//  Copyright © 2016年 Stefans. All rights reserved.
//

UNITY_RUNTIME_VERSION = 5.6.1;
UNITY_SCRIPTING_BACKEND = il2cpp;
GCC_THUMB_SUPPORT = NO;
GCC_USE_INDIRECT_FUNCTION_CALLS = NO
UNITY_IOS_EXPORT_PATH = $(PROJECT_DIR)/unity_ios;
GCC_PREFIX_HEADER = $(UNITY_IOS_EXPORT_PATH)/Classes/Prefix.pch;

OTHER_LDFLAGS = -weak-lSystem -weak_framework CoreMotion -weak_framework GameKit -weak_framework iAd -framework CoreGraphics -framework AVFoundation -framework CoreVideo -framework CoreMedia -framework SystemConfiguration -framework CoreLocation -framework MediaPlayer -framework CFNetwork -framework AudioToolbox -framework OpenAL -framework QuartzCore -framework OpenGLES -framework UIKit -framework Foundation -liconv.2 -liPhone-lib;

HEADER_SEARCH_PATHS = $(inherited) $(UNITY_IOS_EXPORT_PATH) $(UNITY_IOS_EXPORT_PATH)/Classes $(UNITY_IOS_EXPORT_PATH)/Classes/Native $(UNITY_IOS_EXPORT_PATH)/Classes/UI $(UNITY_IOS_EXPORT_PATH)/Libraries $(UNITY_IOS_EXPORT_PATH)/Libraries/libil2cpp/include $(UNITY_IOS_EXPORT_PATH)/Libraries/bdwgc/include;
LIBRARY_SEARCH_PATHS = $(inherited) $(UNITY_IOS_EXPORT_PATH) $(UNITY_IOS_EXPORT_PATH)/Libraries $(UNITY_IOS_EXPORT_PATH)/Libraries/libil2cpp/include;

ENABLE_BITCODE = NO;

//请根据自己的项目修改
SWIFT_OBJC_BRIDGING_HEADER = $(PROJECT_DIR)/$(PRODUCT_NAME)/UnityBridge.h;

OTHER_CFLAGS = -DINIT_SCRIPTING_BACKEND=1;
CLANG_CXX_LANGUAGE_STANDARD = compiler-default;
CLANG_CXX_LIBRARY = libc++;
CLANG_WARN_BOOL_CONVERSION = NO;
CLANG_WARN_CONSTANT_CONVERSION = NO;
CLANG_WARN_DIRECT_OBJC_ISA_USAGE = YES;
CLANG_WARN_EMPTY_BODY = NO;
CLANG_WARN_ENUM_CONVERSION = NO;
CLANG_WARN_INT_CONVERSION = NO;
CLANG_WARN_OBJC_ROOT_CLASS = YES;
CLANG_WARN_UNREACHABLE_CODE = NO;
CLANG_WARN__DUPLICATE_METHOD_MATCH = NO;
GCC_C_LANGUAGE_STANDARD = c99;
GCC_ENABLE_OBJC_EXCEPTIONS = NO;
GCC_PRECOMPILE_PREFIX_HEADER = YES;
GCC_THUMB_SUPPORT = NO;
GCC_USE_INDIRECT_FUNCTION_CALLS = NO;
GCC_WARN_64_TO_32_BIT_CONVERSION = NO;
GCC_WARN_64_TO_32_BIT_CONVERSION[arch=*64] = YES;
GCC_WARN_ABOUT_RETURN_TYPE = YES;
GCC_WARN_UNDECLARED_SELECTOR = NO;
GCC_WARN_UNINITIALIZED_AUTOS = NO;
GCC_WARN_UNUSED_FUNCTION = NO;
GCC_NO_COMMON_BLOCKS = NO;
CLANG_ENABLE_MODULES = NO;

CLANG_WARN_DOCUMENTATION_COMMENTS = NO;

CLANG_WARN_EMPTY_BODY = NO;
CLANG_WARN_INFINITE_RECURSION = NO;
GCC_WARN_ABOUT_RETURN_TYPE = YES;
GCC_WARN_UNINITIALIZED_AUTOS = NO;
CLANG_WARN_UNREACHABLE_CODE = NO;

GCC_WARN_UNUSED_FUNCTION = NO;

CLANG_WARN__DUPLICATE_METHOD_MATCH = NO;

//CLANG_CXX_LANGUAGE_STANDARD = "c++0x";
下载Unity.xcconfig后如下图做相应配置
2. 添加UnityBridge.h UnityUtils.h UnityUtils.mm 到项目
//
//  UnityBridge.h
//
//  Created by Adam Venturella on 10/28/15.
//

#ifndef UnityBridge_h
#define UnityBridge_h

#import "UnityUtils.h"
#import "UnityAppController.h"
#import "Unity/UnityInterface.h"
#endif /* UnityBridge_h */


/**
 * Replacement Function for UnityAppController.h
 *
 */
/*
 NS_INLINE UnityAppController* GetAppController(){
 NSObject* delegate = [UIApplication sharedApplication].delegate;
 UnityAppController* currentUnityController = (UnityAppController *)[delegate valueForKey:@"currentUnityController"];
 return currentUnityController;
 }
 */
//
//  UnityUtils.h
//
//  Created by Adam Venturella on 10/28/15.
//

#ifndef UnityUtils_h
#define UnityUtils_h


void custom_unity_init(int argc, char* argv[]);

#endif /* UnityUtils_h */
//
//  UnityUtils.m
//
//  Created by Adam Venturella on 10/28/15.
//
// this is taken directly from the unity generated main.mm file.
// if they change that initialization, this will need to be updated
// as well.


#include "RegisterMonoModules.h"
#include "RegisterFeatures.h"
#include


// Hack to work around iOS SDK 4.3 linker problem
// we need at least one __TEXT, __const section entry in main application .o files
// to get this section emitted at right time and so avoid LC_ENCRYPTION_INFO size miscalculation
static const int constsection = 0;

void UnityInitTrampoline();


extern "C" void custom_unity_init(int argc, char* argv[])
{
    @autoreleasepool
    {
        UnityInitTrampoline();
//        UnityParseCommandLine(argc, argv); //Unity 5.3+
        UnityInitRuntime(argc, argv); //Unity 5.6+,5.4和5.5用哪个我没试过,可以根据报错情况选择。

        RegisterMonoModules();
        NSLog(@"-> registered mono modules %p\n", &constsection);
        RegisterFeatures();

        // iOS terminates open sockets when an application enters background mode.
        // The next write to any of such socket causes SIGPIPE signal being raised,
        // even if the request has been done from scripting side. This disables the
        // signal and allows Mono to throw a proper C# exception.
        std::signal(SIGPIPE, SIG_IGN);
    }
}

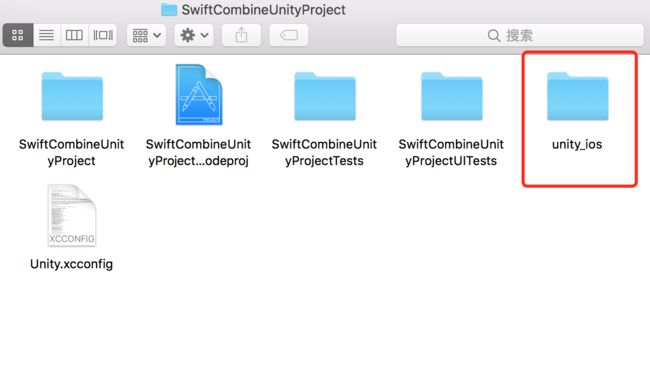
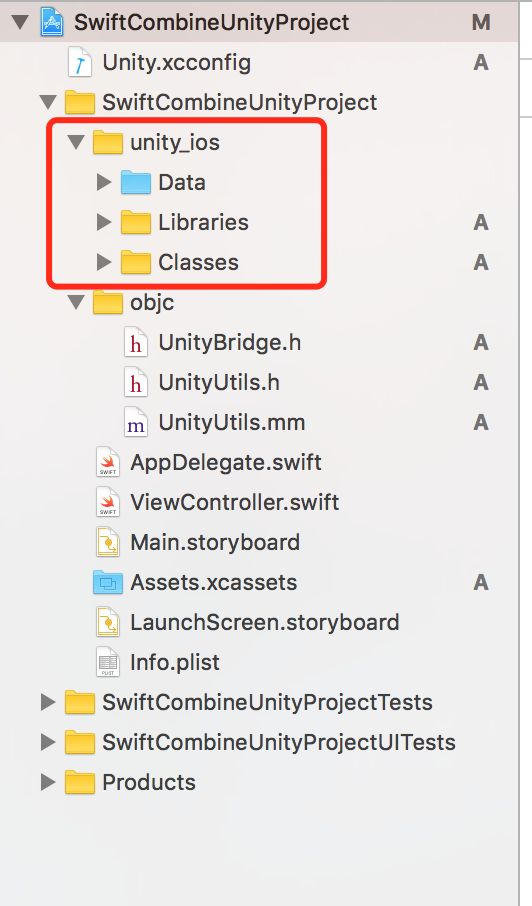
3. 将Unity导出的文件导入到xcode工程中
只需要导入Classes、Data、Libraries三个文件夹
新建文件夹并重命名为:unity_ios,把这三个文件夹拷贝进去

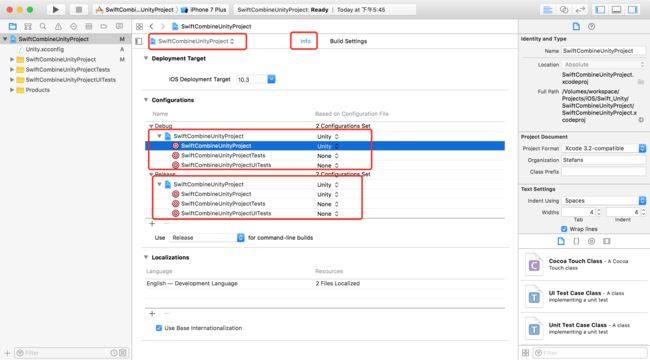
确认一下工程配置

以及更改下Unity_Runtime_Path为5.6.1(填写你自己的unity版本就好了)

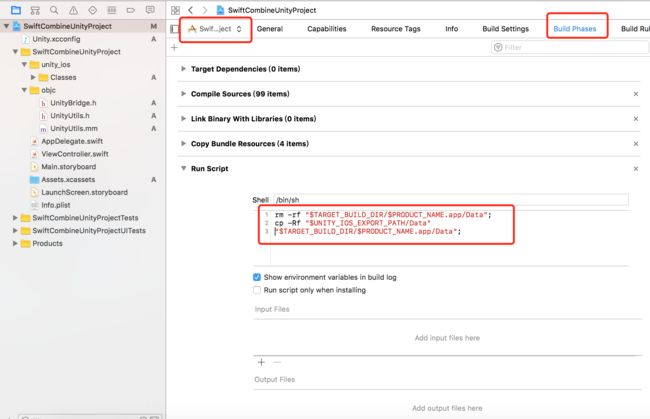
4. 添加Run Script到Build Phases
rm -rf "$TARGET_BUILD_DIR/$PRODUCT_NAME.app/Data";
cp -Rf "$UNITY_IOS_EXPORT_PATH/Data" "$TARGET_BUILD_DIR/$PRODUCT_NAME.app/Data";
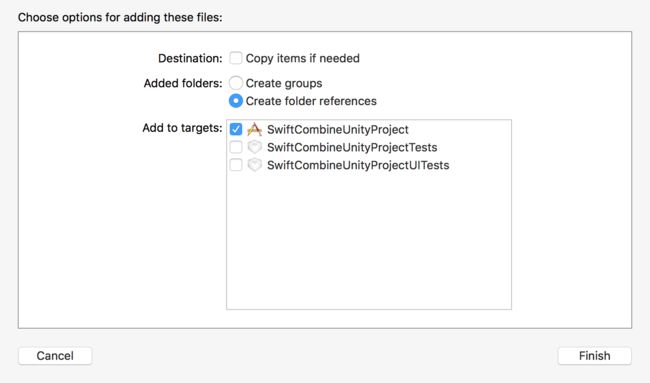
5. Classes、Data、Libraries文件导入到项目中
Classes, Libraries 设置 Create groups

Data 设置 Create folder references
原版里面建议删除一些引用,虽然会加快编译速度,但是每次更新都删除的话也是挺耗时的,所以如果有需要的话建议看看原版。
6. 变更Unity里的方法
找到main.mm
//int main(int argc, char* argv[])
//{
//    signed long long startTime = mach_absolute_time();
//    @autoreleasepool
//    {
//        UnitySetStartupTime(startTime);
//        UnityInitTrampoline();
//        UnityInitRuntime(argc, argv);
//
//        RegisterMonoModules();
//        NSLog(@"-> registered mono modules %p\n", &constsection);
//        RegisterFeatures();
//
//        // iOS terminates open sockets when an application enters background mode.
//        // The next write to any of such socket causes SIGPIPE signal being raised,
//        // even if the request has been done from scripting side. This disables the
//        // signal and allows Mono to throw a proper C# exception.
//        std::signal(SIGPIPE, SIG_IGN);
//
//        UIApplicationMain(argc, argv, nil, [NSString stringWithUTF8String: AppControllerClassName]);
//    }
//
//    return 0;
//}
//替换为
int main_unity_default(int argc, char* argv[])
{
    @autoreleasepool
    {
        UnityInitTrampoline();
//        UnityParseCommandLine(argc, argv); //Unity 5.3+
        UnityInitRuntime(argc, argv); //Unity 5.6+,5.4和5.5用哪个我没试过,可以根据报错情况选择。

        RegisterMonoModules();
        NSLog(@"-> registered mono modules %p\n", &constsection);
        RegisterFeatures();

        // iOS terminates open sockets when an application enters background mode.
        // The next write to any of such socket causes SIGPIPE signal being raised,
        // even if the request has been done from scripting side. This disables the
        // signal and allows Mono to throw a proper C# exception.
        std::signal(SIGPIPE, SIG_IGN);

        //UIApplicationMain(argc, argv, nil, [NSString stringWithUTF8String:AppControllerClassName]);
        //        UIApplicationMain(argc, argv, nil, NSStringFromClass([UnitySubAppDelegate class]));
        UIApplicationMain(argc, argv, nil, [NSString stringWithUTF8String:AppControllerClassName]);
    }

    return 0;
}
找到UnityAppController.h
//最上面添加
#import
//注释该方法
//inline UnityAppController*  GetAppController()
//{
//    return (UnityAppController*)[UIApplication sharedApplication].delegate;
//}
//替换为此方法
NS_INLINE UnityAppController* GetAppController()
{
    NSObject* delegate = [UIApplication sharedApplication].delegate;
    UnityAppController* currentUnityController = (UnityAppController *)[delegate valueForKey:@"currentUnityController"];
    return currentUnityController;
}
7. 修改自己的项目
找到AppDelegate.swift并作如下修改
//
//  AppDelegate.swift
//  SwiftCombineUnityProject
//
//  Created by Stefans on 2017/6/14.
//  Copyright © 2017年 Stefans. All rights reserved.
//

import UIKit

//注释@UIApplicationMain, 让swift从main.swift启动
//@UIApplicationMain
class AppDelegate: UIResponder, UIApplicationDelegate {
    var window: UIWindow?
    var currentUnityController: UnityAppController!

    func application(_ application: UIApplication, didFinishLaunchingWithOptions launchOptions: [UIApplicationLaunchOptionsKey: Any]?) -> Bool {
        currentUnityController = UnityAppController()
        currentUnityController.application(application, didFinishLaunchingWithOptions: launchOptions)

        window = UIWindow.init(frame: UIScreen.main.bounds)
        let sb = UIStoryboard.init(name: "Main", bundle: nil)
        let vc = sb.instantiateInitialViewController()
        window?.rootViewController = vc!;
        window!.makeKeyAndVisible()
        return true
    }

    func applicationWillResignActive(_ application: UIApplication) {
        currentUnityController.applicationWillResignActive(application)
    }

    func applicationDidEnterBackground(_ application: UIApplication) {
        currentUnityController.applicationDidEnterBackground(application)
    }

    func applicationWillEnterForeground(_ application: UIApplication) {
        currentUnityController.applicationWillEnterForeground(application)
    }

    func applicationDidBecomeActive(_ application: UIApplication) {
        currentUnityController.applicationDidBecomeActive(application)
    }

    func applicationWillTerminate(_ application: UIApplication) {
        currentUnityController.applicationWillTerminate(application)
    }
}
添加一个新的main.swift文件到项目
//
//  main.swift
//  SwiftCombineUnityProject
//
//  Created by Stefans on 2017/6/15.
//  Copyright © 2017年 Stefans. All rights reserved.
//

import Foundation
import UIKit

custom_unity_init(CommandLine.argc, CommandLine.unsafeArgv)

UIApplicationMain(
    CommandLine.argc,
    UnsafeMutableRawPointer(CommandLine.unsafeArgv)
        .bindMemory(
            to: UnsafeMutablePointer.self,
            capacity: Int(CommandLine.argc)),
    nil,
    NSStringFromClass(AppDelegate.self)
)
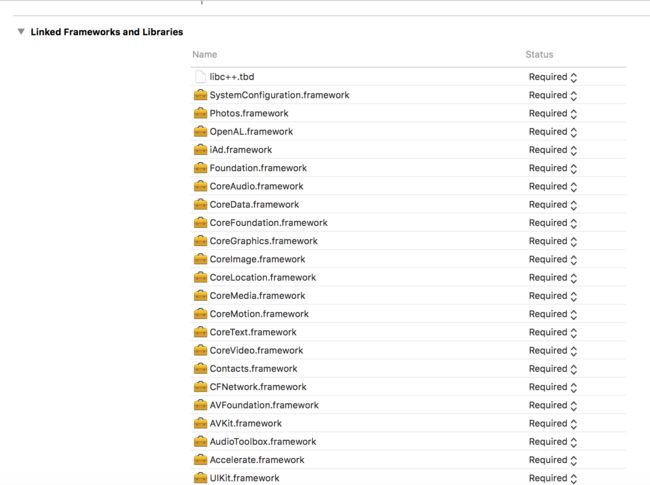
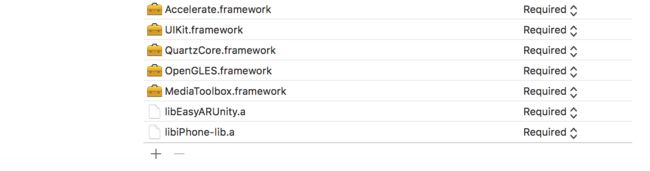
8. 添加依赖库
依赖库是最烦的,按照需求一个个添加吧,特别注意的是使用easyar或者其他ar sdk需要添加libc++.tbd ,其他的看项目。
9. 加载Unity View
//
//  ViewController.swift
//  SwiftCombineUnityProject
//
//  Created by Stefans on 2017/6/14.
//  Copyright © 2017年 Stefans. All rights reserved.
//

import UIKit

class ViewController: UIViewController {
    @IBAction func showUnity(_ sender: UIButton) {
        let unityview = UnityGetGLView()
        unityview?.frame = self.view.bounds;
        unityview?.center = self.view.center
        self.view.addSubview(unityview!)
        self.view.bringSubview(toFront: unityview!)
    }
}
完成之后就可连接真机调试了Let's GO!!!
三. 可能遇到的问题
- 目前该方式只支持真机调试,这点会有些不方便,特别是Unity本身不是完全核心,外面一层壳也有很多功能的时候
可以把Unity模块卸载掉,至于如何卸载,大家可以按照上面操作反向实验。
- 如果用到了AR SDK,会报错
大部分是因为没有给Camera权限,记得plist文件中给Camera的权限
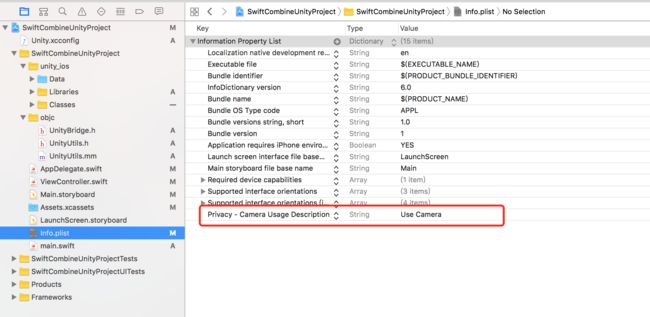 image.png
- 使用EasyAR可能会导致黑屏
在unity_ios/Libraries/Plugins/iOS/EasyARAppController.mm中找到以下代码,并复制到UnityAppController.mm中
extern "C" void ezarUnitySetGraphicsDevice(void* device, int deviceType, int eventType);
extern "C" void ezarUnityRenderEvent(int marker);
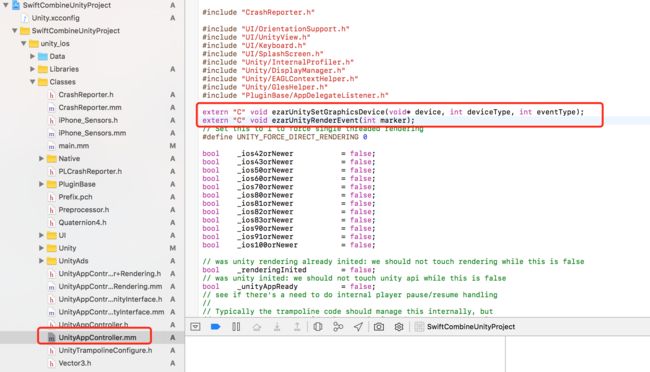
并在UnityAppController.mm中实现以下内容:
    UnityRegisterRenderingPlugin(&ezarUnitySetGraphicsDevice, &ezarUnityRenderEvent);
}```

##四. 大功告成
到此Unity项目就整合进我们的Swift3工程中了,因为Unity版本也一直在更新变化,所以有些小细节部分也会变化,包括最开始整合的是Unity5.3版本,到现在5.6版本发生了些变化,大家根据报错提示做适当修改即可。后续会继续把cocoapod整合进去。