EventBus 简介
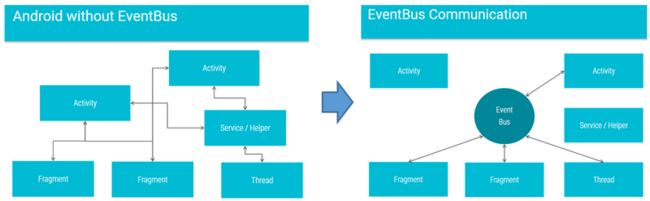
EventBus 直译过来就是事件总线,熟悉计算机原理的人一定很熟悉总线的概念,所有设备都连接到总线上,然后在总线控制器上注册一个地址,当接收到消息的时候,总线控制器就从自己地址列表中取出该地址,把这个消息转发给某个设备。所以这个是个典型的应用了发布-订阅设计模式的开源库,它使用起来非常方便,同时使代码简洁,减少了模块之间的耦合。
使用方法
1. 加入到你的项目中
Gradle:
compile 'org.greenrobot:eventbus:3.0.0'
Maven:
    org.greenrobot
    eventbus
    3.0.0
或者从Maven Center下载。
2. 基本概念:
在使用之前,有几个重要基本概念需要理解:
- Event
- Subscriber
- Publisher
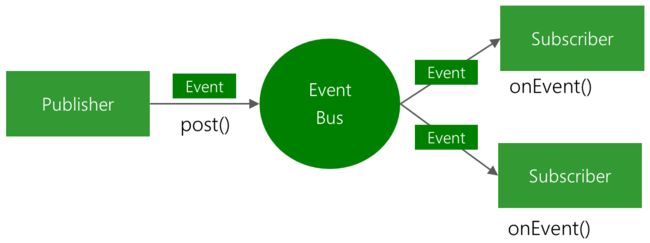
下面这幅图说明了这几者之间的关系:
2.1 Event
由client 调用publisher 发布,包含subscriber所需要的信息,可以定义成Object类的任何子类。如下所示:
public class SelectEvent {
    private List mProducts;
    public SelectEvent(List produtcts){
        mProducts = produtcts;
    }
    private List getProducts(){
        return mProducts;
    }
}
2.2 Publisher
负责分发event的主体。client 调用 EventBus 的 post(Object event) 方法,EventBus 就会开始调度,将event 分发到注册了并监听该 event 的 subscriber 中去。一般调用 EventBus 默认的单例。如下所示:
    List products = new ArrayList();
    ....//add item
    EventBus.getDefault().post(new SelectEvent(products));
2.3 Subscriber
接收和消费 event 的主体。当 client 调用了 post 方法发布了 event 后,EventBus 便开始遍历所有在其中注册的Subscriber , 查找 Subsriber 中的使用了 @Subscribe 注解的方法。使用方法如下所示:
public MainActivity extends Activity {
    @Override
    protected void onCreate(Bundle savedInstanceState) {
        super.onCreate(savedInstanceState);
        EventBus.getDefault().register(this);
    }

        @Override
    protected void onDestroy() {
        EventBus.getDefault().unregister(this);
        super.onDestroy();
    }

    @Subscribe
    public void onEvent(CategorySelectEvent event){
        if(event.getAction() == CategorySelectEvent.ACTION_SELECT){
            if(!selectedList.contains(event.getCategory())) {
                selectedList.add(event.getCategory());
            }
        } else if(event.getAction() == CategorySelectEvent.ACTION_DESELECT) {
            if(selectedList.contains(event.getCategory())) {
                selectedList.remove(event.getCategory());
            }
        }

        tvInfo.setText(String.format("已选择%s件商品",selectedList.size()));

    }
}
3. Subscribe 注解
@Subscribe 注解有三个属性可以设置:
- ThreadMode
- sticky
- priority
3.1 ThreadMode
ThreadMode 是 EventBus 中另外一个重要的概念。EventBus 中的 ThreadMode 分为以下几种:
- POSTING
- MAIN
- BACKGROUND
- ASYNC
我们将分别介绍这四种:
POSTING
在这种模式下,Subscriber 将和事件的发送方在同一个线程,默认的是这种模式。这种模式资源消耗小,不用请求主线程,避免了线程切换,所以最简单也是推荐的方式。事件处理器必须尽快返回,以免阻塞事件发布线程,因为发布线程很可能就是主线程。
MAIN
在这种模式下,Subscriber 在主线程中被调用,也就是 UI 线程。如果正好事件发送方也是主线程,事件处理器将被很快调用。同样的,事件处理器必须尽快返回,因为它在主线程中。
BACKGROUND
在这种模式下,Subscriber 在后台线程中被调用。如果发送线程不是主线程,事件处理器将会直接在发送线程中调用。如果发送线程是主线程,则会将其加入到队列中去,队列中的事件将会在后台线程中被顺序发送。在这种模式下,事件处理器必须尽快返回以免阻塞后台线程。
ASYNC
在这种模式下,事件处理方法将会在一个单独的线程中执行,不同于发送线程,也不同于主线程。如果事件处理方法要进行一些耗时的操作,如访问网络等,那就要使用这种模式。但是我们还是要避免同时使用太多一直运行的异步处理方法,来限制同时运行的线程。EventBus 使用了线程池来重用那些已经完成的异步事件处理的线程。
3.2 Sticky
调用postSticky方法发布的的事件会被缓存到内存中,当Subscriber被注册时,其中Sticky 属性设置为true的 SubscriberMethod 会被立即调用,event 对象会是上次最新更新的值。
3.3 Priority
用于标注 SubscriberMethod 的处理优先级。使用相同 ThreadMode 的 SubscriberMethod,优先级高的会被优先处理。
源码分析
看完了上面的简介之后,我们已经能简单的使用EventBus了,但是如果我们想使用一些高级的功能或者出了问题,我们就需要 read the fucking code 。
我们就从register 开始吧!
    public void register(Object subscriber) {
        Class subscriberClass = subscriber.getClass();
        List subscriberMethods = subscriberMethodFinder.findSubscriberMethods(subscriberClass); //从subscriber 中查找特定的方法
        synchronized (this) {
            for (SubscriberMethod subscriberMethod : subscriberMethods) {
                subscribe(subscriber, subscriberMethod); //将subscriber 和 其中的方法关联起来
            }
        }
    }
非常简单,从subscriber 中查找特定的方法,然后再将subsriber 和其中的方法关联起来。我们依次来看findSubscriberMethods 和 subscribe方法。
    List findSubscriberMethods(Class subscriberClass) {
        List subscriberMethods = METHOD_CACHE.get(subscriberClass);
        if (subscriberMethods != null) {
            return subscriberMethods;
        }

        if (ignoreGeneratedIndex) {
            subscriberMethods = findUsingReflection(subscriberClass);
        } else {
            subscriberMethods = findUsingInfo(subscriberClass);
        }
        if (subscriberMethods.isEmpty()) {
            throw new EventBusException("Subscriber " + subscriberClass
                    + " and its super classes have no public methods with the @Subscribe annotation");
        } else {
            METHOD_CACHE.put(subscriberClass, subscriberMethods);
            return subscriberMethods;
        }
    }
首先从 METHOD_CACHE 中获取这个list,如果找到这个 list 则直接返回。而这个METHOD_CACHE 其实就是一个hashMap:
private static final Map, List> METHOD_CACHE = new ConcurrentHashMap<>();
而ignoreGeneratedIndex 默认是false 的。所以我们来看看findUsingInfo 这个函数。
    private List findUsingInfo(Class subscriberClass) {
        FindState findState = prepareFindState();
        findState.initForSubscriber(subscriberClass);
        while (findState.clazz != null) {
            findState.subscriberInfo = getSubscriberInfo(findState);
            if (findState.subscriberInfo != null) {
                SubscriberMethod[] array = findState.subscriberInfo.getSubscriberMethods();
                for (SubscriberMethod subscriberMethod : array) {
                    if (findState.checkAdd(subscriberMethod.method, subscriberMethod.eventType)) {
                        findState.subscriberMethods.add(subscriberMethod);
                    }
                }
            } else {
                findUsingReflectionInSingleClass(findState);
            }
            findState.moveToSuperclass();
        }
        return getMethodsAndRelease(findState);
    }
prepareFindState 这个函数作用就是返回一个FindState对象,但是是从缓存中返回的,这样就能快速创建对象。而 getSubscriberInfo 这个函数我们进去会发现里面执行的都是 SubscriberInfo 和 SubscriberInfo 这两个接口的方法。但是这两个接口的实现我们却没在代码中找到,这是为啥呢? 我们先卖个关子,后面我们会介绍EventBus的另一个黑科技。按照我们前面介绍的方法使用EventBus的话,这个方法的返回值是null。所以代码会走到 findUsingReflectionInSingleClass这一个分支里面去。我们看看代码:
    private void findUsingReflectionInSingleClass(FindState findState) {
        Method[] methods;
        try {
            // This is faster than getMethods, especially when subscribers are fat classes like Activities
            methods = findState.clazz.getDeclaredMethods();
        } catch (Throwable th) {
            // Workaround for java.lang.NoClassDefFoundError, see https://github.com/greenrobot/EventBus/issues/149
            methods = findState.clazz.getMethods();
            findState.skipSuperClasses = true;
        }
        for (Method method : methods) {
            int modifiers = method.getModifiers();
            if ((modifiers & Modifier.PUBLIC) != 0 && (modifiers & MODIFIERS_IGNORE) == 0) {
                Class[] parameterTypes = method.getParameterTypes();
                if (parameterTypes.length == 1) {
                    Subscribe subscribeAnnotation = method.getAnnotation(Subscribe.class);
                    if (subscribeAnnotation != null) {
                        Class eventType = parameterTypes[0];
                        if (findState.checkAdd(method, eventType)) {
                            ThreadMode threadMode = subscribeAnnotation.threadMode();
                            findState.subscriberMethods.add(new SubscriberMethod(method, eventType, threadMode,
                                    subscribeAnnotation.priority(), subscribeAnnotation.sticky()));
                        }
                    }
                } else if (strictMethodVerification && method.isAnnotationPresent(Subscribe.class)) {
                    String methodName = method.getDeclaringClass().getName() + "." + method.getName();
                    throw new EventBusException("@Subscribe method " + methodName +
                            "must have exactly 1 parameter but has " + parameterTypes.length);
                }
            } else if (strictMethodVerification && method.isAnnotationPresent(Subscribe.class)) {
                String methodName = method.getDeclaringClass().getName() + "." + method.getName();
                throw new EventBusException(methodName +
                        " is a illegal @Subscribe method: must be public, non-static, and non-abstract");
            }
        }
    }
这个函数最重要的地方就是循环里,通过反射的方式,首先判断Subscriber的方法是不是 public 并且不是可以被忽略的(具体可以查看代码)的,如果是,再判断是不是有且只有一个参数。接下来就是判断是不是被@Subscribe 注解过的。如果是,再判断是不是添加过的了,如果不是,就加入到 findState.subscriberMethods 这个list 中去了。看到这里,我们就知道该怎么定义我们的回调函数了:
- 必须是public的,且不能是abstract、static、bridge 和synthetic的zhe。
- 参数只能有且只有一个。
- 必须被 @Subscribe 注解。
而且我们还了解到,可以在注解中设置ThreadMode、优先级以及是否是sticky的。
我们再回到register方法中。在获取到subscriber中的所有回调函数之后,便依次调用 subcribe方法来完成注册。
    private void subscribe(Object subscriber, SubscriberMethod subscriberMethod) {
        Class eventType = subscriberMethod.eventType;
        Subscription newSubscription = new Subscription(subscriber, subscriberMethod);
        CopyOnWriteArrayList subscriptions = subscriptionsByEventType.get(eventType);
        if (subscriptions == null) {
            subscriptions = new CopyOnWriteArrayList<>();
            subscriptionsByEventType.put(eventType, subscriptions);
        } else {
            if (subscriptions.contains(newSubscription)) {
                throw new EventBusException("Subscriber " + subscriber.getClass() + " already registered to event "
                        + eventType);
            }
        }

        int size = subscriptions.size();
        for (int i = 0; i <= size; i++) { //subscriptions是一个按照优先级大小顺序存储的list , 将新的Subscription插入到正确的位置
            if (i == size || subscriberMethod.priority > subscriptions.get(i).subscriberMethod.priority) {
                subscriptions.add(i, newSubscription);
                break;
            }
        }

        List> subscribedEvents = typesBySubscriber.get(subscriber);
        if (subscribedEvents == null) {
            subscribedEvents = new ArrayList<>();
            typesBySubscriber.put(subscriber, subscribedEvents);
        }
        subscribedEvents.add(eventType);

        if (subscriberMethod.sticky) {
            if (eventInheritance) {
                // Existing sticky events of all subclasses of eventType have to be considered.
                // Note: Iterating over all events may be inefficient with lots of sticky events,
                // thus data structure should be changed to allow a more efficient lookup
                // (e.g. an additional map storing sub classes of super classes: Class -> List).
                Set, Object>> entries = stickyEvents.entrySet();
                for (Map.Entry, Object> entry : entries) {
                    Class candidateEventType = entry.getKey();
                    if (eventType.isAssignableFrom(candidateEventType)) {
                        Object stickyEvent = entry.getValue();
                        checkPostStickyEventToSubscription(newSubscription, stickyEvent);
                    }
                }
            } else {
                Object stickyEvent = stickyEvents.get(eventType);
                checkPostStickyEventToSubscription(newSubscription, stickyEvent);
            }
        }
    }
这个函数的作用就是把我们之前获取到的信息放到两个 hashMap 中去。第一个是 subscriptionsByEventType, 它的 key 是eventType,value 是一个存储了 Subscription 的 list,Subscription包含了subscriber 和 subscriberMethod。第二个是typesBySubscriber,它的 key 是Subscriber,value 是一个存储了 eventType 的 list 。用于记录哪些Subscriber被注册了,以便在取消注册的时候依次快速注销subscriptionsByEventType 中与之对应的Event。
看完了 register ,我们再来看 post 吧!废话不多说,上代码:
public void post(Object event) {
PostingThreadState postingState = currentPostingThreadState.get();
List这里用了一个ThreadLocal 类型的 currentPostingThreadState。它首先把event加到eventQueue中,再判断当前线程是不是在正在post。如果不是,就依次把eventQueue 中的 event 发布出去。我们再去postSingleEvent看看它是怎么做的:
    private void postSingleEvent(Object event, PostingThreadState postingState) throws Error {
        Class eventClass = event.getClass();
        boolean subscriptionFound = false;
        if (eventInheritance) {
            List> eventTypes = lookupAllEventTypes(eventClass);
            int countTypes = eventTypes.size();
            for (int h = 0; h < countTypes; h++) {
                Class clazz = eventTypes.get(h);
                subscriptionFound |= postSingleEventForEventType(event, postingState, clazz);
            }
        } else {
            subscriptionFound = postSingleEventForEventType(event, postingState, eventClass);
        }
        if (!subscriptionFound) {
            if (logNoSubscriberMessages) {
                Log.d(TAG, "No subscribers registered for event " + eventClass);
            }
            if (sendNoSubscriberEvent && eventClass != NoSubscriberEvent.class &&
                    eventClass != SubscriberExceptionEvent.class) {
                post(new NoSubscriberEvent(this, event));
            }
        }
    }
首先根据eventType 找到所有eventType 和 它的父类们,然后依次调用 postSingleEventForEventType。这个方法很简单,就是根据 event 的的 class 从我们之前介绍过的 subscriptionsByEventType 找到对应的 list。然后依次对 list 中的每个元素执行 postToSubscription 方法:
    private void postToSubscription(Subscription subscription, Object event, boolean isMainThread) {
        switch (subscription.subscriberMethod.threadMode) {
            case POSTING:
                invokeSubscriber(subscription, event);
                break;
            case MAIN:
                if (isMainThread) {
                    invokeSubscriber(subscription, event);
                } else {
                    mainThreadPoster.enqueue(subscription, event);
                }
                break;
            case BACKGROUND:
                if (isMainThread) {
                    backgroundPoster.enqueue(subscription, event);
                } else {
                    invokeSubscriber(subscription, event);
                }
                break;
            case ASYNC:
                asyncPoster.enqueue(subscription, event);
                break;
            default:
                throw new IllegalStateException("Unknown thread mode: " + subscription.subscriberMethod.threadMode);
        }
    }
这里就是我们之前介绍ThreadMode的时候说过的,根据subscriberMethod的 ThreadMode 来调用相应的Poster 来发布事件。backgroundPoster,mainThreadPoster 和asyncPoster 都维护一个PendingPost队列,当前线程有未处理完的post的时候都将其加入队列中。其中backgroundPoster 和 asyncPoster 共用一个newCachedThreadPool 类型的线程池 。
下图是 EventBus 的架构图
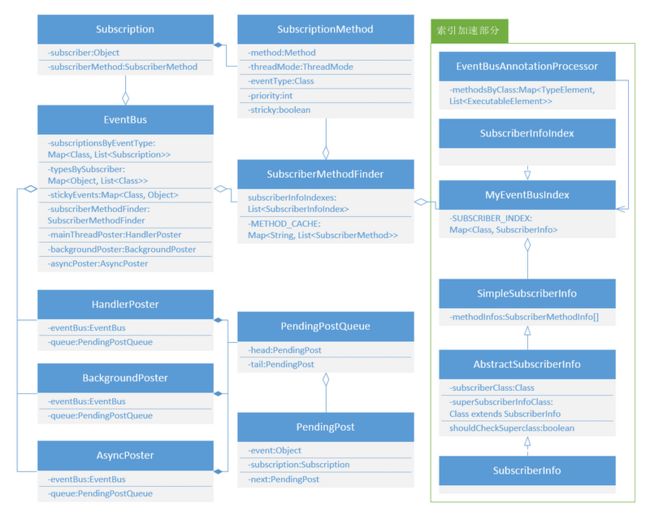
索引加速
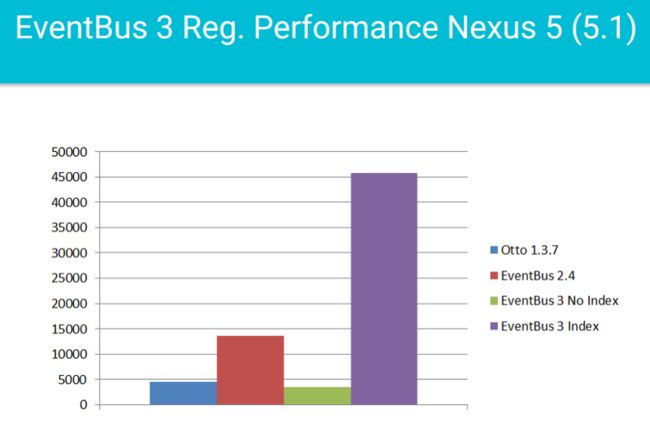
我们在前面留了一个悬念,说EventBus 用了一项黑科技。上面的这个架构图中的右侧部分就是这项黑科技。使用索引加速后,能极大的提高索引速度,下面这张图来自作者的博客。
应用索引加速
前面介绍了这个黑科技多么牛X,相信你已经跃跃欲试了。那我们就开始来介绍怎么使用吧!
- 因为注解解析依赖于android-apt-plugin,所以我们首先在项目的 gradle 的 dependencies 中加入 apt 编译插件:
classpath 'com.neenbedankt.gradle.plugins:android-apt:1.8'
- 在 App 的 build.gradle 中应用apt插件,并设置apt生成的索引的包名和类名,eventBusIndex的值是由你指定的,编译成功后就会生成一个 MyEventBusIndex.java 文件:
apply plugin: 'com.neenbedankt.android-apt'
apt {
    arguments {
        eventBusIndex "com.daniex.demoApp.MyEventBusIndex"
    }
}
- 接着我们在 App 的 dependencies 中引入 EventBusAnnotationProcessor :
apt 'org.greenrobot:eventbus-annotation-processor:3.0.1'
- 编译一次,就会在{ApplicationName}/build/generated/apt/{packagename} 目录下生成 MyEventBusIndex.java 。要应用我们刚刚生成的index,我们可以通过以下方法:
EventBus mEventBus = EventBus.builder().addIndex(new MyEventBusIndex()).build();
如果你不想每次都写这么冗长的代码,你可以在你的 application 类中把我们刚刚生成的索引设置为默认的:
EventBus.builder().addIndex(new MyEventBusIndex()).installDefaultEventBus();
在其他地方我们可以像平常一样用 EventBus.getDefault() 来获取默认实例了。
下面就是通过索引加速生成的代码:
/** This class is generated by EventBus, do not edit. */
public class EventBusIndex implements SubscriberInfoIndex {
    private static final Map, SubscriberInfo> SUBSCRIBER_INDEX;

    static {
        SUBSCRIBER_INDEX = new HashMap, SubscriberInfo>();

        putIndex(new SimpleSubscriberInfo(com.dili.posandroid.activity.ChooseCategoryActivity.class, true,
                new SubscriberMethodInfo[] {
            new SubscriberMethodInfo("onSelcted", com.dili.posandroid.event.CategorySelectEvent.class),
        }));

    }

    private static void putIndex(SubscriberInfo info) {
        SUBSCRIBER_INDEX.put(info.getSubscriberClass(), info);
    }

    @Override
    public SubscriberInfo getSubscriberInfo(Class subscriberClass) {
        SubscriberInfo info = SUBSCRIBER_INDEX.get(subscriberClass);
        if (info != null) {
            return info;
        } else {
            return null;
        }
    }
}
生成索引加速的原理,我们必须的看 EventBusAnnotationProcessor.java 源码:
@SupportedAnnotationTypes("org.greenrobot.eventbus.Subscribe")
@SupportedOptions(value = {"eventBusIndex", "verbose"})
public class EventBusAnnotationProcessor extends AbstractProcessor {
    /** Found subscriber methods for a class (without superclasses). 被注解表示的方法信息 */
    private final ListMap methodsByClass = new ListMap<>();
    private final Set classesToSkip = new HashSet<>(); // checkHasErrors检查出来的异常方法

    @Override
    public boolean process(Set annotations, RoundEnvironment env) {
        Messager messager = processingEnv.getMessager();
        try {
            String index = processingEnv.getOptions().get(OPTION_EVENT_BUS_INDEX);
            if (index == null) { // 如果没有在gradle中配置apt的argument,编译就会在这里报错
                messager.printMessage(Diagnostic.Kind.ERROR, "No option " + OPTION_EVENT_BUS_INDEX +
                        " passed to annotation processor");
                return false;
            }
            /** ... */
            collectSubscribers(annotations, env, messager); // 根据注解拿到所有订阅者的回调方法信息
            checkForSubscribersToSkip(messager, indexPackage); // 筛掉不符合规则的订阅者
            if (!methodsByClass.isEmpty()) {
                createInfoIndexFile(index); // 生成索引类
            }
            /** 打印错误 */
    }

    /** 下面这些方法就不再贴出具体实现了,我们了解它们的功能就行 */
    private void collectSubscribers // 遍历annotations,找出所有被注解标识的方法,以初始化methodsByClass
    private boolean checkHasNoErrors // 过滤掉static,非public和参数大于1的方法
    private void checkForSubscribersToSkip // 检查methodsByClass中的各个类,是否存在非public的父类和方法参数
    /** 下面这三个方法会把methodsByClass中的信息写到相应的类中 */
    private void writeCreateSubscriberMethods
    private void createInfoIndexFile
    private void writeIndexLines
}
结语
每当我们看到项目中 activity 之间,看到activity 跟 Fragment 、activity 跟adapter之间互相调用,强制转换,高度耦合,像一团乱麻的时候,心里总是忍不住骂一句:WTF ! EventBus 高效、简洁和极易入门的特性让人着迷。有了它,妈妈再也不会担心我写出像一坨翔一样的代码了。