对于一个事件处理的过程其实很好奇,不是特别理解响应者链的实现原理,所以接下来几周我将对事件相关实现进行学习,并且归纳总结成几篇文章进行分享。
1. UIEvent 事件管理者
2. UIResponder 响应者
1.UIEvent 事件管理者
UIEvent官方文档
在看官方文档之前,我对"事件"这个概念就只包括触摸和动作(摇一摇等),事实上官方文档中对于事件的类型概况分为四类:
并且对事件的类型还进行了子类型的划分---subtype。其实对于UIEvent就是对各类事件的管理者,下面将以事件的type类型来分别说明:
1.1 touch事件 --UIEventTypeTouches
UITouch官方文档
touch 事件在项目中是最常使用的一类事件。UITouch类就是代表一个手指或者苹果触笔在屏幕中所引发的互动。
既然touch事件是由用户主动触摸触发的,所以UITouch类的所有属性都是用来记录并且解释用户的行为。较值得注意的属性包括:
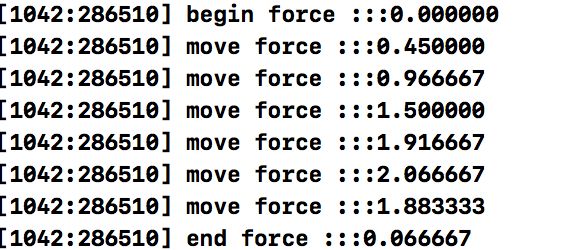
①force:对于触摸而言触发系统更新touch内部数据的原因不仅仅是移动还包括对压力的改变,其中3D Touch 就是监控用户压力的改变所触发不同的阶段。
②view:指的是用户直观触摸的位置最上层的视图。举例而言:当我点击一个自定义的RedView的实例redView时,虽然RedView类内部并没有做事件的处理,但是该属性仍会显示RedView类信息。
③timestamp:指的是事件相对系统启动的时间戳(以秒为单位),我一开始以为这是一个基于应用或者1970年的时间相对时间戳,但是不是,它是基于系统启动的时间而计算的,一般用来记录duration(事件发生的间隔)或者速度等,所以不要直接的使用该值。
对于该事件而言,只有触摸这一类型,并没有子类型而言,所以直接标记为UIEventSubtypeNone。
1.2 motion 事件 --UIEventTypeMotion
对于运动事件而言,很多人都知道就是包括accelerometers(加速计), gyroscopes(陀螺仪), and magnetometer (磁强计)等的Core Motion库框架的使用,但是官方文档中明确的强调了:
Motion events are UIKit triggered and are separate from the motion events
reported by the Core Motion framework。
UIKit触发的运动事件区别于Core Motion库中的运动事件
是因为Core Motion库中的事件直接由Core Motion内部进行处理,并不会通过响应者链。所以UIKit触发的运动事件指的是UIEvent类型中的UIEventTypeMotion,暂时只包括摇一摇UIEventSubtypeMotionShake。
1.3 Press 事件 --UIEventTypePresses
UIPress 事件官方文档
Press事件类似于UIButton的
addTarget:<#(nullable id)#> action:<#(nonnull SEL)#> forControlEvents:<#(UIControlEvents)#>
监听事件,但是这里所说的Button是一种物理真实存在的按钮.例如一个游戏的手柄,电视的遥控器等。
Press events represent interactions with a game controller, AppleTV remote, or other device that has physical buttons。
按压事件代表了对一个游戏控制器,苹果TV远程,或其他有物理按钮的设备之间的交互。
所以对于iPhone的手机而言在没有物理按键连接的情况下,是无法触发该事件的,不要再认为这是咱们应用界面中绘制按钮UIButton的另一种监听方法了。
既然是物理按钮的监控,那么类型跟游戏的控制方式一致:
//向上的键被按压
UIPressTypeUpArrow
//向下的键被按压
UIPressTypeDownArrow
//向左的键被按压
UIPressTypeLeftArrow
//向右的键被按压
UIPressTypeRightArrow
//"选择"键被按压
UIPressTypeSelect
//"菜单"键被按压
UIPressTypeMenu
//播放/暂停 键被按压
UIPressTypePlayPause
1.4 remote-control 事件
Remote-control events allow a responder object to receive commands from
 an external accessory or headset so that it can manage manage audio and
video—for example, playing a video or skipping to the next audio track
远程控制事件运行一个响应者接受从一个外部配件或者手机来的命令以便于管理音频和视频 -- 举例
而言,播放一个视频或者跳过下一个音频。
正如官方文档中所言,当我们想要使用耳机控制音频的播放情况时,使用该事件进行想要按键的监听。
UIEventSubtypeRemoteControlPlay
UIEventSubtypeRemoteControlPause
UIEventSubtypeRemoteControlStop
UIEventSubtypeRemoteControlTogglePlayPause
UIEventSubtypeRemoteControlNextTrack
UIEventSubtypeRemoteControlPreviousTrack
UIEventSubtypeRemoteControlBeginSeekingBackward
UIEventSubtypeRemoteControlEndSeekingBackward
UIEventSubtypeRemoteControlBeginSeekingForward
UIEventSubtypeRemoteControlEndSeekingForward
在介绍完了UIEvent事件类型之后,应该进入有关于事件响应者的部分了:
2. UIResponder 响应者
当用户触发事件后,UIResponder响应者进行相关操作的监听和响应,其中一定要明确的是:
①所有的UIView的子类都能成为响应者的。
@interface UIView : UIResponder
UIView继承于UIResponder,所以每一个UIView的子类控件都能对事件进行响应
②响应者链
当用户在屏幕中触发一个事件时,系统自动的由下至上找到包括事件触发位置的视图,直到找到无法触发的视图,所以无法触发的视图指的是:
1. 界面不可视的视图
view objects that are hidden, or have an alpha level less than 0.01.
当视图被隐藏,或者设置的透明度值少于等于0.01时
类似于以下的一种情况:
    redView.hidden = YES;
    redView.alpha = 0.01;
2.视图被禁止用户交互
redView.userInteractionEnabled = NO;
3.视图未设置clipsToBounds=NO时,子视图超过的部分
举例而言:
    RedView *redView=  [[RedView alloc] initWithFrame:CGRectMake(10, 100, 200, 200)];
    [self.view addSubview:redView];

    BlueView *blueView = [[BlueView alloc] initWithFrame:CGRectMake(10, 100, 300, 300)];
    [redView addSubview:blueView];
blueView作为redView的子视图,大小已经超过了redView。但是由于redView并没有将clipsToBounds设置为NO,所以界面中blueView可以完整的显示。但是系统会将blueView完整的放入响应者链中吗?
当我触摸redView大小范围内的blueView时,打印的是blueView内部的响应方法,证明该部分的blueView被加入响应者链中。
当我触摸redView大小范围外的blueView时,打印的是主viewController的响应方法,说明该部分的blueView并没有加入响应者链中。
分析完什么能加入响应者链中之后,在响应链最上方的也就是系统判断事件发生最上层的view,即为第一响应者,系统会首先将事件分派给该view进行处理。为了更好的理解说明,我将以两个示例的方式进行:
2.1例一:将lZRedView类的实例redView添加到ViewController中。
①在redView中什么都不处理的话,只有单纯的界面处理
系统会自动将redView中无法处理的事件顺着响应链传递给它的父类ViewController的view中进行处理
②在lZRedView中添加对touch的处理方法
-(void)touchesBegan:(NSSet *)touches withEvent:(UIEvent *)event {
    NSLog(@"lZRedView -----Began");
}
-(void)touchesMoved:(NSSet *)touches withEvent:(UIEvent *)event {
    NSLog(@"lZRedView -----Moved");
}
-(void)touchesEnded:(NSSet *)touches withEvent:(UIEvent *)event {
    NSLog(@"lZRedView -----Ended");
}
很显然,系统判断该事件的响应者为redView,并不会将事件转发给响应者链中的其他对象。
这是一个很好理解的地方,但是有一个很容易忽略的问题,在官方文档中有一段说明:
UIKit calls this method when a new touch is detected in a view or window.
Many UIKit classes override this method and use it to handle the
corresponding touch events. The default implementation of this method forwards the message up the responder chain. When creating your own subclasses, call super to
forward any events that you do not handle yourself. For example,
[super touchesBegan:touches withEvent:event];
If you override this method without calling super (a common use pattern),
you must also override the other methods for handling touch events, even if
 your implementations do nothing.
简单而言就是:如果你不想要该类处理事件但是还在该类中重写了touchBegin、move或者end方法的话,你能在这些方法中调用super,如:
[super touchesBegan:touches withEvent:event]; -->在begin方法中将事件转发出去。
但是有一点要注意:
如果你在该类中重写了begin和end两个以上的方法,只在end中进行了super的调用,事件不会转发出去的。
原因是touch事件执行顺序是从begin开始,如果重写了begin方法但是并没有在begin中调用super进行事件的转发,系统处理到begin的时候就会认为是该类想要自己处理事件。
所以如果你想要在自定义的view中处理或者监听移动的状态后转发,一定要安装你重写顺序的第一个方法中就转发。
例二:2.2自定义一个lZTextView,将lzTextView实例添加到ViewController中
对于输入类型的视图而言,有基本的两个判断:是否能成为第一响应者,如果是第一响应者该显示什么内容?
①是否是第一响应者
对于此类型的视图而言,不需要重写begin、move和end等方法,因为这几个方法主要以监听状态为主。而我们的目的只是要在视图成为第一响应者的时候如添加一个高亮的显示。
//系统首先会判断该视图是否能变成第一响应者,默认为NO
-(BOOL)canBecomeFirstResponder {
    return YES;
}
//在判断视图能成为第一响应者之后,可以在该方法中处理一些视图的显示操作。
-(BOOL)becomeFirstResponder {
    [super becomeFirstResponder];
    NSLog(@"这是一些高亮的选择");
    self.layer.backgroundColor =[ UIColor blackColor].CGColor;
    return YES;
}
② 当成为第一响应者之后,该显示什么内容
很多应用在点击输入之后,会弹出自定义的键盘,其实就是通过设置UIResponder响应者的inputView属性:
inputView
The custom input view to display when the receiver becomes the
first responder.
当接收者成为第一响应者的时候自定义的输入视图将会显示
如果想在系统键盘或者自定义的inputView上添加一个附加的视图控制,通过设置UIResponder响应者的inputAccessoryView属性:
If you want to attach custom controls to a system-supplied input view (such as the system keyboard) or to a custom input view (one you provide in the inputView property),You can then use this property to manage a custom accessory view.
转化成代码就是:
       UIView *view = [[UIView alloc] initWithFrame:CGRectMake(0, 0, [UIScreen mainScreen].bounds.size.width, 300)];
        view.backgroundColor = [UIColor redColor];

        UILabel *label = [[UILabel alloc] initWithFrame:CGRectMake(0, 10, frame.size.width, 100)];
        label.textColor = [UIColor whiteColor];
        label.text = @"我是键盘";
        [view addSubview:label];

        self.inputView = view;

        UIView *downView = [[UIView alloc] initWithFrame:CGRectMake(0, 0, [UIScreen mainScreen].bounds.size.width, 60)];
        downView.backgroundColor = [UIColor blackColor];

        UIButton *downBtn = [UIButton buttonWithType:UIButtonTypeCustom];
        [downBtn setBackgroundColor:[UIColor redColor]];
        [downBtn setFrame:CGRectMake(0, 20, 80, 40)];
        [downView addSubview:downBtn];
        [downBtn setTitle:@"收起键盘" forState:UIControlStateNormal];

        [downBtn addTarget:self action:@selector(downViewPressed) forControlEvents:UIControlEventTouchUpInside];

        self.inputAccessoryView = downView;
注意一点的是:设置的inputView和inputAccessoryView大小就是真实弹出的大小,并不会默认为系统键盘相关的默认大小。
其实对于UIEvent和UIResponder而言使用的很频繁,但是细节点还是值得注意的,下一篇文章我会具体的讲解手势识别器和响应者链识别的实现细节。


