Sprite Kit 是iOS 7开始添加的一个新内置框架。主要用于开发2D游戏。支持内容包括 精灵、各种特效(视频、滤镜遮罩),继承了物理引擎等许多内容。
SpriteKit常用的类:
SKSpriteNode ----- 用于绘制精灵的纹理
SKVideoNod ----- 用于播放视频
SKLabelNode ----- 用于渲染文本
SKShapeNode ----- 用于渲染基于Core Graphics 路径的形状
SKEmitterNode ----- 用于创建和渲染粒子系统
SKCropNode ----- 用于使用遮罩来裁剪子节点
SKEffectNode ----- 用于使用遮罩来裁剪子节点
简单介绍一下SpriteKit,下面介绍开始spriteKit 中基础类的使用。
SKScene 场景
使用SKScene之前先说一下SKView,SKView 类是专门用来呈现Sprite Kit 的View,在这个类中可以渲染和管理一个SKScene,每个Scene中可以加载多个精灵,Scene可以管理精灵的行为。
导入SpriteKit 创建SKScene:
func createScene() {
        let skView = SKView.init(frame: self.view.bounds)
        if(skView.scene == nil){
            skView.showsFPS = true
            skView.showsNodeCount = true
            let scene = GameScene(size: skView.bounds.size)
            skView.presentScene(scene)
        }
        self.view.addSubview(skView)
    }
在使用时,一般会将Scene子类化,在子类中设置它的属性。在游戏中都会有多个场景,就会有场景切换,单纯的场景切换会显得非常生硬,所以SpriteKit中提供了过度动画。
crossFadeWithDuration 交叉淡入淡出过渡动画
doorsCloseHorizontalWithDuration 从左右两边水平关闭
doorsCloseVerticalWithDuration 从上下两边垂直关闭
doorsOpenHorizontalWithDuration 从中间向左右两边水平打开
doorsOpenVerticalWithDuration 从中间向左右两边垂直打开
doorwayWithDuration 从中间向两边打开,新场景从后方向屏幕靠近
fadeWithColor 淡入淡出的过渡动画,先变成指定颜色,再变成目标场景
fadeWithDuration 淡入淡出的过渡动画,先变成黑色,再变成指定颜色
flipHorizontalWithDuration 以水平中轴线垂直翻转
flipVerticalWithDuration 以垂直中中轴线水平翻转
movenInWithDirection 新场景从指定方向移入
pushWithDirection 新场景从指定方向推入
revealWithDirection 旧场景向指定方向移除,新场景在旧场景下面
使用:skView.presentScene(scene, transition:SKTransition)
SKSpriteNode 精灵
精灵分为有纹理精灵和无纹理精灵,纹理精灵是常用的,是我们把插图放到场景中的方法,像游戏中的任务角色和背景等。
使用方法,创建精灵:
let KScreenWidth = UIScreen.main.bounds.width
let KScreenHeight = UIScreen.main.bounds.height
func addNode() {
        let texture = SKTexture.init(imageNamed: "ao.jpg")  // 纹理
        let splash = SKSpriteNode.init(texture: texture)
//        let splash = SKSpriteNode.init(imageNamed: "ao.jpg")
        splash.size = CGSize.init(width: KScreenWidth, height: KScreenHeight)
        splash.position = CGPoint.init(x: KScreenWidth/2, y: KScreenHeight/2)
        // 设置锚点
//        splash.anchorPoint = CGPoint.init(x: 0.0, y: 0.0)
        // 精灵着色
        splash.color = SKColor.green
        splash.colorBlendFactor = 0.3   // 颜色混合因子0~1
        splash.setScale(2)  // 缩放 放大两倍
//        splash.xScale = 2   // 单独缩放x
        splash.zRotation = CGFloat(Double.pi)/2  // 旋转
        splash.alpha = 0.5
        splash.isHidden = false
        self.addChild(splash)

//        splash.removeFromParent()
//        removeAllChildren()
    }
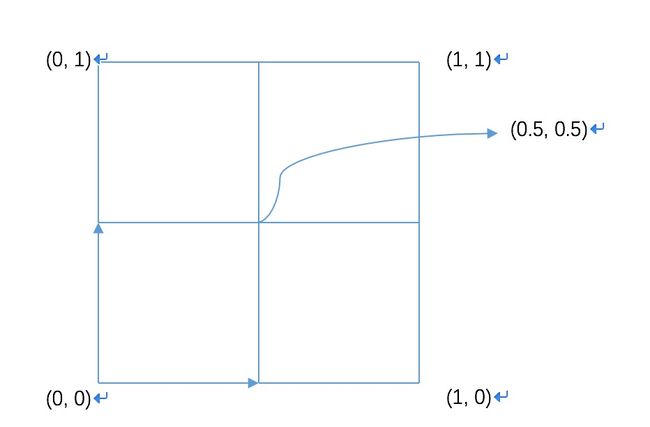
其中的锚点可以根据下面的图理解
可以理解为将图片订在墙上,锚点相当于钉子钉的位置,默认是(0.5, 0.5)。
删除精灵
splash.removeFromParent()
removeAllChildren()
SKLightNode
为了让精灵更具有真实感,SpriteKit提供了SKLightNode作为光源节点。
SKLightNode 可以定义光源的颜色、阴影和衰减程度。继承于SKNode。为了在SKSpriteNode的效果更加逼真,SKSpriteNode 提供了normalTexture 属性,用来储存原贴图的发现贴图NormalMap。
SKLightNode常用属性:
enabled 光源的开关
ambientColor 环境颜色,默认黑色(无)
lightColor 光的颜色,默认白色
shadowColor 被精灵物体遮挡产生的阴影颜色
falloff 光源强度的衰减比率
categoryBitMask 光的种类,32位整数。SKSpriteNode的 lightingBItMask(被何种光照亮)、shadowedBitMask(被何种光产生阴影)、shadowCastBitMask(遮挡何种光线并产生阴影) 存储着光的种类。
SKLightNode使用:
func addLightNode() {
        backgroundColor = SKColor.black
        // 创建精灵
        let spriNode = SKSpriteNode.init(color: UIColor.white, size: CGSize.init(width: 300, height: 300))
        spriNode.position = CGPoint.init(x: KScreenWidth/2, y: KScreenHeight/2)
        self.addChild(spriNode)
        // 添加光源
        let nodeNormMap = spriNode.texture?.generatingNormalMap()
        spriNode.normalTexture = nodeNormMap
        spriNode.lightingBitMask = 1    // 被何种光照
        spriNode.name = "SprNOde"
        let lightSprite = SKLightNode() //实例化光源
        lightSprite.position = CGPoint.init(x: KScreenWidth/2 + 60, y: KScreenHeight/2) // 关照位置
        lightSprite.name = "LightSptite"
        lightSprite.categoryBitMask = 1 // 光的种类
        self.addChild(lightSprite)
    }
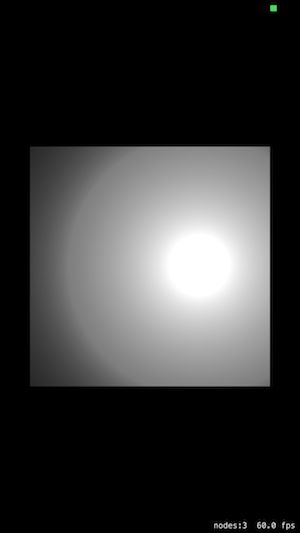
运行结果截图:
SKAction 动作
SKAction是游戏中很重要的一部分,内容很多啊,会写的比较长。首先预览下内容,动作的分类:动作属性、移动动作、序列动作、重复动作、延迟动作、缩放动作、旋转动作、调整尺寸的动作、组合动作、改变透明度的动作、改变颜色的动作、以动画的形式改变纹理的动作、路径动作、反向运动、速度动作、显示或隐藏动作、块动作、自定义动作、删除动作。
创建动作方法
let spriteMoveUp = SKAction.moveBy(x: 300, y: 0, duration: 1.0) // X方向向右移100
1、移动动作
包括以点的方式移动和 以偏移量的方式移动
func nodeAction() {
        let texture = SKTexture.init(imageNamed: "field")  // 纹理
        let background = SKSpriteNode.init(texture: texture)
        background.position = CGPoint.init(x: KScreenWidth/2, y: KScreenHeight/2)
        background.size = CGSize.init(width: KScreenWidth, height: KScreenHeight)
        self.addChild(background)

        let ball = SKSpriteNode.init(imageNamed: "soccer")
        ball.position = CGPoint.init(x: KScreenWidth/2, y: KScreenHeight/2)
        ball.setScale(1.05) // 缩放
        ball.size = CGSize.init(width: 50, height: 50)
        self.addChild(ball)

        // 动作   以点的方式移动
        let spriteMoveUp = SKAction.moveBy(x: 300, y: 0, duration: 1.0) // X方向向右移100
        // ball.run(spriteMoveUp)
        // 动作  以偏移量的方式移动
        let negDelta = CGVector.init(dx: -300, dy: -100)
        let actionMove = SKAction.move(by: negDelta, duration: 2)
        ball.run(actionMove)
    }
2、动作属性
speed 速度
duration 时间
timingMode 曲线方式
曲线方式包括四种:
SKActionTimingLinear 平均分布
SKActionTimingEaseIn 开始较慢,再加快
SKActionTimingEaseOut 开始快,再变慢
SKActionTimingEaseInEaseOut 开始慢,再加快至中间,再变慢
let spriteMoveUp = SKAction.moveBy(x: 300, y: 0, duration: 1.0)
spriteMoveUp.speed = 1.3  // 速度
spriteMoveUp.timingMode = SKActionTimingMode.easeInEaseOut  // 曲线方式
print(ball.speed)  // 获取并输出动作所需时间
3、 序列动作
使用sequence() 方法实现。以上面移动动作为例,将spriteMoveUp、actionMove作为一个序列动作然后执行。
let sequence = SKAction.sequence([spriteMoveUp, actionMove])
ball.run(sequence)
4、重复动作
重复动作分为无限重复和有次数的重复,使用方法:
let sequence = SKAction.sequence([spriteMoveUp, actionMove])
//        let runForever = SKAction.repeatForever(sequence)  // 无限重复
let runRepeat = SKAction.repeat(sequence, count: 2)  // 重复两次(执行两次)
ball.run(runRepeat)
5、延迟动作
使用waitForDuration()方法实现。以序列动作为例,在序列中插入一个延迟动作。
let wait = SKAction.wait(forDuration: 1.0)   // 延迟动作(延迟1s)
let sequence = SKAction.sequence([spriteMoveUp, wait, actionMove])
ball.run(sequence)
6、缩放动作
缩放动作分为:以缩放倍数缩放(scaleTo()、scaleXTo())、以增量值缩放(scaleBy()、scaleXBy())
func scaleAction() {
        let ball = SKSpriteNode.init(imageNamed: "soccer")
        ball.position = CGPoint.init(x: KScreenWidth/2, y: KScreenHeight/2)
        ball.size = CGSize.init(width: 50, height: 50)  // 设置初始大)
        self.addChild(ball)

        // 以缩放倍数缩放
        let shrink = SKAction.scale(to: 0.1, duration: 0.5) // 缩小
        let zoom = SKAction.scale(to: 10, duration: 2) // 放大
        // 对宽高进行缩放
//        let shrink = SKAction.scaleX(to: 0.1, duration: 3) // 缩小
//        let zoom = SKAction.scale(to: 1, duration: 3) // 放大
        let sequence = SKAction.sequence([shrink, zoom])
        let runForever = SKAction.repeatForever(sequence)
//        ball.run(runForever)

        // 以增量值缩放
        let scaleZoom = SKAction.scale(by: 1, duration: 0.2)    // 放大
        let scaleShrink = SKAction.scale(by: -1, duration: 0.2) // 缩小
//        let scaleZoom = SKAction.scaleX(by: 1, duration: 0.2)    // 放大
//        let scaleShrink = SKAction.scaleX(by: -1, duration: 0.2) // 缩小
        let scaleSequence = SKAction.sequence([scaleZoom, scaleShrink])
        let scaleForever = SKAction.repeatForever(scaleSequence)
        ball.run(scaleForever)
    }
7、旋转动作
使用rotateByAngle()方法实现。
   let rotate = SKAction.rotate(byAngle: CGFloat(Double.pi)*2, duration: 3)
   ball.run(rotate)
8、调整尺寸的动作
调整尺寸的动作包括:以目标值调整尺寸、以增量调整尺寸
let resizeWidth = SKAction.resize(toWidth: 100, height: 100, duration: 2)  // 以目标值调整尺寸
ball.run(resizeWidth)
let resize = SKAction.resize(byWidth: 200, height: 200, duration: 2)  // 以增量调整尺寸
ball.run(resize)
9、组合动作
就是同时对两个及以上的动作进行执行。使用group()方法实现。
func groupAction() {
        backgroundColor = SKColor.black

        let star = SKSpriteNode.init(imageNamed: "star.jpg")
        star.position = CGPoint.init(x: KScreenWidth/2, y: KScreenHeight/2)
        star.size = CGSize.init(width: 300, height: 300)
        self.addChild(star)

        let zoom = SKAction.scale(to: 1, duration: 0.2)
        let shrink = SKAction.scale(to: 0.1, duration: 0.2)
        let sequence = SKAction.sequence([zoom, shrink])
        let rotate = SKAction.rotate(byAngle: CGFloat(Double.pi)*2, duration: 1.5)

        let group = SKAction.group([sequence, rotate])  // 组合动画
        let runForever = SKAction.repeatForever(group)
        star.run(runForever)
    }
10、改变透明度的动作
有两种,分别是不需要指定alpha值和指定alpha值(以目标值指定、以增量值指定)。
// 不需要指定alpha值
let fadeOut = SKAction.fadeOut(withDuration: 0.25)
let fadeIn = SKAction.fadeIn(withDuration: 0.25)
// 指定alpha值
let fadeOutAlpha = SKAction.fadeAlpha(to: 0, duration: 0.2) // 以目标值指定
let fadeInAlpha = SKAction.fadeAlpha(to: 1, duration: 0.2)
let hide = SKAction.fadeAlpha(by: -1, duration: 0.2)    // 以增量值指定
let show = SKAction.fadeAlpha(by: 1, duration: 0.2)
11、改变颜色的动作
分为两种:改变混合因子、改变颜色和混合因子。
// 改变混合因子
let color1 = SKAction.colorize(withColorBlendFactor: 0.8, duration: 0.5)
let color2 = SKAction.colorize(withColorBlendFactor: 0.0, duration: 0.5)
// 改变颜色和混合因子
let color = SKAction.colorize(with: SKColor.green, colorBlendFactor: 0.7, duration: 2)
12、以动画的形式改变纹理的动作
使用animateWithTextures()方法实现
func animateTexturesAction() {
        // 加载动画纹理
        let textures = NSMutableArray.init()
        for index in 4...13 {
            let texture = SKTexture.init(imageNamed: "frame-\(index)")
            textures.add(texture)
        }

        let playerSprite = SKSpriteNode.init(texture: textures.firstObject as? SKTexture)
        playerSprite.position = CGPoint.init(x: KScreenWidth/2, y: KScreenHeight/2)
        self.addChild(playerSprite)

        let runRightAction = SKAction.animate(with: textures as! [SKTexture], timePerFrame: 0.1)
        let runForever = SKAction.repeatForever(runRightAction)
        playerSprite.run(runForever)
    }
13、路径动作
使用followPath()方法实现。方法中的属性:
path 用来指定一个CGPathRef路径
offset 用来指定路径中的点是否为相对坐标,true(相对坐标),false(绝对坐标)
orient 指定Z轴在旋转时属性是否改变
sec 动作时间
func pathAction() {
        let background = SKSpriteNode.init(imageNamed: "field")
        background.position = CGPoint.init(x: KScreenWidth/2, y: KScreenHeight/2)
        background.size = CGSize.init(width: KScreenWidth, height: KScreenHeight)
        self.addChild(background)

        let ball = SKSpriteNode.init(imageNamed: "soccer")
        ball.position = CGPoint.init(x: KScreenWidth/2, y: KScreenHeight/2)
        ball.size = CGSize.init(width: 50, height: 50)
        self.addChild(ball)

        let circle = CGPath.init(roundedRect: CGRect.init(x: 200, y:100 , width: 200, height: 200), cornerWidth: 100, cornerHeight: 100, transform: nil)
        let follow = SKAction.follow(circle, asOffset: false, orientToPath: false, duration: 5)
        let runRepeat = SKAction.repeatForever(follow)
        // 反向运动
        let reverse = runRepeat.reversed()
        // 速度动作
        let speedaction = SKAction.speed(to: 15, duration: 1.0)
        let group = SKAction.group([speedaction, reverse])
        ball.run(group)

    }
14、反向运动
let spriteMoveUp = SKAction.moveBy(x: 300, y: 0, duration: 1.0)
let reverse = spriteMoveUp.reversed()  // 反向运动
15、速度动作
使用 speedTo() 或者 speedBy() 实现。
let speedaction = SKAction.speed(to: 5, duration: 1.0)
16、显示或隐藏动作
使用 hide() 和unhide()方法实现
let hide = SKAction.hide()      // 显示动作
let show = SKAction.unhide()    // 隐藏动作
17、块动作
使用runBlock()方法实现,异步调用动作的方法,可指定执行的线程。
func blockAction() {
        let ball = SKSpriteNode.init(imageNamed: "soccer")
        ball.position = CGPoint.init(x: KScreenWidth/2, y: KScreenHeight/2)
        ball.size = CGSize.init(width: 80, height: 80)
        self.addChild(ball)

        // 创建块动作
        let blockAction = SKAction.run {
            let rotate = SKAction.rotate(byAngle: CGFloat(Double.pi*2), duration: 3)
            let runRepeat = SKAction.repeatForever(rotate)
            ball.run(runRepeat)
        }
        ball.run(blockAction)
    }
设置动作执行的线程:
SKAction.run({
}, queue: DispatchQueue)
18、自定义动作
使用customActionWithDuration()实现
func customAction() {
        let background = SKSpriteNode.init(imageNamed: "field")
        background.position = CGPoint.init(x: KScreenWidth/2, y: KScreenHeight/2)
        background.size = CGSize.init(width: KScreenWidth, height: KScreenHeight)
        self.addChild(background)

        let ball = SKSpriteNode.init(imageNamed: "soccer")
        ball.position = CGPoint.init(x: KScreenWidth/2, y: KScreenHeight/2)
        ball.size = CGSize.init(width: 50, height: 50)
        self.addChild(ball)

        let customAction = SKAction.customAction(withDuration: 2) { (node: SKNode, elapsedTime: CGFloat) in
            let fraction = CGFloat(elapsedTime) / 2.0
            let yOff = 100 * 4 * fraction * (1 - fraction)
            node.position = CGPoint.init(x: node.position.x, y: KScreenHeight/2 + CGFloat(yOff))
        }
        let runRepeat = SKAction.repeatForever(customAction)
        ball.run(runRepeat)

        // MARK: 删除动作
//        let remove = SKAction.removeFromParent()
    }
19、删除动作
使用removeFromParent()方法实现。
let remove = SKAction.removeFromParent()
用户交互
1、触摸
触摸是最常见的用户交互之一。分为单拍、多拍触摸(touchesBegan),移动触摸(touchesMoved),结束和取消触摸(touchesEnded)。
在触摸中常用的事件处理:单拍和多拍触摸在一个方法中监听,所以需要进行区分
override func touchesBegan(_ touches: Set, with event: UIEvent?) {
        let mytouches = touches as NSSet
        let touch: AnyObject? = mytouches.anyObject() as AnyObject
        if(touch?.tapCount == 1){
            // 单拍
        }
        if(touch?.tapCount == 2) {
            // 多拍
        }
    }
在移动触摸中获取当前点击的坐标位置
override func touchesMoved(_ touches: Set, with event: UIEvent?) {
        let mytouchs = touches as NSSet
        let touch = mytouchs.anyObject() as! UITouch
        let touchLocation = touch.location(in: self)
        print(touchLocation)
    }
2、手势
常见的手势识别器:
| 名称 | 功能 |
|---|---|
| UITapGestureRecognizer | 轻拍 |
| UIPinchGestureRecognizer | 捏 |
| UISwipeGestureRecognizer | 滑动 |
| UIRotationGestureRecognizer | 旋转 |
| UIPanGestureRecognizer | 移动 |
| UILongPressGestureRecognizer | 长按 |
- 轻拍
分两步,添加手势、实现手势方法。
    func addGestureRecognizer() {
        let tapGestureRecognizer = UITapGestureRecognizer.init(target: self, action: #selector(self.handleTap))
        self.view?.addGestureRecognizer(tapGestureRecognizer)
    }

    func handleTap() {
        backgroundColor = UIColor.yellow
    }
- 捏
捏 其实就是通过两个手指的张合,实现图片的放大和缩小。
    func addGestureRecognizer() {
        let pinchGestureRecognizer = UIPinchGestureRecognizer.init(target: self, action: #selector(handlepin(recognizer:)))
        self.view?.addGestureRecognizer(pinchGestureRecognizer)
    }

    var lastScale: CGFloat = 0.0
    func handlepin(recognizer: UIPinchGestureRecognizer) {
        self.view?.bringSubview(toFront: view!)
        // 复原
        if(recognizer.state == UIGestureRecognizerState.ended){
            lastScale = 1.0
            return
        }

        let scale: CGFloat = 1.0 - (lastScale - recognizer.scale)
        let current: CGAffineTransform = recognizer.view!.transform
        let newaa = current.scaledBy(x: scale, y: scale)
        recognizer.view?.transform = newaa
        lastScale = recognizer.scale
    }
- 旋转
通过旋转手势,两个手指旋转控制图片旋转。
    func addGestureRecognizer() {
        let rotationGestureRecognizer = UIRotationGestureRecognizer.init(target: self, action: #selector(handRotation(recognizer:)))
        self.view?.addGestureRecognizer(rotationGestureRecognizer)
    }
    // 旋转
    func handRotation(recognizer: UIRotationGestureRecognizer) {
        let rataion:CGFloat = recognizer.rotation
        sprite.zRotation = -rataion
    }
- 移动
和触摸中的touchesMoved类似效果,通过移动手势,可以使图片跟着手指的移动手势移动。
    func addGestureRecognizer() {
        let panGestureRecognizer = UIPanGestureRecognizer.init(target: self, action: #selector(handPan(recognizer:)))
        self.view?.addGestureRecognizer(panGestureRecognizer)
    }
    // 移动
    func handPan(recognizer: UIPanGestureRecognizer) {
        let point = recognizer.location(in: self.view)
        let pointY = (self.view?.frame.size.height)! - point.y
        sprite.position = CGPoint.init(x: point.x, y: pointY)
    }
- 滑动
滑动手势:UISwipeGestureRecognizer。在使用时可以使用direction属性设置滑动手势滑动的方向。
    func addGestureRecognizer() {
        let swipeLeftGestureRecognizer = UISwipeGestureRecognizer.init(target: self, action: #selector(handSwipeLeft))     // 向左滑动
        swipeLeftGestureRecognizer.direction = UISwipeGestureRecognizerDirection.left;
        self.view?.addGestureRecognizer(swipeLeftGestureRecognizer)

        let swipeRightGestureRecognizer = UISwipeGestureRecognizer.init(target: self, action: #selector(handSwipeRight))     // 向右滑动
        swipeRightGestureRecognizer.direction = UISwipeGestureRecognizerDirection.right;
        self.view?.addGestureRecognizer(swipeRightGestureRecognizer)
    }
    // 滑动
    func handSwipeLeft() {
        let actionMove = SKAction.move(to: CGPoint.init(x: sprite.size.width/2, y: KScreenHeight/2), duration: 1)
        sprite.run(actionMove)
    }
    func handSwipeRight() {
        let actionMove = SKAction.move(to: CGPoint.init(x: KScreenWidth - sprite.size.width/2, y: KScreenHeight/2), duration: 1)
        sprite.run(actionMove)
    }
- 长按
    func addGestureRecognizer() {
        let longPressGestureRecognizer = UILongPressGestureRecognizer.init(target: self, action: #selector(handLongPress))
        self.view?.addGestureRecognizer(longPressGestureRecognizer)
    }
    // 长按
    func handLongPress() {
        backgroundColor = UIColor.gray
    }
3、重力感应
重力感应事件又被称为加速计事件,属于运动事件的一种。运动时间产生可以通过:倾斜、摇动设备等。这些运动事件的检测基于设设备的加速计或陀螺仪。需要访问这些数据,需要通过coreMotion这个框架,coreMotion有提供访问加速计和陀螺仪数据的接口。
导入coerMotion框架,实例化CMMotionManager()对象。
在使用重力感应前,需要判断设备是否支持重力感应:
import CoreMotion
var mManger:CMMotionManager = CMMotionManager()
override func didMove(to view: SKView) {
    if(!mManger.isAccelerometerAvailable){
        // 重力感应不可用
    }
}
在判断设备支持重力感应后。我们来做一个小功能,使用重力感应来控制精灵对象的移动。
步骤:
- 1、创建场景。
- 2、判断重力感应是否可用。
- 3、添加物理引擎,添加物理体。
- 4、获取重力感应accelerometer的数据。
- 5、根据数据移动精灵。
代码:
import Foundation
import UIKit
import SpriteKit
import CoreMotion

var mManger:CMMotionManager = CMMotionManager()
class GravityScene: SKScene {

    var gravityBall = SKSpriteNode.init(imageNamed: "soccer")

    override func didMove(to view: SKView) {
        // 创建两个精灵对象,场景和移动体
        let background = SKSpriteNode.init(imageNamed: "field")
        background.position = CGPoint.init(x: KScreenWidth/2, y: KScreenHeight/2)
        background.size = CGSize.init(width: KScreenHeight, height: KScreenWidth)
        self.addChild(background)

        gravityBall.position = CGPoint.init(x: KScreenWidth/2, y: KScreenHeight/2)
        gravityBall.size = CGSize.init(width: 50, height: 50)
        self.addChild(gravityBall)

        // 判断重力感应是否可用
        if(!mManger.isAccelerometerAvailable){
            // 重力感应不可用
            let alert:UIAlertController = UIAlertController.init(title: "提示", message: "重力感应不可用", preferredStyle: UIAlertControllerStyle.alert)
            let cancel:UIAlertAction = UIAlertAction.init(title: "取消", style: UIAlertActionStyle.cancel, handler: nil)
            alert.addAction(cancel)

            self.getCurrentVC()?.present(alert, animated: true, completion: {
            })

        }else {
            mManger.startAccelerometerUpdates()
        }


        // 添加物理引擎,添加物理体
        self.physicsBody = SKPhysicsBody.init(edgeLoopFrom: self.frame)
        //创建矩形物理体
        self.gravityBall.physicsBody = SKPhysicsBody.init(rectangleOf: self.gravityBall.frame.size)
        self.gravityBall.physicsBody?.isDynamic = true  // 能承受碰撞和其他外力作用
        self.gravityBall.physicsBody?.affectedByGravity = false // 不承受重力影响
        self.gravityBall.physicsBody?.mass = 0.2    // 给物体任意质量,使移动就会显得自然

    }

    // 飞创移动的方法
    func ballUpdate() {
        let data:CMAccelerometerData? = mManger.accelerometerData
        // 获取accelerometer数据
        var value:Double? = data?.acceleration.x
        if(value == nil){
            value = 0
        }

        // 判断设备倾斜方向
        if(fabs(value!) > 0.2){
            let fvector = CGVector.init(dx: 40*CGFloat(value!), dy: 0)
            self.gravityBall.physicsBody?.applyForce(fvector)
        }
    }

    override func update(_ currentTime: TimeInterval) {
        ballUpdate()
    }

    // 当前控制器响应者
    func getCurrentVC()->UIViewController?{
        var result:UIViewController?
        var window = UIApplication.shared.keyWindow
        if window?.windowLevel != UIWindowLevelNormal{
            let windows = UIApplication.shared.windows
            for tmpWin in windows{
                if tmpWin.windowLevel == UIWindowLevelNormal{
                    window = tmpWin
                    break
                }
            }
        }

        let fromView = window?.subviews[0]
        if let nextRespnder = fromView?.next{
            if nextRespnder.isKind(of: UIViewController.classForCoder()){
                result = nextRespnder as? UIViewController
            }else{
                result = window?.rootViewController
            }
        }
        return result
    }
}
将此场景添加到控制器的视图上显示即可。
    // 创建重力感应场景
    func createGravityScene() {
        let skView = SKView.init(frame: self.view.bounds)
        if(skView.scene == nil){
            skView.showsFPS = true
            skView.showsNodeCount = true
            let scene = GravityScene(size: skView.bounds.size)
            skView.presentScene(scene)
        }
        self.view.addSubview(skView)
    }
最后完成的效果是,场景中的ball精灵会根据手机的左右倾斜方向来移动。
最后奉上前面所有内容的demo Sprite Kit 基础
参考:《iOS游戏框架 Sprite Kit技术详解》
基础篇就这些了。接下来就是进阶部分了:Sprite Kit 进阶(音频、视频、粒子系统)。 还有最后的高级:Sprite Kit 高级(物理引擎、瓦片地图)。会不定期更新,有兴趣的可以关注下哦。


