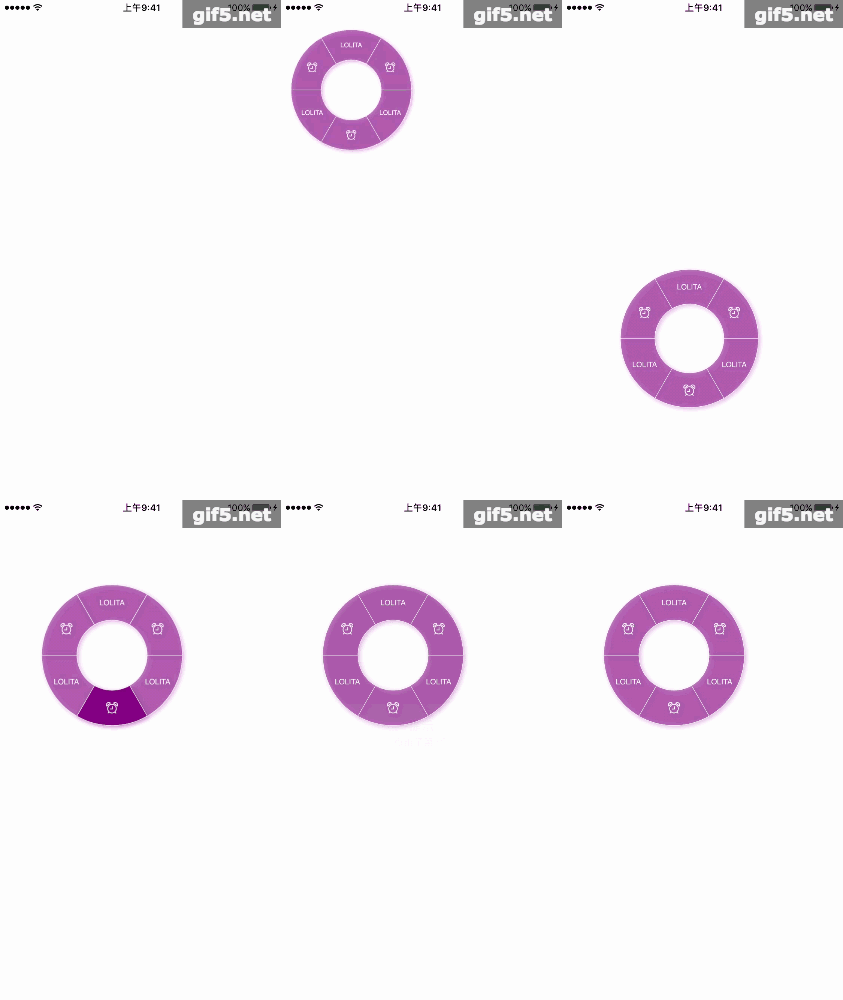
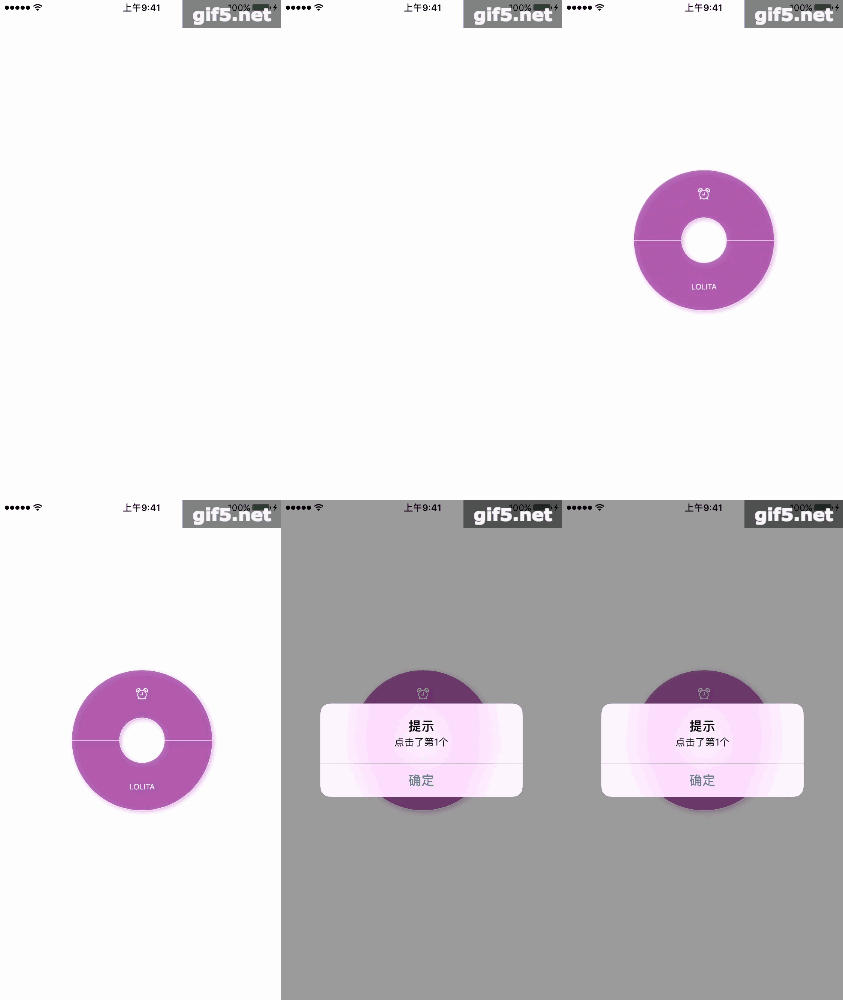
效果演示
自定义部分
1、支持文字、图片
2、填充色可自定义
3、文字大小可自定义
4、多种show动画,并且可自定义动画
5、圆弧宽度可控
使用
self.pieView = [[LLPieView alloc] initWithFrame:CGRectMake(0, 0, pieViewSize.width, pieViewSize.height) andClickBlock:^(NSInteger index) {
    // 点击回调
    NSLog(@"点击了%ld个", index+1);
}];
self.pieView.style = LLPieViewRoate_Z;   // 动画风格
self.pieView.dataArray = @[@"LOLITA",[UIImage imageNamed:@"ss"]]; // 数据组
[self.pieView show];
设置部分
/**
 数据数组,文字或者图片
 */
@property (nonatomic, copy) NSArray *dataArray;
/**
 填充色,默认为Alpha0.5的紫色
 */
@property (nonatomic, strong) UIColor *fillColor;
/**
 半径,最小半径默认为最大半径的一半,最大默认为父视图宽度的一半,当minRadius为0时,样式为圆盘
 */
@property (nonatomic, assign) CGFloat minRadius, maxRadius;
/**
 文字大小,默认为13.0
 */
@property (nonatomic, assign) CGFloat fontSize;
/**
 出现动画,如果设置了该属性,style则不会生效
 */
@property (nonatomic, strong) CAAnimation *animation;
/**
 动画风格
 */
@property (nonatomic, assign) LLPieViewShowStyle style;
适当使用这些属性时,产生的效果如下
1、数量、圆环大小、出现的样式
2、圆盘、颜色、出现样式、字体大小
另外,如果你对提供的出现样式不满意,完全可以自定义animation,又或者不想要出现动画,就不设置style
设计思路
由于系统的控件正常状态下都是规则的,需要不规则的时候我们通常会去改变控件的Layer层,绘制出我们想要的形状,但是如果用系统的控件可能很难做到上面的演示图的效果,所以不如直接从Layer层下手
1、重写CAShapeLayer,绘制出我们想要的形状添加到View上
2、在自定义View中,布局好各个Layer的位置
3、在触摸事件中,找到被点击的Layer,重新设置颜色并返回索引
核心代码
1、绘制不规则图形,已经填充文字和图片
// 绘制路径
UIBezierPath *path = [UIBezierPath bezierPathWithArcCenter:self.centerPoint radius:self.minRadius startAngle:self.startAngle endAngle:self.endAngle clockwise:YES]; // 绘制内弧度
path = [path bezierPathByReversingPath];    // 反转路径
[path addArcWithCenter:self.centerPoint radius:self.maxRadius startAngle:self.startAngle endAngle:self.endAngle clockwise:YES]; // 绘制外弧度
[path closePath];   // 封闭路径
self.path = path.CGPath;
self.fillColor = [self.fullColor colorWithAlphaComponent:0.5].CGColor;  // 设置shapeLayer的填充色
self.lineWidth = 0.5;   //
self.strokeColor = [UIColor whiteColor].CGColor;    // 设置shapeLayer的描边色

// 为了获取不规则图形中心点而创建的临时路径
UIBezierPath *pathTmp = [UIBezierPath bezierPathWithArcCenter:self.centerPoint radius:(self.minRadius+self.maxRadius)/2.0 startAngle:self.startAngle endAngle:(self.startAngle+self.endAngle)/2.0 clockwise:YES];

// 绘制文字
if (self.text) {
    // 获取中心点
    CGSize sizeNew = [self.text sizeWithAttributes:@{NSFontAttributeName:[UIFont systemFontOfSize:self.fontSize]}];
    CATextLayer *textLayer = [CATextLayer layer];
    textLayer.frame = CGRectMake(pathTmp.currentPoint.x-sizeNew.width/2.0, pathTmp.currentPoint.y-sizeNew.height/2.0, sizeNew.width, sizeNew.height);
    textLayer.string = self.text;
    textLayer.fontSize = self.fontSize;
    textLayer.contentsScale = 3;
    textLayer.alignmentMode = kCAAlignmentCenter;
    textLayer.foregroundColor = [UIColor whiteColor].CGColor;
    [self addSublayer:textLayer];
}
// 绘制图像
if (self.image) {
    CALayer *layer = [CALayer new];
    layer.position = pathTmp.currentPoint;
    layer.bounds = CGRectMake(0, 0, self.image.size.width, self.image.size.height);
    layer.contents = (id)self.image.CGImage;
    [self addSublayer:layer];
}

// 设置阴影
self.shadowColor = self.fullColor.CGColor;//shadowColor阴影颜色
self.shadowOffset = CGSizeMake(2,2);//shadowOffset阴影偏移
self.shadowOpacity = 1;//阴影透明度,默认0
2、触摸事件的处理
-(void)touchesBegan:(NSSet *)touches withEvent:(UIEvent *)event{
    CGPoint touchPoint = [[touches anyObject] locationInView:self];
    for (LLShapeLayer *shaperLayer in self.shapeLayerArray) {
        if (CGPathContainsPoint(shaperLayer.path, 0, touchPoint, YES)&&self.clickBlock) {   // 寻找触摸的形状
            [shaperLayer selectedState];    // 设置为选中状态
            self.isSelected = YES;  //
            self.clickIndex = shaperLayer.tag;  // 记录下选择的索引tag
        }
    }
}

// 触摸结束时回调
-(void)touchesEnded:(NSSet *)touches withEvent:(UIEvent *)event{
    for (LLShapeLayer *shaperLayer in self.shapeLayerArray) {
        [shaperLayer unSelectedState];  // 恢复为正常状态
    }
    if (self.isSelected&&self.clickBlock) {
        self.clickBlock(self.clickIndex);   // 回调
    }else{
        self.clickBlock(-1);    // 非区域的触摸
    }
    self.isSelected = NO;
}

// 触摸取消时,考虑到手势问题
-(void)touchesCancelled:(NSSet *)touches withEvent:(UIEvent *)event{
    for (LLShapeLayer *shaperLayer in self.shapeLayerArray) {
        [shaperLayer unSelectedState];  // 恢复为正常状态
    }
    self.isSelected = NO;
}
Demo地址
体会
1、CAShapeLayer和UIView的结合使用,我们可以方便的定义出不规则形状的控件(UIView还是规则的)
2、使用CGPathContainsPoint方法查找触点是否包含在路径中可以让我们知道哪个形状被触摸


