下载教程文件**
·····密码: ahgt**
选择对应名称的文件夹下载,内包含一个(开始)和一个(已完成)文件;(开始)文件用来和教程同步操作,(已完成)是最终结果。
Automatically repeat layers to create grids, tables, and more. 重复图层以创建相同格式的网格、表格等。
Using loops is a great way to reduce the complexity of your prototype and save time when repeating common elements. This Facebook Notifications prototype consists of one looped notification, with an editable Profile Picture, text, timestamp and glyph. Download the tutorial files to rebuild this prototype using loops.
使用循环复用常见的元素,能很大程度的减少原型复杂性,节省时间提交效率。
这个 Facebook 的通知原型包含一个循环通知,可编辑的文件图片、文本、时间和字符。下载教程文件。
Manually duplicating 手动复制
All layers mentioned above are already prepared in the tutorial files — for one notification only. If we wanted to make a few rows of notifications without loops, we could Copy ⌘C and Paste ⌘V the Group. This process however is laborious, and does not support easy editing and changing should any need arise later on.
上面提到的图层都已经在教程文件中准备了,但只有第一条通知。如果我们想在没有循环的情况下多添加几行通知,可以复制 Cmd C 并粘贴 Cmd V Notification 组。
但是这个过程很繁琐,尤其以后要编辑格式样式等得一条一条改,那就太可怕了。
Looping instead 用循环替代
With loops we can use our one notification as an instance and repeat it. If we want to change one thing across all notifications, we can do it once, and have it reflected across each of them. To create a loop, double-click on the Patch Editor and type to find Loop Press Return ⏎.
循环可以以一个通知为实例,重复使用这个实例,相当于母版。如果要在所有通知中改变一个元素,只需要调整一次,其他的通知也会自动调整。
添加一个 [Loop]( 模块到编辑器。
Looping a position 循环位置
We know that we need 6 of these notifications, so change the Loop patch Count input to 6. We want these 6 notifications to stack up vertically, so connect the Index output of the Loop patch to the Position Y of the Notification Group.
这个原型种需要6个通知,所以将 Loop 模块的 Count 值改为 6。这6个通知是垂直方向排列的,所以将 Loop 模块的 Index 输出口连接到 Notification 图层组的 Position Y 属性。
Hiding the Chrome Group shows us the 6 instances of Notification appear to be stacked up on top of each other. They are actually positioned 1 point vertically away from each other starting a Position Y of 0. This is because the Loop patch gives us 6 values and numbers starting from 0 which are connecting directly to the Y Position of Notification.
隐藏 Chrome 图层组会显示叠在一起的 6 个通知。实际上下一条通知距离上一条的垂直距离有 1pt。这是因为 Loop 模块给出了从 0 开始的 6 个值和数字,它们直接连接到 Notification 图层的Y位置。
Adding space to a looped position 给循环添加位置和间距
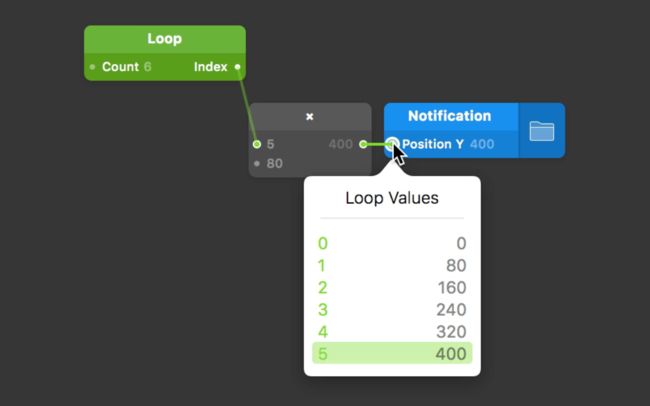
We know that each of our 6 instances of Notification has a Height value of 80. We also know that our Index values are 0 through 5. We therefore need to multiply the indexes by 80 to have them positioned 80 points vertically away from each other.
已知 6 个 Notification 组有相等的高度 80pt。也知道 Index 值是 0 到 5 。因此,需要将索引乘以80,使它们相互间隔 80pt。
Double-click on the Patch Editor ⌘⏎ and type to find the × patch. Press Return ⏎. Connect the Loop patch Index output to one input on the × patch, and make the remaining input 80. Finally, connect the output of the × patch to the Notification Position Y Layer Property patch.
添加一个 × X模块到 Loop 模块和 Notification 模块中间,× 模块的第二个值输入80。
The index value multiplied by 80 will position the Notification instances vertically. Try changing the value from 80 to something higher or lower to get a better idea of how this works.
索引值乘以 80 ,垂直定位通知列表 。尝试将值从 80 改为更高或更低实现不同的效果。
Offsetting a loop 抵消一个循环
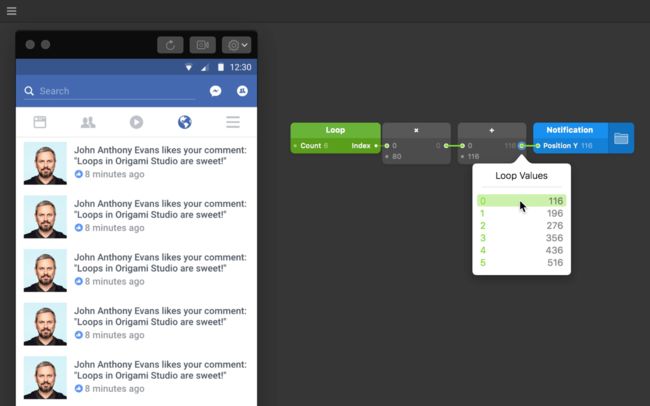
The 6 instances of Notification need to be push these down equally to sit just below the Chrome. Double-click on the Patch Editor ⌘⏎ and type to find the + patch. Press Return ⏎.
这 6 条通知现在和 Chrome 组叠在了一起,需要移动到 Chrome 组下面来。添加一个 + + = 模块。
In the Patch Editor, position the + patch between the × patch and Notification Position Y Layer Property patch. Connect the output of the × patch to the topmost input of the+ patch. Finally, connect the + patch output to the Notification Position Y Layer Property patch.
把 + 模块插到 × 模块和 Notification 模块中间。
× 模块的输出口连接到 + 模块的第一个输入口。
Re-enable the Chrome in the Layers panel. Select and scrub the second input of the + patch to find the point value where the Notification instances sit flush underneath the Chrome (try somewhere around 116).
显示 Chrome 组。在 + 模块的第二个输入口填写 Chrome 组的高度值,这样通知列表就能刚好显示在 Chrome 组下面。
Changing individual properties 更改单个属性
Up to now we have affected only the Position property of the Notification instances. How can we change things on each Notification instance, such as the Profile Picture Image?
到目前为止,只实现了改变 Notification 实例的Position 属性。要怎么让每个通知实例显示的元素不一样了,比如头像啊?
Within the starting tutorial files you should find a folder of Profile Picture images. Drag that folder into Origami.
在教程文件中,应该有一个名为 Profile Picture 的文件夹。将文件夹拖入编辑器。
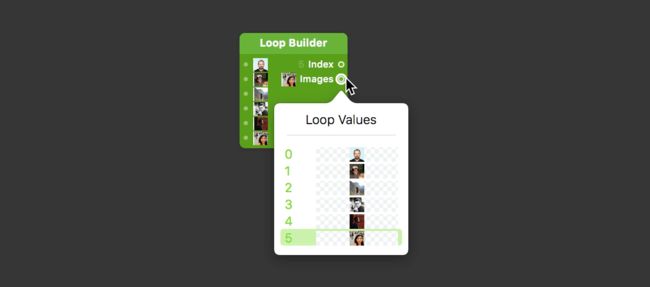
Origami will take these images and create a Loop Builder patch, with all the images as inputs.
Origami 将用这些图像创建一个 Loop Builder 模块,每个图片都是一个输入口。
Connect the Images output of the Loop Builder patch to the Profile Picture Image input in the Layers panel. Keep an eye on what happens in the Viewer as a result.
将Loop Builder 模块的 Images 输出口连接到图层窗口中头像图层 Profle Picture 的 Image 属性上。哒哒~头像们就变成步一样的了。
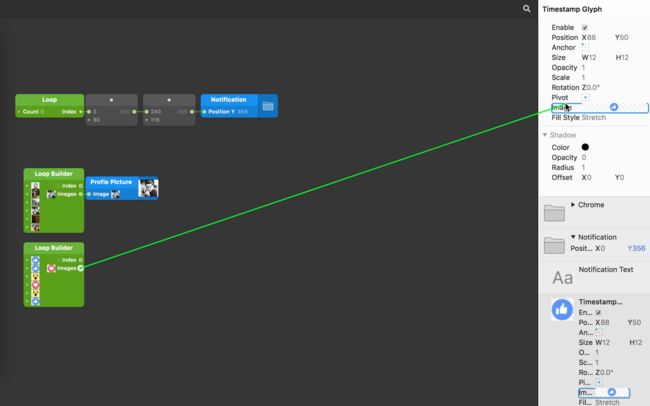
The Loop Builder patch loops through each instance of Notification and assigns an image to each, in order. We can do the same thing with Timestamp Glyph, so navigate to the starting tutorial files and drag the Icons folder into Origami.
Loop Builder 模块循环每个 Notification 实例,并按顺序为每个实例分配一个图片。用 Timestamp Glyph 也可以相同的事,打开教程文件夹,将Icons 文件夹拖入编辑器。
With the resulting Loop Builder patch, connect the output to the Timestamp Glyph Image input. Notice how all the glyphs in the prototype are updated similar to how the Profile Pictures were.
将生成的 Loop Builder 模块 Image 输出口连接到Timestamp Glyph 图层的 Image 属性。注意看字符就跟头像一样更新了。
The difference between the Loop Builder and Loop patches is that the Loop Builder patch provides an index plus a type of layer as well. In this case, images.
Loop Builder 和 Loop 模块之间的区别是Loop Builder 模块提供了一个索引以及一个图层类型。在这个教程中是图像。
Beyond images 除了图片的其他内容替换
Insert a Loop Builder patch by double-clicking on the Patch Editor ⌘⏎ and typing to find Loop Builder. Press Return ⏎. Right-click on this Loop Builder patch and change the Number of Inputs to 6. Right-click again on on the Loop Builder patch again and change the Type to Text.
除了直接拖文件夹,也可以通过模块库添加 Loop Builder 模块。模块上右键,Number of Inputs 改为6,类型 Type 改为文本 Text。
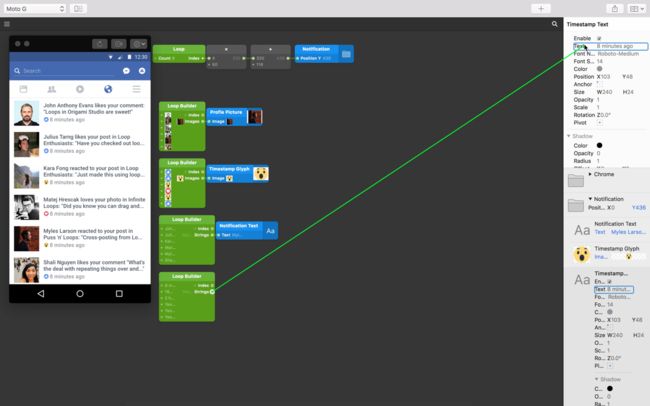
We are going to use this new Loop Builder patch to replace the Notification Text on each instance. Feel free to populate the inputs with whatever text you would like before going onto the next step. Next, connect the the Strings output from the Loop Builder patch to the Notification Text layer Text input.
用这个新的 Loop Builder 模块来替换每个实例上的 Notification Text 文字,进入下一步之前,在左侧输入口随意填写一些文字。接下来,将 Loop Builder 模块的的 Strings 输出口连接到 Notification Text 图层的 Text 属性。
Keep an eye on the Viewer to see your changes populate the prototype with the new content. Next, instead of adding another Loop Builder patch and editing the Number of Inputs and Type, Option-click ⌥ the previous Loop Builder and drag to just below.
查看器中可以看到已经用新内容填写 Notification Text 的文字了。
接下来,复制一个刚刚的文字 Loop Builder 模块,按住 Alt 拖动模块复制。不是添加另一个新建一个。
Change the input values of this patch to whatever you would like before proceeding. Next, connect the String output of this Loop Builder patch to the Timestamp Text input.
改变输入口的值,再将输出口连接到 Timestamp Text 图层的 Text 属性。
You should now have a prototype consisting of 6 different notifications. Each of these notifications contains easily-editable, looped contents.
现在应该有 6 个值不一样但格式一样的通知了。
相关案例
18. Instagram Boomerang
屏幕和滚动之间的转换。
相关模块
Rectangle Loop Loop Builder
NEXT UP
12. 交互循环 Interactive Loops
添加和捕获交互示例到循环。


