要使用drawRect必须先自定义一个view, 系统的drawRect方法会在视图即将出现与视图已经出现的时候调用.
1.在此方法中系统已经创建一个与view相关联的上下文(layer上下文), 只要获取上下文就行;(获取和创建上下文都是UIGraphics开头)
2.绘制路径;
3.把绘制的内容保存到上下文中;
4.把上下文的内容渲染到view的layer上.
- (void)drawRect:(CGRect)rect{

//    [self drawLine];
       //[self drawCurve];
    //[self drawRectangle];
     //    [self drawOval];
 //   [self drawArcWithRect:rect];
}
画弧
#pragma mark - 画弧
- (void)drawArcWithRect:(CGRect)rect{
CGPoint center = CGPointMake(rect.size.width * .5, rect.size.height * .5);
CGFloat radius = rect.size.width * .5 - 10;
//开始角度为0说明从三点钟方向开始, 角度可以为负, endAngle为-M_PI_4表示终点是二点钟方向, 最后一个参数是是否顺时针, 如果是, 则从三点钟方向开始顺时针画弧, 画到两点钟方向为止, 如果为NO, 则逆时针从三点钟画到二点钟
UIBezierPath *path = [UIBezierPath bezierPathWithArcCenter:center radius:radius startAngle:0 endAngle:M_PI_4 clockwise:YES];
//画扇形
//添加一条半径
[path addLineToPoint:center];
//闭合图形
[path closePath];

//如果是fill的话会自动关闭路径, 不用写closePath
[path stroke];
}
画椭圆
#pragma mark - 画椭圆
- (void)drawOval{
   UIBezierPath *path = [UIBezierPath bezierPathWithOvalInRect:CGRectMake(50, 50, 100, 50)];
//这句话实现了获取上下文, 描述路径, 把路径添加到上下文, 把上下文内容渲染到layer
[path stroke];
}
曲线
#pragma mark - 画曲线
- (void)drawCurve{
CGContextRef ctx = UIGraphicsGetCurrentContext();
UIBezierPath *path = [UIBezierPath bezierPath];
//画曲线
//1.设置起点
[path moveToPoint:CGPointMake(50, 280)];
//2.添加一根曲线, 第一个参数是曲线终点, 第二个参数是磁铁位置. 吸引线段变得有弧度
[path addQuadCurveToPoint:CGPointMake(250, 280) controlPoint:CGPointMake(50, 50)];
//3.把路径添加到上下文
CGContextAddPath(ctx, path.CGPath);
//4.把上下文渲染到layer上
CGContextStrokePath(ctx);
}
直线
#pragma mark - 画直线
- (void)drawLine{

//  1.在此方法中系统已经创建一个与view相关联的上下文(layer上下文), 只要获取上下文就行;(获取和创建上下文都是UIGraphics开头)
CGContextRef ctx = UIGraphicsGetCurrentContext();
//2.绘制路径(一条路径可以描述多条线)
UIBezierPath *path = [UIBezierPath bezierPath];

//    2.1 设置起点
[path moveToPoint:CGPointMake(50, 280)];
//2.2 添加一根线到终点
[path addLineToPoint:CGPointMake(250, 50)];

//画第二条线
//    [path moveToPoint:CGPointMake(100, 280)];
//2.2 添加一根线到终点, 直接写addLine不写moveTo则代表在上一根线的终点继续画
[path addLineToPoint:CGPointMake(200, 280)];

//设置线的粗细
CGContextSetLineWidth(ctx, 10);

//设置两根线的连接样式, 第二个参数是枚举
CGContextSetLineJoin(ctx, kCGLineJoinRound);

//设置两根线各组尾部的样式, 第二个参数是枚举
CGContextSetLineCap(ctx, kCGLineCapRound);

//    setStroke还是setFill看最终设定的渲染方式
[[UIColor redColor] setStroke];

//3.把绘制的内容添加到上下文中
//UIBezierPath是UIKit框架  第二个参数, CGPathRef是coreGraphic框架
CGContextAddPath(ctx, path.CGPath);

//4.把上下文渲染到view的layer上(stroke或fill的方式)
CGContextStrokePath(ctx);
}
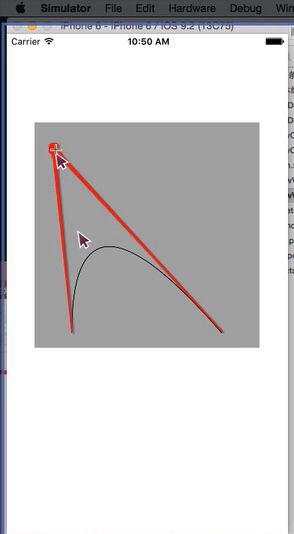
IMG_3131.JPG
矩形
#pragma mark - 画矩形
- (void)drawRectangle{

CGContextRef ctx = UIGraphicsGetCurrentContext();
//直角矩形
//    UIBezierPath *path = [UIBezierPath bezierPathWithRect:CGRectMake(50, 50, 100, 50)];
//圆角矩形
UIBezierPath *path = [UIBezierPath bezierPathWithRoundedRect:CGRectMake(50, 50, 100, 50) cornerRadius:5];
//Stroke是矩形边框变红, Fill是矩形包裹的面积变红, 当然, 最终的渲染方式也要跟着改
[[UIColor redColor] setStroke];
//3.把路径添加到上下文
CGContextAddPath(ctx, path.CGPath);
//4.把上下文渲染到layer上
CGContextStrokePath(ctx);
}