有几个不错的文档,介绍这个功能
http://www.jianshu.com/p/74fe6cbc542b
http://my.oschina.net/u/2340880/blog/511509
http://www.tuicool.com/articles/bAVvQb
http://www.cocoachina.com/ios/20151021/13849.html
http://krakendev.io/peek-pop/
http://iosguy.com/2015/09/17/adopting-3d-peek-pop/
一、快捷启动
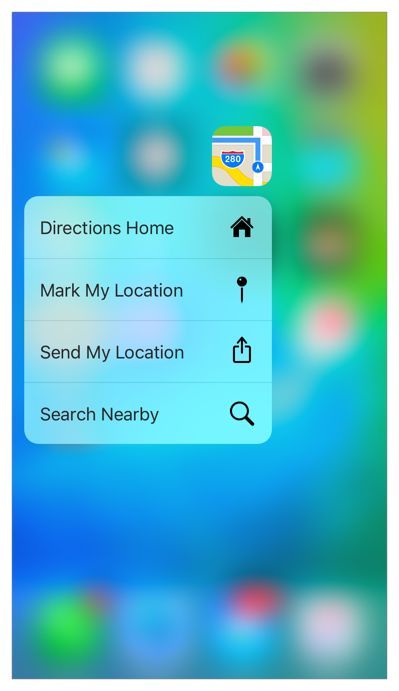
iOS 9 SDK提供了定义静态或者动态快速选项的API
1.静态方式创建ShortcutItem
https://developer.apple.com/library/ios/documentation/General/Reference/InfoPlistKeyReference/Articles/iPhoneOSKeys.html#//apple_ref/doc/uid/TP40009252-SW36
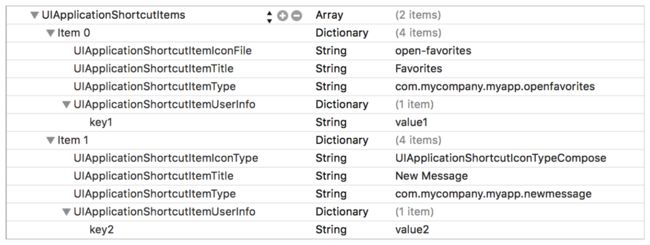
一共有五个属性可以填写:
UIApplicationShortcutItemType(必填)开发者自行指定一个字符串
UIApplicationShortcutItemTitle(必填)会显示在屏幕上
UIApplicationShortcutItemSubtitle 会显示在屏幕上
UIApplicationShortcutItemUserInfo
UIApplicationShortcutItemIconFile 自己的icon文件(必须是35*35,单色方形的图片)
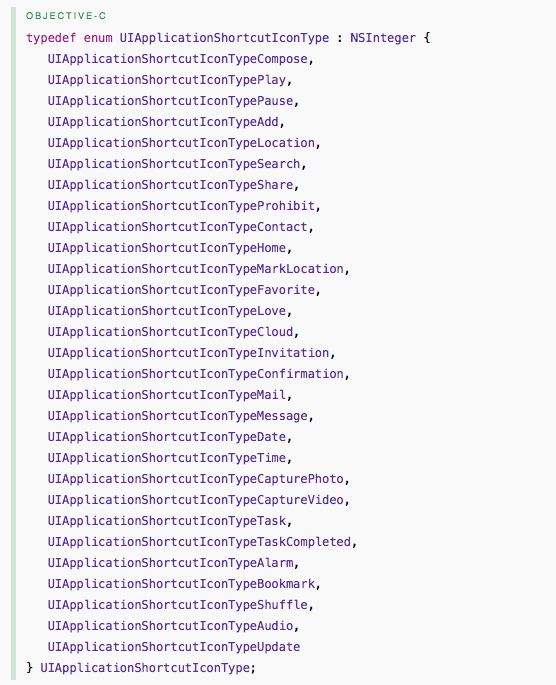
UIApplicationShortcutItemIconType 系统icon,具体类型看附图
2.动态方式创建ShortcutItem
在appDelegate中,可以使用代码设置ShortcutItem,但是需要注意,动态的ShortcutItem会排在静态的后面,而且app从未启动时(代码未执行)也不会生成动态ShortcutItem,生成以后,如果删掉下面的代码,又没有新代码清除已经存在的动态ShortcutItem,那么app的动态ShortcutItem将会继续存在
- (BOOL)application:(UIApplication *)application didFinishLaunchingWithOptions:(NSDictionary *)launchOptions{

//...
    [self init3DTouchEntry];
//...
    return YES;
}
//初始化3Dtouch入口
- (void)init3DTouchEntry {
    // Override point for customization after application launch.
    UIApplicationShortcutItem *shortItem1 = [[UIApplicationShortcutItem alloc] initWithType:@"打开应用" localizedTitle:@"打开应用"];
//    UIApplicationShortcutItem *shortItem2 = [[UIApplicationShortcutItem alloc] initWithType:@"弹框" localizedTitle:@"弹框"];
    NSArray *shortItems = [[NSArray alloc] initWithObjects:shortItem1, nil];
    [[UIApplication sharedApplication] setShortcutItems:shortItems];
}
3.响应ShortcutItem的点击
- (void)application:(UIApplication *)application performActionForShortcutItem:(UIApplicationShortcutItem *)shortcutItem completionHandler:(void (^)(BOOL))completionHandler{
    if ([shortcutItem.localizedTitle isEqualToString: @"打开"]) {

        return;
    }
}
二、Peek和Pop
1.ViewController继承协议
UIViewControllerPreviewingDelegate
2.注册view支持3DTouch
- (void)viewDidLoad {

    [super viewDidLoad];
    [self regist3DTouch];

}

-(void)regist3DTouch
{
    [self registerForPreviewingWithDelegate:self sourceView:listView];
}
通过如上代码,就可以给tableView增加3DTouch支持,不过需要注意,如果我们不是给tableView整体添加,而是给cell添加,因为cell会被重用,会有显示问题,原因如下:
You can designate more than one source view for a single registered view controller, but you cannot designate a single view as a source view more than once.
但是选择整个tableView为3DTouch对象,Peek的时候,整个tableView会突出显示,而不是某一个cell,这时候需要在Peak的时候,进行一些处理(感谢 iosguy的文章)
3.响应Peek
  - (UIViewController *)previewingContext:(id)context viewControllerForLocation:(CGPoint) point
  {
      UIViewController *childVC = [[UIViewController alloc] init];
      childVC.preferredContentSize = CGSizeMake(0.0f,300f);  //不知道是干啥用

      CGRect rect = CGRectMake(10, point.y - 10, self.view.frame.size.width - 20,20);
      context.sourceRect = rect;  //发虚显示的bounds
      return childVC;
  }
返回Peek要显示的ViewController
配合之前注册的tableView的3DTouch支持,代码如下:
- (UIViewController *)previewingContext:(id)context viewControllerForLocation:(CGPoint) point
{

    NSIndexPath *indexPath = [listView indexPathForRowAtPoint:point];
    if (indexPath) {
            UITableViewCell *cell = [listView cellForRowAtIndexPath:indexPath];
            context.sourceRect = cell.frame;//设置突出显示的区域,不然整个tableView会突出显示
            NewsDetailViewController *newsDetailView = [[NewsDetailViewController alloc] init];
            return newsDetailView;
        }
    }

    return nil;

}
4.Peek选项
Peek选项就是在Peek的时候,向上滑动,会有一些选项,可以快速执行某些操作,添加Peek选项,需要在想要预览的VC中添加如下方法:
- (NSArray> *)previewActionItems {
    UIPreviewAction* action1 = [UIPreviewAction actionWithTitle:@"选项1" style:UIPreviewActionStyleDefault handler:^(UIPreviewAction * _Nonnull action, UIViewController * _Nonnull previewViewController) {
        NSLog(@"点击了选项1");
    }];

    UIPreviewAction* action2 = [UIPreviewAction actionWithTitle:@"选项2" style:UIPreviewActionStyleSelected handler:^(UIPreviewAction * _Nonnull action, UIViewController * _Nonnull previewViewController) {
        NSLog(@"点击了选项2");
    }];

    UIPreviewAction* action3 = [UIPreviewAction actionWithTitle:@"选项3" style:UIPreviewActionStyleDestructive handler:^(UIPreviewAction * _Nonnull action, UIViewController * _Nonnull previewViewController) {
        NSLog(@"点击了选项3");
    }];

    return [NSArray arrayWithObjects:action1,action2, action3, nil];
}
5.响应Pop
- (void)previewingContext:(id )previewingContext commitViewController:(UIViewController *)viewControllerToCommit
{
    [self showViewController:vc sender:self];
    //或者下面这句
   // [self.navigationController pushViewController: viewControllerToCommit animated:NO];
}
总之就是把刚才Peek的内容,按照需要的逻辑显示出来,就可以了


