Self-Driving Car Engineer Nanodegree
Project: Behavioral Cloning
Behavioral Cloning Project
The goals / steps of this project are the following:
- Use the simulator to collect data of good driving behavior
- Build, a convolution neural network in Keras that predicts steering angles from images
- Train and validate the model with a training and validation set
- Test that the model successfully drives around track one without leaving the road
- Summarize the results with a written report
Rubric Points
Here I will consider the rubric points individually and describe how I addressed each point in my implementation.
Files Submitted & Code Quality
1. Submission includes all required files and can be used to run the simulator in autonomous mode
My project includes the following files:
- model.py containing the script to create and train the model
- drive.py for driving the car in autonomous mode
- model.h5 containing a trained convolution neural network
- writeup_report.md or writeup_report.pdf summarizing the results
2. Submission includes functional code
Using the Udacity provided simulator and my drive.py file, the car can be driven autonomously around the track by executing
python drive.py model.h5
3. Submission code is usable and readable
The model.py file contains the code for training and saving the convolution neural network. The file shows the pipeline I used for training and validating the model, and it contains comments to explain how the code works.
Model Architecture and Training Strategy
1. An appropriate model architecture has been employed
My model is using keras library.
The model is based on Nvidia net, consists of 5 convolution neural network layers and 4 dense layers. (model.py lines 75-90)
The model includes RELU layers to introduce nonlinearity (code line 78-82), and the data is normalized in the model using a Keras lambda layer (code line 76). Three dropout layer is add to the model to reduce overfitting.
my code:
model = Sequential()
model.add(Lambda(lambda x: ((x / 255.0) - 0.5), input_shape=(160,320,3))) #normalize the data
model.add(Cropping2D(cropping=((70,25), (0,0))))
model.add(Conv2D(24,(5,5),strides=(2,2),activation="relu")) #conv layer 1
model.add(Conv2D(36,(5,5),strides=(2,2),activation="relu"))
model.add(Conv2D(48,(5,5),strides=(2,2),activation="relu"))
model.add(Conv2D(64,(3,3),activation="relu"))
model.add(Conv2D(64,(3,3),activation="relu"))
model.add(Flatten())
model.add(Dense(100))
model.add(Dense(50))
model.add(Dense(10))
model.add(Dense(1))
2. Attempts to reduce overfitting in the model
The model contains dropout layers in order to reduce overfitting (model.py lines 85.87.89).
The epoch was set to 2, more then these number, seems no help to the validation loss.
The model was tested by running it through the simulator and ensuring that the vehicle could stay on the track.
3. Model parameter tuning
The model used an adam optimizer, so the learning rate was not tuned manually (model.py line 93).
4. Appropriate training data
Training data was chosen to keep the vehicle driving on the road. Base on the training data from project site. I found the car always fail at the corner after the bridge, so I add 10 times of corner data.
Model Architecture and Training Strategy
1. Solution Design Approach
The overall strategy for deriving a model architecture was to make the program run, then improve the performance step by step.
My first step was to use only one Flatten layer and one Dense layer, to make sure the clone.py can run and build the model.h5 file. I run the drive.py and the simulator to make sure the enviroment works well.
original model:
model = Sequential()
model.add(Flatten(input_shape=(160,320,3)))
model.add(Dense(1))
Then I change the model to Lenet, I am familiar with this model because I have use in "Traffic sign classifier".The performance is better, the car can run on the road but fail at the corner after the bridge.
Lenet model:
#Lenet model
model = Sequential()
model.add(Lambda(lambda x: ((x / 255.0) - 0.5), input_shape=(160,320,3))) #normalize the data
model.add(Cropping2D(cropping=((70,25), (0,0))))
model.add(Convolution2D(6,5,5,activation="relu"))
model.add(MaxPooling2D())
model.add(Convolution2D(6,6,5,activation="relu"))
model.add(MaxPooling2D())
model.add(Flatten())
model.add(Dense(120))
model.add(Dense(84))
model.add(Dense(1))
After add more data, the car still can't go through the corner. So I think Lenet has only two convolution layer, maybe the model can't fully understand the information in the data. This is a kind of underfitting.The model need more layers and more connection.I change the model to NVIDIA model, this model have 5 convolution layer and 4 dense layer, it is deeper than Lenet.NVIDIA model works better than Lenet model, the car can run through the corner.
nvidia model:
#nvidia model
model = Sequential()
model.add(Lambda(lambda x: ((x / 255.0) - 0.5), input_shape=(160,320,3))) #normalize the data
model.add(Cropping2D(cropping=((70,25), (0,0))))
model.add(Conv2D(24,(5,5),strides=(2,2),activation="relu")) #conv layer 1
model.add(Conv2D(36,(5,5),strides=(2,2),activation="relu"))
model.add(Conv2D(48,(5,5),strides=(2,2),activation="relu"))
model.add(Conv2D(64,(3,3),activation="relu"))
model.add(Conv2D(64,(3,3),activation="relu"))
model.add(Flatten())
model.add(Dense(100))
model.add(Dense(50))
model.add(Dense(10))
model.add(Dense(1))
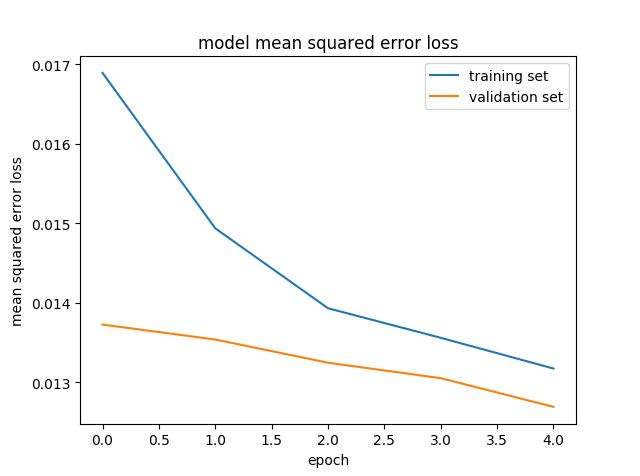
In order to gauge how well the model was working, I split my image and steering angle data into a training and validation set. I found that original NVIDIA model had a low mean squared error on the training set but a high mean squared error on the validation set. After epoch2 the validation error is increase. This implied that the model was overfitting.
To combat the overfitting, I add three dropout layer after dense layer. It looks better, the validation loss is still decrease at epoch5. But I find the validation accuracy did not proportinal to the drive performance. Validation accuracy 0.013 is not better than 0.015, that is a strange situation, i have not find the answer.

At the end of the process, (without the dropout layer) the vehicle is able to drive autonomously around the track without leaving the road.
2. Final Model Architecture
The final model architecture (model.py lines 74-90) consisted of a convolution neural network with the following layers and layer sizes:
- image normalization using lamda function
- Cropping2D, give up the top 70 pixel and bottom 25 pixel in the pictures
- Convolution:5x5, filter:24,stride:2x2,activation:RELU
- Convolution:5x5, filter:36,stride:2x2,activation:RELU
- Convolution:3x3, filter:48,stride:2x2,activation:RELU
- Convolution:3x3, filter:64,stride:2x2,activation:RELU
- Convolution:3x3, filter:64,stride:2x2,activation:RELU
- Fully connected: neurons:100
- Fully connected: neurons:50
- Fully connected: neurons:10
- Fully connected: neurons:1
3. Creation of the Training Set & Training Process
To capture good driving behavior, I first recorded two laps on track one using center lane driving. Here is an example image of center lane driving:

I then use three camera data, left, middle and right. I want teach the model when the car is not in the middle of the road, how to come back. Using left image and right image is a good way, because I can add a correction value to the angle, then told the car to come back.
left image:
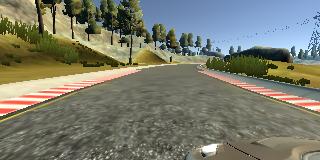
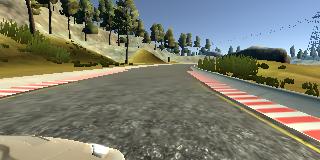
middle image:
right image:
I use these code to load the left image, right image and modify the angle:
for i in range(3):
    name = 'data/IMG/'+batch_sample[i].split('/')[-1]
    image = cv2.imread(name)
    images.append(image)
    correction = 0.1
    if i == 0:
        angle = float(batch_sample[3])#middle image
    if i == 1:
        angle = float(batch_sample[3]) + correction#left image
    if i == 2:
        angle = float(batch_sample[3]) - correction#right image
    angles.append(angle)
The track1 is mostly left corner, so how the teach the car turn left? One way is record counter-clockwise laps. Another way is flip the image, and flip the steering angle. I prefer the easiest way, so I horizontal flip the image.
fliped image:

I use these code to filp the image and steering angle:
#flip image
augmented_measurements,augmented_images = [],[]
for image,measurement in zip(images, angles):
    augmented_images.append(image)
    augmented_measurements.append(measurement)
    augmented_images.append(cv2.flip(image,1))
    augmented_measurements.append(measurement*-1.0)
images = augmented_images
angles = augmented_measurements
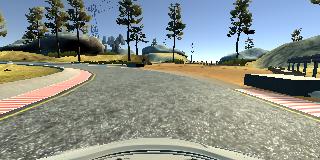
After above workings, the car still stucked at the corner after the bridge.This corner has significant different compare to other corners, the corner has a dark border. So I think get more traning data at the corner is a good way to improve the performance. And another attempt is improve the model, use more convolution layers.I record 10 times pictures about this corner.
The corner after the bridge, has a dark border:
After the collection process, I had 27957(9319x3) number of data points.
I finally randomly shuffled the data set and put 20% of the data into a validation set. I used this training data for training the model. The validation set helped determine if the model was over or under fitting. The ideal number of epochs was 5 as evidenced by more epochs didn't improve the drive performance. I used an adam optimizer so that manually training the learning rate wasn't necessary.
4. Use data generator to save memery
The traning data has more then 20000 images(160,320,3), load these images need huge memery.Generators can be a great way to work with large amounts of data. Instead of storing the preprocessed data in memory all at once, using a generator you can pull pieces of the data and process them on the fly only when you need them, which is much more memory-efficient.
Instead of using return, the generator uses yield, which still returns the desired output values but saves the current values of all the generator's variables. When the generator is called a second time it re-starts right after the yield statement, with all its variables set to the same values as before.
This is my code for generator:
#define generator, load the samples batch by batch, saving computer memory.
def generator(samples, batch_size=32):
    num_samples = len(samples)
    while 1: # Loop forever so the generator never terminates
        #shuffle(samples)
        for offset in range(0, num_samples, batch_size):
            batch_samples = samples[offset:offset+batch_size]

            #load image to memory
            images = []
            angles = []
            for batch_sample in batch_samples:
                for i in range(3):
                    name = 'data/IMG/'+batch_sample[i].split('/')[-1]
                    image = cv2.imread(name)
                    images.append(image)
                    correction = 0.1
                    if i == 0:
                        angle = float(batch_sample[3])#middle image
                    if i == 1:
                        angle = float(batch_sample[3]) + correction#left image
                    if i == 2:
                        angle = float(batch_sample[3]) - correction#right image
                    angles.append(angle)

            #flip image
            augmented_measurements,augmented_images = [],[]
            for image,measurement in zip(images, angles):
                augmented_images.append(image)
                augmented_measurements.append(measurement)
                augmented_images.append(cv2.flip(image,1))
                augmented_measurements.append(measurement*-1.0)
            images = augmented_images
            angles = augmented_measurements

            # trim image to only see section with road
            X_train = np.array(images)
            y_train = np.array(angles)

            yield sklearn.utils.shuffle(X_train, y_train)
Befor using generator , the memory cost is almost 18GB.When using generator, the memory cost if less than 6GB.


My record:
- Initial model,add normalize
- change network structure to LeNet, failed at first corner.
- change drive speed to 10mph
- flip images
- add left image and right image, offset = 0.05
- alarm "mamery not enough", add memery to 24GB
- add Cropping layer
- left image and right image,offset = 0.2, epochs=3
- left image and right image, offset = 0.1, epochs=3
- use fit generator, memery cost less than 6GB
- add 3 laps data, still can't go through the corner after the bridge
- use original data, plus 6 times of the corner after the bridge (keybord input)
- use original data, plus 10 times of the corner after the bridge (keybord input)
- change model structure to Nvidia model (5 convolution layer and 4 Dense layer), the car can run the whole lap.
- recording video in autonomous mode
- visualizing loss using history_object
- add drop out layer, validation accuracy = 0.013 , but fail at the corner
- delete drop out layer, epochs = 2, drive speed = 15mph
Suggest possible improvements to the program
1)Haven't found the relation between validation accurcy and drive performance. Using dropout and 5 epochs could make the car drive smooth, but the car failed at the corner after the bridge. I think better traning data or more traning data maybe improve the performance.
2)I use keyboard to record the drive data, I plan to buy a joystick to record better traning data.
3)Try the second track.