RxCache--打造自己的Android缓存框架

简介

提供Android缓存功能,包括对SD卡内存Sharedpreference以及同时存储SD卡内存的双层缓存操作,缓存对象包括:实现序列化的对象Bitmap以及字符数组。下载项目https://github.com/bh4614910/RxCache。

1.使用

导入项目依赖

    implementation "io.reactivex:rxandroid:1.2.1"
    implementation "io.reactivex:rxjava:1.1.6"

在调用缓存API之前需要初始化缓存配置,推荐在Application当中进行初始化.

        //初始化缓存配置,包括磁盘缓存路径,缓存大小,内存缓存大小,加密策略等。
        // 最后调用.install(this)方法完成初始化
        CacheInstaller.get()
                .configDiskCache("TestCache", 50 * 1024 * 1024, 1)
                .install(this);

完成初始化之后就可以正常使用缓存操作了。

存储

项目本身一共两种缓存的调用方式:

  • 直接在项目当中进行链式的调用。
  • 一种是类似于retrofit的接口调用方式。

存储的对象可以是实现序列化的对象Bitmap以及字符数组。以缓存bitmap为例,看一下调用实例:

调用方式一
/**
 * 定义接口
 */
public interface TestInerface {
    //注解标明请求方式,超时时间等等
    //method设置当前操作为put,调用缓存到SD卡以及内存当中的双层缓存
    @Method(methodType = MethodType.PUT,cacheType = CacheType.TWO_LAYER)
    //设置过期时间为1天
    @Lifecycle(time = 1,unit = TimeUnit.DAYS)
     Observable putData( @CacheKey String key,@CacheValue T value, @CacheClass Class clazz);
}

//调用缓存存储bitmap
TestInerface testInerface = RetrofitCache.create(TestInerface.class);
testInerface.putData("testKey", bitmap, Bitmap.class).observeOn(AndroidSchedulers.mainThread())
.subscribe(new Action1() {
                    @Override
                    public void call(Boolean aBoolean) {
                        Toast.makeText(TestActivity.this, aBoolean + "", Toast.LENGTH_SHORT).show();
                    }
                });

整个存储过程可分为两步:

  1. 定义接口,并通过注解标明请求方式,请求参数等。
  2. 在项目中调用缓存API。

整个API的调用过程与Retrofit很相似,在定义接口时的注解说明如下:

注解 类型 说明
@Lifecycle 方法注解 设置过期时间,包括时长和单位,存储时调用
@Method 方法注解 设置缓存方法以及存储方式
@ShareName 方法注解 sharedPreference缓存时的文件名
@Strategy 方法注解 设置超时策略,读取缓存时调用
@CacheClass 参数注解 设置缓存类,标注一个Class对象
@CacheKey 参数注解 设置缓存的key值,标注一个String对象
@CacheValue 参数注解 设置缓存内容
调用方式二

直接通过链式调用

        //调用put方法存储数据
        RxCache.get().setTimeout(1, TimeUnit.DAYS)
                .putData2TwoLayer("diskKey", bitmap).observeOn(AndroidSchedulers.mainThread())
                .subscribe(new Action1() {
                    @Override
                    public void call(Boolean aBoolean) {
                        Toast.makeText(TestActivity.this, aBoolean + "", Toast.LENGTH_SHORT).show();
                    }
                });
            //setTimeout方法设置超时时间
            //putData2TwoLayer调用双层缓存,参数为缓存的key值以及缓存内容

调用存储方法putXX后返回一个Observable对象,当返回true时代表缓存成功,返回false代表缓存失败。

两种方法各有利弊

  • 方式一方便对缓存的管理,并省去在项目中对缓存策略等的配置内容。
  • 方式二调用方式更直接,代码也相对更少一些。

注意:无论哪种调用方式,都需要先初始化配置信息。

读取

读取方式和存储类似,也分为两种,详细调用内容不再赘述,直接看代码。

//----------------------方式一------------------------------
//定义接口
public interface TestInerface {
    //注解标明请求方式,超时策略等等
    //请求方式为get,读取对象为从SD卡中读取
    @Method(methodType = MethodType.GET,cacheType = CacheType.DISK)
    //设置超时策略,当数据超时时返回null
    @Strategy(key = ExpirationPolicies.ReturnNull)
     Observable getData(@CacheKey String key, @CacheClass Class clazz);
}
testInerface.getData("testKey",Bitmap.class).observeOn(AndroidSchedulers.mainThread())
.subscribe(new Action1() {
                    @Override
                    public void call(Bitmap s) {
                        if (s != null) {
                            testImage.setImageBitmap(s);
                        } else {
                            Toast.makeText(TestActivity.this, "数据为null", Toast.LENGTH_SHORT).show();
                        }
                    }
                });

//----------------------方式二------------------------------
 RxCache.get().getDataTwoLayer("diskKey", Bitmap.class).observeOn(AndroidSchedulers.mainThread())
 .subscribe(new Action1() {
                    @Override
                    public void call(Bitmap s) {
                        if (s != null) {
                            testImage.setImageBitmap(s);
                        } else {
                            Toast.makeText(TestActivity.this, "数据为null", Toast.LENGTH_SHORT).show();
                        }
                    }
                });

读取缓存会返回一个Observable对象,通过subscribe()订阅后可以拿到返回的数据,并进行操作。

注意:默认执行subscribe()的线程为调用时所在线程,如果需要修改线程,需自行调用observeOn()方法修改调用线程。

另外还有删除清空缓存等API,调用方式与存储读取类似,省略这部分内容,感兴趣的可以自己下载试一下。https://github.com/bh4614910/RxCache
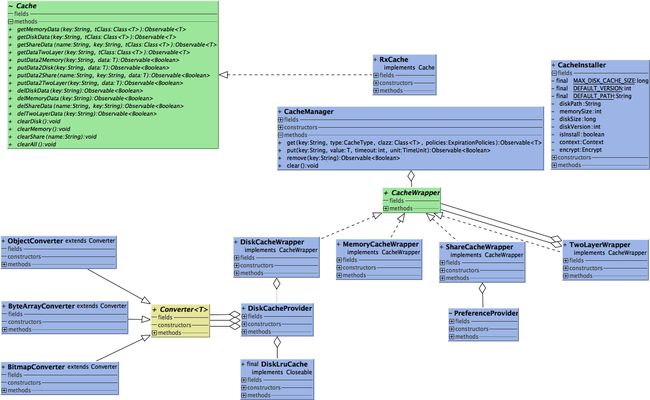
2.架构设计

说完对整个API的使用,再来详细看一下整个缓存的项目结构。


RxCache--打造自己的Android缓存框架_第1张图片
CacheUML.png

整个项目可以大体分为三层

  • 基础层:主要负责存储的基础操作,包括对SD卡内存SharedPreference的基础操作。
  • 控制层:负责根据对不同的事务类型进行分发。
  • API:对外暴露的API,目前提供两种API调用方式。

3.基础层实现

基础操作分为三种:sharedPreferencememory以及disk。对于三种存储方式,提供统一的供上层调用的API接口CacheWrapper

/**
 * 缓存控制类接口
 */

public interface CacheWrapper {

    /**
     * 读取缓存类
     *
     * @param  缓存值类型,需要实现Parcelable接口
     * @param key 缓存的key值
     * @return 返回CacheResult类型
     */
     CacheResource get(String key, Class clazz);

    /**
     * 存储缓存类
     *
     * @param key   缓存的key值
     * @param value 缓存值
     * @param    缓存值类型,需要实现Parcelable接口
     * @return 返回true或者false表示缓存是否成功
     */
     boolean put(String key, CacheResource value);

    /**
     * 清空缓存
     */
    void clear();

    /**
     * 删除某个值
     *
     * @param key 需要删除的缓存值对应key
     * @return 返回true或者false表示删除是否成功
     */
    boolean remove(String key);


    /**
     * 构造用工厂接口
     */
    interface Factory {
    }

    interface Factory2 {
        CacheWrapper create(Context context, CacheType type, String shareName);
    }
}

各个存储方法再各自实现对应的存储内容。

sharedPreference是我们在项目当中经常用到的,为了让它也满足上层API的调用,我们对它的基础操作进行封装PreferenceProvider,之后再对接口进行具体实现DiskCacheWrapper

memory也就是我们的内存缓存,我们选用LruCache作为基础操作类型,LruCache的核心思想就是要维护一个缓存对象列表,其中对象列表的排列方式是按照访问顺序实现的,即一直没访问的对象,将放在队尾,即将被淘汰。而最近访问的对象将放在队头,最后被淘汰。有兴趣的可以去了解一下LruCache的具体实现。

使用时我们先初始化LruCache并重写sizeOf方法,计算存储数据的大小,这里我提供了一个SizeUtil方便大小的计算,之后的调用方式非常简单,直接看代码

/**
 * 内存缓存控制类
 */

public class MemoryCacheWrapper implements CacheWrapper {
    private LruCache memoryCache;
    private static final int DEFAULT_MEMORY_CACHE_SIZE = (int) (Runtime.getRuntime().maxMemory() / 8);

    public static MemoryCacheWrapper get(){
        return MemoryCacheHolder.mInstance;
    }

    private MemoryCacheWrapper() {
        memoryCache = new LruCache(getCacheSize()) {
            @Override
            protected int sizeOf(String key, Object value) {
                if (Bitmap.class.isAssignableFrom(value.getClass())) {
                    return (int)SizeUtil.getBitmapSize((Bitmap) value);
                } else {
                    return (int) SizeUtil.getValueSize(value);
                }
            }
        };
    }

    /**
     * 获取缓存大小
     *
     * @return
     */
    private int getCacheSize() {
        int cacheSize = CacheInstaller.get().getMemorySize();
        if (cacheSize <= 0) {
            cacheSize = DEFAULT_MEMORY_CACHE_SIZE;
        }
        return cacheSize;
    }


    @Override
    public  CacheResource get(String key, Class clazz) {
        CacheResource value = (CacheResource) memoryCache.get(key);
        if (value != null) {
            return value;
        }
        return null;
    }

    @Override
    public  boolean put(String key, CacheResource value) {
        if (value != null && memoryCache.get(key) == null) {
            memoryCache.put(key, value);
            return true;
        } else {
            LogUtil.log("value值为空或key值以及存在");
        }
        return false;
    }

    @Override
    public void clear() {
        memoryCache.evictAll();
    }

    @Override
    public boolean remove(String key) {
        Object object = memoryCache.remove(key);
        if (object == null) {
            return false;
        } else {
            return true;
        }
    }

    private static class MemoryCacheHolder {

        public static MemoryCacheWrapper mInstance = new MemoryCacheWrapper();

        private MemoryCacheHolder() {
        }
    }
}

有些缓存模块没有使用LruCache,而是使用HashMap作为存储结构,两种方案都是可行的,这里使用LruCache主要是为了方便图片的存储。

细心的朋友会发现这里put的参数和get返回的数据都是CacheResource类型,我们把存储的数据,以及超时时间等统一的存储进这个数据结构,也就是说CacheResource作为控制层和基础层传递的介质。

之后就是disk也就是SD卡的存储。这一部分使用DiskLruCache作为基础操作类型,和sharedPreference一样,首先我们对DiskLruCache的操作进行封装,以统一对上层调用的API。

/**
 * Created by liubohua on 2018/7/24.
 * 提供本地缓存基础操作。
 */

public class DiskCacheProvider {
    private DiskLruCache diskLruCache;
    private Converter objectConverter;
    private Converter bitmapConverter;
    private Converter byteArrayConverter;

    public DiskCacheProvider(File directory, int appVersion, long maxSize) {
        objectConverter = new ObjectConverter();
        bitmapConverter = new BitmapConverter();
        byteArrayConverter = new ByteArrayConverter();
        try {
            diskLruCache = DiskLruCache.open(directory, appVersion, 1, maxSize);
        } catch (IOException e) {
            e.printStackTrace();
        }
    }

    public CacheResource getBitmap(String key) {
        DiskLruCache.Snapshot snapShot = null;
        try {
            snapShot = diskLruCache.get(key);
            if (snapShot != null) {
                InputStream is = snapShot.getInputStream(0);
                CacheResource value = null;
                value = bitmapConverter.read(is);
                if (value != null) {
                    return value;
                }
            }
        } catch (IOException e) {
            e.printStackTrace();
        } finally {
            snapShot.close();
        }
        return null;
    }

    public CacheResource getObject(String key) {
        DiskLruCache.Snapshot snapShot = null;
        try {
            snapShot = diskLruCache.get(key);
            if (snapShot != null) {
                InputStream is = snapShot.getInputStream(0);
                CacheResource value = null;
                value = objectConverter.read(is);
                if (value != null) {
                    return value;
                }
            }
        } catch (IOException e) {
            e.printStackTrace();
        } finally {
            if(snapShot!=null){
                snapShot.close();
            }
        }
        return null;

    }

    public CacheResource getBytes(String key) {
        DiskLruCache.Snapshot snapShot = null;
        try {
            snapShot = diskLruCache.get(key);

            if (snapShot != null) {
                InputStream is = snapShot.getInputStream(0);
                CacheResource value = null;
                value = byteArrayConverter.read(is);
                if (value != null) {
                    return value;
                }
            }
        } catch (IOException e) {
            e.printStackTrace();
        } finally {
            if (snapShot != null) {
                snapShot.close();
            }
        }
        return null;
    }

    public boolean putObject(String key, CacheResource value) {
        try {
            DiskLruCache.Editor editor = diskLruCache.edit(key);
            OutputStream outputStream = editor.newOutputStream(0);
            boolean result = false;
            result = objectConverter.write(value, outputStream);
            if (result) {
                editor.commit();
            } else {
                editor.abort();
            }
            return result;
        } catch (IOException e) {
            LogUtil.error("存储报错", e);
        }
        return false;
    }

    public boolean putBitmap(String key, CacheResource value) {
        try {
            DiskLruCache.Editor editor = diskLruCache.edit(key);
            OutputStream outputStream = editor.newOutputStream(0);
            boolean result = false;
            result = bitmapConverter.write(value, outputStream);
            if (result) {
                editor.commit();
            } else {
                editor.abort();
            }
            return result;
        } catch (IOException e) {
            LogUtil.error("存储报错", e);
        }
        return false;
    }

    public boolean putBytes(String key, CacheResource value) {
        try {
            DiskLruCache.Editor editor = diskLruCache.edit(key);
            OutputStream outputStream = editor.newOutputStream(0);
            boolean result = false;
            result = byteArrayConverter.write(value, outputStream);
            if (result) {
                editor.commit();
            } else {
                editor.abort();
            }
            return result;
        } catch (IOException e) {
            LogUtil.error("存储报错", e);
        }
        return false;
    }

    public boolean remove(String key) {
        try {
            return diskLruCache.remove(key);
        } catch (IOException e) {
            e.printStackTrace();
        }
        return false;
    }

    public void clear() {
        try {
            diskLruCache.delete();
        } catch (IOException e) {
            e.printStackTrace();
        }
    }


}

在这个类当中除了对DiskLruCache的封装外,还有三个转换器ObjectConverterBitmapConverterByteArrayConverter分别用于将三种存储的数据类型转换成对应的流进行存储。以ObjectConverter为例,我们看一下这部分代码。

/**
 * 类与流的转换器,需要实现序列化的对象
 */
public class ObjectConverter extends Converter {
    public boolean write(CacheResource value, OutputStream outputStream) {
        ObjectOutputStream oos = null;
        try {
            oos = new ObjectOutputStream(outputStream);
            writeHeader(outputStream,value);
            oos.writeObject(value.getData());
            oos.flush();
            return true;
        } catch (IOException e) {
            LogUtil.error("ObjectConverter数据解析出错", e);
        } finally {
            try {
                oos.close();
            } catch (IOException e) {
                e.printStackTrace();
            }
        }
        return false;
    }

    public CacheResource read(InputStream inputStream) {
        ObjectInputStream ois = null;
        CacheResource cacheObject = new CacheResource<>();
        try {
            ois = new ObjectInputStream(inputStream);
            readHeader(inputStream,cacheObject);
            cacheObject.setData(ois.readObject());
            return cacheObject;
        } catch (IOException e) {
            LogUtil.error("ObjectConverter数据解析出错", e);
        } catch (ClassNotFoundException e) {
            LogUtil.error("ObjectConverter数据解析出错", e);
        } finally {
            try {
                ois.close();
            } catch (IOException e) {
                e.printStackTrace();
            }
        }
        return null;
    }
}

这个类继承自Converter方法,这个类提供了readHeader(inputStream,cacheObject)writeHeader(outputStream,value)方法,以魔法数字的形式存储超时时间等除存储内容之外的数据。

之后把DiskCacheProvider封装为DiskCacheWrapper供控制层调用。

4.控制层

控制层的工作主要有

  • 根据不同的操作类型分发事务。
  • 对超时时间加以判断,触发超时策略。
  • CacheResource的封装和解析。
  • key值进行加密
/**
 * Cache管理类
 */

public class CacheManager {
    private CacheWrapper wrapper;
    private Encrypt encrypt;

    public CacheManager(CacheWrapper wrapper, Encrypt encrypt) {
        this.wrapper = wrapper;
        this.encrypt = encrypt;
    }

    /**
     * 获取缓存内容
     *
     */
    public  Observable get(final String key, final CacheType type, final Class clazz, final ExpirationPolicies policies) {
        Observable observable = Observable.create(new Observable.OnSubscribe>() {
            @Override
            public void call(Subscriber> subscriber) {
                String cacheKey = encrypt.getEncryptKey(key);
                CacheResource cacheResource = null;
                if(wrapper!=null){
                    cacheResource = wrapper.get(cacheKey,clazz);
                }
                subscriber.onNext(cacheResource);
                subscriber.onCompleted();
            }
        }).filter(new Func1, Boolean>() {
            @Override
            public Boolean call(CacheResource resource) {
                if (resource != null) {
                    if (resource.isExpired()) {
                        if (policies == ExpirationPolicies.ReturnNull) {
                            resource.setData(null);
                        }
                        remove(key).subscribe();
                    }
                }
                return true;
            }
        }).map(new Func1, T>() {
            public T call(CacheResource resource) {
                if (resource != null) {
                    return resource.getData();
                } else {
                    return null;
                }
            }
        }).subscribeOn(Schedulers.io());


        return observable;
    }

    /**
     * 添加缓存
     */
    public  Observable put(final String key, final T value, final long timeout, final TimeUnit unit) {
        Observable observable = Observable.create(new Observable.OnSubscribe() {
            @Override
            public void call(Subscriber subscriber) {
                String cacheKey = encrypt.getEncryptKey(key);
                CacheResource cacheResource = new CacheResource<>(value, System.currentTimeMillis(), timeout, unit);
                boolean result = false;
                if (wrapper != null) {
                    result = wrapper.put(cacheKey, cacheResource);
                }
                subscriber.onNext(result);
                subscriber.onCompleted();
            }
        }).subscribeOn(Schedulers.io());

        return observable;
    }

    /**
     * 移除缓存内容
     *
     */
    public Observable remove(final String key) {
        Observable observable = Observable.create(new Observable.OnSubscribe() {
            @Override
            public void call(Subscriber subscriber) {
                boolean result = false;
                String cacheKey = encrypt.getEncryptKey(key);
                if (wrapper != null) {
                    wrapper.remove(cacheKey);
                }
                subscriber.onNext(result);
                subscriber.onCompleted();
            }
        }).subscribeOn(Schedulers.io());

        return observable;
    }

    /**
     * 清空缓存
     */
    public void clear() {
        if (wrapper != null) {
            wrapper.clear();
        }
    }

    public static class CacheWrapperFactory implements CacheWrapper.Factory2 {
        @Override
        public CacheWrapper create(Context context, CacheType type, String shareName) {
            if (type == CacheType.DISK) {
                return new DiskCacheWrapper();
            } else if (type == CacheType.MEMORY) {
                return MemoryCacheWrapper.get();
            } else if (type == CacheType.SHARED) {
                return new ShareCacheWrapper(context, shareName);
            } else if (type == CacheType.TWO_LAYER) {
                return new TwoLayerWrapper();
            }
            return null;
        }
    }

}

对外提供加密接口Encrypt,用户可以实现这个接口并实现自己的加密方式,默认使用MD5加密。

5.封装api

封装的API主要有三部分:

  • CacheInstaller缓存的配置类
  • RxCache对外提供的存取操作API
  • RetrofitCacheRetrofit的形式调用API

CacheInstaller以单例的形式对外提供,在一个项目当中,该类应该之初始化一次,简单看一下这部分代码。

public class CacheInstaller {
    private static final long MAX_DISK_CACHE_SIZE = 50 * 1024 * 1024; // 50MB
    private static final int DEFAULT_VERSION = 1;
    private static final String DEFAULT_PATH = "cache";
    private String diskPath;
    private int memorySize;
    private long diskSize =0l;
    private int diskVersion = -1;
    private boolean isInstall = false;
    private Context  context;
    private Encrypt encrypt;

    private CacheInstaller() {
    }

    private static class SingleTon {
        private static CacheInstaller INSTANCE = new CacheInstaller();
    }

    public static CacheInstaller get() {
        return SingleTon.INSTANCE;
    }

    /**
     * 配置磁盘缓存配置
     */
    public CacheInstaller configDiskCache(String diskPath, long diskSize, int diskVersion) {
        if (isInstall) {
            return this;
        }
        this.diskPath = diskPath;
        this.diskSize = diskSize;
        this.diskVersion = diskVersion;
        return this;
    }

    /**
     * 配置内存缓存配置
     *
     */
    public CacheInstaller configMemoryCache(int memorySize) {
        if (isInstall) {
            return this;
        }
        this.memorySize = memorySize;
        return this;
    }

    /**
     * 配置全局加密方式
     *
     */
    public CacheInstaller encryptFactory(Encrypt.Factory factory) {
        if (isInstall) {
            return this;
        }
        if(factory!=null){
            encrypt = factory.create();
        }
        return this;
    }

    /**
     * 完成装填工作
     */
    public void install(Context context) {
        this.isInstall = true;
        this.diskPath = getDirectory(context);
        this.diskVersion = getVersion();
        this.diskSize = getCacheSize(context);
        this.encrypt = createEncrypt();
        this.context = context.getApplicationContext();
    }

    /**
     * 重置装填状态
     * 慎用
     */
    public void resume() {
        this.isInstall = false;
    }
}

RxCache的代码只是对外提供API,没有逻辑代码。

RetrofitCache使用动态代理的方式。

    public static  T create(Class clazz) {
        RetrofitProxy proxy = new RetrofitProxy();
        try {
            return (T) Proxy.newProxyInstance(RetrofitCache.class.getClassLoader(), new Class[]{clazz}, proxy);
        } catch (Exception e) {
            e.printStackTrace();
        }
        return null;
    }
    
    public class RetrofitProxy implements InvocationHandler {
    RxCache rxCache;

    @Override
    public Object invoke(Object proxy, Method method, Object[] args) throws Throwable {
        car.wuba.saas.cache.retrofit.annotation.Method method1 = method.getAnnotation(car.wuba.saas.cache.retrofit.annotation.Method.class);
        Strategy strategy = method.getAnnotation(Strategy.class);
        Lifecycle lifecycle = method.getAnnotation(Lifecycle.class);
        ShareName shareName = method.getAnnotation(ShareName.class);
        Class CacheClazz = null;
        Object CacheValue = null;
        String CacheKey = null;

        Annotation[][] allParamsAnnotations = method.getParameterAnnotations();

        //获取key、value等注解对应的参数
        if (allParamsAnnotations != null) {
            for (int i = 0; i < allParamsAnnotations.length; i++) {
                Annotation[] paramAnnotations = allParamsAnnotations[I];
                if (paramAnnotations != null) {
                    for (Annotation annotation : paramAnnotations) {
                        if (annotation instanceof CacheClass) {
                            CacheClazz = (Class) args[I];
                        }

                        if (annotation instanceof CacheKey) {
                            CacheKey = (String) args[I];
                        }

                        if (annotation instanceof CacheValue) {
                            CacheValue = args[I];
                        }
                    }
                }
            }
        }
        //初始化各项参数
        if (method1 != null) {
            MethodType methodKey = method1.methodType();
            CacheType typeValue = method1.cacheType();
            long time = 0;
            TimeUnit unit = null;
            if (lifecycle != null) {
                time = lifecycle.time();
                unit = lifecycle.unit();
            }
            ExpirationPolicies policies = ExpirationPolicies.ReturnNull;
            if (strategy != null) {
                policies = strategy.key();
            }
            String name = "";
            if (shareName != null) {
                 name = shareName.name();
            }
            rxCache = RxCache.get();
            if (methodKey == MethodType.PUT) {
                return putMethod(typeValue, time, unit, CacheKey, CacheValue, name);
            } else if (methodKey == MethodType.GET) {
                return getMethod(typeValue, policies, CacheKey, CacheClazz, name);
            } else if (methodKey == MethodType.REMOVE) {
                return removeMethod(typeValue, CacheKey, name);
            } else if (methodKey == MethodType.CLEAR) {
                clearMethod(typeValue, name);
            }

        }
        return null;
    }

总结

缓存SDK参考了Glide以及okHttp等内部的缓存形式,并结合我们当前的项目结构和需求进行构建,本人还是个新手,有什么问题还希望大神们多多指教。感兴趣的小伙伴也可以自己下载,修改来试试。下载链接https://github.com/bh4614910/RxCache

你可能感兴趣的:(RxCache--打造自己的Android缓存框架)