标贴-1的结构是:中间字体背景这一块,加上下面两块。通过绝对定位,把下面两块分别定位到中间那块的两头。
两个脚是用
border做的,和做三角形的手法是一样的,只不过是去掉了一个边,留下了三个边。
结构
样式
#header {
    height: 56px;
    display: inline-block;
    position: relative;
    margin-left: 56px;
}
#header a {
    color: #fff;
    text-decoration: none;
    font-size: 24px;
    line-height: 56px;
    padding: 10px 20px;
    background-color: #16A085;    /*--背景色--*/
    border: 3px solid #eee;    /*--边框色--*/
}
/*--伪元素制作边框--*/
#header:before, #header:after {
    content: '';
    height: 0;
    width: 0;
    position: absolute;
    left: -45px;
    top:30px;
    z-index: -1;
}
#header:before {
    border-top:28px solid #018B72;
    border-right:28px solid #018B72;
    border-bottom:28px solid #018B72;
    border-left:28px solid transparent;   /*--左边边框消失--*/
}
#header:after {
    border-top:28px solid #018B72;
    border-right:28px solid transparent;    /*--右边边框消失--*/
    border-bottom:28px solid #018B72;
    border-left:28px solid #018B72;
    right: -45px;    /*--移动到右边--*/
    left: auto;
}
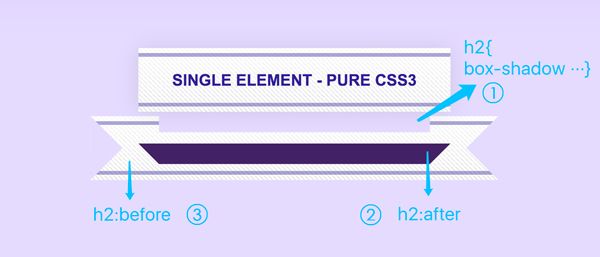
标贴-2的做法又不一样了,共三个图层。
结构
Single Element - Pure CSS3
样式
*{
    margin: 0;
    padding: 0;
}
body {
        background-color: #E5DCFF;
        text-align: center;
        box-shadow: inset 0 0 100px 50px #D0BDFD;   /*--紫色的内阴影--*/
}
h2 {
    display: inline-block;
    font-size: 14px;
    line-height: 28px;
    font-family: arial, verdana;
    outline: none;
    margin: 120px 0;
    padding: 14px 30px;
    color: #302694;
    text-transform: uppercase;   /*--全部大写--*/
    box-shadow:
    0 0 30px 0 rgba(0, 0, 0, .1),
    0 36px 0 -18px #E5DBFF;  /*--h2下面的投影--*/
    position: relative;
}
h2设置了行高和内边距,还没有填充背景色。
h2:before{
    content: '';
    position: absolute;
    top: 18px;
    left: -15%;
    width: 130%;
    height: 0;
    border: 28px solid rgba(0, 0, 0, 0);
    border-left: 28px solid #E5DCFF;
    border-right: 28px solid #E5DCFF;
    z-index: -1;
}
宽度比标题那栏宽30%,所以要往左边挪15%,使两边对称。再往下挪了18个像素。左右边框填充背景色,看起来就像剪掉了一样。
h2:after {
    content: '';
    position: absolute;
    top: 100%;
    left: 0;
    width: 100%;
    height: 0;
    border-top: 18px solid #432464;   /*--只留下上边框,显示为梯形--*/
    border-left: 18px solid transparent;
    border-right: 18px solid transparent;
    z-index: -1;
}
宽度因为和h2是一样的,所以设置了100%,它的位置正好在h2的下面,于是绝对定位设置top:100%,这一层深色的框被上面的h2box-shadow遮住了中间的部分,只剩下左右两个角,正好是想要的效果。
h2, h2:before {
        background-image:

/*上下两条深色的线条*/
        linear-gradient(
            transparent 8%,
            rgba(48, 38, 148, 0.4) 8%,
            rgba(48, 38, 148, 0.4) 14%,
            transparent 14%,
            transparent 86%,
            rgba(48, 38, 148, 0.4) 86%,
            rgba(48, 38, 148, 0.4) 92%,
            transparent 92%),

/*白色带透明度的背景渐变*/
        linear-gradient(
            rgba(255, 255, 255, 0.75),
            rgba(255, 255, 255, 0)
        ),

/*细线条纹理*/
        linear-gradient(
            45deg,
            transparent 40%,
            rgba(0, 0, 0, 0.1) 40%,
            rgba(0, 0, 0, 0.1) 60%,
            transparent 60%),

/*白色背景*/
        linear-gradient(white, white);

/*背景尺寸*/
        background-size:
        cover, /*宽线条*/
        cover, /*白色渐变*/
        4px 4px, /*细线条*/
        cover; /*白色背景*/
}
h2, h2:before, h2:after {
    box-sizing: border-box;
    background-origin: border-box;
}   /*Fix to make the borders appear on the ribbon ends also*/
背景的纹理都是 “渐变属性” 完成的。
最后为什么设置box-sizing: border-box呢?去掉这一条,你会发现:
box-sizing:border-bo是CSS3新增属性,了解这个属性,我们先从块级元素的盒子大小说起,通常一个块级元素实际所占宽高度=外边距(margin)+ 边界宽度(border-width) + 内边距(padding)+ 高度(height) / 宽度(width)
如果设置了border-box,实际所占宽高度 = 设置的高度(height)/ 设置的宽度(width)+ 外边距(margin)。
所以设置了box-sizing:border-bo的h2:before, h2:after会回到之前给它们分别设置的宽度:130%,100%。


