前言:
编辑器扩展部分在开发调试过程中会非常有帮助,基本上每个项目都会涉及到自定义Editor Window和Inspector,以及
制作一些通用的或是针对当前项目的便利性工具,方便开发人员使用。这里做上总结下。之前没怎么关注文档,细节
太多了,后面会不时的回来看看。
ExtendingTheEditor.html
Unity lets you extend the editor with your own custom inspectors and Editor Windows and you can define how properties are displayed in the inspector with custom Property Drawers. This section explains how to use these features.
通过custom inspectors and Editor Windows来扩展我们的编辑器。
1.通过自定义的Property Drawers来自定义Inspector面板,定义字段如何显示在面板上。
2.EditWindow即创建一个脚本派生自EditWindow,通过代码来触发该EditWindow,并在上面添加功能所需要的UI。
注意:(EditWindow不同于IMGUI中的Window,IMGUI的Window是显示在当前的SceneView中,而EditWindow则是弹出一个新的独立窗体,就像Inspector,GameView,SceneView这些独立的内建的窗体组件是一样的)
注意:(所有的这些自定义类的脚本定义都必须放在特殊文件夹Editor下)
定义并显示一个EditWindow:
//C# Example

using UnityEngine;
using UnityEditor;
using System.Collections;

class MyWindow : EditorWindow {
    [MenuItem ("Window/My Window")]

    public static void  ShowWindow () {
        EditorWindow.GetWindow(typeof(MyWindow));
    }

    void OnGUI () {
        // The actual window code goes here
    }
}
默认显示在屏幕上的左上角,你可以随意移动位置,该位置会被保存起来,下一次再打开Window会读取之前的位置,省得你继续调整。
EditorWindow.GetWindow(typeof(MyWindow));
这行代码是启动代码。
如何想要自定久EditWindow的位置,可以使用GetWindowWithRect
//C# Example

using UnityEngine;
using UnityEditor;
using System.Collections;

class MyWindow : EditorWindow {
    [MenuItem ("Window/My Window")]
    public static void  ShowWindow () {
        //EditorWindow.GetWindow(typeof(MyWindow));
        MyWindow window = (MyWindow)EditorWindow.GetWindowWithRect(typeof(MyWindow), new Rect(0, 0, 500, 550));
    }

    void OnGUI () {
        // The actual window code goes here
    }
}
实现EditWindow中的GUI:
EditWindow中UI的部分也是通过OnGUI来实现。所以你可以直接使用GUI或GUILayout来实现,Unity也为Editor单独提供了EditGUI和EditGUILayout,他们可以混合实现。
//C# Example
using UnityEditor;
using UnityEngine;

public class MyWindow : EditorWindow
{
    string myString = "Hello World";
    bool groupEnabled;
    bool myBool = true;
    float myFloat = 1.23f;

    // Add menu item named "My Window" to the Window menu
    [MenuItem("Window/My Window")]
    public static void ShowWindow()
    {
        //Show existing window instance. If one doesn't exist, make one.
        EditorWindow.GetWindow(typeof(MyWindow));

//  EditorWindow window = GetWindow(typeof(MyWindow));
  //      window.position = new Rect(100, 100, 300, 150);
    //    window.Show();
    }

    void OnGUI()
    {
        GUILayout.Label ("Base Settings", EditorStyles.boldLabel);
        myString = EditorGUILayout.TextField ("Text Field", myString);

        groupEnabled = EditorGUILayout.BeginToggleGroup ("Optional Settings", groupEnabled);
            myBool = EditorGUILayout.Toggle ("Toggle", myBool);
            myFloat = EditorGUILayout.Slider ("Slider", myFloat, -3, 3);
        EditorGUILayout.EndToggleGroup ();
    }
}
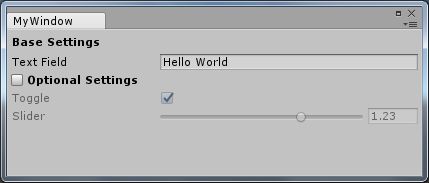
但是可以看出来,EditorGUILayout和EditorGUI显然是封装处理过了,比如Slider,使用GUI或是GUILayout实现,需要
Label+Slider+TextField(不可编辑)的组合,需要手动封装实现,而EditGUILayout就已经封装好了。所以自定义编辑器尽量
是使用EditXXX吧。
Property Drawers:
有两个用处:
1.为每一个可序列化的实例,自定义UI
2.为每一个应用了自定义特性的脚本成员,自定义UI
(为可序列化的类,为某自定义的特性Attribute)
如果你有一个自定义的类,并且他是可序列化的,你想要通过Property Drawer来自定义他在Inspector中的显示。
注意: Property attribute应该放在一个常规的文件夹下,而不是Editor
Property Drawers源码:
using System;
using System.Reflection;
using UnityEngine;

namespace UnityEditor
{
    public abstract class PropertyDrawer : GUIDrawer
    {
        //
        // Properties
        //
        public PropertyAttribute attribute {
            get;
        }

        public FieldInfo fieldInfo {
            get;
        }

        //
        // Constructors
        //
        protected PropertyDrawer ();

        //
        // Methods
        //
        public virtual float GetPropertyHeight (SerializedProperty property, GUIContent label);

        internal float GetPropertyHeightSafe (SerializedProperty property, GUIContent label);

        public virtual void OnGUI (Rect position, SerializedProperty property, GUIContent label);

        internal void OnGUISafe (Rect position, SerializedProperty property, GUIContent label);
    }
}
下面是官方的一个自定义PropertyDrawer例子:
using System;
using UnityEngine;

public enum IngredientUnit { Spoon, Cup, Bowl, Piece }

// Custom serializable class
[Serializable]
public class Ingredient
{
    public string name;
    public int amount = 1;
    public IngredientUnit unit;
}

public class Recipe : MonoBehaviour
{
    public Ingredient potionResult;
    public Ingredient[] potionIngredients;
}
说明:
定义了Ingredient自定义类,可序列化,稍后会通过自定义PropertyDrawer来重新绘制Ingredient在Inspector面板中的布局。
(自定义的类需要手动加上特性Serializable才可以被序列化)
using UnityEditor;
using UnityEngine;

// IngredientDrawer
[CustomPropertyDrawer(typeof(Ingredient))]
public class IngredientDrawer : PropertyDrawer
{
    // Draw the property inside the given rect
    public override void OnGUI(Rect position, SerializedProperty property, GUIContent label)
    {
        // Using BeginProperty / EndProperty on the parent property means that
        // prefab override logic works on the entire property.
        EditorGUI.BeginProperty(position, label, property);

        // Draw label
        position = EditorGUI.PrefixLabel(position, GUIUtility.GetControlID(FocusType.Passive), label);

        // Don't make child fields be indented
        var indent = EditorGUI.indentLevel;
        EditorGUI.indentLevel = 0;

        // Calculate rects
        var amountRect = new Rect(position.x, position.y, 30, position.height);
        var unitRect = new Rect(position.x + 35, position.y, 50, position.height);
        var nameRect = new Rect(position.x + 90, position.y, position.width - 90, position.height);

        // Draw fields - passs GUIContent.none to each so they are drawn without labels
        EditorGUI.PropertyField(amountRect, property.FindPropertyRelative("amount"), GUIContent.none);
        EditorGUI.PropertyField(unitRect, property.FindPropertyRelative("unit"), GUIContent.none);
        EditorGUI.PropertyField(nameRect, property.FindPropertyRelative("name"), GUIContent.none);

        // Set indent back to what it was
        EditorGUI.indentLevel = indent;

        EditorGUI.EndProperty();
    }
}
说明:
定义IngredientDrawer,派生自PropertyDrawer,需要加上特性[CustomPropertyDrawer(typeof(Ingredient))]
typeof(XXX)为需要进行处理的可序列化的自定义类。
通过上面展示出来的PropertyDrawer源码,重写OnGUI(Rect position, SerializedProperty property, GUIContent label)
方法即可。
以 EditorGUI.BeginProperty(position, label, property)开始,并以EditorGUI.EndProperty();结束
中间插入重绘的代码。
EditorGUI.PrefixLabel是在一些控件之前创建一个Label,GUIUtility.GetControlID(FocusType.Passive)获取唯一的控件
ID,FocusType.Passive为焦点类型,passive即不接受焦点,即我们在按下tab键进行控件之间切换时,是否需接受焦点。
(如果需要接受,要通过GetControlID来通过IMGUI系统)
EditorGUI.PrefixLabel通常是获取起始位置,标签则是实例的名称(当前可序列化自定义类的实例)
EditorGUI.indentLevel:缩进级别
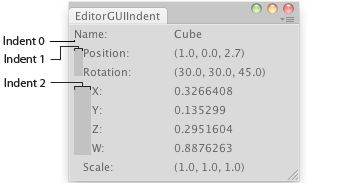
这里设置indentLevel设置为0,所有元素同样的缩进级别,并在最后,恢复至原始的值,这样不会影响到后面控件的使用。
之后分别声明了amountRect,unitRect,nameRect三个指定字段的矩形区域,相对于position的位置。
EditorGUI.PropertyField在编辑器上创建一个序列化的字段。
FindPropertyRelative用于获取指定的字段。
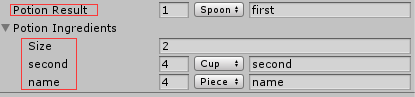
红框标识的是PrefixLabel
通过属性特性Property Attribute来自定义脚本成员的GUI:
比如我当前类中使用了int或是float类型的值,我只想针对该成员进行自定义GUI,而不影响其它元素的布局和显示。
可以针对Property Attribute特性本身应用PropertyDrawer.
// Show this float in the Inspector as a slider between 0 and 10
[Range(0f, 10f)]
float myFloat = 0f;
using UnityEngine;

public class MyRangeAttribute : PropertyAttribute
{
       public readonly float min;
       public readonly float max;

       public MyRangeAttribute(float min, float max)
        {
            this.min = min;
            this.max = max;
        }
}
using UnityEditor;
using UnityEngine;

// Tell the MyRangeDrawer that it is a drawer for properties with the MyRangeAttribute.
[CustomPropertyDrawer(typeof(MyRangeAttribute))]
public class RangeDrawer : PropertyDrawer
{
    // Draw the property inside the given rect
    public overrride void OnGUI(Rect position, SerializedProperty property, GUIContent label)
    {
        // First get the attribute since it contains the range for the slider
        MyRangeAttribute range = (MyRangeAttribute)attribute;

        // Now draw the property as a Slider or an IntSlider based on whether it's a float or integer.
        if (property.propertyType == SerializedPropertyType.Float)
            EditorGUI.Slider(position, property, range.min, range.max, label);
        else if (property.propertyType == SerializedPropertyType.Integer)
            EditorGUI.IntSlider(position, property, (int) range.min, (int) range.max, label);
        else
            EditorGUI.LabelField(position, label.text, "Use MyRange with float or int.");
    }
}
另一个针成类成员的例子,之前文章中有提到过位标志,即进行位|(OR)操作,开关方式,让一个值可以包含多种条件,
也是可以通过自定义Inspector实现,默认定义了一个枚举值,在默认的GUI只是显示一个下拉菜单,里面列所当前枚举类型所有的值,但只能单选,下面小例子实现可以多选的实现:
// Custom serializable class
public enum IngredientUnit { Spoon, Cup, Bowl, Piece }
同样以IngredientUnit枚举为例。
// Custom serializable class
[System.Serializable]
public class Ingredient
{
    public string name;
    public int amount = 1;
    [MyEnum]
    public IngredientUnit unit;
}
在IngredientUnit上应用了自定义特性[MyEnum]
public class MyEnumAttribute:PropertyAttribute
{
    public MyEnumAttribute()
    {

    }
}

[CustomPropertyDrawer(typeof(MyEnumAttribute))]
public class MyEnumDrawer:PropertyDrawer{

    public override void OnGUI (Rect position, SerializedProperty property, GUIContent label)
    {
        property.intValue = EditorGUI.MaskField (position, label, property.intValue, property.enumNames);
    }
}
自定义特性类MyEnumAttribute,派生自PropertyAttribute
自定义MyEnumDrawer,派生自PropertyDrawer,并通过CustomPropertyDrawer告诉编译器MyEnumAttribute作为处理的对象。
public Ingredient potionResult;
在Monobehaviour中定义Ingredient变量,效果如下:

注意:位标志中,每个枚举值都必须是2的幂,保证每一个值都有唯一的不重复的位。
再小总结下,如何是针对某个成员进行自定义在Inspector中显示,要实现PropertyAttribute特性类的派生类,并对该类
进行Property Drawer实现即可。
最后,如何给Component来进行自定义的Inspector显示,上面是对成员以及可序列化的实例进行自定义。
官方例子:
using System.Collections;
using System.Collections.Generic;
using UnityEngine;

public class LookAtPoint : MonoBehaviour {

    public Vector3 lookAtPoint = Vector3.zero;

    void Update()
    {
        transform.LookAt(lookAtPoint);
    }
}
定义LookAtPoint组件脚本,并绑定在一个gameObject物体上。
现在要对LookAtPoint脚本进行Inspector的自定义。需要派生自Editor,并通过CustomEditor特性来告诉编译器,哪个组件将做为Editor类。
//c# Example (LookAtPointEditor.cs)
using UnityEngine;
using UnityEditor;
[CustomEditor(typeof(LookAtPoint))]
[CanEditMultipleObjects]
public class LookAtPointEditor : Editor
{
    SerializedProperty lookAtPoint;

    void OnEnable()
    {
        lookAtPoint = serializedObject.FindProperty("lookAtPoint");
    }
    public override void OnInspectorGUI()
    {
        serializedObject.Update();
        EditorGUILayout.PropertyField(lookAtPoint);
        serializedObject.ApplyModifiedProperties();
    }
}
和上面提到的不同,继承自Editor,重写OnInspectorGUI方法,在里面完成GUI的自定义。
并且通过serializedObject.FindProperty来找到具体的lookAtPoint字段。
serializedObject.Update();
serializedObject.ApplyModifiedProperties();
是一定要有的,不然无法保存修改后的值。
EditorGUILayout.PropertyField(lookAtPoint);没有改变,在编辑器上创建一个字段。
如果暂地保持布局原样不动,可以只写下面这句代码:
base.OnInspectorGUI ()或DrawDefaultInspector ();
调用基本类的绘制,默认布局。
除上使用serializedObject.FindProperty的形式获取实例的成员之外,还有另外一种实现方式:
LookAtPoint point = (LookAtPoint)target;
point.lookAtPoint = EditorGUILayout.Vector3Field ("LookAtPoint", point.lookAtPoint);
如果有限制值的区间,也可以这样定义:
LookAtPoint point = (LookAtPoint)target;
point.lookAtPoint.x = EditorGUILayout.Slider ("X",point.lookAtPoint.x, 0, 1);
point.lookAtPoint.y = EditorGUILayout.Slider ("Y",point.lookAtPoint.y, 0, 1);
point.lookAtPoint.z = EditorGUILayout.Slider ("Z",point.lookAtPoint.z, 0, 1);
在Editor中有另外一个可以重载的方法:
public override bool HasPreviewGUI()
    {
        return point.HasPreview;
    }
通过布尔开关控制是否显示预览视图。
同样,也有相对应可以在预览视图上绘制的方法:
public void OnPreviewGUI (Rect r, GUIStyle background);
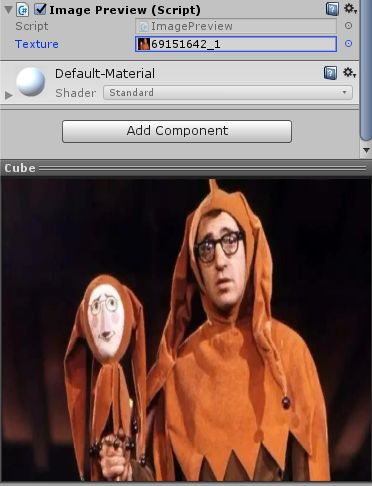
通常HasPreviewGUI和OnPreviewGUI要获取来自另外一个脚本的信息,比如我有一个脚本叫ImagePreview,
我只有在将该脚本附加到gameobject上以后,我才应该显示预览图。并显示在previewGUI上,下面是小例子:
using System.Collections;
using System.Collections.Generic;
using UnityEngine;

public class ImagePreview : MonoBehaviour {

    public Texture2D texture;

    // Use this for initialization
    void Start () {

    }

}
注意,如果没有Start方法,那么在Inspector面板上就不会有选框可供关闭显示。
texture初始化可以直接在Inspector中指定,也可以通过代码加载,代码加载需要将资源放置
在特殊的文件夹Edit default resources中,代码如下:
texture = EditorGUIUtility.Load ("xxxx.jpg") as Texture2D;
在LookAtPointEditor方法中,修改HasPreviewGUI:
public override bool HasPreviewGUI()
    {
        ImagePreview preview = (target as LookAtPoint).GetComponent ();
        if (preview != null&&preview.isActiveAndEnabled) {
            return true;
        }
        return false;

    }
获取ImagePreview为空,并且处于活动状态。
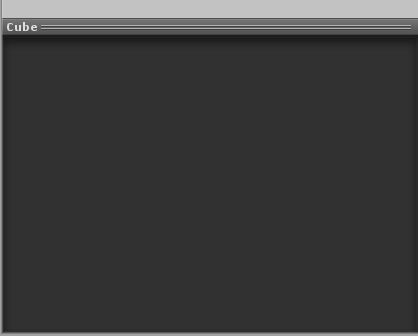
下一步在OnInspectorGUI中处理绘制:
public override void OnPreviewGUI (Rect r, GUIStyle background)
{
ImagePreview preview = (target as LookAtPoint).GetComponent ();
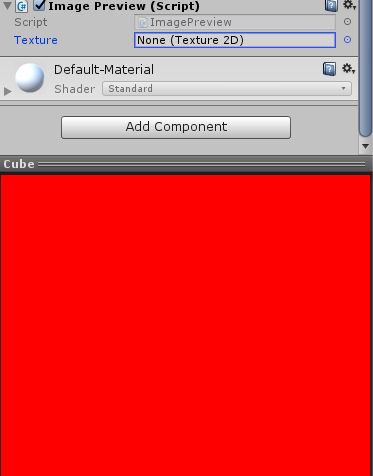
if (preview.texture == null) {
EditorGUI.DrawRect (r, Color.red);
} else {
EditorGUI.DrawPreviewTexture (r, preview.texture);
}
}
如果texture==null,就绘制一个红色的矩形框
Editor中也可以重载OnSceneGUI,比如编辑mesh,地形的绘制等等,这里就不介绍了,应用得不多,后面有具体使用时,再写出来
最后想到另一个,如何在SceneView中绘制图标,让当前的对象更具辨识度,如下:
void OnDrawGizmos() {
        Gizmos.DrawIcon(transform.position, "xxx.png", true);
    }
先告一段落,之后接触到新的知识点,再补充上来。
(AssetDataBase)
自定义编辑器这些可以参照很多源码的实来学习,如地图编辑类插件是对自定义部分使用非常繁杂的。
到此为止,如果大家发现有什么不对的地方,欢迎指正,共同提高,感谢您的阅读!
编辑于2018.7.25
最近发现将自己在未来要去深入学习的东西新建成一篇文章,会很想着马上就去解决他,然后发表出来,现在已经列出来很多了,但事情都分轻重缓急,我已经抵抗此一段时间了,还是要先做眼下最重要的事儿,之后在业余时间上都会补上来。
闲话少说,有点累了,休息半小时,接着学习。