分布式 Erlang
Erlang 自带分布式功能,并且 Erlang 语言的消息发送也完全适应分布式环境。
我们称一个 Erlang VM 是一个 Erlang Node。所以每次用 erl 命令启动一个 erlang shell,就是启动了一个 Node.
我们有两种办法连接两个 Node。第一种是显式的调用 net_kernel:connect_node/1,第二种是在使用 RPC 调用一个远程的方法的时候,自动加入集群。
来试一下,先启动第一个 node,命名为 'node1', 绑定在 127.0.0.1 上。并设置 erlang distribution cookie:
$ erl -name [email protected] -setcookie 'dist-cookie'
([email protected])1>
cookie 是用来保护分布式系统安全的,只有设置了相同 cookie 的 node 才能建立分布式连接。
我们在另外一个终端里,再启动一个新的 node2:
$ erl -name [email protected] -setcookie 'dist-cookie'
([email protected])1> nodes().
[]
([email protected])2> net_kernel:connect_node('[email protected]').
true
([email protected])3> nodes().
['[email protected]']
([email protected])4>
erlang:nodes/0 用来显示与当前建立了分布式连接的那些 nodes。
再启动一个新的 node:
$ erl -name [email protected] -setcookie 'dist-cookie'
([email protected])1> net_adm:ping('[email protected]').
pong
([email protected])2> nodes().
['[email protected]','[email protected]']
([email protected])3>
这次我们仅仅 ping 了一下 node1, 就已经建立了 node1, node2, node3 所有 3 台 node 组成的集群。
前面我们有提到过,发送消息语句完全适应分布式环境,我们来试试:
在 node2 里查看一下当前 erlang shell 的 PID:
([email protected])4> self().
<0.63.0>
在 node3 里,我们查看一下这个 <0.63.0> 对应到本地的 PID 系统是怎么表示的:
([email protected])7> ShellNode2 = rpc:call('[email protected]', erlang, list_to_pid, ["<0.63.0>"]).
<7525.63.0>

%% 然后我们给它发个消息:
([email protected])8> ShellNode2 ! "hi, I'm node3".
"hi, I'm node3"
在 node2 里,我们就会收到这条消息:
([email protected])5> flush().
Shell got "hi, I'm node3"
ok
看到了吧,只要我们知道一个 PID,不论他是在本地 node 还是在远端,我们都能用 ! 发送消息,语义完全一样。
所以前面的聊天程序里,我们只需要把 PID 存到 mnesia,让它在各个 node 之间共享,就可以实现从单节点到分布式的无缝迁移。
分布式 Erlang 怎么工作的?
启动 erlang 的时候,系统会确保一个 epmd (erlang port mapping daemon) 已经起来了。
$ lsof -i -n -P | grep TCP | grep epmd
epmd      22871 liuxinyu    3u  IPv4 0x1b13d7ce066b8f6d      0t0  TCP *:4369 (LISTEN)
epmd      22871 liuxinyu    4u  IPv6 0x1b13d7ce04d5741d      0t0  TCP *:4369 (LISTEN)
epmd      22871 liuxinyu    5u  IPv4 0x1b13d7ce0830f865      0t0  TCP 127.0.0.1:4369->127.0.0.1:59719 (ESTABLISHED)
epmd      22871 liuxinyu    6u  IPv4 0x1b13d7ce055ded7d      0t0  TCP 127.0.0.1:4369->127.0.0.1:52371 (ESTABLISHED)
epmd      22871 liuxinyu    7u  IPv4 0x1b13d7ce10169295      0t0  TCP 127.0.0.1:4369->127.0.0.1:52381 (ESTABLISHED)
epmd      22871 liuxinyu    9u  IPv4 0x1b13d7ce12755d7d      0t0  TCP 127.0.0.1:4369->127.0.0.1:53066 (ESTABLISHED)
epmd 监听在系统的 4369 端口,并记录了本地所有 erlang node 开放的分布式端口。
来看一下 node1 使用的端口情况:
$ lsof -i -n -P | grep TCP | grep beam
beam.smp  47263 liuxinyu   25u  IPv4 0x1b13d7ce10713b8d      0t0  TCP *:52370 (LISTEN)
beam.smp  47263 liuxinyu   26u  IPv4 0x1b13d7ce10713295      0t0  TCP 127.0.0.1:52371->127.0.0.1:4369 (ESTABLISHED)
beam.smp  47263 liuxinyu   27u  IPv4 0x1b13d7ce12754295      0t0  TCP 127.0.0.1:52370->127.0.0.1:52405 (ESTABLISHED)
beam.smp  47263 liuxinyu   28u  IPv4 0x1b13d7ce12844295      0t0  TCP 127.0.0.1:52370->127.0.0.1:53312 (ESTABLISHED)
epmd 工作的原理是:
- node1 监听在 52370 端口。
- 当 node2 尝试连接 [email protected] 的时候,node2 首先去 127.0.0.1 机器上的 empd 请求一下,获得 node1 监听的端口号:52370。
- 然后 node2 使用一个临时端口号 52405 作为 client 端,与 node1 的 52370 建立了 TCP 连接。
Hello World
我们 Hello World 程序的教学目的是,熟悉如何创建一个可以上线的项目。
让我们用 erlang.mk 创建一个真正的 hello world 工程。很多项目是用 rebar 的,到时候自己学吧。
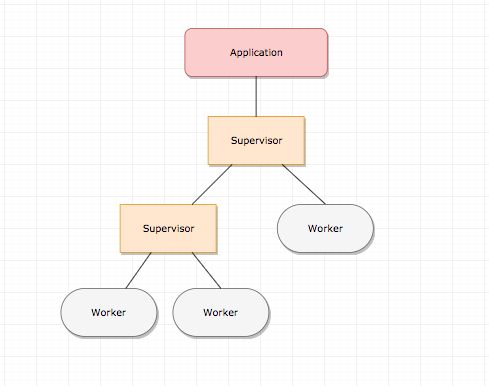
OTP 工程的基本框架
- 一个项目可以包含很多个
Application, 每个 application 包含了本应用的所有代码,可以随时加载和关闭。 - 一个 Application 一般会包含一个顶层
Supervisor进程,这个顶层 Supervisor 下面管理了许多 sub Supervisor 和worker进程。 - Supervisor 是用来监控
worker的, 我们的业务逻辑都在 worker 里面,supervisor 里可以定制重启策略,如果返现某个 worker 挂掉了,我们可以按照既定的策略重启它。 - 这个框架叫做
Supervision Tree.
Supervisor 可用的重启策略:
- one_for_all:如果一个子进程挂了,重启所有的子进程
- one_for_one:如果一个子进程挂了,只重启那一个子进程
- rest_for_one:如果一个子进程挂了,只重启那个子进程,以及排在那个子进程后面的所有子进程 (一个 supervisor 会按顺序启动很多子进程,排在一个子进程后面的叫
rest)。 - simple_one_for_one:当你想要动态的启动一个进程的多个实例时,用这个策略。比如来一个 socket 连接我们就启动一个 handler 进程,就适用于这种。
我们在后面的实例中理解这些概念。
创建工程
官方示例
我们首先创建一个 hello_world 目录,然后在里面建立工程的基本框架:
$ mkdir hello_world && cd hello_world
$ curl -O https://erlang.mk/erlang.mk

$ make -f erlang.mk bootstrap SP=2
$ make -f erlang.mk bootstrap-rel
$ l
total 480
drwxr-xr-x  7 liuxinyu  staff   238B  3 21 15:21 .
drwxr-xr-x  9 liuxinyu  staff   306B  3 21 15:04 ..
-rw-r--r--  1 liuxinyu  staff   167B  3 21 15:21 Makefile
-rw-r--r--  1 liuxinyu  staff   229K  3 21 15:14 erlang.mk
drwxr-xr-x  4 liuxinyu  staff   136B  3 21 15:14 rel
-rw-r--r--  1 liuxinyu  staff   164B  3 21 15:14 relx.config
drwxr-xr-x  4 liuxinyu  staff   136B  3 21 15:21 src
$ l rel/
total 16
drwxr-xr-x  4 liuxinyu  staff   136B  3 21 15:14 .
drwxr-xr-x  7 liuxinyu  staff   238B  3 21 15:21 ..
-rw-r--r--  1 liuxinyu  staff     5B  3 21 15:14 sys.config
-rw-r--r--  1 liuxinyu  staff    58B  3 21 15:14 vm.args
然后我们创建一个 hello_world.erl, 模板是 gen_server :
$ make new t=gen_server n=hello_world SP=2
$ l src
total 24
drwxr-xr-x  5 liuxinyu  staff   170B  3 21 19:01 .
drwxr-xr-x  8 liuxinyu  staff   272B  3 21 18:59 ..
-rw-r--r--  1 liuxinyu  staff   673B  3 21 19:01 hello_world.erl
-rw-r--r--  1 liuxinyu  staff   170B  3 21 18:59 hello_world_app.erl
-rw-r--r--  1 liuxinyu  staff   233B  3 21 18:59 hello_world_sup.erl
以上我们生成的文件里,文件命名有一些约定。与工程名同名的文件 hello_world.erl 里是我们的 worker,gen_server 的模板文件,是工程的入口文件。_app 后缀的是 application behavior, _sup 结尾的是 supervisor behavior.
hello_world_app.erl 里面,start/2 函数启动的时候,启动了整个应用的顶层 supervisor,hello_world_sup:
start(_Type, _Args) ->
  hello_world_sup:start_link().
hello_world_sup.erl 里面,调用 supervisor:start_link/3 之后,supervisor 会回调 init/1。我们需要在 init/1 中做一些初始化参数的设置:
init([]) ->
  %% 重启策略是 one_for_one
  %% 重启频率是5 秒内最多重启1次,如果超过这个频率就不再重启
  SupFlags = #{strategy => one_for_one, intensity => 1, period => 5},

  %% 只启动一个子进程,类型是 worker
  Procs = [#{id => hello_world,   %%  给子进程设置一个名字,supervisor 用这个名字标识这个进程。
              start => {hello_world, start_link, []}, %% 启动时调用的 Module:Function(Args)
              restart => permanent,  %% 永远需要重启
              shutdown => brutal_kill, %% 关闭时不需要等待,直接强行杀死进程
              type => worker,
              modules => [cg3]}],  %% 使用的 Modules
  {ok, {SupFlags, Procs}}.
在 hello_world.erl 里的 init/1 里添加一个 timer
init([]) ->
  timer:send_interval(10000, {interval, 3}), %% 每隔 10 秒发一个 {interval, 3} 给自己进程
  {ok, #state{}}.
最后 make run 看看效果。可以看到每次崩溃都会被 supervisor 重启:
$ make run
([email protected])1> hello_world(<0.228.0>): doing something bad now...
=ERROR REPORT==== 21-Mar-2018::19:44:35 ===
** Generic server <0.228.0> terminating
** Last message in was {interval,3}

...

hello_world(<0.247.0>): doing something bad now...
=ERROR REPORT==== 21-Mar-2018::19:44:58 ===
** Generic server <0.247.0> terminating
** Last message in was {interval,3}
然后添加一个 timer 的回调函数,回调函数里故意写了一行让程序崩溃的代码
handle_info({interval, Num}, State) ->
  io:format("~p(~p): doing something bad now...~n", [?MODULE, self()]),
  1 = Num,
  {noreply, State};
完整代码:
https://github.com/terry-xiaoyu/learn-erlang-in-30-mins/tree/master/hello_world
然后呢?
以上你已经学会了基本的 Erlang 常用技能,可以投入工作了。
当你使用 Erlang 有了一段时间,想要系统学习和掌握它的时候,看下面的资料:
- Learn You Some Erlang for Great Good:Fred 老师擅长讲故事,灵魂画风。可能是多数Erlang从业者的第一位老师。
- Erlang and OTP In Action: 快速教会你在生产环境中,怎么使用 Erlang。
- Designing for Scalability with Erlang/OTP: 作者以其丰富的从业经验,告诉你如何使用 Erlang 设计可伸缩的系统。
- Erldocs 平常你需要查文档的。
