文章作者:Tyan
博客:noahsnail.com | CSDN |
本文主要是对Caffe中mnist数据集上训练的LeNet模型进行结构分析和可视化。
import caffe
import numpy as np
import matplotlib.pyplot as plt

# 定义LeNet模型信息
deploy = 'lenet.prototxt'
model = 'lenet_iter_10000.caffemodel'

# 加载模型
net = caffe.Net(deploy, model, caffe.TEST)

# 计算均值
# blob = caffe.proto.caffe_pb2.BlobProto()
# bin_mean = open(mean_file, 'rb' ).read()
# blob.ParseFromString(bin_mean)
# arr = np.array(caffe.io.blobproto_to_array(blob))
# npy_mean = arr[0]
# mu = npy_mean.mean(1).mean(1)

# init transformer
transformer = caffe.io.Transformer({'data': net.blobs['data'].data.shape})
transformer.set_transpose('data', (2, 0, 1))
# transformer.set_mean('data', mu)
transformer.set_raw_scale('data', 255)
# transformer.set_channel_swap('data', (2, 1, 0))

# get certain layer feature
def init(pimg, lay_name):
    global transformer
    global net
    image = caffe.io.load_image(pimg, color = False)
    image
    transformed_image = transformer.preprocess('data', image)
    net.blobs['data'].data[...] = transformed_image
    output = net.forward()
    result = output[lay_name]
    return result
# Test
result = init('test.jpg', 'prob')
print result.shape
print result
(1, 10)
[[ 1.  0.  0.  0.  0.  0.  0.  0.  0.  0.]]
LeNet网络的所有layer以及layer的输出数据
data: 输入图片数据大小为28*28
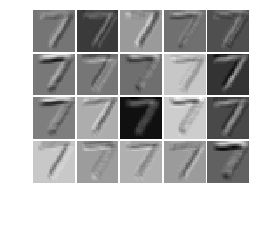
conv1: 20个卷积核,卷积之后feature map大小24*24
pool1: pooling后feature map大小变为12*12, 共20层
conv2: 50个卷积核, 卷积之后feature map大小为8*8
pool2: pooling后feature map大小变为4*4, 共50层
ip1: 全连接层一, 500个结点
ip2: 全连接层二, 10个结点
prob: 对ip2进行softmax
备注: conv1之后得到20个feature map, conv2有50个卷积核, 每个卷积核在20个feature map卷积之后, 20个卷积之后的feature map对应位置上的点的数据累加之后取激活函数(ReLU)得到该卷积核的对应的feature map, 因此conv2执行之后的feature map个数为50, 而不是50*20.
# all layer name and blob shape
# blob shape is (batch_size, channel_dim, height, width).
for layer_name, blob in net.blobs.iteritems():
    print layer_name + '\t' + str(blob.data.shape)
data  (1, 1, 28, 28)
conv1 (1, 20, 24, 24)
pool1 (1, 20, 12, 12)
conv2 (1, 50, 8, 8)
pool2 (1, 50, 4, 4)
ip1 (1, 500)
ip2 (1, 10)
prob  (1, 10)
LeNet网络的权重(weights + biases)
conv1: 20个卷积核, weights大小为5*5, 20个biases
conv2: 50个卷积核, weights大小为5*5, 50个biases
ip1: conv2之后得到50个4*4大小的feature map, 排列起来大小为800, 与ip1的500个结点进行全连接, weights个数为500*800, biases个数为500
ip2: ip1的500个结点与ip2的10个结点进行全连接, weights个数为500*10, biases个数为10
# all layer name and parameters shape
# param[0] is weights, param[1] is biases
# weights shape is (output_channels, input_channels, filter_height, filter_width)
# biases shape is (output_channels,)
for layer_name, param in net.params.iteritems():
    print layer_name + '\t' + str(param[0].data.shape) + '\t' + str(param[1].data.shape)
conv1 (20, 1, 5, 5) (20,)
conv2 (50, 20, 5, 5)  (50,)
ip1 (500, 800)  (500,)
ip2 (10, 500) (10,)
numpy pad
padding分为四部分
第一部分: (0, n ** 2 - data.shape[0]), 补充方阵的缺少的部分, 0表示前面不补, 后面补n ** 2 - data.shape[0]列
第二部分: (0, 1)表示每个filter的前面不补, 后面补1列, filter补了一行
第三部分: (0, 1)表示每个filter的前面不补, 后面补1列, filter补了一列
第四部分: (0, 0)剩下的不补充数据
# param(weights) visualization
def visualization(data):
    # normalize data for display
    data = (data - data.min()) / (data.max() - data.min())

    # force the number of filters to be square
    n = int(np.ceil(np.sqrt(data.shape[0])))

    # add some space between filters
    padding = (((0, n ** 2 - data.shape[0]), (0, 1), (0, 1)) + ((0, 0),) * (data.ndim - 3))
    data = np.pad(data, padding, mode = 'constant', constant_values = 1)

    # tile the filters into an image
    data = data.reshape((n, n) + data.shape[1:]).transpose((0, 2, 1, 3) + tuple(range(4, data.ndim + 1)))
    data = data.reshape((n * data.shape[1], n * data.shape[3]) + data.shape[4:])
    plt.imshow(data, cmap='gray')
    plt.axis('off')
    plt.show()
# feature map visualization
feature_map = net.blobs['conv1'].data[0]
visualization(feature_map)
# filter visualization
filters = net.params['conv1'][0].data
visualization(filters.reshape(20, 5, 5))

