涉及知识点:
CGContextRef // 联系图形上下文,可以说是画布的存在吧
UIBezierPath // 贝塞尔曲线,画啥都可以,没有画不了的,只有想不到的
CAShapeLayer // 配合贝塞尔曲线使用的shape图层,贝塞尔的“最佳搭档”
CAGradientLayer // 渐变图层
CABasicAnimation // (基础)Core Animation 显示动画
最近想弄一下比较实在的东西,然后有个朋友跟我说:“要不你就弄弄贝塞尔吧”。搞就搞吧,只有贝塞尔的话就有点单调,干脆就加点其他东西实现个简单的折线图吧,所以这个demo就出来了,不过这仅仅是小demo,完整的版本还没写好封装。话不多说,整个demo分四步:第一步,实现横、轴坐标轴;第二步,虚线与渐变层的实现;第三步,描点连线。直接上图贴代码,简单快捷。
第一步 X 、Y轴的实现
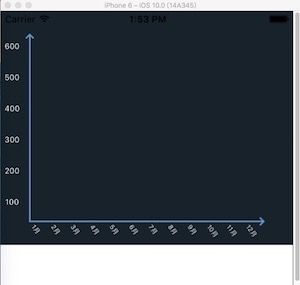
直接上第一张图
创建一个类,继承于UIView,在.m文件中的- (void)drawRect:(CGRect)rect 方法中画出我们所需要的X轴Y轴坐标线。在这个方法中,我们所实现的视图能够在view上重新描画展示。
- (void)drawRect:(CGRect)rect {
// Drawing code
CGContextRef context = UIGraphicsGetCurrentContext();
CGContextSetLineWidth(context, 2.0);
CGContextSetRGBStrokeColor(context, 97/255.0, 150/255.0, 198/255.0, 1);
CGContextMoveToPoint(context, boundX, boundY);
// Y 轴
CGContextAddLineToPoint(context, boundX, rect.size.height - boundY);
// X 轴
CGContextAddLineToPoint(context, rect.size.width - boundX, rect.size.height - boundY);
// X轴 箭头
CGContextMoveToPoint(context, rect.size.width - boundX - 5, rect.size.height - boundY -5);
CGContextAddLineToPoint(context, rect.size.width - boundX, rect.size.height - boundY);
CGContextAddLineToPoint(context, rect.size.width - boundX - 5, rect.size.height - boundY + 5);
// Y轴 箭头
CGContextMoveToPoint(context, boundX - 5, boundY + 5);
CGContextAddLineToPoint(context, boundX, boundY);
CGContextAddLineToPoint(context, boundX + 5, boundY + 5);
// 结束绘制
CGContextStrokePath(context);
}
X轴与Y轴的数据实现,在这里分别写了两个实例方法,在initWithFram:初始化方法中调用
#pragma mark 创建x轴的数据
- (void)createXLine{
CGFloat month = 12;
for (NSInteger i = 0; i < month; i++) {
UILabel * x_label = [[UILabel alloc]initWithFrame:CGRectMake((self.frame.size.width - 2 * boundX)/month * i + boundX, self.frame.size.height - boundY + boundY*0.2, (self.frame.size.width - 2 * boundX)/month- 5, boundY/2)];
// LabelMonth.backgroundColor = [UIColor greenColor];
x_label.tag = 1000 + i;
x_label.text = [NSString stringWithFormat:@"%ld月",i+1];
x_label.font = [UIFont systemFontOfSize:8];
x_label.transform = CGAffineTransformMakeRotation(M_PI * 0.3);
x_label.textColor = [UIColor whiteColor];
[self addSubview:x_label];
}
}
#pragma mark 创建y轴数据
- (void)createYLine{
CGFloat Y_Value = 6;
for (NSInteger i = 0; i < Y_Value; i++) {
UILabel * y_label = [[UILabel alloc]initWithFrame:CGRectMake(0, (self.frame.size.height - 2 * boundY)/Y_Value * i + boundX, boundY, boundY/2.0)];
// labelYdivision.backgroundColor = [UIColor greenColor];
y_label.tag = 2000 + i;
y_label.text = [NSString stringWithFormat:@"%.0f",(Y_Value - i)*100];
y_label.font = [UIFont systemFontOfSize:10];
y_label.textColor = [UIColor whiteColor];
y_label.textAlignment = NSTextAlignmentCenter;
[self addSubview:y_label];
}
}
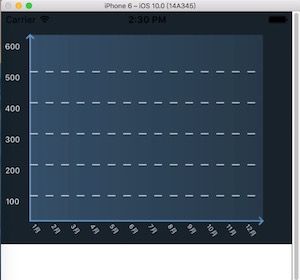
第二步 虚线与渐变图层背景的设置
在这里我们需要设置三个属性,分别是:1.渐变的背景视图(添加到当前视图上), 2.渐变图层(作用于背景视图的layer层),3.颜色数组(添加渐变图层的颜色属性数值,也就是渐变哪几种颜色,这里我用了两种比较低调灰沉一点的色调)
有一点要注意的是,我这里画的虚线是通过CAShapeLayer的 lineDashPattern属性来设置的
同样编写两个方法:- (void)drawGradientBackgroundView 设置渐变层背景 和 - (void)setDashLine 设置虚线,并在初始化方法中调用
- (void)drawGradientBackgroundView {
// 渐变背景视图(不包含坐标轴)
self.gradient_backgroundView = [[UIView alloc] initWithFrame:CGRectMake(boundX, boundY, self.bounds.size.width - boundX*2, self.bounds.size.height - 2*boundY)];
[self addSubview:self.gradient_backgroundView];
/** 创建并设置渐变背景图层 */
//初始化CAGradientlayer对象,使它的大小为渐变背景视图的大小
self.gradient_layer = [CAGradientLayer layer];
self.gradient_layer.frame = self.gradient_backgroundView.bounds;
//设置渐变区域的起始和终止位置(范围为0-1),即渐变路径
self.gradient_layer.startPoint = CGPointMake(0, 0.0);
self.gradient_layer.endPoint = CGPointMake(1.0, 0.0);
//设置颜色的渐变过程
// [UIColor colorWithRed:67 / 255.0 green:106 / 255.0 blue:140 / 255.0 alpha:1.0]
// [UIColor colorWithRed:59 / 255.0 green:92 / 255.0 blue:120 / 255.0 alpha:1.0]
self.colors_arr = [NSMutableArray arrayWithArray:@[(__bridge id)[UIColor colorWithRed:95 / 255.0 green:148 / 255.0 blue:195 / 255.0 alpha:0.4].CGColor, (__bridge id)[UIColor colorWithRed:59 / 255.0 green:92 / 255.0 blue:120 / 255.0 alpha:0.4].CGColor]];
self.gradient_layer.colors = self.colors_arr;
//将CAGradientlayer对象添加在我们要设置背景色的视图的layer层
[self.gradient_backgroundView.layer addSublayer:self.gradient_layer];
}
- (void)setDashLine{
for (NSInteger i = 1;i < 6; i++ ) {
UILabel * label1 = (UILabel*)[self viewWithTag:2000 + i];//获取Y轴数据label的位置根据其位置画横虚线
UIBezierPath * path1 = [UIBezierPath bezierPath];
[path1 moveToPoint:CGPointMake( 0, label1.frame.origin.y - boundY)];
[path1 addLineToPoint:CGPointMake(self.frame.size.width - 2 * boundX,label1.frame.origin.y - boundY)];
CAShapeLayer *dashLayer = [CAShapeLayer layer];
dashLayer.strokeColor = [UIColor whiteColor].CGColor;
dashLayer.fillColor = [UIColor clearColor].CGColor;
// 设置线条宽度
dashLayer.lineWidth = 1.0;
// 设置虚线 每间隔十个画一条线,总共十条
dashLayer.lineDashPattern = @[@10, @10];
dashLayer.path = path1.CGPath;
[self.gradient_backgroundView.layer addSublayer:dashLayer];
}
}
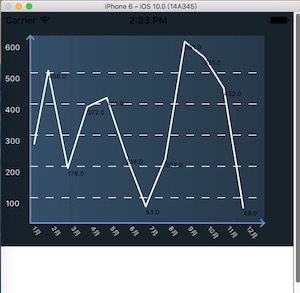
第三步 描点连线
由于是懒得在电脑上安装GIF的制作应用,所以就上不了动态图了,简单贴一张完整图片就好
- (void)drawLine{
UILabel * label = (UILabel*)[self viewWithTag:1000];//根据横坐标上面的label 获取直线关键点的x 值
UIBezierPath * path = [[UIBezierPath alloc]init];
self.path1 = path;
[path moveToPoint:CGPointMake( label.frame.origin.x - boundX + 7, (600 -arc4random()%600) /600.0 * (self.frame.size.height - boundY*2 ) )];
//创建折现点标记
for (NSInteger i = 1; i< 12; i++) {
UILabel * label1 = (UILabel*)[self viewWithTag:1000 + i];
CGFloat arc = arc4random()%600; //折线点目前给的是随机数
[path addLineToPoint:CGPointMake(label1.frame.origin.x - boundX, (600 -arc) /600.0 * (self.frame.size.height - boundY*2 ) )];
UILabel * falglabel = [[UILabel alloc]initWithFrame:CGRectMake(label1.frame.origin.x , (600 -arc) /600.0 * (self.frame.size.height - boundY*2 )+ boundY , 30, 15)];
// falglabel.backgroundColor = [UIColor blueColor];
falglabel.tag = 3000+ i;
falglabel.text = [NSString stringWithFormat:@"%.1f",arc];
falglabel.font = [UIFont systemFontOfSize:8.0];
[self addSubview:falglabel];
}
[path stroke];
self.lineChartLayer = [CAShapeLayer layer];
self.lineChartLayer.path = path.CGPath;
self.lineChartLayer.strokeColor = [UIColor whiteColor].CGColor;
self.lineChartLayer.fillColor = [[UIColor clearColor] CGColor];
self.lineChartLayer.lineWidth = 2;
self.lineChartLayer.lineCap = kCALineCapRound;
self.lineChartLayer.lineJoin = kCALineJoinRound;
[self.gradient_backgroundView.layer addSublayer:self.lineChartLayer];//直接添加导视图上
CABasicAnimation *pathAnimation = [CABasicAnimation animationWithKeyPath:@"strokeEnd"];
pathAnimation.duration = 3;
pathAnimation.repeatCount = 1;
pathAnimation.removedOnCompletion = YES;
pathAnimation.fromValue = [NSNumber numberWithFloat:0.0f];
pathAnimation.toValue = [NSNumber numberWithFloat:1.0f];
// 设置动画代理,动画结束时添加一个标签,显示折线终点的信息
pathAnimation.delegate = self;
[self.lineChartLayer addAnimation:pathAnimation forKey:@"strokeEnd"];
}
虽然这个demo做的是不太美观,不过整体都拆分开了几个方法调用,方便了扩展,后续会为大家继续补充其他功能,还有完整封装好的代码。
附上Github的链接:
https://github.com/zengxcgg/LineChartDemo.git


