搭建hibernate
原文链接:http://blog.csdn.net/qq_22329521/article/details/74330968
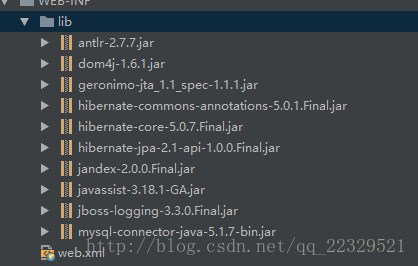
需要导入的hibernate的包
其中所需要的依赖包
需要的配置文件
一个是元数据orm的配置文件
例如
package com.fmt.hibernate;

public class Customer {

    /*
     * CREATE TABLE `cst_customer` (
      `cust_id` BIGINT(32) NOT NULL AUTO_INCREMENT COMMENT '客户编号(主键)',
      `cust_name` VARCHAR(32) NOT NULL COMMENT '客户名称(公司名称)',
      `cust_source` VARCHAR(32) DEFAULT NULL COMMENT '客户信息来源',
      `cust_industry` VARCHAR(32) DEFAULT NULL COMMENT '客户所属行业',
      `cust_level` VARCHAR(32) DEFAULT NULL COMMENT '客户级别',
      `cust_linkman` VARCHAR(64) DEFAULT NULL COMMENT '联系人',
      `cust_phone` VARCHAR(64) DEFAULT NULL COMMENT '固定电话',
      `cust_mobile` VARCHAR(16) DEFAULT NULL COMMENT '移动电话',
      PRIMARY KEY (`cust_id`)
    ) ENGINE=INNODB AUTO_INCREMENT=1 DEFAULT CHARSET=utf8;
     */
    private Long cust_id;

    private String cust_name;
    private String cust_source;
    private String cust_industry;
    private String cust_level;
    private String cust_linkman;
    private String cust_phone;
    private String cust_mobile;
    public Long getCust_id() {
        return cust_id;
    }
    public void setCust_id(Long cust_id) {
        this.cust_id = cust_id;
    }
    public String getCust_name() {
        return cust_name;
    }
    public void setCust_name(String cust_name) {
        this.cust_name = cust_name;
    }
    public String getCust_source() {
        return cust_source;
    }
    public void setCust_source(String cust_source) {
        this.cust_source = cust_source;
    }
    public String getCust_industry() {
        return cust_industry;
    }
    public void setCust_industry(String cust_industry) {
        this.cust_industry = cust_industry;
    }
    public String getCust_level() {
        return cust_level;
    }
    public void setCust_level(String cust_level) {
        this.cust_level = cust_level;
    }
    public String getCust_linkman() {
        return cust_linkman;
    }
    public void setCust_linkman(String cust_linkman) {
        this.cust_linkman = cust_linkman;
    }
    public String getCust_phone() {
        return cust_phone;
    }
    public void setCust_phone(String cust_phone) {
        this.cust_phone = cust_phone;
    }
    public String getCust_mobile() {
        return cust_mobile;
    }
    public void setCust_mobile(String cust_mobile) {
        this.cust_mobile = cust_mobile;
    }
    @Override
    public String toString() {
        return "Customer [cust_id=" + cust_id + ", cust_name=" + cust_name + "]";
    }
}
当前一个Customer对象 需要建立他相应的xml文件
接下啦是hibernate的主配置文件最重要的该文件的文件名字必须是hibernate.cfg.xml,同时在src的目录
        com.mysql.jdbc.Driver
        jdbc:mysql:///hibernate?useUnicode=true&characterEncoding=utf8
        root
        123456
        org.hibernate.dialect.MySQLDialect


        true
        true


        update
代码的增删改查
 @Test
    public void fun1(){
        //1创建,调用空参构造
        Configuration conf=new Configuration();
        //2读取配置文件,j加载src下的Hibernate.cfg.xml文件
        conf.configure();

        //根据配置,创建SessionFactory对象
        //SessionFaction就是用来创建Session的
        //sessionFactory 负责保存和使用所有配置信息,消耗内存资源较大
        //sessionFactory 属于线程安全的对象设计
        //所以SessionnFactory全局唯一
        SessionFactory sessionFactory = conf.buildSessionFactory();

        //session对象是表达hibernate框架与数据库之间的连接可以理解为JDBC中的connection对象,但同时可以操作sql,是hibernate的核心对象
        //获取Session
        Session session = sessionFactory.openSession();
        //获取线程绑定的session
//        Session currentSession = sessionFactory.getCurrentSession();

        //获取操作事务
//        Transaction transaction = session.getTransaction();
        //开启事务病获得操作事务(建议使用)
        Transaction transaction1 = session.beginTransaction();

        /*
        保存
        Customer customer=new Customer();
        customer.setCust_name("jd");
        session.save(customer);
         */


        /*
        查询
         session.get 第一个参数是类,第二个是主键id
         Customer customer = session.get(Customer.class, 1l);
         System.out.println(customer);
         */

       /*
        修改
        Customer customer = session.get(Customer.class, 1l);
        customer.setCust_name("百度");
        session.update(customer);
         */


       /*
        删除
         Customer customer = session.get(Customer.class, 1l);
        customer.setCust_name("百度");
        session.delete(customer);
        */

        transaction1.commit();//提交
//        transaction1.rollback();//回滚
        session.close();//释放资源
        sessionFactory.close();//释放资源

    }
实体类创建注意事项
- 持久化提供无参构造
- 成员变量私有,提供共有get/set方法访问,需提供属性
- 持久化类的属性,应尽量使用包装类型
- 持久化需要提供oid,与数据库中的主键列对应(如果一个表没有主键,无法映射到hibernate表中,主键相同hibernate认为对象相同)
- 不要用final修饰class(hibernate使用cglib代理生成代理对象,代理对象是继承被代理对象,如果被final修改将无法生成代理)
主键生成策略
在元对象xml中
.....
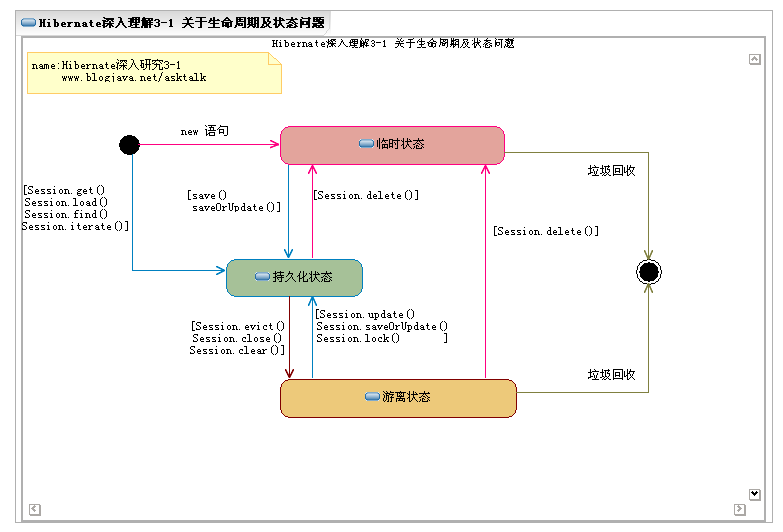
hibernate实体对象的状态
三种状态:瞬时状态,持久化状态,游离状态
     Configuration conf=new Configuration();
        conf.configure();
        SessionFactory sessionFactory = conf.buildSessionFactory();

        Session session = sessionFactory.openSession();

        Transaction transaction = session.beginTransaction();

        Customer customer=new Customer();//没有id,没有与session关联

        customer.setCust_name("jd");//瞬时状态
        session.save(customer);//持久化状态,由id,有关联

        transaction.commit();//提交
        session.close();//游离|托管状态。有id。没关联
        sessionFactory.close();
持久化状态的特点持久化对象的任何变化都会自动同步到数据库中
 Configuration conf=new Configuration();
        conf.configure();
        SessionFactory sessionFactory = conf.buildSessionFactory();

        Session session = sessionFactory.openSession();

        Transaction transaction = session.beginTransaction();

        Customer customer = session.get(Customer.class, 2l);
        customer.setCust_name("tianmao");//这里没有设置update的操作,仍然修改了数据库

        transaction.commit();//提交
        session.close();
        sessionFactory.close();
hibernate一级缓存
Test
    public void fun1() {
        Configuration conf = new Configuration().configure();
        SessionFactory sessionFactory = conf.buildSessionFactory();

        Session session = sessionFactory.openSession();

        Transaction transaction = session.beginTransaction();

         //这里这回进行一次的查询 session缓存了 id位2l的custion到内存中,第二次查询不会走数据库查询
        Customer customer1 = session.get(Customer.class, 2l);
        Customer customer2 = session.get(Customer.class, 2l);
        Customer customer3 = session.get(Customer.class, 2l);

        System.out.println(customer1==customer2);
        transaction.commit();
        session.close();
        sessionFactory.close();
    }

  @Test
    public void fun2() {
        Configuration conf = new Configuration().configure();
        SessionFactory sessionFactory = conf.buildSessionFactory();

        Session session = sessionFactory.openSession();

        Transaction transaction = session.beginTransaction();

        Customer customer1 = session.get(Customer.class, 2l);//tianmao


        customer1.setCust_name("jd");
        customer1.setCust_name("tianmao");
        //这里不会进行update操作,值进行了查询的sql
        //seesion保存了查询出来后的快照,对比当时的快照是否发生变化同步到数据库
        transaction.commit();
        session.close();
        sessionFactory.close();
    }
Hibernate的隔离级别设置
在主配置文件中
加入


4
调用获取当前线程中的session对象调用sessionFactory.getCurrentSession(); 注意点需要在配置文件中声明,同时通过getCurrentSession方法获得到的session当事务提交时,session会自动关闭,不要手动close关闭
thread
Hql查询
hql查询:HQL是Hibernate Query Language的简写,HQL采用面向对象的查询方式
  Session session= HibernateUtils.openSession();
        Transaction transaction = session.beginTransaction();

        //书写HQL语句
//        String hql="from com.fmt.hibernate.Customer";
//        String hql="from Customer ";//查询所有Custom对象
         /**
         //查询id位2的
        String hql="from Customer where cust_id =2";
        Query query = session.createQuery(hql);
        */
       /**
         条件查询
         String hql="from Customer where cust_id =?";
        Query query = session.createQuery(hql);
        //query.setLong(0,2l);
        query.setParameter(0,2l);//这个不用的参数做具体设置较为方便
        */
         /**
        命名查询
        String hql="from Customer where cust_id =:cust_id";//冒号后面的字符串是setParamerter中的第一个参数
        Query query = session.createQuery(hql);
        query.setParameter("cust_id",2l);
        */


          /**
        分页查询
        String hql="from Customer ";
        Query query = session.createQuery(hql);
        query.setFirstResult(1);//第几页
        query.setMaxResults(3);//每次返回最大多少
        */
        List list = query.list();//返回list
        System.out.print(list);
//        Object o = query.uniqueResult();//接受唯一的查询
        //根据HQL语句创建查询对象
        //根据查询对象获取查询结果


        /**


 //内链接
//        String hql="from Customer c inner join c.linkMens";
//        Query query = session.createQuery(hql);
//        List list = query.list();
//        for (Object[] arr:list){
//            System.out.println(Arrays.toString(arr));
//        }

 //迫切内链接(与上述多了个fetch,同时query.list返回返现不在是Object[]),同理左外右外
//        String hql="from Customer c inner join fetch c.linkMens";
//        Query query = session.createQuery(hql);
//        List list = query.list();
//        for (Customer arr:list){
//            System.out.println(arr);
//        }
        */
        transaction.commit();
        session.close();
Criteria查询
Criteria是一种比hql更面向对象的查询方式。Criteria 可使用 Criterion 和 Projection 设置查询条件
  Session session= HibernateUtils.openSession();
        Transaction transaction = session.beginTransaction();

        /**
           基本查询
        Criteria criteria = session.createCriteria(Customer.class);
        List list = criteria.list();
         */


      /**
     * 条件查询
     * HQL中,不可能出现任何数据库相关的信息
     * >                gt
     * >=               ge
     * <                lt
     * <=               le
     * ==               eq
     * !=               ne
     * in               in
     * between and      between
     * like             like
     * is not null      isNotNull
     * is null          isNull
     * or               or
     * and              and


       //查询所有Customer
        Criteria criteria = session.createCriteria(Customer.class);
        criteria.add(Restrictions.ne("cust_id",2l));//这里的ne就是Resctirction提供的方法
        List list = criteria.list();
     */


         /**
         分页
         Criteria criteria = session.createCriteria(Customer.class);
        criteria.setFirstResult(0);
        criteria.setMaxResults(2);
        List list = criteria.list();
         */


        /**
         聚合函数
           Criteria criteria = session.createCriteria(Customer.class);
        criteria.setProjection(Projections.rowCount());//Projections
        Long number = (Long) criteria.uniqueResult();
         */

        System.out.println(list);


        /**


        transaction.commit();
        session.close();


    //离线查询
    @Test
    public void fun5(){
         //上层构建查询条件
        DetachedCriteria dc=DetachedCriteria.forClass(Customer.class);
        dc.add(Restrictions.idEq(61));
        //dao层代码基本不动
        Session session= HibernateUtils.openSession();
        Transaction transaction = session.beginTransaction();

        Criteria executableCriteria = dc.getExecutableCriteria(session);
        List list = executableCriteria.list();
        System.out.print(list);
        transaction.commit();
        session.close();
    }
原生sql查询
    Session session= HibernateUtils.openSession();
        Transaction transaction = session.beginTransaction();

        String sql="select * from cst_customer";
        SQLQuery sqlQuery = session.createSQLQuery(sql);
        //因为查询查来的是有几行几行里面有几列
        List list = sqlQuery.list();
        for (Object[] objs:list){
            for (Object o:objs){
                System.out.println(o);
            }
        }
        transaction.commit();
        session.close();
       Session session= HibernateUtils.openSession();
        Transaction transaction = session.beginTransaction();

       /**
        条件查询
        String sql="select * from cst_customer where cust_id =?";
        SQLQuery sqlQuery = session.createSQLQuery(sql);
        sqlQuery.setParameter(0,2l);
       */
        /**
        分页查询
        String sql="select * from cst_customer limit ?,?";
        SQLQuery sqlQuery = session.createSQLQuery(sql);
        sqlQuery.setParameter(0,0);
        sqlQuery.setParameter(1,1);
       */
        //这里是给添加实体,查询后就会出该实体
        sqlQuery.addEntity(Customer.class);
        List list = sqlQuery.list();
        System.out.print(list);
懒加载
   Session session = HibernateUtils.openSession();
        Transaction transaction = session.beginTransaction();
        /**
                //立即获得
        Customer customer = session.get(Customer.class, 18l);
        */
        /**
        //返回一个代理对象 只有对对象使用了才会进行查询
        Customer customer = session.load(Customer.class, 18l);
        System.out.println(customer);//这里才会进行查询如果不操作对象,最后也不会进行数据查询
        */
        //返回一个代理对象 如果当期对象呗使用了才会进行查询
        Customer customer = session.load(Customer.class, 18l);
        transaction.commit();
        session.close();
如果要关闭懒加载,建议是开启懒加载
在对象的xml表中配置
//lazy 是关闭懒加载这样load也是当即查询,默认是true
懒加载注意事项,在懒加载的使用要调用懒加载出来的对象,确保seesion并未关闭!!
一对多,多对一
public class
Customer {

    /*
     * CREATE TABLE `cst_customer` (
      `cust_id` BIGINT(32) NOT NULL AUTO_INCREMENT COMMENT '客户编号(主键)',
      `cust_name` VARCHAR(32) NOT NULL COMMENT '客户名称(公司名称)',
      `cust_source` VARCHAR(32) DEFAULT NULL COMMENT '客户信息来源',
      `cust_industry` VARCHAR(32) DEFAULT NULL COMMENT '客户所属行业',
      `cust_level` VARCHAR(32) DEFAULT NULL COMMENT '客户级别',
      `cust_linkman` VARCHAR(64) DEFAULT NULL COMMENT '联系人',
      `cust_phone` VARCHAR(64) DEFAULT NULL COMMENT '固定电话',
      `cust_mobile` VARCHAR(16) DEFAULT NULL COMMENT '移动电话',
      PRIMARY KEY (`cust_id`)
    ) ENGINE=INNODB AUTO_INCREMENT=1 DEFAULT CHARSET=utf8;
     */
    private Long cust_id;

    private String cust_name;
    private String cust_source;
    private String cust_industry;
    private String cust_level;
    private String cust_linkman;
    private String cust_phone;
    private String cust_mobile;
    private Set linkMens=new HashSet<>();
    public Long getCust_id() {
        return cust_id;
    }
    public void setCust_id(Long cust_id) {
        this.cust_id = cust_id;
    }
    public String getCust_name() {
        return cust_name;
    }
    public void setCust_name(String cust_name) {
        this.cust_name = cust_name;
    }
    public String getCust_source() {
        return cust_source;
    }
    public void setCust_source(String cust_source) {
        this.cust_source = cust_source;
    }
    public String getCust_industry() {
        return cust_industry;
    }
    public void setCust_industry(String cust_industry) {
        this.cust_industry = cust_industry;
    }
    public String getCust_level() {
        return cust_level;
    }
    public void setCust_level(String cust_level) {
        this.cust_level = cust_level;
    }
    public String getCust_linkman() {
        return cust_linkman;
    }
    public void setCust_linkman(String cust_linkman) {
        this.cust_linkman = cust_linkman;
    }
    public String getCust_phone() {
        return cust_phone;
    }
    public void setCust_phone(String cust_phone) {
        this.cust_phone = cust_phone;
    }
    public String getCust_mobile() {
        return cust_mobile;
    }
    public void setCust_mobile(String cust_mobile) {
        this.cust_mobile = cust_mobile;
    }

    public Set getLinkMens() {
        return linkMens;
    }

    public void setLinkMens(Set linkMens) {
        this.linkMens = linkMens;
    }

    @Override

    public String toString() {
        return "Customer [cust_id=" + cust_id + ", cust_name=" + cust_name + "]";
    }


}


//联系人实体
public class LinkMan {
    /*
     * CREATE TABLE `cst_linkman` (
      `lkm_id` bigint(32) NOT NULL AUTO_INCREMENT COMMENT '联系人编号(主键)',
      `lkm_name` varchar(16) DEFAULT NULL COMMENT '联系人姓名',
      `lkm_cust_id` bigint(32) NOT NULL COMMENT '客户id',
      `lkm_gender` char(1) DEFAULT NULL COMMENT '联系人性别',
      `lkm_phone` varchar(16) DEFAULT NULL COMMENT '联系人办公电话',
      `lkm_mobile` varchar(16) DEFAULT NULL COMMENT '联系人手机',
      `lkm_email` varchar(64) DEFAULT NULL COMMENT '联系人邮箱',
      `lkm_qq` varchar(16) DEFAULT NULL COMMENT '联系人qq',
      `lkm_position` varchar(16) DEFAULT NULL COMMENT '联系人职位',
      `lkm_memo` varchar(512) DEFAULT NULL COMMENT '联系人备注',
      PRIMARY KEY (`lkm_id`),
      KEY `FK_cst_linkman_lkm_cust_id` (`lkm_cust_id`),
      CONSTRAINT `FK_cst_linkman_lkm_cust_id` FOREIGN KEY (`lkm_cust_id`) REFERENCES `cst_customer` (`cust_id`) ON DELETE NO ACTION ON UPDATE NO ACTION
    ) ENGINE=InnoDB AUTO_INCREMENT=3 DEFAULT CHARSET=utf8;
     */
    private Long lkm_id;
    private Character lkm_gender;
    private String lkm_name;
    private String lkm_phone;
    private String lkm_email;
    private String lkm_qq;
    private String lkm_mobile;
    private String lkm_memo;
    private String lkm_position;

    //表达多对一关系
    private Customer customer ;

    //----------------------------------------------
    //不与数据库中的列对应,只为了接收表单参数
    private Long cust_id;


    public Long getCust_id() {
        return cust_id;
    }
    public void setCust_id(Long cust_id) {
        this.cust_id = cust_id;
    }
    public Customer getCustomer() {
        return customer;
    }
    public void setCustomer(Customer customer) {
        this.customer = customer;
    }
    public Long getLkm_id() {
        return lkm_id;
    }
    public void setLkm_id(Long lkm_id) {
        this.lkm_id = lkm_id;
    }
    public Character getLkm_gender() {
        return lkm_gender;
    }
    public void setLkm_gender(Character lkm_gender) {
        this.lkm_gender = lkm_gender;
    }
    public String getLkm_name() {
        return lkm_name;
    }
    public void setLkm_name(String lkm_name) {
        this.lkm_name = lkm_name;
    }
    public String getLkm_phone() {
        return lkm_phone;
    }
    public void setLkm_phone(String lkm_phone) {
        this.lkm_phone = lkm_phone;
    }
    public String getLkm_email() {
        return lkm_email;
    }
    public void setLkm_email(String lkm_email) {
        this.lkm_email = lkm_email;
    }
    public String getLkm_qq() {
        return lkm_qq;
    }
    public void setLkm_qq(String lkm_qq) {
        this.lkm_qq = lkm_qq;
    }
    public String getLkm_mobile() {
        return lkm_mobile;
    }
    public void setLkm_mobile(String lkm_mobile) {
        this.lkm_mobile = lkm_mobile;
    }
    public String getLkm_memo() {
        return lkm_memo;
    }
    public void setLkm_memo(String lkm_memo) {
        this.lkm_memo = lkm_memo;
    }
    public String getLkm_position() {
        return lkm_position;
    }
    public void setLkm_position(String lkm_position) {
        this.lkm_position = lkm_position;
    }
}
在原先的hibernate.cfg.xml
在添加
同时配置LinkMan.cfg.xml
   @Test
    public void fun1(){
        Session session = HibernateUtils.openSession();
        Transaction transaction = session.beginTransaction();


        Customer customer = new Customer();
        customer.setCust_name("阿里");
        LinkMan linkMan=new LinkMan();
        linkMan.setLkm_name("马云1");
        LinkMan linkMan1=new LinkMan();
        linkMan1.setLkm_name("马云2");

        customer.getLinkMens().add(linkMan);
        customer.getLinkMens().add(linkMan1);
        /**

          session.save(customer);
          //这里没有添加保存linman对象是因为使用级联操作,在之前Customer的配置中,级联操作会顺带保存
//        session.save(linkMan);
//        session.save(linkMan1);
        */

        /**
        Customer customer = session.get(Customer.class, 18l);
        LinkMan linkMan = new LinkMan();
        linkMan.setLkm_name("马云3");
        customer.getLinkMens().add(linkMan);
        */

        /**
        Customer customer = session.get(Customer.class, 18l);
        LinkMan linkMan = session.get(LinkMan.class, 9l);
        customer.getLinkMens().remove(linkMan);
        //如果不调用delete 在数据库id为9的linman还存在,但是指向Customer外键为null
        //session.delete(linkMan);
        如果需要删除customer 同时删除linkman 在linkman的配置文件中也添加级联操作
        */

        transaction.commit();
        session.close();
    }
Inverse 属性
http://blog.csdn.net/lzgs_4/article/details/45844045(这篇讲的比较通俗易懂)
多对多操作
//角色对象
public class Role {
    /*
     *
      CREATE TABLE `sys_role` (
  `role_id` bigint(32) NOT NULL AUTO_INCREMENT,
  `role_name` varchar(32) NOT NULL COMMENT '角色名称',
  `role_memo` varchar(128) DEFAULT NULL COMMENT '备注',
  PRIMARY KEY (`role_id`)
) ENGINE=InnoDB AUTO_INCREMENT=6 DEFAULT CHARSET=utf8;
     */

    private Long role_id;
    private String role_name;
    private String role_memo;
    //表达多对多
    private Set users = new HashSet();
    public Long getRole_id() {
        return role_id;
    }
    public void setRole_id(Long role_id) {
        this.role_id = role_id;
    }
    public String getRole_name() {
        return role_name;
    }
    public void setRole_name(String role_name) {
        this.role_name = role_name;
    }
    public String getRole_memo() {
        return role_memo;
    }
    public void setRole_memo(String role_memo) {
        this.role_memo = role_memo;
    }
    public Set getUsers() {
        return users;
    }
    public void setUsers(Set users) {
        this.users = users;
    }

}

public class User {
    /*
     * CREATE TABLE `sys_user` (
      `user_id` bigint(32) NOT NULL AUTO_INCREMENT COMMENT '用户id',
      `user_code` varchar(32) NOT NULL COMMENT '用户账号',
      `user_name` varchar(64) NOT NULL COMMENT '用户名称',
      `user_password` varchar(32) NOT NULL COMMENT '用户密码',
      `user_state` char(1) NOT NULL COMMENT '1:正常,0:暂停',
      PRIMARY KEY (`user_id`)
    ) ENGINE=InnoDB AUTO_INCREMENT=9 DEFAULT CHARSET=utf8;
     */
    private Long user_id;
    private String user_code;
    private String user_name;
    private String user_password;
    private Character user_state;
    //表达多对多
    private Set roles = new HashSet();
    public Long getUser_id() {
        return user_id;
    }
    public void setUser_id(Long user_id) {
        this.user_id = user_id;
    }
    public String getUser_code() {
        return user_code;
    }
    public void setUser_code(String user_code) {
        this.user_code = user_code;
    }
    public String getUser_name() {
        return user_name;
    }
    public void setUser_name(String user_name) {
        this.user_name = user_name;
    }
    public String getUser_password() {
        return user_password;
    }
    public void setUser_password(String user_password) {
        this.user_password = user_password;
    }
    public Character getUser_state() {
        return user_state;
    }
    public void setUser_state(Character user_state) {
        this.user_state = user_state;
    }
    public Set getRoles() {
        return roles;
    }
    public void setRoles(Set roles) {
        this.roles = roles;
    }


}
User和Role的配置文件里 set内容是几乎是镜像的
在User的配置文件中配置


在Role的配置文件中配置
   Session session = HibernateUtils.openSession();
        Transaction transaction = session.beginTransaction();

        /**
        如果不设置inverse属性会报错查看上面配置
        User u1=new User();
        u1.setUser_name("小明");
        User u2=new User();
        u2.setUser_name("小红");

        Role r1=new Role();
        r1.setRole_name("保洁");

        Role r2=new Role();
        r2.setRole_name("教师");


        //用户表达关系
        u1.getRoles().add(r1);
        u1.getRoles().add(r2);

        u2.getRoles().add(r1);
        u2.getRoles().add(r2);


        //角色表达关系(如果配置了invser下面r1,r2的操作可以不用操作)
        r1.getUsers().add(u1);
        r1.getUsers().add(u2);

        r2.getUsers().add(u1);
        r2.getUsers().add(u2);

        session.save(u1);
        session.save(u2);
        session.save(r1);
        session.save(r2);

        */

        /**
        //新增角色
          User user = session.get(User.class, 13l);
        Role role = new Role();
        role.setRole_name("运动员");
        user.getRoles().add(role);
        //用不用可以根据是否已经设置了联级属性
        //  session.save(role);
        */
         /**
        //删除角色

        User user = session.get(User.class, 13l);

        Role role1 = session.get(Role.class, 11l);
        Role role2 = session.get(Role.class, 12l);
        user.getRoles().remove(role1);
        user.getRoles().remove(role2);
        */
        transaction.commit();
        session.close();
在一对多的关联中,在一的一方设置inverse=”true”让多的一方来维护关联关系更有助于优化,因为可以减少执行update语句
关联查询中的懒加载
http://blog.csdn.net/csdn_gia/article/details/54694910(案例充足)
批量抓取
 List list = query.list();
        for (Customer c:list)
        {    //如果不设置批量抓取,每次都会查询,根据需求设置batch-size
            System.out.println(c.getLinkMens());
        }
参考文章:http://blog.csdn.net/fg2006/article/details/6436517
http://blog.csdn.net/lzgs_4/article/details/45844045
http://blog.csdn.net/csdn_gia/article/details/54694910

