进入工程,首先看到的是帮助文档。
使用过程中,随时可以查看这篇文档。
文档没有翻译成中文。
我看到里面有个别的说法,与界面不符。可能是由于版本升级没有跟上的原因,也可能是mac与windows版本不一致,当然只是猜测。
NON-FICTION WITH SUB-HEADS
About This Template
When compiled (File > Compile), this project will generate a document in standard manuscript format with sub-headings inside the chapters.
How To Use This Template
Edit the Title Page document to ensure it contains the correct information.
Create a new folder for each chapter and title each folder with the name of the chapter. If you don’t intend to use chapter names, just use something descriptive that tells you what the chapter is about. (You do not need to title the folders “Chapter One” and so on, as chapter numbering will be taken care of automatically during the Compile process.) The first chapter folder has been created for you with the placeholder title “Chapter Subtitle”.
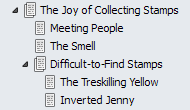
Create a new text document for each sub-section within the chapter folders, giving each the title of the subheading you wish to appear in the text. You can nest text documents for smaller subheadings, like this:
If you don’t require a foreword, move the “Foreword” document to the Trash folder. Alternatively, rename it “Preface” or “Introduction” if you prefer. If you would rather the foreword come after the table of contents—as is sometimes the case—drag the “Foreword” document and drop it below the “Contents” document.
If you are compiling to the RTF file format or if you have Microsoft Office installed and are compiling to DOC, DOCX, PDF or Print, you can create a table of contents. Before compiling, simply select all the documents you wish to be included in the contents listing (usually this will be the “Foreword”, all chapter folders, and “Endnotes”, but not the nested sub-sections), then go to Edit > Copy Special > Copy Documents as ToC. Paste into the “Contents” document below the “Contents” title. The resulting linked text and page number tags will be replaced with the final chapter names and page numbers in the compiled document. You can format the contents however you wish, for example removing the underlines or indenting subsections if you chose to include them. You don’t need to do this every time you compile, just when chapters have been added, deleted, renamed or moved around. (Note to Microsoft Word users: If you export to Word, you may need to generate a print preview in Word to force the page numbers to show up correctly—they may appear as question marks before doing so.) Deselect “Include in compile” for the Contents document in the inspector if you do not want it in your final output.
If you have no footnotes or endnotes in your text, be sure to delete the “Endnotes” document.
“Notes” and “Ideas” folders have been provided for your convenience, although you can replace them or create different top-level folders for your research materials if necessary (these are just regular folders that have had custom icons assigned to them using the Documents > Change Icon feature.)
Compile your manuscript into standard manuscript format by selecting File > Compile. The “Front Matter” folder is already selected for inclusion in the compile Contents pane.
Making Changes
There are various minor changes you can make to the settings to tweak this template so that it better suits your needs, as follows:
Chapter subtitles: If you don’t want to include the names of your chapter folders below the chapter numbering text in the compiled document, go to the “Formatting” pane in the Compile dialog and deselect “Title” in the list of elements to include. You will also need to edit the title prefix in the “Section Layout”.
Hierarchical numbering: If you require hierarchical numbering for sub-sections, choose “Non-Fiction with Sub-Heads (Hierarchical)” from the “Format As” menu in Compile. Alternatively, edit the “Section Layout” for each level in the “Formatting” pane of Compile and add the “<$hn>” (for “hierarchical numbering”) tag to the title prefixes.
Page header: You can edit the page header in the “Page Settings” pane of the Compile dialog.
Font: You can use the “Formatting” pane in Compile to change the font used in the final document by selecting a row in the elements table, then clicking into the preview text to select it and clicking the “A” button in the format bar to change the font settings.
Sample Document
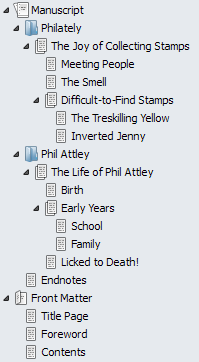
See the “Sample MS” PDF file in the Research folder for an example of a document that has been created using this template. This is what the “Draft” folder structure looked like in the binder for this sample document:
Final Note
Scrivener project templates are flexible and are not intended to restrict you to a particular workflow. You can change, delete or move the files and folders contained in the template, and you can create your own templates by setting up a skeletal project with the files, folders and settings you would like to use for new projects and using File > Save As Template.
前一篇 后一篇


