Dagger2学习笔记1(基础概念学习)
Dagger2学习笔记2(学习Dagger2的简单使用)
Dagger2学习笔记3(各个注解学习)
上篇文章中学习了Dagger2中各个注解的作用及如何使用, 其中涉及到两个特殊的注解, @Singleton 和@ Scope, 接下来我们将学习怎么使用它们做到全局单例.
上篇文章我们学习到Singleton是继承自Scope, 所以可以看做是Scope的代表实现. Scope的作用是保证依赖对象在作用范围内单例, 提供局部范围的单例,所谓局部范围就是它的生命周期范围
举个栗子:
public class Dog {
    private String name;

    public Dog(String name){
        this.name = name;
    }

    @Override
    public String toString() {
        return "Dog{" +
                "name='" + name + '\'' +
                '}' + "hashcode = "+hashCode();
    }
}
@Module
public class MainModule {

    @Provides
    Dog provideDog(){
        return new Dog("bob");
    }

}
@Component(modules = MainModule.class)
public interface MainComponent {
    void inject(MainActivity mainActivity);
}
public class MainActivity extends AppCompatActivity {

    @Inject
    Dog dog1;

    @Inject
    Dog dog2;

    @Override
    protected void onCreate(Bundle savedInstanceState) {
        super.onCreate(savedInstanceState);
        setContentView(R.layout.activity_main);
        DaggerMainComponent.builder().mainModule(new MainModule()).build().inject(this);
        ((TextView)findViewById(R.id.tv1)).setText(dog1.toString());
        ((TextView)findViewById(R.id.tv2)).setText(dog2.toString());
    }
}
以上代码中, 没有使用@Singleton 修饰, 在MainActivity 中对 Dog进行两次依赖注入, 查看输出结果
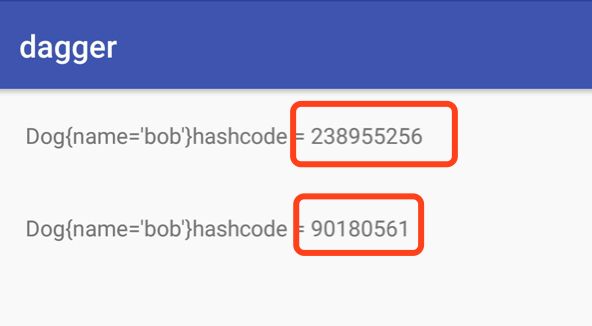
可以看出得到的是两个Dog对象, 也就是每依赖注入一次都会从新调用一次provideDog方法.
接下来我们使用@Singleton注解进行. 修改其中部分代码(Module的依赖提供方法上以及Component的类名上)
@Module
public class MainModule {

    @Singleton
    @Provides
    Dog provideDog(){
        return new Dog("bob");
    }
}
@Singleton
@Component(modules = MainModule.class)
public interface MainComponent {
    void inject(MainActivity mainActivity);
}
运行结果如下:

我们可以看到两个对象输出的hash值相同, 已经实现了一部分的单例, but, 你以为这就实现了全局单例了么? 我们再写一个新的页面测试下!
public class SecondActivity extends AppCompatActivity {

    @Inject
    Dog dog1;
    @Inject
    Dog dog2;

    @Override
    protected void onCreate(@Nullable Bundle savedInstanceState) {
        super.onCreate(savedInstanceState);
        setContentView(R.layout.activity_second);
        DaggerMainComponent.builder().mainModule(new MainModule()).build().inject(this);
        ((TextView)findViewById(R.id.tv1)).setText(dog1.toString());
        ((TextView)findViewById(R.id.tv2)).setText(dog2.toString());
    }
}
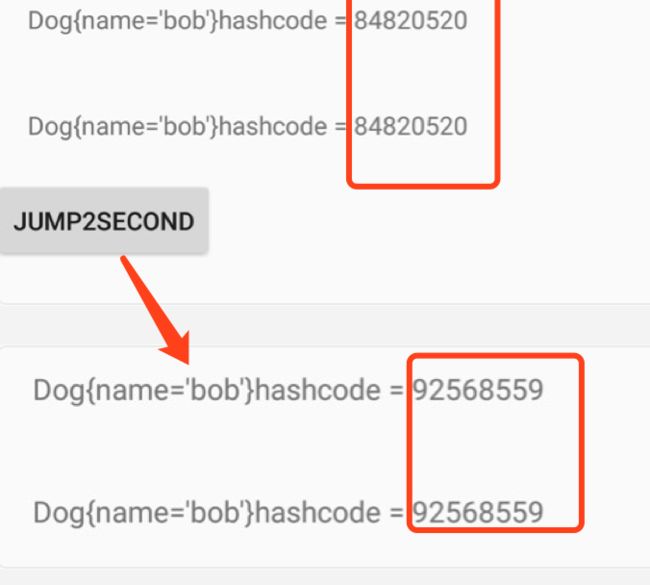
我们发现, 虽然provideDog使用@Singleton注解, 但是在不同的页面,拿到的依赖对象仍然不是同一个, 这也就是我们之说的局部范围的单例, 使用@Singeton注解或者定制的@Scope的, 只在同一个activity(或者fragment)的一个生命周期中保持单例. 而平时我们希望一些对象能够在整个应用的生命周期中只存在一个, 也就是说实现全局意义上真正的单例该怎么做呢?
DaggerMainComponent在两个activity中被各自被实例化一次, 导致产生了两个不同的对象, 所以我们需要做到让Component能够实现单例, Android中, 我们知道在整个App生命周期中都只有一个Appclication实例,所以在Application中获得一个唯一的component实例, 用它来提供我们需要的单例:
代码如下:
- 自定义Application, 并且提供一个唯一的baseComponent类
public class BaseAppclication extends Application {

    private BaseComponent baseComponent;

    @Override
    public void onCreate() {
        super.onCreate();
        baseComponent = DaggerBaseComponent.builder().baseModule(new BaseModule()).build();
    }

    public BaseComponent getBaseComponent(){
        return baseComponent;
    }
}
- 把dog类的依赖提供提取到BaseModule中
@Module
public class BaseModule {

    @Singleton
    @Provides
    Dog provideDog(){
        return new Dog("bob");
    }
}
- BaseComponent中不再需要写inject方法, 因为这个component是用来让别的component来依赖的, 只需要告诉别的component他可以提供哪些类型的依赖即可, 这个例子中 我们提供一个全局Dog的依赖
@Singleton
@Component(modules = BaseModule.class)
public interface BaseComponent {
    Dog provideDog();
}
- 在我们自己的Component, 使用dependencies依赖于baseComponent, (在@Component注解参数中, 可以依赖多个module和component, 根据自己的业务需求定义即可.)
@ActivityScope
@Component(dependencies = BaseComponent.class)
public interface MainComponent {
    void inject(MainActivity mainActivity);
    void inject(SecondActivity mainActivity);
}
这一步需要注意的是, 这个component也需要进行单例修饰, 但是当我们使用@Singleton注解时, 编译会报一个Error:(14, 1) 错误: This @Singleton component cannot depend on scoped components, 如果依赖的component中也使用了@singleton时, 被依赖的地方就不能使用了,于是我自定义了一个Scope: ActivityScope
@Scope
@Retention(RetentionPolicy.RUNTIME)
public @interface ActivityScope {
}
好了, 现在准备工作都做好了, 在页面中重新进行依赖注入工作,
public class MainActivity extends AppCompatActivity {

   @Inject
   Dog dog1;

   @Inject
   Dog dog2;

   @Override
   protected void onCreate(Bundle savedInstanceState) {
       super.onCreate(savedInstanceState);
       setContentView(R.layout.activity_main);
       DaggerMainComponent.builder().baseComponent(((BaseAppclication)getApplication()).getBaseComponent()).build().inject(this);
       ((TextView)findViewById(R.id.tv1)).setText(dog1.toString());
       ((TextView)findViewById(R.id.tv2)).setText(dog2.toString());
   }

   public void click(View v){
       startActivity(new Intent(this, SecondActivity.class));
   }
}
这个Component在build的时候需要提供依赖的baseComponent, 此时我们使用已经在baseApplication中已经提供的唯一的baseModule, SecondActivity中代码和上边差不多, 不贴了. 运行查看结果:
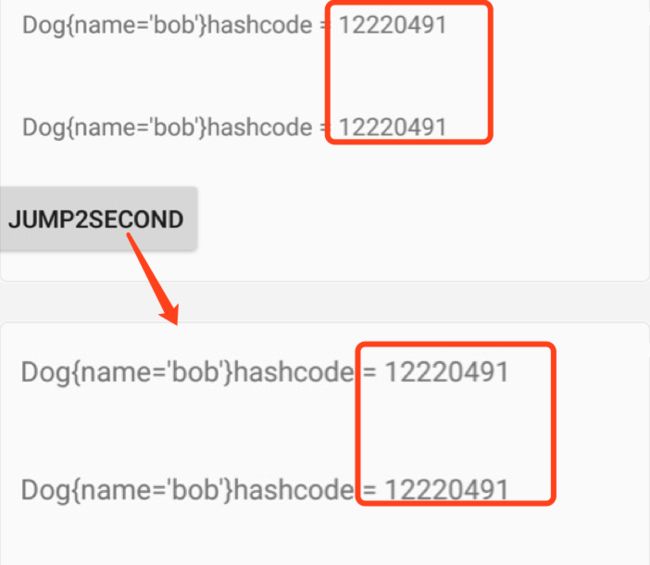
哈哈, 我们发现已经成功的实现了单例!!
下篇文章中会写到关于Lazy和Provider的使用.
Dagger2学习笔记5(关于Lazy,Provide的使用)
本文至此, End!~~