实验:在centos6实现PXE安装
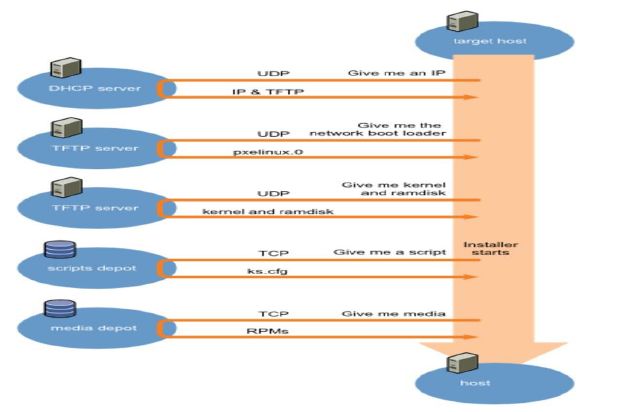
PXE 原理图:
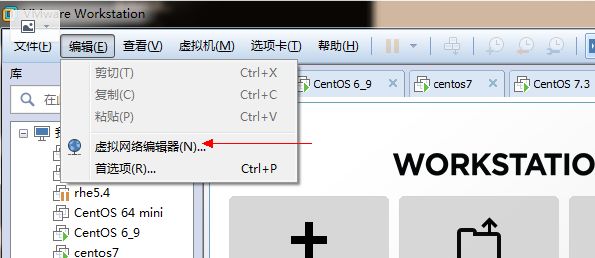
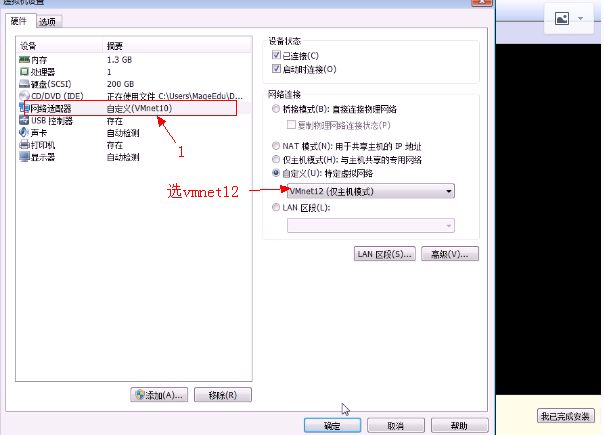
外部网络设置:添加独立网段
1.
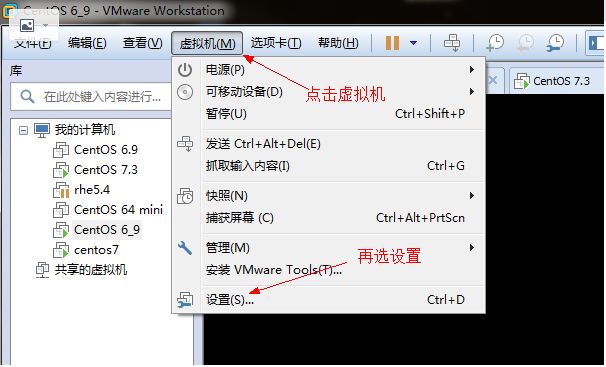
2.
3
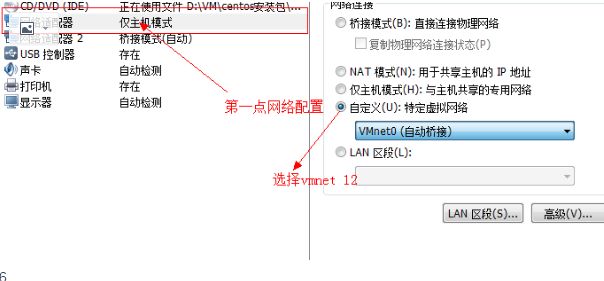
4
5
6.
linux系统环境设置:
.确认iptables 和selinux关闭
1)关闭selinux
a. 永久有效
修改 /etc/selinux/config 文件中的 SELINUX="" 为 disabled 。
b. 即时生效
setenfore 0
2).关闭防火墙的方法为:
a. 永久性生效
开启:chkconfig iptables on
关闭:chkconfig iptables off
b. 即时生效,重启后失效
开启:service iptables start
关闭:service iptables stop
1. 安装软件包,设置服务开机启动
1)安装服务软件包(vsftpd, tftp-servce ,dhcp,syslinux)
yum install vsftpd tftp-service dhcp syslinux
2)开启服务
chkconfig dhcpd on
chkconfig tftpd on
chkconfig vsftpd on
service xineted restart
service vsftpd start
ss -nutlp 查看要启动的服务端口是否被打开
2,准备yum源(即把 yum源放在 /var/ftb/pub下)
cd /var/ftb/pub
mkdir /var/ftb/pub/centos /6 -p(参考yum源结构)
cp -a /media/CentOs6.9 Final/* /var/ftp/pub/ksdir/ks6-1.cfg(实验时节约时间可以用mount /dev/sr0 /var/ftp/pub/ksdir/ks6-1.cfg)
3.配置ks(应答文件 )文件
1)将anaconda-ks复制过来修改,并重命名为ks6-1.cfg
cp /root/anaconda-ks /var/ftp/pub/ksdir/ks6-1.cfg
2)修改ks6-1.cfg
vim /var/ftp/pub/ksdir/ks6-1.cfg
修改成:
Kickstart file automatically generated by anaconda.
#version=DEVEL
install
url --url=ftp://192.168.226.131/pub/centos/6 #安装路径
text #文本安装
reboot #安装完自动重启
zerombr #清空Mbr
lang en_US.UTF-8
keyboard us
network --onboot yes --device eth0 --bootproto dhcp --noipv6
network --onboot yes --device eth1 --bootproto dhcp --noipv6
firewall --service=ssh
authconfig --enableshadow --passalgo=sha512
selinux --enforcing
timezone Asia/Shanghai
# The following is the partition information you requested
# Note that any partitions you deleted are not expressed
# here so unless you clear all partitions first, this is
# not guaranteed to work
clearpart --all #清除所有分区
part /boot --fstype=ext4 --size=2000 #安装分区
part / --fstype=ext4 --size=50000
part /app --fstype=ext4 --size=40200
part swap --size=1200
%packages
@base
@core
@debugging
@basic-desktop
@directory-client
@fonts
@general-desktop
@graphical-admin-tools
@input-methods
@internet-applications
@internet-browser
@legacy-x
@network-file-system-client
@office-suite
@print-client
@remote-desktop-clients
@server-platform
@server-policy
@workstation-policy
mtools
pax
python-dmidecode
oddjob
wodim
sgpio
genisoimage
device-mapper-persistent-data
abrt-gui
samba-winbind
certmonger
pam_krb5
krb5-workstation
libXmu
%end
后面还可以加%proce %end之间加安装后程序
3)安装 system-config-kickstart来检测修改文件ks6-1.cfg是否有错误
yum install system-config-kickstart
ksvalidator /var/ftp/pub/ksdir/ks6-1.cfg
4)给要被放问的yum 源给以访问权限
chmod +r /var/ftp/pub/ksdir/*.cfg
4.配置DHCP服务
1)可以参考 /usr/share/doc/dhcp-4.1.1/dhcpd.conf.sample文件进行配置(更便捷的方法是将其复制过来作为模板修改)
cp /usr/share/doc/dhcp-4.1.1/dhcpd.conf.sample /etc/dhcp/dhcpd.conf
2)进入 该文件进行修改
a. vim /etc/dhcp/dhcpd.conf
subnet 192.168.25.0 netmask 255.255.255.0{
range 192.168.25.10 192.168.25.100; #分配子网段的范围
next-server 192.168.25.106;
filename "pxelinu.0 #将pxelinu.0复制到tftp服务器上(next-server)
}
b. 启动DHCP服务
service dhcpd start
5.准备 PXE相关文件
cp /usr/share/syslinux{pxelinux.0,menu.c32} /var/lib/tftpboot/ #准备菜单文件
cp /misc/cd/images/{initrd.oimg,vmlinuz} /var/lib/tftpboot/ mkdirmpxelinux.cfg #准备内核与虚拟文件系统
cp /misc/cd/isolinux/isolinux.cfg /var/lib/tftpboot/pxelinux.cfg/default #准备模板文件
6.准备启动菜单
vim /var/lib/tftpboot/pxelinux/default
default menu.c32 #默认菜单menu.c32
#prompt 1
timeout 600 #单位为十分之一秒,为一分钟倒计时
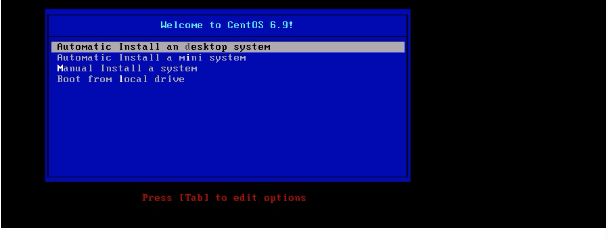
menu title Welcome to CentOS 6.9!
label desktop #自动安装桌面
menu label Automatic Install an ^desktop system
kernel vmlinuz
append initrd=initrd.img ks=ftp://192.168.25.106/pub/ksdir/ks6-1.cfg #应答文件路径
label mini #自动安装最小化
menu label Automatic Install a m^ini system
kernel vmlinuz
append initrd=initrd.img inst.repo=ftp://192.168.25.106/pub/centos/6 #仓库路径
label local #默认安装
menu default
menu label Boot from ^local drive
localboot 0xffff
注意:ks文件的权限(其他人没有读权限)
所以要加上:chmod +r /var/ftp/pub/ksdir/
7.测试是否成功
1). 配置好vm
2 ).
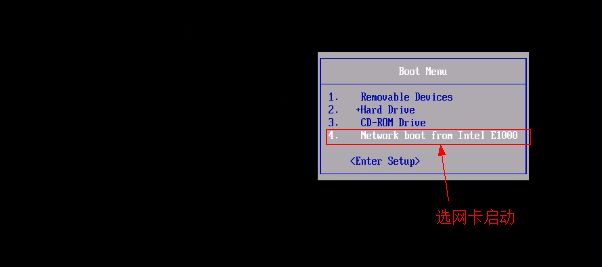
3)
4)
