git地址:https://github.com/guhaibo312/HBFrame.git
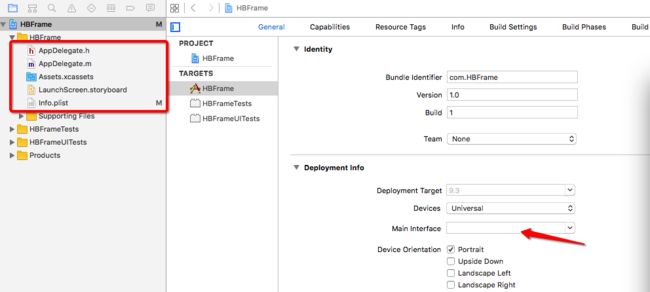
首先:新建项目,删除没用的文件(Main.storyboard,ViewController),并配置启动项(Main Interface):
既然修改了启动项不使用storyboard,当然就要设置window和window的根控制器。这里我们使用继承了UITabBarController的MainTabBarController作为根控制器
AppDelegate中
- (BOOL)application:(UIApplication *)application didFinishLaunchingWithOptions:(NSDictionary *)launchOptions {
    // Override point for customization after application launch.
    self.window = [[UIWindow alloc] initWithFrame:[UIScreen mainScreen].bounds];
    self.window.rootViewController = [[MainTabBarController alloc] init];
    [self.window makeKeyAndVisible];
    return YES;
}
下面我们来看一些自定义的MainTabBarController
(分为2部分)
- 添加子控制器
这里我们抽出添加子控制器的方法。(将子控制器包装在 继承自UINavigationController 的 MainNavigationController中)
- (void)viewDidLoad {
    [super viewDidLoad];
    // Do any additional setup after loading the view.

    UIViewController *homeController = [[UIViewController alloc] init];
    [self addChildController:homeController title:@"首页" iconNormal:@"icon_tab_a2_normal" iconSelected:@"icon_tab_a2_selected"];

    UIViewController *circleVc = [[UIViewController alloc] init];
    [self addChildController:circleVc title:@"圈子" iconNormal:@"icon_tab_a1_normal" iconSelected:@"icon_tab_a1_selected"];

    UIViewController *nearbyVc = [[UIViewController alloc] init];
    [self addChildController:nearbyVc title:@"附近" iconNormal:@"icon_tab_a3_normal" iconSelected:@"icon_tab_a3_selected"];

    UIViewController *mineVc = [[UIViewController alloc] init];
    [self addChildController:mineVc title:@"我的" iconNormal:@"icon_tab_w4_normal" iconSelected:@"icon_tab_w4_selected"];
}

- (void) addChildController : (UIViewController *) viewController title : (NSString *) title iconNormal : (NSString *) iconNormal iconSelected : (NSString *) iconSelected
{
    viewController.view.backgroundColor = HBRandomColor; //添加背景色(随机色)
    viewController.title = title;
    viewController.tabBarItem.image = [UIImage imageNamed:iconNormal];
    UIImage *selectedImage = [UIImage imageNamed:iconSelected];
    // 声明:这张图片按照原始的样子显示出来,不要渲染成其他的颜色(比如说默认的蓝色)
    selectedImage = [selectedImage imageWithRenderingMode:UIImageRenderingModeAlwaysOriginal];
    viewController.tabBarItem.selectedImage = selectedImage;
    [self addChildViewController:[[MainNavigationController alloc] initWithRootViewController:viewController]];
}

@end
这里我给控制器添加了一个随机的背景色,说到这里就说一下PCH文件的添加。
首先:新建一个PCH文件,然后添加上宏
#define HBRGB(r,g,b) [UIColor colorWithRed:(r)/255.0 green:(g)/255.0 blue:(b)/255.0 alpha:1.0]
#define HBRandomColor HBRGB(arc4random_uniform(256), arc4random_uniform(256), arc4random_uniform(256)) //随机色

#define RGBCOLOR_HEX(hexColor) [UIColor colorWithRed: (((hexColor >> 16) & 0xFF))/255.0f         \
green: (((hexColor >> 8) & 0xFF))/255.0f          \
blue: ((hexColor & 0xFF))/255.0f                 \
alpha: 1]
#define GRAYTEXTCOLOR RGBCOLOR_HEX(0x7b7b7b)
#define ButtonNormalColor RGBCOLOR_HEX(0x67d2ca)

//屏幕高
#define SCREENHEIGHT [UIScreen mainScreen].bounds.size.height
//屏幕宽
#define SCREENWIDTH [UIScreen mainScreen].bounds.size.width
然后配置一下PCH文件:点击项目名->Build Settings->搜索"prefix header"->双击prefix header右侧 出现输入框,在项目中找到PCH文件 直接拖入 即可生成路径->commend + B 编译 就可以用了。

- 替换系统的tabbar 在中间添加一个圆形的button
方案:自定义MainTabBarView 继承UITabBar,重写layoutSubviews方法将原来的按钮向左向右移动留出中间的空间区域 用于添加按钮。 之后只用KVC直接替换系统tabBar
.h文件

#import
@class MainTabBarView;

@protocol MainTabBarViewDelegate

- (void) mainTabBarViewDidClick : (MainTabBarView *)hBTabBarView;


@end

@interface MainTabBarView : UITabBar

@property(nonatomic,weak) id tabbarDelegate;

@end
.m文件

@interface MainTabBarView()

@property (nonatomic,strong) UIButton *addButton;

@end

@implementation MainTabBarView

- (instancetype)initWithFrame:(CGRect)frame
{
    self = [super initWithFrame:frame];
    if (self) {
        self.addButton = [[UIButton alloc] init];
        [self.addButton setImage:[UIImage imageNamed:@"icon_add_tag"] forState:UIControlStateNormal];
        [self.addButton addTarget:self action:@selector(addClick) forControlEvents:UIControlEventTouchUpInside];
        [self addSubview:self.addButton];

    }
    return self;
}

- (void)layoutSubviews
{
    [super layoutSubviews];

    CGFloat buttonW = SCREENWIDTH * 0.2;
    for (int i = 0; i < self.subviews.count; i ++) {
        UIView *view = self.subviews[i];
        if ([view isKindOfClass:NSClassFromString(@"UITabBarButton")]) {
            view.width = buttonW;
            view.height = self.height;
            view.y = 0;
            if (i < 4) {
                view.x = (i - 2) * buttonW;
            }else
            {
                view.x = (i - 1) * buttonW;
            }
        }
    }

    self.addButton.width = buttonW;
    self.addButton.height = self.height;
    self.addButton.y = 0;
    self.addButton.x = 2 * buttonW;
}

- (void)addClick
{
    if ([self.tabbarDelegate respondsToSelector:@selector(mainTabBarViewDidClick:)]) {
        [self.tabbarDelegate mainTabBarViewDidClick:self];
    }
}
中间按钮点击事件传给控制器。
回到MainTabBarController
中 使用KVC替换tabbar 并且设置tabbar代理
    int i = 1; //0系统tabbar  1自定义tabbar
    if (i == 1) {
        MainTabBarView *tabBar = [[MainTabBarView alloc] init];
        tabBar.tabbarDelegate = self;
        [self setValue:tabBar forKeyPath:@"tabBar"]; //KVC直接修改系统tabbar
    }
下面进入UINavigationController 导航控制器
总共分为2个部分
- 设置全局主题(将代码写在initialize方法中) 这里做统一设置。
//APP生命周期中 只会执行一次
+ (void)initialize
{
    //导航栏主题 title文字属性
    UINavigationBar *navBar = [UINavigationBar appearance];
    [navBar setTitleTextAttributes:@{NSForegroundColorAttributeName : [UIColor orangeColor], NSFontAttributeName : [UIFont systemFontOfSize:16]}];

    //导航栏左右文字主题
    UIBarButtonItem *barButtonItem = [UIBarButtonItem appearance];
    [barButtonItem setTitleTextAttributes:@{NSForegroundColorAttributeName : [UIColor whiteColor], NSFontAttributeName : [UIFont systemFontOfSize:12]} forState:UIControlStateNormal];

    //tabBar主题 title文字属性
    UITabBarItem *tabBarItem = [UITabBarItem appearance];
    [tabBarItem setTitleTextAttributes:@{NSForegroundColorAttributeName : GRAYTEXTCOLOR} forState:UIControlStateNormal];
    [tabBarItem setTitleTextAttributes:@{NSForegroundColorAttributeName : ButtonNormalColor} forState:UIControlStateSelected];

}
- 拦截push请求(在push之前 设置隐藏tabbar 和 添加返回按钮等操作)
- (void)pushViewController:(UIViewController *)viewController animated:(BOOL)animated
{
    if (self.viewControllers.count > 0) {
        viewController.hidesBottomBarWhenPushed = YES; //隐藏tabbar

        //添加返回按钮
        viewController.navigationItem.leftBarButtonItem = [UIBarButtonItem setNavigationBarBackGroundImgName:@"icon_back" target:self selector:@selector(back)];
    }

    [super pushViewController:viewController animated:animated];
}

- (void)back
{
    [self popViewControllerAnimated:YES];
}
这里用到了2个分类
1.UIBarButtonItem+Extension 添加UIBarButtonItem的分类
+ (instancetype)setNavigationBarBackGroundImgName:(NSString*)imageName target : (UIViewController *)target selector: (SEL)selector
{
    UIButton * rightButton= [UIButton buttonWithType:UIButtonTypeCustom];
    [rightButton setImage:[UIImage imageNamed:imageName] forState:UIControlStateNormal];
    rightButton.size = rightButton.imageView.image.size;
    [rightButton addTarget:target action:selector forControlEvents:UIControlEventTouchUpInside];
    UIBarButtonItem *rightBarBtnItem = [[UIBarButtonItem alloc] initWithCustomView:rightButton];
    return rightBarBtnItem;
}
2.UIView+Extension 快速设置View的x,y, width, height,size等属性
好了,到这里先停一下,把项目的结构修改一下

大致的修改了一下,具体的结构要根据业务需求区划分了。
简单的添加一些常用的功能
新建HomeController (在MainTabBarController 中简单的修改即可)

-
跳转
    self.navigationItem.rightBarButtonItem = [[UIBarButtonItem alloc] initWithTitle:@"跳转" style:UIBarButtonItemStylePlain target:self action:@selector(push)];

- (void)push
{
    HBText1Controller *text1Vc = [[HBText1Controller alloc] init];
    text1Vc.name = @"你好";
    text1Vc.title = @"标题";
    [self.navigationController pushViewController:text1Vc animated:YES];
}
-
网络请求 AFN
将AFNetworking 拖至3rdParty文件夹下 在HomeController中添加
#import "AFNetworking.h"
    //AFN网络请求
    AFHTTPRequestOperationManager *manager = [AFHTTPRequestOperationManager manager];

    NSMutableDictionary *param = [NSMutableDictionary dictionary];
    param[@"phonenum"] = @"13500000000";
    param[@"password"] = @"123456";

    [manager POST:@"http://123.57.42.13/WenShen/V3.0.0/User/login" parameters:param success:^(AFHTTPRequestOperation *operation, id responseObject) {
        HBLog(@"%@",responseObject);//返回的JSON

    } failure:^(AFHTTPRequestOperation *operation, NSError *error) {

    }];
这里的HBLog是一个宏,需要在PCH文件中配置 只有在开发阶段才会打印log 正式上线是不会打印log的
#ifdef DEBUG // 处于开发阶段
#define HBLog(...) NSLog(__VA_ARGS__)
#else // 出去发布阶段
#define HBLog(...)
#endif
-
既然接到返回值了,接下来就是解析json 使用MJExtension 同样的将MJExtension 拖至3rdParty文件夹下 OK来看看怎么用
1.首先要有一个model (model不是乱建的,根据返回的数据格式 和 你所需要用到的数据 创建的)

注意 只需要在.h文件中创建属性,.m文件什么都不用写!

OK 回到HomeController中 将MJExtension 拖至3rdParty文件夹下
#import "HBUser.h"
#import "MBProgressHUD+MJ.h"
#import "MJExtension.h"

回调的代码改为
[manager POST:@"http://123.57.42.13/WenShen/V3.0.0/User/login" parameters:param success:^(AFHTTPRequestOperation *operation, id responseObject) {
        HBLog(@"%@",responseObject);//返回的JSON

        HBUser *user = [HBUser objectWithKeyValues:responseObject[@"data"][@"userInfo"]];
        //提示信息
        [MBProgressHUD showSuccess:user.area];
    } failure:^(AFHTTPRequestOperation *operation, NSError *error) {
        [MBProgressHUD showError:@"失败"];
    }];
HBUser *user = [HBUser objectWithKeyValues:responseObject[@"data"][@"userInfo"]]; 只需要一句代码 就将json解析转成了我们的model! 进入到MJExtension 里面看看我们会发现提供了 (plist,json,字典)转模型,(plist,json,字典)转模型数组。 还是挺强大的。
好了,今天就先到这里,一些你们常用的第三库或者第三方SDK 我就不写在这里了,根据业务需求自己加入就好。如果需要demo的,稍后我会上传,贴上项目地址。